Technique
0
2 113
Share
Energy supply to a residential building is a vital issue for the people living in it. When installing electrics for a kitchen unit, it is necessary to strike a balance between the need to connect the largest number of devices and safety during operation of the installed electrical network. In order to correctly place sockets in an apartment, you need to carefully calculate the load, taking into account the materials used and current standards. How many sockets are needed in the kitchen and at what height should they be placed for convenience?
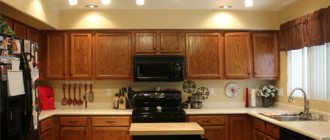
Sockets in the kitchen are useful for household appliances
- Sockets in the kitchen: correct location and optimal quantity
- At what height from the floor are sockets made?
- Height from table top
- Installation height standards
- Power consumption of electrical appliances
- Calculation of the optimal height of sockets: from the floor and above the tabletop
- Installation (installation) of sockets: built into the tabletop, retractable, corner, overhead
- Making a hole and a channel for the wires
- Fastening the box and block
- Connection to the network according to the diagram
Which cable to choose for the kitchen
Next, you need to calculate the cross-section of the common supply wire of the electrical panel and the outgoing wiring to each pantograph. Follow the rules here:
- for device loads up to 3.5 kW - copper cable VVGng-Ls 3*2.5mm2
- for device loads up to 5.5 kW - copper cable VVGng-Ls 3*4mm2
- with a total load of all devices up to 10 kW - copper cable VVGng-Ls 3*6mm2
- with a total load of all devices up to 15 kW - copper cable VVGng-Ls 3*10mm2
Why there should be a brand VVGnG-Ls is discussed in detail in the article below:
Even if you have a house with an old grounding system (without a third protective conductor), still do the wiring with a 3-core cable. This will save you in the future from additional costs for reconstruction and replacement of wires.
As a last resort, the third wire will be a backup for zero or phase, in case of a possible break or other damage.
Self-installation
If you have a certain desire, after a detailed study of video materials on the Internet, as well as current norms and regulations, it will be quite possible to install the sockets yourself. It is recommended to carry out the work taking into account the following algorithm of actions:
- A detailed diagram is drawn up.
- The points and lines specified in the project are transferred to the walls of the room.
- Holes are drilled for installing electrical boxes and grooves are made for laying wires (a grinder, a hammer drill, or a milling cutter may be required).
- Using plaster and plastic fasteners, socket boxes and cables are fixed to the wall.
- The laid line is checked and communications are connected to the apartment switchboard.
This technology is standard and may vary depending on various factors.
The grooves are usually sealed with a plaster mixture and are made strictly vertically so that, for example, when placing cabinets, their location can be predicted. The length of the protruding end of the cable must be at least 10 cm, which is necessary for normal connection of the fittings. Installing the outlet couldn't be easier. The main thing is to adhere to polarity and remember about grounding.
When planning the placement of a block of sockets, do not forget about choosing the correct center distance between adjacent mounting boxes. It must be strictly 71 cm, since, otherwise, it will not be possible to install fittings with a standard common frame. Ideally, it is recommended to install a residual current device on each line (group of lines), which will protect you and your household from electric shock in the event of emergency situations.
In this case, all equipment is de-energized, with the exception of the refrigerator (possibly also the router, emergency light and other consumers connected to a separate, non-disconnected line).
How to place sockets in the kitchen
Electrician in the kitchen
DIY kitchen wiring: step-by-step instructions
How to choose sockets for the kitchen
Retractable tabletop sockets
Installing exhaust ventilation in the kitchen
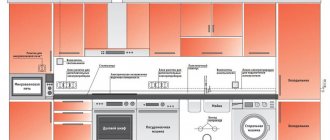
Layout of sockets in the kitchen
After choosing the wiring, you need to decide on the sockets.
Always plan the placement of outlets after the kitchen design is approved, otherwise there may be problems. For example, work area sockets can easily end up in the wrong place and end up hidden behind the refrigerator.
To ensure that your sockets and switches are in their places, take a plan for arranging your kitchen furniture.
After that, mark all the necessary sockets on it. You can even do this by hand.
On this plan, there is still no need to clearly assign installation locations and calculate dimensions and distances. Just count the number and purpose of each outlet.
Installation (installation) of sockets: built into the tabletop, retractable, corner, overhead
Determining the number of electrical appliance connection points to be placed in the kitchen is an important point at the planning stage of the electrical circuit in this room. This must be done in order to know which wire will need to be wound. How many sockets to connect to one wire? How many circuit breakers are needed and what rated power sockets should be taken.
Making a hole and a channel for the wires
According to the drawn up electrical diagram, places for installing electrical appliance connection points are marked on the walls.
At these points, using special concrete drill bits, holes are made for inserting the cable and placing the socket box.
Channels are laid to these holes using the gating method for laying the wire from the main power cable entering the kitchen.
If sockets are planned in the kitchen in the countertop, then the channels are grooved according to the plan for placing furniture in these places.
Fastening the box and block
The installation of electrical sockets begins with the installation of a socket box, after the wire is routed to the connection point through the punched channels.
The outlet box is mounted into the prepared hole. First you need to try it on in place and install whether or not you need to change the size of the hole. After this, holes open in the box where you need to insert the supplied wire. The box is inserted into the wall, and the gaps between the wall and the box are sealed.
The end of the wire core is stripped one to one and a half centimeters. If the freed core consists of several or many wires, then they need to be twisted together.
The freed core is secured in screw or spring clamps.
The excess wire is placed between the wall in the hole and the bottom of the socket box. This is done carefully, avoiding kinks in the wire.
The socket box is secured in the box using screws with expanding forks or claws.
The base of the socket and the cover are put on and screwed on top.
Classic sockets in the kitchen are the best choice
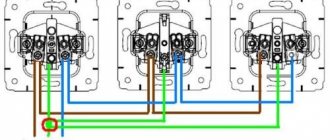
Connection to the network according to the diagram
Installing an outlet in the wall is not the final installation of the electrical network. The wire for the socket must be laid in special channels and closed. If the installation is done in grooved channels, then it is advisable to lay the wire in corrugated tubes for additional protection.
Connection procedure
The lines of the most energy-intensive units require circuit breakers. The main power cable, from which all wiring in the kitchen is done, must enter the apartment power panel through its own circuit breaker.
Kitchen sockets must be grounded.
Number of sockets
How many minimum outlets are required in the kitchen?
Here, follow the rule - for each stationary kitchen appliance, plan your own socket + 2 blocks along the edges of the countertop + 1 piece near the dining table.
The category of stationary appliances includes a refrigerator, range hood, hob and oven, microwave, dishwasher, garbage disposer.
In addition, it doesn’t hurt to mount one socket immediately under or near the switch at the entrance to the room.
The area with switches usually remains uncluttered, and a free point where you can take voltage (for example, for a vacuum cleaner) is never superfluous.
Now mark the points on the apron for connecting non-stationary devices. Place at least two pieces on each part (right and left) of the kitchen.
This will include an electric kettle, blender, mixer, etc.
Advantages
If the installation of wall panels is compared with laying tiles, the following advantages can be identified:
- There are many colors and textures of such products. This allows, for example, to perfectly match the color of the wall panels with the color of the countertop. As a result, it looks harmonious.
- Installing the panels is easy, especially when compared to laying tiles. After all, installing tiles requires certain skills, experience and more time. This is especially difficult to do if the walls are uneven. But wall panels do not require all this, you only need some tools and a little time.
- It is no secret that tiles may fall off over time, especially if they were not installed professionally. There may be several reasons for this. But this will not happen with wall panels. After all, even if shrinkage occurs, it will not affect the structure in any way.
Kinds
There are several types of panels:
- Leafy. They are similar to plywood, but have an image on the surface. The joints between the products are filled with slats or sealant. The thickness of such panels ranges from 3 to 6 mm, and their size is 1.22x2.44 meters.
- Square. Sizes from 30x30 to 98x98 cm. Thanks to the use of tiles of different textures, you can combine panels to create a mosaic.
- Rack and pinion. Such products resemble the well-known lining. Such panels can be fastened in two ways: “groove-groove” or “groove-tenon”.
Often the panels are made to look like wood.
Materials
In addition to the mentioned MDF, products can be made from chipboard, PVC or specially treated wood.
As for chipboard and MDF, they are made using a hot press method, combining wood chips with synthetic additives.
The disadvantage of chipboard is its low strength and resistance to moisture, so it is not recommended for use in the kitchen.
In any case, all materials must be certified. It is advisable to have proof of fire safety. This is not a requirement, but recommended.
Lathing
Bars are used that are installed perpendicularly. They are secured with screws at a distance of up to 50 cm from each other.
Mounting profile
Well used if the walls are uneven. Also, the profile is not hampered by high humidity, unlike wooden sheathing, for example. First you need to install the metal slats, then the profile to which the panels are attached. The method eliminates warping.
Glue
Glue is a popular method of attaching wall panels in the kitchen with your own hands. If the surface is smooth and clean, nothing prevents you from fixing the panels with glue without using profiles and sheathing. It is applied with a roller or spatula.
Do not forget to use a level to ensure the quality of installation is at a high level. After completing the process, it is recommended to double-check the horizontalness of the structure, as well as the uniformity of the seams. This is especially true in corners. After completing the installation of the panels, it is recommended to wipe them with a damp sponge so that no dirt or glue residue remains on the surface (if the installation was carried out using glue).
Conclusion
Wall panels are a simple and effective way to arrange a kitchen workspace. Any housewife will appreciate the practicality of such a solution. The panels are easy to clean and do not absorb dirt and moisture. At the same time, they perfectly ennoble the space, creating comfort and coziness, which are also important in this room. And if something else is not clear, you can additionally watch the video instructions, and then the installation will be easy and quick.
Probably, you need to start with the fact that the wall panel in the kitchen can be made from different materials, each of which has its own advantages and disadvantages. And since the kitchen is the place where a lot of grease and other drops fall on the walls near the work surfaces, you need to approach the choice of material very carefully.
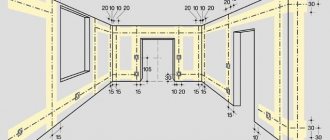
Distances and locations
When you have decided on the quantity, it’s time to move on to calculating the required sizes and indentations. To do this, draw something like a scan of the walls where the furniture will stand.
Here you will need the exact dimensions of the kitchen - length, height of the room. Gradually, in the form of rectangles, you draw the equipment and all the cabinets.
If the kitchen is corner, do the same with the adjacent wall.
Next, take your plan with the number of sockets and transfer them to the wall layouts. For each technique, follow its own rules.
Fridge
For refrigerators, manufacturers recommend placing the socket group under the appliance itself, that is, in the bottom row, so that the connection is not visible.
It is impossible to say unambiguously with 100% certainty at what height the bottom row of sockets should be made.
Based on IKEA recommendations, they advise placing them at a height of approximately 10cm from the floor, i.e. flush with cabinet legs.
This is explained by the fact that if you install it higher, the built-in equipment will rest against the forks.
If you intend to turn off the plug quite often, then the bottom connection for the refrigerator is not always convenient. In this case, you can place the whole thing at the height of the working area.
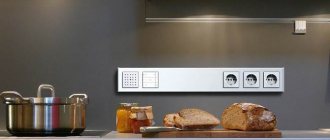
Sockets in the work area and above the tabletop
The height of the tabletop is usually 85cm, maximum 90cm. Then there is a partition with a height of 550-600mm and then cabinets.
Place sockets in this area 105cm from the floor.
In this case, they will not end up in the middle of the wall, and it will be convenient to cover them with the same microwave.
The minimum distance from the countertop should be at least 5cm so that the kitchen plinth does not touch them. Location: one set in any corner, plus between the hob and sink.
As mentioned above, at least two pieces. If you don't like the look of sockets above the kitchen splashback, consider the option of a pull-out unit from the countertop.
You definitely need to consider whether there will be built-in appliances in the upper cabinets. For example, a microwave.
You will also have to make a separate outlet for it. It is not feng shui to pull the cords from above to the tabletop area.
Hood
Also at the top, at a height of 1.9m-2.0m, there is an outlet for the hood. However, a lot can depend on the brand. If this is a cheap option, then you can get by with the cable outlet and then connect it directly inside the equipment.
But if this is an expensive model, then it comes with its own fork. And cutting off the factory plug will void the warranty.
Hob and oven
If you have a powerful hob, either a cable outlet is made, followed by connection directly under the panel contact blocks, or a special power socket is installed.
Ovens, unlike cooking ovens, come with regular forks, so there’s no need to be fancy here. Plug them into simple sockets.
When there are cabinets with hinged doors to the left or right of the cooker and oven, it is very convenient to place sockets directly inside them. Step back 15-20cm from the edge and mount it.
If this is not possible, then you will have to connect from the lower group.
If the oven is installed separately from the hob, for example at chest height, make a socket for it in the lower cabinet at a height of up to 750mm.
Dishwasher
According to SP 31-110 2003 clause 14.29, it is prohibited to install any sockets under or above sinks or sinks.
Therefore, always back off a few centimeters when installing a socket group near this plumbing fixture. This applies to both the lower placement and the working area at the top. It is also prohibited to place sockets behind the dishwasher and washing machine.
Near the dining table (if it is located near the wall and not in the center of the kitchen), it is advisable to plan one outlet.
On major holidays, when there is an influx of guests and relatives in the apartment, you will definitely need to connect something on the table - a mixer, a juicer, a food processor, etc.
And on simple days, you can easily attach a laptop there when working in the kitchen.
Power consumption of electrical appliances
Before planning the number and height of sockets from the floor in the kitchen, you will have to work on a kind of energy consumption plan. So, below is a list of electrical appliances that will be used in the kitchen, with their power:
- Lighting – 150-200 Watt.
- Microwave – 2000 Watt.
- Refrigerator – 100 Watt.
- Dishwasher - 1000-2000 Watt.
- Electric kettle – 2000 Watt.
- Oven – 2000 Watt.
- Water heater – 2000 Watt.
- Hob - 3500-7500 Watt.
The following devices require special connection:
- Dishwasher;
- washing machine;
- hob;
- water heater;
- oven.
The greatest load on the network comes from the operation of the electric stove, oven and water heater.
The usual connection is suitable for a microwave, electric kettle, food processor, refrigerator, electric meat grinder and toaster. At the same time, the dishwasher and washing machine, electric kettle, and microwave oven consume the most power.
Although all these devices will not be connected to the network at the same time, the load is quite high. Consequently, the average power fluctuates between 10-15 kW, as a rule, current collectors have a power of 7 kW, during normal and alternating operation of devices in the house. If this indicator is higher, then it makes sense to output 380 V wiring and distribute it across phases if possible.
Depending on the load, you will need to select wires with a larger cross-section
To determine the number of connection points, at the stage of drawing up a kitchen design project, you need to make a list of required units, appliances and lighting devices that will be powered from such a network connection device.
Depending on the design of the kitchen furniture and its location in the room, the locations of single sockets or devices with the ability to connect several devices are selected.
Regulations and standards help to correctly install sockets in height. This is done in accordance with the location of furniture and kitchen units so that tables or cabinets do not interfere with their use.
Depending on the material from which the walls are made and the method of wiring, devices for connecting electrical appliances can be:
- built into the wall, such devices are used mainly in apartments of panel or brick houses;
- invoices for hidden wiring and invoices for open wiring. Most often they are used in wooden housing construction or when laying retro wiring on insulators.
Modern regulations require that sockets be equipped with grounding.
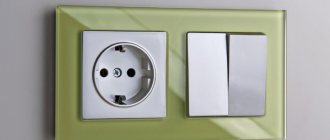
Each outlet is selected according to the type needed in a given location.
- Single device with open plug holes.
- A panel of two, three or four open-hole outlets.
- Single devices and panels with hidden openings. They can be with a rotating bar, curtains or a special lid. Such connection points are made so that small children cannot accidentally stick something there. A socket with a cover is selected if you want to place it near water. In this case, a model with a degree of protection of IP54 is suitable. It ensures that water will not reach the electrical source.
- The connection device must be selected for each device separately. All of them are designed for a certain current strength. If the instructions indicate the current strength for the device is 10 - 16 amperes, then the outlet must be installed at 16 amperes, and not at 10.
Recommendations for wiring and circuit breakers
- for a group of sockets into which devices up to 3.5 kW are connected, a 16A circuit breaker is installed
- for devices up to 5.5 kW automatic 25A. Moreover, it is better to extend a separate group to this pantograph
You can also navigate using the following table for selecting machines and cables when connecting a hob:
- since the kitchen is a wet room, plus a huge number of objects with a metal case, it is mandatory to install an incoming RCD with a current of 30 mA in the panel in front of all machines
- all sockets must have a grounding contact, for a rated current of up to 16A, for hidden wiring
- A separate socket is installed for each pantograph
- do not use carriers or extension cords in the kitchen
This is not only an additional load on the wiring, but also a potential short circuit (due to spilled tea or other liquid).
Bathroom
| vendor code | Description | Price including VAT, rub. | Quantity, pcs. | Cost including VAT, rub. |
| 1E10201300 | Grounding socket, screw terminals, white | RUR 154.00 | 2 | RUR 308.00 |
| 1E52101300 | Single frame, white | RUB 33.00 | 2 | RUB 66.00 |
| Total for the bathroom | 374,00 R. |
The bathroom has an electrical outlet for the boiler and hand dryer.
How to distribute the power load
Before purchasing and installation, you need to correctly calculate the number of electrical outlets.
To do this, you need to calculate the power load from all the equipment in the kitchen. How much power do kitchen appliances consume:
- lighting –200 W;
- microwave oven – 2000V;
- refrigerator – 100 W;
- electric kettle – 2000 W;
- dishwasher – 1500-2000W;
- water heater – 2000W;
- washing machine – 2500 W;
- electric stove - from 5000 W to 15000 W.
Powerful electrical appliances are equipped with separate sockets that can withstand such a load. You need to calculate the total power of all devices. Of course, no one will turn them on at the same time, but the limiting value should be known.
As a rule, the maximum power of several operating devices should not exceed 7 kW. Otherwise, you should think about introducing a 380 V power supply and distributing the load across phases. The number of sockets should be equal to the number of connected units, plus a few in case of breakdown or inconvenience of use.
Common mistakes
Installation of wiring and sockets before approval and approval of the kitchen furniture design project.
The problems you will definitely encounter in this case are hidden sockets behind cabinets, refrigerators, etc. It is very likely that you will even have to use carriers, since the factory cords and plugs will simply not reach the connection points.
Straight kitchen ideas in different styles
| Style | Traits |
| Classic | direct kitchen with patina, solid wood furniture, built-in appliances, noble shades of burgundy interspersed with gold, curtains made of light fabrics, a large chandelier, which is located directly above the dining table. |
| Provence | artificially aged surfaces, shades similar to those faded in the sun, bright elements that stand out against the general background, floor design in dark colors. |
| Country | warm colors, the use of brick, wood, ceramics, stone, wickerwork, lace, open shelves for dishes on which you can place homemade accessories and other cute trinkets, ceramic/clay dishes, brass pans, wooden spoons, curtains, tablecloths, napkins from lace, linen fabrics, stylized galleries, stained glass windows, folk decorations, decorative cornices. |
| High tech | light, functional furniture without excessive decoration, metallic design notes, cool tones, glass, metal. |
| Minimalism | Only the essentials are used, a minimum amount of decor, a lightweight set using plastic, metal, glass; instead of a dining table, you can use a tabletop attached to the wall. |
| Loft | a straight loft kitchen is: industrial, rough materials, strict palette, communications remain visible, industrial footage, huge windows. |
Don’t know where to start when choosing a kitchen for your apartment? It’s okay, we’ll help you! A detailed list of questions to answer before going to the store. Click on the button.
Switch locations
It is no secret that it is recommended to install switches at the level of the lowered hand, taking into account the side of the door opening. There are other points:
- put each type of lighting (central, spot, perimeter, main area lighting, dining room) on a separate switch. This way you will vary the amount of light and save energy;
- Place the second control unit near the dining area. Otherwise, you will have to get up from the table every time to turn off the extra light;
- use the principle of walking distance - all switches should be close to your work triangle;
- add another separate switch to the unit to illuminate the work area, because turning on small lamp buttons every time, and even with wet hands, will be extremely inconvenient.
Table: power and wire cross-section for connecting kitchen appliances
| Types of equipment | Maximum power consumption | Socket | Cable cross-section | Machine in the dashboard | |
| Single-phase connection | Three-phase connection | ||||
| Dependent set: electrical panel plus oven | about 11 kW | Calculated for the power consumption of the kit | Up to 8.3 kW/4 mm² (PVA 3*4) 8.3–11 kW/6 mm² (PVA 3*6) | Up to 9 kW/2.5 mm² (PVA 3*2.5) 9–15/4 mm² (PVA 3*4) | separate, at least 25 A (380 V only) plus RCD |
| Electrical panel (independent) | 6–11 kW | Calculated for panel power consumption | Up to 8.3 kW/4 mm² (PVA 3*4) 8.3–11 kW/6 mm² (PVA 3*6) | Up to 9 kW/2.5 mm² (PVA 3*2.5) 9–15/4 mm² (PVA 3*4) | separate, at least 25 A plus RCD |
| Electric oven (independent) | 3.5–6 kW | euro socket | Up to 4 kW/2.5 mm² (PVA 3*2.5) from 4 to 6 kW/4 mm² (PVA 3*4) | 16 A 25 A | |
| Gas panel | euro socket | 1.5 mm² (PVA 3*1.5) | 16A | ||
| Gas oven | euro socket | 1.5 mm² (PVA 3*1.5) | 16A | ||
| Washing machine | 2.5 kW 7 kW with drying | euro socket | 2.5 mm² (PVA 3*2.5) 7 kW/4 mm² (PVA 3*4) | separate, 16 A separate, 32 A | |
| Dishwasher | 2–2.5 kW | euro socket | 2.5 mm² (PVA 3*2.5) | separate, 16 A | |
| Refrigerator, freezer | less than 1 kW | euro socket | 1.5 mm² (PVA 3*1.5) | 16 A | |
| Hood | less than 1 kW | euro socket | 1.5 mm² (PVA 3*1.5) | 16 A | |
| Coffee machine, steamer, microwave oven | up to 2 kW | euro socket | 1.5 mm² (PVA 3*1.5) | 16 A | |
RCD is a residual current device that protects the serviced section of the electrical network when a leakage current occurs.