Sections of the article:
How to turn on the power supply without a computer, bypassing the motherboard
The power supply from the computer can be used separately, without a motherboard. More details about launching a power supply without a PC will be discussed below.
Using a computer power supply, you can get the following output voltage: 3.3 V, 5 V and 12 V. It is the latter voltage that is so often chased, because 12 Volts can be used as a power supply for car audio equipment, connecting LED strips and much more.
How to turn on the power supply without a computer
When working with a stationary PC, a situation may arise in which the computer simply refuses to turn on. Using the “Power” button does nothing, and what could cause such dysfunction is also unknown. Most often, suspicion falls on the computer's power supply; if it fails, the voltage supply to the motherboard stops. How to turn on the power supply without a computer and using the “Power” button on the case? Let's figure it out.
Checking the functionality of the power supply
We start the computer using peripheral devices
This function is available on many motherboards, but has significant differences between different manufacturers. For example, Asus has the ability to turn on without a power button using the keyboard and certain key combinations that the developers have provided.
Also, most often there is a nuance in connecting peripherals via the PS\2 interface, and not USB.
Regardless of which manufacturer you have, let's consider the situation in general.
You can find out more details from the specification of your particular hardware.
- In the picture above I have highlighted these settings. As you can see, start with a mouse click is disabled and start with the keyboard is enabled when pressing the space bar. If you have these settings installed, you will be able to turn on both when the computer is turned off and after sleep mode.
Yes, there may not be general instructions for everyone, but this information should be enough for you to navigate directly on your PC. Let's move on.
Features of turning on the power supply without a PC
As you know, the computer is turned on using the “Power” button, which, in turn, is connected to the motherboard. To run the power supply without a computer, we need to exclude the motherboard from this circuit using a method that I will describe below.
When performing this operation, remember that:
- It is necessary to turn off the PC and completely disconnect the power supply from the computer;
- You need to connect some kind of load to one of the external connectors of the power supply (any old hard drive or CD (DVD) player will do). Without such a load, various negative consequences are possible, in the form of the power supply refusing to start, its failure, and other undesirable dysfunctions;
- Be extremely careful when performing the following operations. Accidentally closing the wrong contacts can damage the device.
LEDs
Today, LED strips are widely used as a light source or decorative lighting, including in ordinary apartments. One of the voltages at the output of a computer power supply is 12V. This is exactly the indicator that the LED strip requires. You just need to make a few manipulations with the power supply, connect a strip to it, and economical lighting is ready!
We start the power supply without a computer
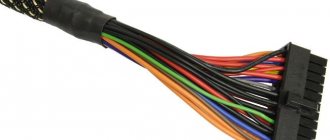
To bypass the circuit using the motherboard, we need some kind of metal clip or small wire with stripped ends. Even ordinary technical tweezers may come in handy.
Wiring like this is enough
- Take the main PSU connector that connects to the motherboard (usually an ATX connector with 24 pins, rarely with 20);
- Connect one end of the wire (brackets) to pin 4 (usually the green wire from the power supply is connected to it), and the other to pin 5 (black wire).
Connect as shown
The green contact in the diagram is usually depicted as “PS-ON” (“Power Supply ON” - turning on the power supply), and the black one as “COM” (“Common” - common) or GND (“Ground” - grounding);
- The power supply should turn on and its cooler should work.
Some craftsmen connect a full-fledged switch instead of such wiring.
Switch instead of jumper
Other ways to check the power supply
There are also a number of alternative ways to check the performance of the power supply.
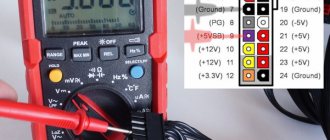
Output voltage measurement
To check the performance of the power supply, we can measure its output voltage using a voltmeter. To do this, it is recommended to turn on the power supply as indicated above (if it turns on). And measure the indicators of a number of wires of the black and pink wires of the main 24-pin connector. In the case of black and pink wires, the indicator should be 3.3, black and yellow - 12, and black and red - 5 V. The permissible deviation should not exceed 5% in the lower or upper direction.
Measure the output voltage
Checking for swelling of capacitors
The second way is to check the hardware of your power supply for the presence of swollen capacitors on the board. To do this, you need to disconnect the power supply from the PC, remove the cover from it and visually inspect all existing capacitors.
Swollen and normal capacitors
If you notice swollen capacitors, then there is a high probability that they have already exhausted their service life and need to be replaced. You need to unsolder them from your power supply and replace them with new ones of the same value.
Preparation
Before proceeding to the procedure for checking the power supply for its functionality, it is imperative to ground yourself. This is done so as not to damage the internal components of the computer. After all, during manipulations it is impossible to avoid contact with elements of the motherboard.
If this is not done, then instead of checking the power supply, the system board may need to be repaired. Although it is relatively strong, it is still vulnerable to static electricity discharges.
The procedure itself should be performed on a table, while standing on a rubber or any other insulating surface. Also, for the “operation” itself, you will need a screwdriver to remove the side panel of the system unit and remove the power supply.
How to start a computer power supply without a computer
Breakdowns and malfunctions in the operation of a computer are an integral part of the process of operating the device. Failures (damage) can be software or hardware. Software problems are related directly to the software, while hardware problems imply a breakdown of the physical components of the computer system. Both groups of breakdowns require immediate and competent intervention from a specialist.
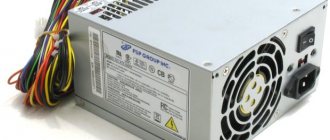
A computer power supply (or Power Supply) is a minor element of a computer system that is necessary to fill the computer components with a direct current energy flow. Explained in simple terms, Power Supply is the source of electrical power for a computer.
The need to connect PS without auxiliary elements arises in such cases:
- The need to diagnose the operation of the device.
- In the process of renovation.
- When using multiple power supplies in one computer case.
- Diagnostics of the performance of new circuits.
Diagnosis of nutrition problems
Power problems can be difficult to diagnose, especially if the user doesn't know what to look for. Here are some tips on how to quickly identify the problem if the power supply does not start and how to resolve this failure.
A bad source can be the cause of many PC problems. Experience can help a technician diagnose problems caused by a faulty source that is usually ignored by new technicians.
Any intermittent problem may be caused by a faulty source. Common symptoms when a computer power supply does not start:
- Failure when turning on voltage.
- Spontaneous reboot or intermittent blocking during stable operation.
- Memory errors.
- HDD and fan do not rotate.
- Overheating due to the fan being turned off.
- Frequent shutdowns that cause system restarts.
- Electric shocks that are felt when touching the body.
There are also some obvious clues that should answer the question of why the power supply won't start. These include:
Another way to check the power supply is to use special software. It can detect changes in temperature or performance, and will show how much power is being supplied to which components, which will help solve the problem faster.
Power unit. General information. Standard power supply startup
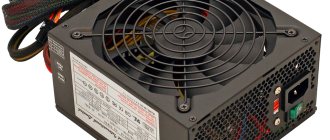
Using an electrical power supply helps protect your computer from frequent power outages. A mandatory element that comes with the Power Supply is a fan (other names: cooler, cooler). It constantly cools the PS and protects it from overheating, which can lead to breakdown.
The standard process of turning on Power Supply involves pressing the “Start” button on the motherboard, which activates the process of powering the unit. There is a widespread belief that it is impossible to turn on a power supply without a motherboard, because it does not start without voltage, but this is just a misconception.
If when you press the computer's power button it does not turn on and does not react in any way, then we can assume that the motherboard is most likely faulty or the Power Supply is broken. Before buying new expensive components, you should diagnose the operation of existing ones.
Turn on the computer without the “Power” button
The Power button is usually made of plastic, and the main structure inside that supports it is also made of plastic. Often the stop in this design can break due to strong pressure, so we will not be able to turn on the computer in the usual way, with the power button. But there are several options to do this without a special button, although not as convenient.
To do this, you need to open the inspection cover of your system unit.
At first, until you decide to take the system unit for repair, you can use this method. You can also rearrange buttons or contacts if the shape and location of the case allows this.
| Method name | Description | Application |
| Enable using mouse or keyboard | The computer starts by pressing a specific button on the keyboard or mouse. | For comfort. |
| Starting without a power button using motherboard pins | The PC starts by closing the contacts | When it is not possible to connect the power button. |
| Remote start | Launch occurs from a remote device (for example, from a smartphone) | For convenience or when you need to start the computer without being near it. |
| Enabling in a different boot mode | The operating system boots in one of the alternative modes for diagnostics or debugging. | In case of crash or loading errors. |
Turning on the power supply without a motherboard or checking the power supply
Often the motherboard has an LED indicating standby voltage. If it is active, both standby and primary nutrition are present.
Expert opinion
Viktor Pavlovich Strebizh, lighting and electrical expert
Any questions ask me, I will help!
Although a pulse power supply is not an entry-level radio-electronic circuit, its DIY diagnostics and repairs are accessible to many people who have basic knowledge and skills in the field of radio electronics. If there is something you don’t understand, write to me!
How to turn on the power supply without a computer
To turn on the power supply without a computer, you should pay attention to the tables of the locations of all the necessary contacts on the connector. The pins of a standard ATX block are presented in the table below:
| Color | Signal | Contact | Contact | Signal | Color |
| Orange | +3.3V | 1 | 13 | +3.3V | Orange |
| +3.3V sense | Brown | ||||
| Orange | +3.3V | 2 | 14 | -12 V | Blue |
| Black | Earth | 3 | 15 | Earth | Black |
| Red | +5V | 4 | 16 | Power on | Green |
| Black | Earth | 5 | 17 | Earth | Black |
| Red | +5V | 6 | 18 | Earth | Black |
| Black | Earth | 7 | 19 | Earth | Black |
| Grey | Power good | 8 | 20 | -5V | White |
| Violet | +5 VSB | 9 | 21 | +5V | Red |
| Yellow | +12 V | 10 | 22 | +5V | Red |
| Yellow | +12 V | 11 | 23 | +5V | Red |
| Orange | +3.3V | 12 | 24 | Earth | Black |
Before you learn how to turn on a power supply without a computer, follow these tips: do not start the power supply without supplying at least some load. The circuit that converts electricity may break and then the ATX unit will need to be replaced. Such repairs can be quite expensive.
How to start a power supply without a motherboard:
- Close the Power On contact to zero. In almost all cases it is colored green.
- Short the ground - any contact painted black. It is enough to close just one. Closed contacts look like this:
- If you are using a pin table, then take a simple paperclip and touch it to pins 15 and 16. In this simple way you will close them. The table above will help you navigate the ATX power supply pins. Once the required contacts have been closed, Power Supply should start. If this does not happen, then you can short the green wire and the other black one.
- Try not to overload the Power Supply as much as possible. Connect to it, for example, a hard drive or floppy drive.
Chinese block manufacturers often confuse the English color names gray and green, so the green wire may be gray. In any case, try to navigate according to the table.
Getting different voltages - connection table
| 17.0V | 12V and -5V |
| 15.3V | 3.3V and -12V |
| 10.0V | 5V and -5V |
| 8.7V | 12V and 3.3V |
| 8.3V | 3.3V and -5V |
| 7.0V | 12V and 5V |
| 1.7V | 5V and 3.3V |
The power supply has also become more compact and mobile, so there will be a lot of applications for it - the need for a powerful and separate source of various voltages arises often. The author of the project is Babay iz Barnaula
.
Replacing the ATX block and repair tips
Replacing an ATX power supply is expected in the event of a breakdown of the old copy or in the case when the constituent elements of a personal computer have been replaced: more powerful video cards, processors, motherboards, more RAM. In the case of such a PC upgrade, the power supply becomes unable to supply power to all components of the PC. First of all, you need to remove the existing ATX element, install a new one and test its performance. You just need to know the basic concepts of circuit design and follow the instructions below:
- Necessary tools: standard size Phillips screwdriver.
- It is necessary to turn off the power to the personal computer - this process involves unplugging the power cord from the power supply.
- The next step is to remove the wall of the system unit; it is usually removed from the left side of the case by unscrewing several screws.
- Remove all accumulated dust from the computer components with a brush or vacuum cleaner. Please note that you should clean your computer from accumulated dust at least once every six months. Only after complete cleansing of dust can you proceed to the next steps.
- Disconnect all wires belonging to the power supply from other devices. Pay attention to the possible presence of special latches in the connectors. Do not pull out the connected wires abruptly.
- After disconnecting all the wires, unscrew the screws that secure the power supply to the computer's system power supply. This way the old power supply will be removed.
- To connect a new power supply, repeat all the steps exactly the opposite: attach it to the system unit, carefully connect all its wires to the necessary elements, connect an electrical cord with a power of 220 Volts to the power supply.
How to turn on a computer power supply without a computer
All computer components are designed to work in conjunction with each other, but there is one element of the system that is somewhat self-contained and can work on its own. We are talking about the computer's power supply. Indeed, despite the fact that it is designed to work together with other computer components, their presence is not at all necessary for its operation, unlike, for example, a video card.
On the other hand, the question arises: why turn on the computer power supply without connecting it to the computer? There are two main reasons. Firstly, to check its performance. Let's say you press the power button on the computer case, but it doesn't turn on. The simplest thing you can do in such a situation is to make sure the power supply is working. You can also check the output voltages under load if there are malfunctions in the computer and suspicion falls on the power supply.
Secondly, it can be used as a powerful universal power source with different voltages. This way, you can find a new use for your old computer power supply.
We figured out why we might need to start a computer power supply without the help of a computer, we just need to figure out how to do it. It seems logical to just plug it into an electrical outlet. The idea is certainly correct, but this is not enough, it will not work, since it is controlled by the computer’s motherboard.
This means that we need to imitate commands from the motherboard, fortunately this is done in an elementary way. To do this we need a piece of wire or a piece of flexible metal, such as a paper clip. Our task is to close two contacts in the block that supplies power to the motherboard. This will be the start command for the computer’s power supply.
We take the connector for powering the motherboard and connect the green wire (PS_ON) with any black wire (COM) using a jumper. The plug comes in two versions: contact (old standard) and contact (sometimes collapsible 20+4). In this case, this does not affect anything, however, in power supplies from unknown manufacturers, the wire colors may be mixed up. Therefore, we recommend that you check the diagram below just in case, so as not to accidentally short-circuit something else.
It should be noted that computer power supplies do not like to work without load, so it is recommended to always connect some kind of consumer. The easiest way is to take a cooler, an unnecessary hard drive or a light bulb of the appropriate voltage and power. We connect the load to the power supply, in this case the case cooler, and use a piece of red wire with stripped ends to connect the green and adjacent black wires.
Now if you plug the power supply into an outlet, it will work immediately. To turn off the power supply, you can not unplug it from the outlet, but simply open the jumper we made. For those people who are going to use the computer power supply as a separate power source, it is recommended to ensure reliable contact in the block by soldering, mating block or other means. Also, to improve ease of use, you can embed a button in the jumper that will control turning the power supply on and off.
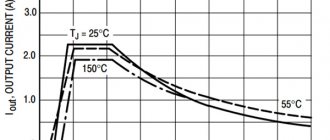
Load diagram for all lines
So, in order to carry out a complete diagnosis of the power supply, it is necessary to load the power buses with at least half the power of the power supply. We are especially interested in the +12 V, +5 V and +3.3 V lines. First, let’s assemble a simple device:
This device uses its own set of resistors to load each of the lines, connected to the corresponding contacts of the motherboard power supply. As for the number of resistors in each set, everything will depend on how much current we want to load each line. Knowing the voltage on the bus and the resistance of the resistors (different on each line, see diagram), it is easy to calculate that each additional resistor on the +12 V bus will increase the current by 12 / 5.1 = 2.35 A. For the +5 V and + 3.3 V lines this will be 5 / 1.6 = 3.1 A and 3.3 / 1.0 = 3 A, respectively.
Thus, if we decide to load the +12 V bus with a current of 10 A, then we will need 10 / 2.35 = 4 resistors with a nominal value of 5.1 Ohm (see diagram). A current of 12 A on the +5 V bus can be obtained by connecting 4 resistors with a nominal value of 1.6 Ohms.
How to operate the device? We connect the required number of load resistors to the corresponding sockets of the power supply, install a paper clip, give the start command (see the previous section), and turn on the power supply to the network. After the fan rotates (if it rotates), we measure the voltage on all buses, as we did without load.
We “drive” our power supply for 5-10 minutes, repeating the measurements and monitoring the temperature of the air blown out by the fan. At half load the air should be slightly warm. If the voltage values are within the permissible range, then you can be sure that the power supply is working and will not let us down.
Expert opinion
Alexey Bartosh
Specialist in repair and maintenance of electrical equipment and industrial electronics.
Ask a Question
Important! If we want to test a powerful power supply, then we will need currents that the ATX block simply cannot withstand, since it only has 2 wires of the +12 V bus. In this case, we connect the yellow wires of the processor and video card power blocks parallel to the yellow wires of the ATX block.
As we have seen, the device is quite simple to repeat, but if we need it more than once, then using it is not entirely convenient. A power supply of a different power will appear, and the load currents will need to be changed. To do this, you will have to recalculate the number of resistors in each channel and pick up a soldering iron.
Therefore, if we plan to work with the device often, then it makes sense to modify it. The modification scheme is not particularly complicated, but using such a tester is much more convenient and safer for the power supply itself, since nothing will hang “on the snot”, there will be no paper clips or bad contacts that can burn out the power supply pads. In addition, with the help of such a tester we will be able to monitor the presence of all voltages and signals visually.
Scheme of a full-fledged power supply tester
Here, each channel is also loaded with groups of resistors, but if desired, some of them can be turned off by simply flicking a switch. The diode assembly D1 prevents the flow of current from bus to bus - this made it possible to get by with just one toggle switch S2. To visually monitor the presence of voltage on all buses, indicator lamps X1-X6 have been added to the circuit. At the same time, light bulbs on low-power buses -5 V, -12 V and +5V SV are simultaneously load-bearing.
The role of a paperclip giving the command to turn on the power supply is now played by switch S1. And the PG signal (power is normal), generated by the power supply, is indicated by an LED connected through transistor T1 to the corresponding contact of the ATX block. The Fan, connected to the +12 V circuit, serves to cool the load resistor cassettes, which will heat up during prolonged operation.
Thanks to this design, the device can be connected to the power supply via 1 ATX connector. True, to do this you will have to find the appropriate socket into which the plug of the power supply being tested will be inserted. Alternatively, it can be removed from the faulty motherboard.
Working with the device is as simple as possible. Set toggle switch S2 to the desired mode (see table below). We connect the tested power supply to the ATX socket of the tester, plug it (the unit) into the socket. We close switch S1, the power supply starts. The presence of voltage along the lines and the PG signal is monitored visually. If everything is lit and glowing, you can pick up the tester and take measurements.
Table of currents by lines depending on the position of switch S2
| Tire | Current at switch position S2, A | |
| 150 W | 250 W | |
| +12 V | 7.5 | 12.2 |
| +5 V | 6.4 | 12.6 |
| +3.3 V | 6.6 | 13.3 |
| -5 V | 0.22 | 0.22 |
| -12 V | 0.22 | 0.22 |
| +5V SV | 0.72 | 0.72 |
Expert opinion
Alexey Bartosh
Specialist in repair and maintenance of electrical equipment and industrial electronics.
Ask a Question
Perhaps the only inconvenience of working with such a device is the lack of a built-in voltmeter. But if desired, this problem can be solved. To do this, it is enough to integrate a voltmeter with a measurement limit of up to 15-20 V and a biscuit switch into the circuit.
According to the tester details. Load resistors must be wirewound with a power of at least 15 W for the +12 V bus and 10 W for the remaining buses. Switch S2 must withstand a current of at least 25 A. It can be found in an auto shop. Transistor T1 – any low-power silicon, npn structure. LED - any indicator light. Toggle switch S1 is also any. Fan – 12-volt cooler from the same power supply or similar. The Schottky diode assembly D1 can be taken from a faulty power supply. It is located in the rectifier on the 5 V bus.
Turning on an ATX and AT computer power supply
In some situations, it is necessary to start the power supply without using a personal computer (PC). First of all, this is necessary to check the functionality of the component and the voltage at the terminals. Next, we will consider in detail the principle of operation and startup of the power supply without the use of a computer.
Important! Before starting the process, it is worth mentioning right away that starting the power supply (PSU) without using a PC or other load (at least a connected light bulb or cooler) can lead to its breakdown and electric shock, so all actions are performed on at your own risk.
Standard activation procedure
The operating principle of the power supply is based on converting electricity (mains voltage) to the value required for the functioning of the PC. Thanks to this, computer components can operate stably and not be affected by various interferences.
The startup process is as follows:
- first of all, the current is supplied to the filter , which is responsible for peaks, harmonics and interference in the electrical network;
- further, due to passage through the filter, the current stabilizes . Let's take for example a power value of 350V;
- then the current is supplied to the inverter , where it is converted into a variable value from 30 kHz to 55 kHz. Finally, current is supplied to all components of the PC through different taps, because equipment requires different voltages.
How to turn on the power supply without a computer
The first power supplies for PCs were produced according to the AT standard. Thanks to this, the launch could be done without using a PC, i.e. directly. Now the units are produced in the new ATX standard, and idle starting is now harmful to them. They are equipped with SATA and Molex connectors for connecting hard drives and video cards. There are also 4-pin and 8-pin power supply for connecting the processor and 20 pin (older devices) or 24 pin (modern PCs are equipped) for the motherboard.
To start the power supply, you need to know which contacts need to be closed; as a rule, (green) and COM connectors are used . Next, we will take a step-by-step look at the general steps to start without a PC.
First of all, you need to understand which cables carry what voltage in order to protect yourself. Power supply pinout diagram:
| Color | Voltage level in Volts | Connector number | Connector number | Voltage level in Volts | Color |
| orange | +3,3 | 1 | 13 | +3,3 | orange |
| orange | +3,3 | 2 | 14 | -12 | blue |
| black | grounding | 3 | 15 | grounding | black |
| red | +5 | 4 | 16 | Power on | green |
| black | grounding | 5 | 17 | grounding | black |
| red | +5 | 6 | 18 | grounding | black |
| black | grounding | 7 | 19 | grounding | black |
| grey | Power good | 8 | 20 | -5 | white |
| violet | +5 VSB | 9 | 21 | +5 | red |
| yellow | +12 | 10 | 22 | +5 | red |
| yellow | +12 | 11 | 23 | +5 | red |
| orange | +3,3 | 12 | 24 | grounding | black |
- First you need to disconnect the power supply from the network and other PC components;
- then unscrew the fastening bolts and carefully remove the power source from the system unit;
Please note that units equipped with 20 pin and 20+4 pin connectors should not be turned on without load. Otherwise, it may fail.
- to provide the load . The main thing is that the power supply does not work without load;
- Next, you need to short circuit PS_ON (green) and COM (black). To start, we use a paper clip or make a jumper. The jumper can be made from an ordinary piece of wire with stripped ends;
- We close the contacts, insert a paperclip or jumper into the PS_ON and COM connectors and start the power supply.
AT standard power supply , everything is a little different. Shorting the green and black contacts will not turn on the power supply without the motherboard. two combinations at once to start : blue - black and white - brown.
ATTENTION! When starting an AT standard power supply, you should be careful! The voltage at one of the closed contacts is 220 Volts!
Further actions if the power supply does not start
If starting the power supply with a jumper wire is unsuccessful, then first of all you should check:
Checking for serviceability
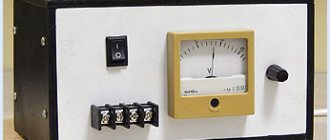
In this case, testing is carried out without a PC, so you will have to check each output voltage separately. This can be done using a multimeter or a special tester for power supplies. It is a digital voltmeter with terminals for connecting any power supply connector.
Voltages are measured at each connector, the level is determined by the color of the wire. Permissible deviation limits are indicated in the table.
| Wire insulation color | Voltage, V | Permissible limits, V |
| Black | 0 V (ground, common) | |
| Red | +5 | +4,75..+5,25 |
| Orange | +3,3 | +3,285..+3,45 |
| Yellow | +12 | +11,4..+12,6 |
| White | -5 | |
| Blue | -12 | |
| Green | +5 Power_ON | 0 volts when start enabled |
| Grey | +5 Power_good | |
| Violet | +5 Stand by |
Article on the topic: 5 ways to check your computer power supply
Repair Tips
If all voltages are in order, then the power supply can be considered serviceable and installed in the computer. If something is wrong, you can try to repair the power supply. The success of the repair depends on the relationship between the problem and the qualifications of the technician. Some faults can be identified by visual inspection and eliminated without having any special skills (but in most cases you will need to be able to solder).
The most common problem that can be identified with the naked eye is swollen , leaking and torn oxide capacitors . If such are found, they should be unsoldered without hesitation and replaced with similar ones or with higher voltage and capacity.
Next, you need to inspect the board from the side of the conductors for poor-quality soldering, cracks in the board tracks and cracks in the places where components are soldered. This inspection is best done under magnification. Identified problems are eliminated using a soldering iron.
Upon inspection, you can determine if the fuse is faulty - if it is in a glass case. If the body is ceramic, the insert must be tested with a multimeter.
You can also visually detect burnt-out elements. They also need to be replaced, but it must be borne in mind that the cause of burnout may be in other components whose malfunction cannot be determined at a glance. Therefore, most likely, repairs will not be limited to such replacement.
If the fault cannot be found by inspection, a more in-depth diagnosis of the power supply will be required, for this you will need a power supply circuit, an oscilloscope and skills to work with it.
How to use a computer power supply
From an unnecessary power supply it is quite possible to make devices that are useful in everyday life. Next, let's look at how you can use a computer block.
Converting the power supply into an alternating voltage source
A constant voltage source from a computer power supply is quite a convenient thing. To do this, you will need to replace the resistance coils and remove the inductor. Thanks to this, you can adjust the voltage from 0 to 20V. If a standard voltage (12V) is required, then you need to install a thyristor regulator.
Converting a power supply into a charger
To convert the power supply into a charger, you will need to replace the Schottky diodes with ultra-fast ones. The main advantage of such a charger is that it is light in weight and dimensions. The disadvantages of this device are its sensitivity to overloads and short circuits. To prevent overloads and short circuits, it is necessary to construct a protection system.
How to raise 12V line to 13.5V
The theory says, and practice flawlessly confirms, that by loading a 5V line with a low-resistance resistor of decent power, the voltage on the 12V line increases. 13.
5V on the 12V line occurs only when between the ground wire and the 5V line there is an assembly of 5 series-connected 22Ohm resistors, the total power of which is 50W.
If you do not have such resistors, then it is quite possible to load the 5V channel using an assembly of light bulbs connected in series with the corresponding power rating.