In the age of automation, every person strives to make their home more “smart,” change the design and automate what previously was at a primitive level for many years. The main important aspect in the house is lighting, which should be of high quality and sufficient at the moment when we need it, and the best option would be to control it without getting up from your seat. In this article we will talk about a (LED) chandelier with a remote control, which has recently gained great popularity among consumers, which of course could not but affect the appearance of a large and varied number of all kinds of chandeliers and lamps of different types and designs. We will talk about malfunctions and repairs of remote controlled chandeliers.
The design of such chandeliers is not as simple as conventional ones and in order to assemble them, more time and knowledge is needed. Control, switching and dimming are performed using a remote control and a controller built into the chandelier. Such devices can be divided into three types:
- LED
- Halogen
- Combined
Regardless of the type, almost all chandeliers on the control panel have a modular design and consist of interchangeable blocks, which greatly simplifies their repair. What blocks does this chandelier consist of?
Radio control unit.
Radio control is carried out using a “radio relay” with a switching voltage of 220 volts and up to 1 kilowatt of power. Depending on the price and complexity of the chandelier, this unit can be multi-channel, that is, it can consist of several electromagnetic relays. Essentially, this unit is a wireless switch, commands to which are sent by a remote control. It is also called a “switch”, which is often marked on the block and in the instructions. In addition to load control, some models also dim the LED backlight or, more rarely, the halogen load.
Block of halogen lamps.
The basis of this circuit is an electronic transformer. In rare cases, the transformer may be electromagnetic (toroidal), but with an average power of the lighting elements its weight will be about 2 kg. The load for the electronic transformer is halogen lamps with a G4 base, which are connected in parallel to the transformer.
It should be noted that without sufficient load the pulse transformer will not start, so for most models the switching is carried out via a 220 volt line. If a transformer is rated at 200 watts, for example, then if there is only one 10-watt light bulb on its load line, then it most likely will not start either. To start an electronic transformer, the load must be at least 15% of its rated power (what is written on the case).
Halogen light bulbs are checked with a multimeter or a continuity tester for a break, but you need to remember that such light bulbs should not be touched with your fingers to prevent natural oil from getting from your fingers. Therefore, halogen light bulbs are removed and installed by wrapping them in a napkin or a clean cloth.
LED block.
As a rule, this block is the third control channel. At the input there is an LED driver designed for the exact number of LEDs in terms of power. The quality of the driver (the complexity of the circuit) depends on the price of the chandelier, but often it consists of a rectifier, a damping capacitor and a resistive divider. In more expensive models, its role is played by a switching power supply or converter. The LED supply voltage is approximately 3 volts, but the drivers operate on a current limiting principle.
To power LED strips (RGB), switching power supplies are often used, with a constant output voltage of 12 volts. Many modern chandelier models use LEDs that smoothly change their light during operation.
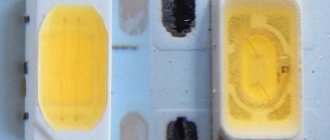
The output of some driver models can be connected from 4 to 22 LEDs connected in series, and if at least one LED fails, the entire chain of LEDs will stop lighting, then you will need to determine the culprit and replace or insert a jumper, but although the LEDs themselves are very easy to replace (they simply insert the leads into the connector). But we must remember - do not confuse the polarity!
Transparent LEDs with a wide beam angle are suitable for replacement; they have a flattened lens. In ordinary elongated LEDs, the light comes out more precisely. If some LEDs from the chandelier line shine with different intensities, then it is better to replace them all. The price if you look at AliExpress is small for 100 pieces, no more than 2 dollars.
Repair and main causes of malfunction
The chandelier does not turn on with the remote control or switch
In fact, the most common breakdown is that the chandelier does not turn on in any way. It is better to check everything sequentially: the batteries in the remote control, the switch, the presence of mains voltage at the chandelier input. If power comes to the controller, then the fault often lies in it, but you need to look at the lighting groups and you can try another remote control.
The chandelier does not turn on but you can hear clicks in the chandelier when you press the remote control
Clicks indicate that the controller is working and switches the lighting circuits. In this case, you need to see if all channels are turned on or just one. Here it will be easy to find the culprit. Most likely, one of the channels will be faulty, or rather its power supply or driver. Here you need to make sure that there is mains voltage at the input of this block, but you need to turn on this channel from the remote control or switch. Most likely the power supply or driver is faulty, or there is a short circuit in the secondary circuit in the load, or the light bulbs have burned out.
If the voltage to such a unit does not come out at least one from the controller channels, but clicks are heard, then the easiest way is to replace the controller paired with the remote control, here all the options are standard and interchangeable, you just need to know the number of channels and power. With sufficient knowledge, you can open the controller and look at the cause of the breakdown; it can be extremely simple, for example, “no contact.”
LED backlight does not light up
If it does not turn on either from the remote control or from the switch and at the same time voltage is supplied to the driver, then the cause of the breakdown is often the failure of the driver’s ballast capacitor. Here you need to open the driver and measure the voltage at the output of the capacitor.
In other cases, you need to make sure that the required voltage is supplied to the LED strip or chain of LEDs. There may also be a reason for the failure of one of the LEDs in the entire sequential chain. If possible, you can quickly check this by replacing the driver or power supply with a known good one or by applying voltage to the lighting line from an external voltage source, for example, from an regulated power supply.
Main causes of the problem
The crackling sound may resemble a buzzing or buzzing sound. There are several reasons for a breakdown.
Oxidation of contacts
If the contacts of the device become overgrown with carbon deposits or oxidize, an electric arc occurs the moment they come together. The cause of sparking is complicated by the size of the deposit. When shoots form on the end plates, the wiring can catch fire, i.e., the contacts close.
Plate loosening
The spring that presses the contact at the moment of switching on weakens - the characteristic sharp and clear click is no longer heard. A problem is indicated by the device turning on softly and the need to press the button for the light to appear. The danger is that the switch sparks constantly, causing a fire risk.
Lamp power mismatch with contacts
A halogen lamp or high-power LED source creates a load on the contacts. The simplest way to solve the problem is to replace the switch with one that corresponds to the lighting power indicators.
Poor quality of contacts and plates
A breakdown typical of budget models. The button operates on the principle of soft start, which, in combination with low-power automatic machines, provokes sparking.
A serious malfunction is accompanied by sparks, heating and crackling at the same time.
Other causes of contact failure
Factors that cause switch sparks and crackles also include:
- high humidity – activates the oxidation reaction;
- incorrect or weak connection of cores;
- increased load on contacts - humming occurs;
- constant voltage fluctuations.
Broken contacts will lead to failure of household appliances.
Repairing a wireless switch
Many owners of Chinese chandeliers with a remote control are faced with the fact that after a year or two their chandelier begins to respond poorly to commands from the remote control. As a rule, the malfunction manifests itself as follows:
It turns on if the remote control is brought close.
Does not respond well to commands from the remote control.
Does not respond to turning off channels A, B, C individually. Only all modes can be turned off with the D button.
On the page about the design and repair of a chandelier with a control panel, I already talked about this malfunction. I learned about its reason from a comment from one of the site visitors. After some time, I encountered this problem personally.
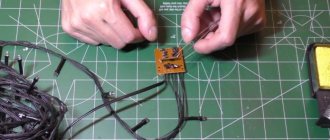
The reason for the poor response of the chandelier to commands is not related to the remote control (RC), but to this box with the inscription “Wireless switch”. This is a wireless switch (radio switch). He is the one responsible for receiving and executing commands. In my case, this block is marked Y-7E. This is a three-channel option.
As it turned out, the cause of the failure lies in the metal film capacitor, which is part of the power supply on the ballast capacitor. In the photo it is indicated by a red arrow.
Its capacity is usually 1
1.5 microfarads (µF). Operating voltage from 250V.
This circuit, using a capacitor that absorbs excess voltage, is actively used in Chinese chandeliers. The same circuit is used to power the LED part, if any.
Signs of a faulty switch
The following signs will help you understand that the switch is broken:
- the device may not turn on at all;
- a cracking sound appears when you press a key;
- at the moment of switching on the light bulb burns out;
- when turned on, the lighting device will blink and crackle;
- the case heats up if the switch is operated for a long time;
- a key gets stuck – you need to press it several times;
- the lighting does not turn on.
Most problems are caused by improper wiring or the switch itself.
Why does the LED lamp blink and what to do in this case?
In order to understand why the LED chandelier blinks, and this situation is possible even when it is turned off, you need to understand what this type of lamp is.
In the base of lamps of this type there is an electronic control unit with a diode bridge, to which an alternating current of 220 V is supplied through a fuse, and at the output a direct current with a certain ripple is formed, which negatively affects the operation of the product. To eliminate, or, as they say, “smooth out” the pulsation, a capacitor is installed as a filter element. This is what causes the LED lamp to blink when it is turned off.
The most common situation when a switched-off chandelier on LED lamps blinks occurs when installing a switch equipped with backlighting. When turned off, a small current passes through the indication LED, which provides a glow, while the circuit is closed through the light bulb, which leads to charging of the capacitor. Having reached a certain capacity, the capacitor tries to start the lamp, but this is only enough for one time and full switching does not occur. Well, then the process repeats.
The easiest option to get rid of the chandelier blinking in this case is to simply remove the indicator from the housing. There is another solution in which a resistor is connected parallel to the lamp. It takes on the load and prevents the LED lamp from flickering. If you don’t particularly want to do soldering and get into the design of the lamp, you can replace one LED lamp with a low-power incandescent lamp, the tungsten spiral of which will act as a resistor.
Sometimes, before these complex operations, it is enough to check the circuit breaker installation diagram. Incorrect installation, when the switch breaks the neutral wire, can also be the reason why the LED lamps in the chandelier blink.
In conclusion, we note that constant blinking of lamps in chandeliers or other lighting devices significantly reduces their service life. And if the reasons are not identified in a timely manner, the product will fail earlier than stated by the manufacturer.
Types of switches
When the switch crackles or sparks when turned on, it is necessary to install a new device or repair it. Flickering lights or switching on with a bang can lead to line shorts, fires, and breakdowns of household appliances. To properly repair the device, you need to understand its design.
Manufacturers produce the following product modifications:
- With one, two, three keys. Designed for installation in residential premises. To turn on the device, you need to press a key, closing the circuit.
- Push-button. Models that have an LED indicator. The design does not differ from standard ones.
- Dimmer. Allows you to adjust the lighting at the user’s discretion - adjustable brightness or intensity. The contacts are activated by rotating the wheel.
- Repeated. Devices that turn on the light by turning a button on the body.
Depending on the type of control, you can choose sensor devices, devices with a timer, acoustic or remote options.
Most houses and apartments have key switches that are easy to repair.
Why is the socket cracking?
Sockets crack for several reasons: Exceeding the power for which the electrical installation product is designed. Long service life and natural wear of connectors. Loosening of contact clamps.
Interesting materials:
How to find out the registration of a car in Ukraine? How to find out traffic police fines on a driver's license? How to find out how much bar the turbine blows? How do you know how much oil to put in the engine? How to find out how many layers there are in a tire? How to find out the condition of the suspension springs? How to find out the expiration date of a timing belt? How to find out the cost of insurance? How to find out the country of origin by wine? How to find out the country of manufacture of a car?
Required Tools
When a spark appears in the switch, it is not necessary to call professional electricians. You can remove simple damage yourself.
To work you will need:
- indicator screwdriver – a model with a light bulb or electronic display is suitable;
- a standard screwdriver, which is used to unscrew screws;
- insulating tape;
- fine-grained sandpaper;
- pliers;
- marker;
- stationery knife for removing the insulating coating from the cable.
Before starting repairs, you need to know the design of the device. The switches are produced in a plastic case and have internal operating units and a frame. It is attached to the device with screws or latches. The main mechanism is located in the socket box and is secured with spacers or screws.
To make the contacts easier to access, you will need to remove the outer part from the switch.
Design and principle of operation of a chandelier with remote control
You can remotely control any chandelier, even an exclusive antique one with incandescent lamps. You need to buy a remote control and a radio receiver (controller), which is built in instead of a switch, on the ceiling or lamp cover. The first option is rarely used, as it requires the installation of additional wiring for the zero connection.
Modern pendant lamps are manufactured with a radio receiver inside and a remote control that serves as a radio signal transmitter. The receiver and remote control are tuned to the same frequency and use a common signal encryption algorithm. This avoids interference from neighbors using similar equipment.
The remote control (the simplest one) has 4 buttons that allow you to work in 4 modes: turning on/off individual blocks (up to 3) and simultaneously turning off all of them at once. Complex models have more buttons (for color selection mode, brightness adjustment, timer settings). The order in which the modes are turned on does not matter.
When you press one of the buttons, the radio signal enters the receiver, is processed and transmitted to the control unit responsible for the specific function. The remote control can operate at different distances; for a standard city apartment, eight meters is enough (in a country cottage, the distance must be increased).
To operate the remote control, batteries are inserted into it, and the receiver is powered from a household electrical outlet. It is necessary to connect phase and zero to the terminals. For an old chandelier, you need to buy a kit adapted for pair work. It is configured by the manufacturer; if one of the elements is faulty, another set is purchased.
There is one peculiarity when combining a remote control with a switch. The radio receiver is not able to recognize the method by which voltage is supplied. When you turn off the lighting device using the remote control, it should light up from the switch. If there is a break in the power supply before turning on, the lamp lights up spontaneously if the switch keys are not moved to the off position.
The disadvantage of remote control is the possibility of overheating of the radio signal receiver. The maximum temperature level is indicated on the packaging; if it is exceeded, there is a risk of fire. The risk increases if the receiver is built into the lighting fixture structure. The problem is solved by a blower device or by placing the controller separately on a radiator that removes excess heat.
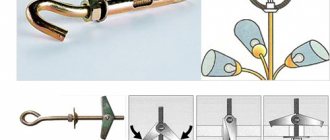
Regardless of the type of chandelier, it is mounted on a strip attached to the ceiling. At its base there are holes for the strip studs. The weight is held in place by nuts. The controller is placed in a hollow base along with other parts.
Lamps can be regular halogen or LED. When installing, it is necessary to take into account their features.
Important! For stretch ceilings, only LEDs can be used. The halogen lights are too hot and can damage the design.
Repair algorithm
If the switch shorts, you can repair it yourself, working in stages:
- Line loss. The machine in the input panel is turned off.
- Checking for voltage. This can be done by touching the indicator screwdriver to an outlet in another room.
- Dismantling the device. You will need to remove the switch from the groove and remove the decorative trim. After this, the voltage is checked again, the screws on the sides are unscrewed, and the housing is removed from the socket.
- Disconnecting cables. For two-key models, you will need to mark the input wire with a marker.
- Disassembling the case and searching for contacts. The contact group is located above a plastic button mounted on screws.
- Troubleshooting. The contacts are cleaned or the device is completely replaced.
- Reassemble the case in the reverse order, reconnect the wires. The finished mechanism in the housing is returned to the socket box.
- Turning on the machine in the panel and testing the switch for serviceability.
There is no need to repair the old switch - the light will flash again. Better change your device.
Welcome to vip-cxema.org
Dear day, my question is from the classic genre, but maybe someone had a similar situation. All of a sudden, the chandelier went out in the room, accompanied by a slight crack, which was usually a two-key switch. I’ll say right away that 1 the lamps are intact 2 I called it 3 The distribution box opened everything in order, no burnt wires, everything is connected securely. On the chandelier itself, V comes on one wire, measured relative to the other socket on the other 2 - weak voltage, it turns out that there is no zero. The wiring in the house is hidden, what could have happened, and most importantly, where I can’t imagine? There are no miracles in the world. Yes, everything is banally simple.
For several hours at night, and sometimes during the day, something crackles in the chandelier when it is turned off. Such a continuous crashing noise. it seems very quiet, but it gets on your nerves.
Features of disassembling the device and cleaning contacts
If the dimmer switch for the light line shorts when turned on, you need to disassemble and clean the contacts. The work is carried out as follows:
- Removing the adjustment knob. You will need to remove semicircular parts or slots. Hold the body with one hand, and gently pull the handle with the other.
- Removing the mounting locknut or screws. Use a screwdriver by turning it counterclockwise.
- Removing the plastic cover and frame.
- Loose internal fasteners of the dimmer mechanism.
- Removing the switch from the socket box.
What causes the socket to spark?
It is worth noting that a spark in an electrical appliance is the result of current passing from contact to contact through the air. Due to the appearance of such a mini-discharge, severe damage may occur in the wires. Their edges tend to heat up very quickly, burn and melt.
Fun fact: this phenomenon in the electrical network is akin to natural lightning, which we observe during a thunderstorm; similar to thunder is a dry crackling sound, which we will also mention.
The reasons why an outlet sparks are described in more detail below.
The plug and socket do not match the production standard. Although many use a combination of a couple of Soviet and modern parts. A striking example is the parallel use of modern Shuko plugs, which are equipped with electrodes with a diameter of 4.8 mm, with sockets that were produced back in the Soviet Union.
Well, modern devices include equipment with plugs whose electrode diameter is 0.8 mm smaller. As a result of such a discrepancy between the plug and the socket, a gap appears, which in the future can serve as a source of sparks.
Poor build quality of the device. The materials from which the product is made are of low quality.
The wires that supply voltage to the socket contacts are worn out. This phenomenon is explained by operation in conditions where the temperature regime and permissible current do not meet the required parameters.
Thus, the insulation resists less well, resulting in a violation of the integrity of the protective layer. Well, the appearance of sparks already indicates that a breakdown has occurred and this problem should be solved as soon as possible.
Loose contact of screw terminals. That is, if the connection between the wires of the electrical network and the parts of the socket is unreliable, then such a breakdown may occur while working with electrical equipment. Loosening also occurs if clamping elements are used in the structure of the device.
In this case, the pressure spring becomes weaker. Accordingly, the tightening of the screws in the screw mechanism is weakened. If you hear the socket rattling, it means the clamps are loose.
I would like to note that this phenomenon is typical for sockets in the manufacture of which aluminum wire was used. Some time after the start of operation, the so-called process of leakage of the metal itself (that is, aluminum) occurs. The result of this phenomenon is the need to periodically tighten such a connection.
Overloads in the electrical network. This can happen when a person connects an electrical appliance whose power does not correspond to the parameters allowed by a particular outlet.
A clear example of overloading is the use of extension cords and tees for single devices. And if the outlet sparks when you plug in, it's an obvious sign of overload.
Mechanical wear and loosening of contacts, which occurs when regularly changing plugs from different devices in the socket. So, what should you do if the socket sparks, but you don’t have the opportunity to replace it? Then just disassemble the device and tighten the contacts.
The appearance of soot. If you hear a crackling sound in the device, this indicates that carbon deposits have formed in it. Replace or clean the device.
How to repair touch switches
Touch modifications are equipped with a remote control and special boards with control chips. It is worth disassembling such a switch after reading the manufacturer's instructions.
- Removing the decorative trim.
- Visual search for the panel with sensors, which is located under the plate. Depending on the number of lines served, there are 1-3 elements.
- Search for a sensitive area on the pad - sensors are indicated by circles.
- Detection of LEDs indicating the position of the switch (red - on, blue - off). Under this panel there are nodes to which conductors are connected.
- Disconnecting inputs and outputs. You need to remove the clips that secure the touchpad.
- Removing the bolts from the housing mounted on the socket box and inspecting problem areas.
- Checking voltage on individual cables. The faulty wire is replaced.
- Reassembling the mechanism. The main unit is connected to the power supply, placed in the socket and secured with screws. After this, the touch panel and decorative overlay are attached.
A special feature of the touch switch is that it interrupts the power supply in the event of a breakdown. When the light bulb burns out, the device is switched off. It does not change even after installing a new lamp. To turn on the light you need to touch the plate.
If the LED lamp begins to shine dimly
The situation when an LED lamp shines dimly often comes as a surprise to consumers. They purchased a light source using advanced technology and expected it to produce a bright and powerful stream of light. We will look at the main reasons why an LED lamp shines less brightly than expected, and suggest ways to change this.
The LED lamp began to shine dimly due to low voltage
The first thing you should check when looking for an answer to why an LED lamp is dim is whether the voltage level in the network is sufficient. The lighting device is powered by an alternating current network, so when the voltage drops, even a high-quality lamp with good working light does not shine at full strength.
This is easy to check - just connect another device to the AC mains. If this LED lamp also begins to shine dimly, then the reason is low voltage. This problem is typical for suburban housing. This can be solved by installing a stabilizer on the light and socket.
Natural degradation process of LEDs
Any LED lamp or LED lamp with a built-in light module at a certain moment begins to shine less brightly.
This is due to the degradation of LEDs - a natural process when the elements technically cannot work at full capacity.
This is checked using the information on the product packaging, where the manufacturer indicates the probable degradation period of the LED components. If the period coincides with the period when the lamp began to shine dimly, it needs to be replaced.
LED light is dim due to incorrect wattage selection
This happens when replacing an old lamp in a lamp with an LED light source, but with the wrong power selection.
Like other light sources, an LED lamp is selected for the lighting fixture according to the manufacturer’s recommendations. If the LED light is dim and the lamp was installed recently, you need to check the information on the device.
This problem can be solved by replacing the LED lamp with a similar one, but with the correct characteristics.
A lamp with incorrect assembly or low-quality components
If the voltage in the network is correct, the lamp power is selected correctly, and it is too early to talk about the natural degradation of LEDs, most likely the problem is in the quality of lighting products.
Therefore, when purchasing an LED lamp or light source, it is important to pay attention to products from trusted manufacturers - for example, LED lamps from Arlight. They are manufactured in accordance with international standards, certified and have a warranty period
They are manufactured in accordance with international standards, certified and have a warranty period
They are manufactured in accordance with international standards, certified and have a warranty period.
How to prevent sparks
To prevent sparks from forming at the contacts, manufacturers install arc suppression chambers that cool the arc. Some brands may make solderings from materials that are not susceptible to oxidation. Current will pass through them. You can use several methods yourself.
Spark arresting circuits
Suitable for high-speed devices that generate sparks at the moment of closing. Most often there are two options:
- For relays and DC starters. You will need a diode with an anode on the negative pole and a cathode on the positive pole. Energy dissipation occurs on the active part (self-induction). The diode will close the circuit.
- Snubber. The shunt RC circuit is designed to dissipate the energy accumulated in the inductance at the moment of active resistance of the network.
The contacts are located close together, so the spark extinguishing circuit reduces the load.
Pressure plates
The method is suitable for sparking contacts of a starter or machine. A special spring mechanism ensures tight contact between the contact pads. To connect, you will need to install a spring mechanism in the closed contact position, retracting it and lowering it back. A click/thump should be heard.
The work is carried out in a network without voltage.
Removing carbon deposits
You can clean the surface of conductors not only with fine sandpaper. An eraser or a wooden match will ensure a smooth surface and eliminate the risk of increasing contact resistance.
How to carry out installation correctly
The illuminated switch mechanism involves a small lamp that glows when the switch is turned off. A small neon lamp or LED along with a resistance element can be used to illuminate the device. The backlight has wires that need to be connected to power during installation.
Preparing for installation and mandatory safety precautions
Without basic knowledge of safety precautions, it is better not to start working with electrical equipment at all. Illiterate electrical installation can lead to electric shock, failure of electrical appliances, and fire.
Basic rules of behavior when working with electricity:
- all work must be carried out in a de-energized network;
- it is unacceptable to overload the power grid;
- check the markings of the wires for compliance with the connected network;
- It is better to replace a damaged section of the network rather than repair it;
- Do not touch connected equipment with wet hands.
A regular indicator screwdriver or multimeter will help determine the nature of the conductors - where is the zero and where is the phase. The indicator is sufficient if the electrical network is single-phase. To analyze a three-phase network, use a multimeter.
Installation example of a 2-gang switch with backlight
The main design differences between LED switches are in the backlight mechanism. It can be ready to use and does not require any action to connect it. Another type of design requires connecting wires that power an LED or neon lamp.
Let's consider a more complex option - how to connect a backlit device, in which the conductors need to be connected independently.
First of all, pry up the keys with a screwdriver or other suitable tool and remove them. Separate the core (internal mechanism) from the body.
Next, determine the correct position of the switch using an indicator. To do this, by touching the contacts with a screwdriver on one side and an indicator on the other, check whether the device is on or off.
If the indicator lights up, it means it is turned on. In this state, turn it so that the keys with the pressed side are located on top.
One of the wires coming from the indicator is connected to the input terminal, and the second is connected to the key contact. If there are several keys, then the wire is connected to the first of them, starting from the left. Simultaneously with the wire going from the indicator to the input terminal, the phase conductor is also connected.
The two outlet phase wires that go to the chandelier are connected to the output terminals simultaneously with the second backlight wire, making sure that it does not fall out of contact.
With this connection method, the backlight will turn on after opening the contacts using the first key. The second will not have any effect on turning off the backlight, and the light will remain on even when the lighting is on.
In order for the indicator light to go out when you press any of the keys, you need to make a jumper yourself that will connect the indicator to both keys.
If you do not take into account the connection of the backlight, installation proceeds as in a conventional device. A phase conductor is led through the junction box to the switch and connected to the input terminal L, inserting it into the hole and screwing it in with a screw.
Next, two outlet phase wires are connected to the device contacts L1 and L2, which also lead to the chandelier through the junction box. One of them is connected to one lamp, the other to the other two. The zero passes through the junction box in the wiring box, then goes to all the chandelier lamps, closing the contact.
Video: Energy saving lamp flashes. Causes and how to eliminate
there could be many reasons for this. if the light bulb cracks and the cracking is accompanied by flickering of the light, then this means that the contact between the plate in the socket and the base of the light bulb is poor, and a spark is formed. This can be avoided by replacing the cartridge, or by cleaning the contacts and bending them so that they fit better into the base. if this is a light bulb in a chandelier, then for such work it is not enough to simply turn off the light switch, because any of the two wires may be out of phase, as a result of which you can get an electrical shock. electric shock When installed correctly, the switch is installed on the phase wire.
The type of light bulb is not specified in the question - a regular incandescent lamp or an “economy” lamp. After all, each of these light bulbs may crack during operation. It could be a bad contact in the socket itself, or maybe the special material that glues the bulb bulb and the base cracks due to the temperature, or the black dielectric at the bottom of the base cracks and bursts. Nothing is eternal. And in “housekeepers” inside the base the electrical board may crack (the contact of the spirals may move away from the terminals). So there are many options, but most likely the only solution is to replace the light bulb.
Eliminate the crackling of the chandelier when the light is on and replace the mechanism for turning on the lamp in the bathroom
Skip to content. You have JavaScript disabled. Some functions may not work. Please enable JavaScript to access all features. Posted on January 13 — I would like to immediately apologize for the noob question and if I suddenly came to the wrong address. In general, the situation is this: we almost always had incandescent lamps in our house. One day I decided to try the energy-saving one, but to my surprise I noticed a slight crackling sound when I turned it on and sometimes during operation.
Even then I realized that something was wrong, but I could not understand what it was. This lamp died within months, which is too fast. Subsequently, incandescent lamps were used, which, by the way, are constantly dying in my room. On average, one lamp lasts no more than a month.
There is no crackling sound when the incandescent lamp is operating, but occasionally there is a flickering for a second, I attributed this to a voltage drop, but later I discovered something interesting. Today I decided to try an LED lamp, but when I turned it on I heard the same crackling noise. I immediately turned it off and decided to put it in the kitchen for a test - everything was fine, nothing crackled. It’s a shame to kill the LED lamp, so I installed a regular incandescent lamp in my room for now. Actually, are there any guesses as to what this might be connected with?
There are 3 sockets in the chandelier, in all three the lamp behaves equally poorly, but in other rooms everything is fine. Switch without backlight.
In theory, it cannot short-circuit anything, everything in the cartridges is normal at first glance, it cannot short-circuit anything anywhere, the contacts are not burnt. What do you advise? Sent January 14 — Sent January 16 — There are 3 sockets in the chandelier which, to be honest, can hardly be called cartridges, in one of them we managed to get the lamp to work normally if we screwed it in not too tightly, but not too loosely, so in the process it’s all about them, although, perhaps, somewhere in the chandelier itself, i.e.
I'm thinking of replacing the chandelier altogether, it's already old. Posted 07 February - HTML mode enabled. The visual editor is not available while HTML is enabled.
You may lose some formatting when you turn off HTML mode and return to visual. Welcome to vip-cxema. Guest Message by DevFuse. Crackling noise when the lamp is turned on Posted by atlas28 , Jan 13 Number of users reading this topic: 0 0 users, 0 guests, 0 anonymous.
Login Need an account? Register now! I forgot my password. Remember me This is not recommended for public computers. Login anonymously Do not add me to the list of active users.
General progress of repair work
Checking for no voltage
Important! There is no need to make special efforts to disassemble the case, since usually the cover of a closed switch can be easily removed
Removing the switch housing
Removing the switch cover
If a switch with two buttons is closed, then mark with a felt-tip pen the wire that supplies electricity and is common to both switching modes.
Switch screw location
Removing the mounting screws
Almost every apartment owner is faced with such a problem as a faulty light switch. If such a situation arises, you do not need to immediately call a specialist to your home. Most often, you can fix this problem yourself. A light switch malfunction is most often caused by poor contact between the connecting plates of the electrical wires. To fix it, you just need to clean the contacts and check the tightness of the wires in the switch connectors.
The whole process consists of three stages: preparatory work; disassembling and cleaning contacts; assembling and installing the light switch in its original place.
Preparatory process
At the initial stage of repairing the switch, you need to completely de-energize this section of the electrical network and prepare the necessary devices and tools. To clean the disassembly and strip the contacts, you will need a screwdriver, an electricity indicator and regular sandpaper or a file.
It is important that there is no electricity in the network. This is why you need an indicator. A file is useful for removing plaque from the contacts, and a screwdriver for unscrewing and assembling the entire installation
A file is useful for removing plaque from the contacts, and a screwdriver for unscrewing and assembling the entire installation.
Disassembling the switch and cleaning the contacts
First you need to make sure that there is actually no electricity going to the light switch. Then, prying the device button with a screwdriver, remove it from the device. The plastic shell can also be removed with a little force.
The next step is to remove the switch from its mounting location. To remove it from the plastic shell in the wall, you need to loosen two screws. After unscrewing them a little, we pull the device out of the wall. To disconnect the light switch from the wires, loosen the fasteners and pull them out of the clamps.
Having seen blackened and coated contacts, we clean them with a file or special sandpaper. The cleaning process must be continued until plaque and fumes are completely removed.
Assembly and installation of the switch
After completing all the steps to clean the contacts from plaque, you can begin assembling the device. To do this, you need to connect all the wires to their original place and tighten the clamps
It is important to create excellent communication to prevent bad interactions. Having assembled the entire structure, we insert the switch into the plastic case. After making it level and even, tighten both fastening screws
If the plastic frame is not put in its original place, you will have to loosen the screws and put it on until the switch is completely installed in the network. Although, if the switch is properly mounted in the wall, this should not be a problem.
After making it level and even, tighten both fastening screws. If the plastic frame is not put in its original place, you will have to loosen the screws and put it on until the switch is completely installed in the network. Although, if the switch is properly mounted in the wall, this should not be a problem.
At the final stage, insert the power button and start the central electricity monitoring device. Now we check the functionality of the switch. To do this, turn on the light in the room several times. If everything works stably, then calling an electrician will not be necessary.
If the switch has stopped working, then you should look into the root cause of its failure. Today there can be many reasons. You don't necessarily need to call a professional. You can repair the light switch yourself. The causes of failure are usually minor and therefore almost anyone can cope with them.
Sometimes, in order to restore the device's operation, you will need to clean the switch contacts. In this article we have provided detailed information on how to fix a light switch. The reasons for breakage of the switch can be varied, and in this article we will look at them.