The best manufacturers
The market now offers a huge number of connecting busbars produced by various manufacturers, from global corporations to local companies. However, there are manufacturers who have proven themselves to be the best, whose products can be purchased without fear for their quality, performance and reliability.
At the moment, one of the leaders and the most famous manufacturer of power equipment, including connecting busbars, on the world market is the Swiss company ABB. The company's products are reliable, safe and wear-resistant.
The products of the French brand Legrand, specializing in the production of electrical products, are also popular. The products produced by the company comply with the latest European quality standards and can be used with equal success both in simple residential panels and in large production facilities.
In the domestic market, one of the leading manufacturers and suppliers of electrical equipment at the moment is the IEK company, which achieved its success thanks to the extreme availability of products for consumers and twice became the winner of the “Brand No. 1 in Russia” award.
The Kursk Electrical Apparatus Plant (KEAZ), which existed back in the USSR, successfully competes with the IEK brand. The products manufactured by the plant are distinguished by their reliability, durability and relatively affordable price, and the selection line is currently one of the largest in the domestic market.
I would also like to mention the Chinese company EKF electrotechnica, which is quite well known in Russia. The price and quality of the products it produces are comparable to the parameters of IEK brand products, however, the five-year warranty period forces many to choose this company.
Electrical panel for the meter and machines - choosing an installation location
Let's start with the simplest part - where to place the switchboard in the apartment? It is most convenient to place it near the front door in the hallway. In this case, you will not have to pull the power cable far from the site. The best height option is at the eye level of an adult. And it’s convenient to take meter readings and turn off the machines if necessary.
For those who support pushing everything under the ceiling, “for greater security, like they used to hang meters,” let’s say the following. Old electric meters with fuse plugs were simply mounted on the wall without boxes, and therefore were hung from the ceiling.
A modern electrical panel has a durable casing and is locked, so children will not get in unless you leave the key in a visible place.
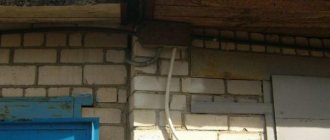
When choosing a location for installing a panel in a private house or cottage, you need to consider where and how the cable from the overhead line or underground supply line is or will be installed. Data on external networks can be obtained from local energy sales.
Buy a ready-made one or assemble an electrical panel yourself
As they say in the old song “what progress has come”, you can buy a ready-made shield with a full filling or assemble a ready-made one. If your electrician suggests such a “proprietary” assembly design, then do not be alarmed. The panels are assembled by enterprises and electrical installation companies, including on order or for standard residential wiring projects.
The main point that needs to be clarified is whether your master has worked with ready-made shields before or this is his first experience. If he has installed a dozen or two such assemblies and knows their features, then feel free to agree. But if you are a “guinea pig” for the first experiment, refuse. It’s better to let him assemble it himself, with his own hands, the old fashioned way.
Which is better: rigid or flexible wire when installing a distribution panel?
The main difference between a rigid wire used for an electrical panel and a flexible one is the ability of a flexible wire to bend in the desired direction up to 12 times (decreases over time), as well as the ease with which it bends.
As a rule, to connect automation in the distribution board, professional electricians use flexible wire PuGV. Because it is more convenient to work with it. For work carried out independently by residents or unskilled workers, rigid wire is often used.
In both the first and second cases, the required build quality can be achieved. However, a wiring diagram assembled using a flexible wire looks more aesthetically pleasing.
Using busbars
The industry offers two types of combs for connecting modular switching devices. In one type of comb bus, the contacts are made in the form of pins. Another type has fork-shaped contacts.
The combs consist of conductive bars (usually copper) with contacts and a plastic insulating body. The distance between the contacts is equal to the width of one module and is 18 mm. Connecting busbars can have from 1 to 4 poles.
Each pole fits into a separate groove in the housing and is reliably isolated from other conductive busbars. Using a comb bus, you can connect both single-pole circuit breakers and three-phase RCDs.
Connection busbars are available with 12, 24, 36 or 48 modules. The tires can be cut to obtain the required number of modules. For cutting, you can use any suitable tool, such as a hacksaw.
The following technical characteristics are marked on the tire casings:
operating voltage;
rated current;
cross-section of conductive busbars.
The pin connection bars are suitable for all types of modular switching devices. To use buses with fork contacts, machines must have special terminals.
The use of combs requires greater material costs than the use of wire jumpers. However, the use of connecting busbars significantly reduces the installation time.
In addition, installation performed using combs looks more aesthetically pleasing. There is more space in cabinets and panels.
The disadvantages of using connecting buses include the impossibility of replacing faulty circuit breakers or RCDs without disconnecting adjacent switching devices.
To summarize, we can say that it is better to use jumpers when there is a small number of modular devices on the rail. In the case of a large installation volume, it is advisable to use connecting bars.
Advantages and disadvantages
The advantages of using copper-based connecting combs include:
- Simplicity and high speed of assembly.
- Obtaining a high-quality and reliable electrical connection.
- Reducing the total number of contacts by half, which increases the reliability of the connections formed.
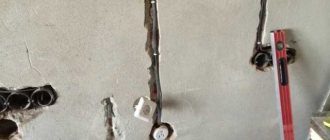
When installing standard jumpers made from electrical wires, there are two exposed contact ends per clamp. When using a single-phase comb, for example, only one tooth (bend) is used.
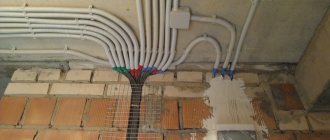
Installation specialists solve the problem of saving contacts in their own way - they connect the machines not with separate jumpers, but with a continuous wire. To do this, loops with the required bending radius are made in the electrical connection areas.
The disadvantages of the connection method, which uses electrical connecting buses, include:
- It is inconvenient to replace the automatic protection device, since in this case you have to remove the entire comb.
- Impossibility of adding another machine (this will require a new dimension).
One of the possible solutions to the problem of the second case is to install backup devices with frequently used ratings of 10 and 16 Amps in the panel in advance. Their output contacts are left unused until a certain point in time, and they themselves constantly remain in the off state.
Taking into account the special techniques for installing machines and their redundancy, the use of connecting combs is advisable in any situation, despite the existing disadvantages.
Installation features
The cross-section of jumpers or busbars between circuit breakers connected to the same phase is made based on calculations relative to the switch through which the largest load current passes. This mistake is often made by inexperienced installers; if you put jumpers in the circuit based on the currents of a machine designed for 10A, and there is a load of 25A in the circuit, then the contacts on this machine will definitely burn out. Factory busbars are made of one section along the entire length, observing the installation rule based on the maximum load current; in the circuit of automatic machines the assembly will function for a long time.
Distance between pin taps on busbars
In some cases, when circuit breakers on the same rail need to be connected to the same phase, but their shapes and dimensions are different. Problems arise: the bus contacts may not coincide with the terminals of the machines; in this case, connections are made with stranded or single wires. In this situation, it is allowed to use jumpers of different cross-sections, taking into account the sequence of connecting the circuit breakers. First of all, the circuit breaker with the highest power is connected, then the smaller one, and the last in the circuit is the circuit breaker with the minimum current load. As the rating of the machines decreases, the permissible cross-section of the wires on the jumpers decreases.
| current (A) | Power in 1 phase (kW) | Power of 3-phase network (kW) | Required wire cross-section (mm2) |
| — | — | — | copper |
| 1 | 0,21 | 0,51 | 1.1 |
| 2 | 0,41 | 1,1 | 1,1 |
| 3 | 0,71 | 1,6 | 1,1 |
| 4 | 0,91 | 2,1 | 1,1 |
| 5 | 1,1 | 2,5 | 1,1 |
| 6 | 1,4 | 3,3 | 1 |
| 8 | 1,6 | 5,2 | 1,5 |
| 10 | 2,3 | 5,4 | 1,5 |
| 16 | 3,4 | 8,5 | 1,5 |
| 20 | 4,5 | 10,4 | 2,5 |
| 25 | 5,4 | 13,2 | 4.1 |
| 32 | 7,1 | 16,7 | 6,1 |
| 40 | 8,7 | 21,2 | 10 |
| 50 | 11,1 | 26,4 | 10 |
| 63 | 14 | 33,3 | 16 |
| 80 | 17,5 | 52,6 | 25 |
| 100 | 22,1 | 65, | 35 |
The installation of jumpers in single-phase networks does not differ significantly from the installation of jumpers in three-phase circuits. Single-phase lines are divided into groups by connecting single circuit breakers to one phase. In the case of three-phase circuits, triple and combined circuit breakers are connected, while at the same time it is possible to connect single circuit breakers for each phase separately.
Typical installation mistakes
Connecting a comb bus is not a complicated operation. A basic understanding of how and where electrical current should flow is sufficient. However, even experienced electricians periodically make mistakes in connecting the comb:
- During installation, the maximum current of the product must be taken into account. It is even better to use a comb bus with a current reserve.
- In some cases, it is advisable to take tension into account. The insulation of a typical comb is rated at 500 V. Sometimes higher voltages are used in production.
- Don't forget about fork-shaped tires. Their maximum current is 63 A.
- Mistakes when choosing a comb. This type of connector is purchased after purchasing circuit breakers, when their exact number and location are known.
Alignment methods
Comb
To correctly connect the machines, it is good to use a bus or comb, which is selected depending on the number of phases:
- for a single-phase circuit, a two-pole as well as a single-pole model is suitable;
- three-phase - four and three-pole.
Installation is easy. For the required number of machines, a specific comb model with the required number of poles is selected.
When choosing a comb with the maximum number of contacts, you should remove the excess using a hacksaw. To complete the installation, the tire is inserted into each clamp at the same time, and then the screws are tightened. The outputs are installed according to the diagrams.
Jumpers
Connecting machines using jumpers is used when there are a small number of switches and there is enough space in the panel for unhindered access to all contacts. This method can be used not only for a single-phase type of circuit, but also for a three-phase version.
For work carried out in the panel, it is worth preparing all jumpers of the required length, as well as the appropriate cross-section. For the so-called single-core conductors used, a cross-section is selected to combine the wires of the machines with a pre-calculated power. One of the suitable methods for creating jumpers is the continuous method.
At the end of such preparation, it is preferable to remove the existing insulation from the ends by about a centimeter, then expose the wire by removing the film with a knife.
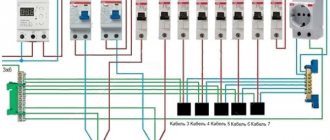
Then you should install the ends into the entrance holes, while tightening the screws. Then the load sources are connected to the output, as in the photo, which clearly shows the connection of automatic switches.
Do not forget that it is important to not press the neutral and phase wires tightly because of their possibility of heating during operation of the electrical network, as well as the likelihood of unwanted alignment of the zero with the phase due to softening of the insulation under the influence of heating.
To combine switches with a cable, you can use a stranded wire with the required cross-section
However, in this case it is important to clean it a few centimeters.
A special tip corresponding in size to the cross-section of the wire used should be put on the end, crimped using pliers. You can combine switches in sequential order.
Following the instructions for combining switches located in the panel, but in the absence of the required tools, as well as tips, you can tin the uninsulated wire using a soldering iron.
In the absence of a special soldering iron, installation can be carried out using conductors without insulation. Such an installation is not practical and, under excessive loads, can cause overheating of the conductors in the overlap area and, naturally, a high degree of danger of unwanted fire. This type of association does not have an attractive appearance.
Remember that the correct connection of machines with each other using a stranded conductor should be carried out by adhering to a previously developed diagram. In this case, you can use machines from different manufacturers. Their diameters can be completely different, since installation with a flexible type wire makes it possible to do this.
When deciding which wire is preferable to connect the machines, check the correctness of this connection. As a rule, this is common for a three-phase circuit. Even a tiny mistake can cause a short circuit and, consequently, damage to the electrical device you are using.
Design
The combs have a prefabricated design. The structure is based on a flat copper busbar. It has bends for installation on machines. Depending on the number of connected phases, there are 1 or 4 buses in one comb. They are insulated with non-flammable plastic. Usually white or gray.
The design is made in such a way that when assembled there are practically no exposed conductive parts. This increases the safety of operating personnel. And the junction box becomes less susceptible to dust.
Installing a circuit breaker is easy
Circuit breaker installation can be divided into three parts:
- DIN rail fastening;
- Installation of a circuit breaker;
- Connecting the circuit breaker.
DIN rail mounting
In a new electrical panel or electrical box, the DIN rail is attached to ready-made places using self-tapping screws or bolts.
To install a DIN rail in an old floor panel, you need:
- Drill two holes in the metal platform of the shield;
- Cut threads into them;
- Secure the DIN rail with two bolts.
In the new floor panels, special perforated racks are already installed for fastening DIN rails, and fastening the DIN rails is not difficult.
Circuit breaker installation
After installing the DIN rail, we proceed to installing the circuit breaker.
- Prepare the circuit breaker and a long screwdriver;
- Pull the latches down and slide the circuit breaker onto the DIN rail;
- Release the latch. It should catch on the DIN rail.
A three-phase circuit breaker is installed in a similar way.
Circuit breaker connection
- To connect the circuit breaker, unscrew the screws of the upper and lower terminals;
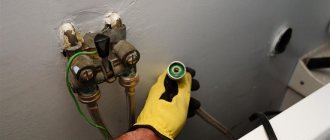
- Insert pre-protected wires into the clamps;
- Tighten the clamps firmly, but not too enthusiastically.
The household series of switching equipment has another name - modular. The reason for this is that all circuit breakers, switches, and RCDs are assembled from modules of the same width. Their overall dimensions are approximately the same.
An important property of the modular series equipment is that its mounting is unified. Let's remember how old circuit breakers were attached to the surface. To do this, it was necessary to drill holes, sometimes even cut threads into them. And also use fasteners: screws, nuts, washers. Not only is this inconvenient, but it is also unsafe. In an electrical panel, part of which is energized, replacing the circuit breaker is carried out with a certain degree of risk. A dropped screw can short-circuit a phase to the housing and cause a short circuit. And both an amateur and a professional electrician can drop it.
No screws are required to fasten electrical equipment of the modular series. All of them are installed on a standard metal strip. It's called a din rail, let's figure out what it is.
The abbreviation DIN comes from the abbreviation of the name of the German Institute for Standardization, Deutsches Institut fur Normund. Strictly speaking, this abbreviation is used not only to designate rails, it is used in other areas to mark standard connectors, fastener parameters, and so on.
Connecting the connecting comb for machines in the electrical panel to the RCD
According to safety standards, all modern apartment buildings must be equipped with outlet lines that are protected by automatic circuit breakers or RCDs. In accordance with regulations and common sense, each line in a distribution board must be equipped with reliable protection to prevent current leakage. Such fuses are easy to connect using combs. However, the connection process itself is slightly different from installing circuit breakers.
When installing RCDs with automatic circuit breakers (single-phase), the connecting bus for them must have at least two poles. This requirement is due to the need to supply zero and phase to power the difavtomat. The use of a single-phase comb in this case is unacceptable, since there is no possibility of synchronous closure for all protection consumers located in the same row. In this case, the outgoing teeth of the tire should be placed one at a time (the pitch between the parts should correspond to the width of one module).
Tire for automatic machines (combs). Types and application. Peculiarities
During the assembly and installation of distribution boards, many difficult moments arise, especially when connecting groups of circuit breakers and protective devices. There are various devices that greatly simplify this work, for example a tire for automatic machines (comb). Until recently, to connect several electrical circuit breakers in a panel from one power line, the electrician had to make several jumpers from insulated wire of a given cross-section.
This method of connecting machines to each other has a serious drawback in that if one jumper fails, the circuit breakers following it will not receive electricity. This situation can occur as a result of poor-quality contact of the jumper and its burnout.
Also, the disadvantages of connecting with homemade jumpers include:
- A significant increase in installation time, since it is necessary to measure pieces of wires along the length, bend them, remove insulation, and crimp the ends.
- Violation of the aesthetics of appearance in the distribution board due to the large number of wires.
- Wire jumpers often interfere with the installation of devices that should be located above the machines on the DIN rail.
This situation can be eliminated by a circuit breaker bus, which is specially designed to connect a group of parallel devices in the form of residual current devices or circuit breakers. It is often called a comb or comb busbar because of its appearance.
Design features and types
A single-pole bus for automatic machines has a simple device consisting of a copper bus (a) and an insulator (b).
Depending on the type of connected devices, combs are divided into the following types:
The number of plates in the comb bus corresponds to the number of poles. Each type of connecting busbar is used for its own purposes. For example, single-pole connectors are used to connect 1-phase machines, and 4-pole connectors are used for 3-phase devices with four poles (3 phases + zero).
There are combs with different pitches: 18 mm and 27 mm. With smaller pitches they are used to connect single-module machines. The width of one module is 18 mm. Combs with a pitch of 27 mm are designed for connecting circuit breakers of 1.5 modules (18 x 1.5 = 27 mm).
Switchboard diagram
If you decide to assemble the switchboard yourself, you should start by developing a diagram. Everything should be spelled out in it, from the input machine to the switches. The circuit in the old housing stock will be two-wire (without grounding). In this case, a PE bus is not required.
For a small one-room apartment, a simple panel layout will include:
- Input two-pole circuit breaker (32 A);
- Electricity meter;
- RCD for two poles 40 A with leakage current 30 mA;
- 3 automatic machines for 16 A each (separately for lighting, sockets and a washing machine);
- Shield body;
- DIN rails for mounting;
- N-bus designed to connect the neutral conductor.
Additionally, a voltage control relay can be installed. It will protect against voltage surges in the event of a zero burnout. This device is triggered by contact between zero and phase. The relay breaks the circuit, protecting the connected household appliances from damage.
In case of frequent business trips, experts advise connecting the refrigerator to a separate device. As a result, all equipment except it can be de-energized.
For apartments with a larger area and correspondingly higher electricity consumption, it is necessary to increase the number of machines. They are installed on circuits with large household appliances (for example, on a dishwasher or air conditioner), as well as on each individual room. Additionally, RCDs of a lower rating can be installed to provide protection against electric shock.
In new houses, an additional ground loop (PE conductor) can be installed. In this case, the switchboard circuit will be different. For a small one-room apartment, the shield will include the following elements:
- Boxing with Din-rails;
- 40 A input circuit breaker;
- Counter;
- RCD two-pole 50 A with leakage current 30 mA;
- 4 automatic machines (three of them for 16 A and an additional one for 25 A for connecting an electric stove);
- Zero (N) and ground (PE) buses;
- Connecting bus for automatic machines.
In a multi-room apartment with a large number of circuits, the installation of additional RCDs with a value of 16-25 A at 10 mA is required. These devices will react faster to a leak, thereby ensuring selectivity when shutting down. Due to problems with internal wiring, washing machines often give an electric shock if touched with wet hands. This can be fatal for children or people with heart problems. The RCD will “notice” a small current leak in the circuit and will turn off the power supply when the housing and the bare wire come into contact.
The three-phase circuit is found in new houses or townhouses. The voltage in this case is not 220, but 380 V. The distribution panel circuit in this case is more complicated, it includes three- and single-phase components. The shield will include the following components:
- Input machine with four poles and 63 A;
- Counter;
- RCD four-pole 40 A at 30 mA;
- Linear single-pole circuit breakers (16.25 and 40 A);
- Two-pole automatic circuit breakers for protecting kitchen appliances or for installing hydromassage equipment in the bathroom; they can be replaced by a pair of RCDs and an automatic circuit breaker;
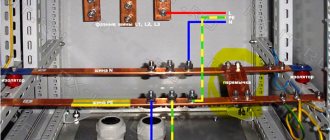
- Zero and protective tires;
- Combs for distributing the load in phases.
For a private house, this scheme can be supplemented by installing a general RCD for fire protection.
Some houses have a three-phase network, but the voltage of 380 V is provided only to power the electric stove. All other equipment is powered from 220 V. In this case, the panel circuit is combined. A three-pole 63 A machine is installed at the entrance, after which a meter is installed. Next, the cable is run in two directions. In the first, the excess phase is removed and single-phase equipment is installed. The second direction remains unchanged; the stove is connected through a three-pole circuit breaker and an RCD.
Calculations and organizational issues
It was planned to replace the old Soviet meter with a new one that meets modern requirements. Replacing the main aluminum wire going to the apartment from the distribution panel with a good solid copper wire with a cross-section of 4 mm. And the actual installation and assembly of the electrical panel in the apartment. It was decided to entrust the first two points to an electrician from the power company. He promised to help with the re-issuance of the necessary documents, for a fee.
With my own hands, I decided to install the electrical panel in place and connect the circuit breakers, RCDs and wiring inside the panel. This is what I will write about in more detail below.
I divided the electrical wiring in the apartment into the following groups and, as described in the article “Designing electrical wiring in the apartment,” I calculated the approximate load on each group and the required type of machines:
- garage (25 A, circuit breaker)
— electric oven (16 A, automatic switch)
— washing machine (16 A, differential automatic)
— dishwasher (16 A, differential automatic)
— split air conditioner for the hall (10 A, automatic switch)
— split air conditioner for the bedroom (6 A, automatic switch)
— lighting and sockets in the bathroom (6 A, differential circuit breaker)
— lighting and sockets in the kitchen (16 A, differential circuit breaker)
— lighting and sockets in hallways (6 A, differential circuit breaker)
— hall lighting (6 A, automatic switch)
- bedroom lighting (6 A, automatic switch)
— hall sockets (16 A, differential circuit breaker)
— bedroom sockets (16 A, differential circuit breaker)
— a group of sockets for a video surveillance system, home router and doorbell (6 A, circuit breaker, this group was planned to be powered from an uninterruptible power supply)
I had one phase coming into my apartment, it was decided to install a 32 A circuit breaker at the entrance, which would be enough to simultaneously connect 7 kW consumers.
When laying and installing wires, it is important not to confuse wire colors and designations:
L – phase, usually white, brown or red wires are used for it;
N – neutral wire, there is a blue wire for it;
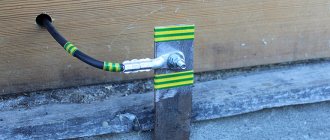
PE – protective wire, grounding, usually a yellow-green wire is used for it;
Of all the types of panels, I chose a metal panel for internal installation with 24 places for machines and space for a meter.
Connection diagram
There are two ways to connect sockets: from the electrical distribution box in a house or apartment, or using a cable (in this case, the subsequent device is connected from the previous one). Direct connection from the junction box is considered the main and most reliable method.
When connecting with a cable, cable consumption and the number of cables in the distribution box are reduced. However, there is a ban on connecting more than four sockets in this way. In addition, if the contact in one of them is lost, all those following it will not work. When connected in series (loop), the voltage in the assembled network will increase from the first electrical installation device to subsequent ones, which can lead to excessive heating. For this reason, it is advisable to connect with a cable when you plan to connect low-power electrical appliances to the sockets: bedside lamps, lamps, chargers for laptops or phones. Connecting three-phase power outlets with a cable is prohibited.
When drawing up an installation plan for the electrical wiring of a room (apartment, cottage), it is advisable to connect all single devices and their units to the junction box directly. This is especially true for blocks. An exception can be made for nearby single sockets with a distant distribution box.
Attention! Common colors of wires in household electrical wiring: blue - zero (zero working), white, black, brown, gray or red - phase, yellow-green - neutral protective (grounding conductor)
Photo of using zero buses
- Retro wiring in a wooden house: calculation of parameters, design, installation and selection of vintage elements. 165 photos of stylish ideas
- Heating cable for gutters and roofs: choosing and installing a self-regulating anti-icing heater with your own hands (135 photos + video instructions)
- Types of electrical cables and wires: device, purpose, marking and characteristics of the main types of cables used in houses and apartments (150 photos)
- Methods for laying cables in trenches: step-by-step instructions for laying and installing power cables in earthen trenches (140 photos)
- Types of cable channels and cable boxes: types, sizes and materials of manufacture. 120 photos and videos of cable channel installation
- How to twist wires correctly? How to make a reliable and secure connection with your own hands (155 photos)
Installation and connection rules
As mentioned above, combs replaced the jumpers of automatic switches, proving to be more reliable, more durable and easier to use. They are used to connect circuit breakers and other protective devices after the switch.
As with any devices, the connecting bus of the comb for machines has installation and connection rules. They are quite simple and do not require the use of additional equipment.
To connect the bus to the machine, you will need:
- Make sure that the bus is suitable for the number of poles, the size of the machine on the DIN rail and the mounting. To avoid discrepancies, it is better to immediately purchase a comb and a machine from the same manufacturer.
- Using a hacksaw, you need to cut the tire to the required length.
- Cut off the dielectric housing with a margin of 1-2 centimeters to avoid a short circuit.
- Place a special casing on the tire.
- Proceed with the installation and installation of strips for fastening electrical machines, taking into account the markings, the protective device has 2 or more poles. To do this, you will need to insert each tap into a special hole in the machine, each of which has a regular clamp, tightened with standard bolts.
- When using a tire with forks, the bends are mounted in specially designed sockets.
- You need to connect the input power wire to one of the outer terminals.
Types of bends
There are two types of outlet contacts included in the connecting combs.
- Bends made in the form of pins and designated as “Pin”. They are used very often because they fit most automatic devices.
- Fork branches marked with the “Fork” icon.
The second type of contact is used much less frequently, since its installation requires a special clamp, which is not available for all connected AVs. The cross-section of the outlet pins is selected in such a way that it is sufficient to work with load currents up to 63 Amps inclusive.
When choosing single-phase busbars, as well as any other dimensions that differ in the type of taps, you will need to take into account a number of design features. For each class of connected devices, only a certain bus sample is suitable. When they try to install a connecting comb whose taps do not correspond to a given device, they may simply not fit completely into the sockets. In this case, some part of the bus plane remains open, which poses a threat to users and installers.
As an example, ABB brand machines are given, the body of which is available in two versions: S200 and a simpler model – S200L. For the first of these samples, a tire designated PSH is suitable, and for the S200L a different type of tire, PS, will be required.
Chinese combs with standard bends may not fit the step size at all, which makes them impossible to use. Experts advise not to skimp on the quality of these products and to purchase only after consultation with sales managers.