Electrician in the house
Encyclopedia about electricity from A to Z
Masters catalog
Find the best master or company in your city
We mount the junction box with our own hands
Distribution boxes for hidden wiring are an important element of one of the most common electrical wiring installation schemes in apartments and houses.
It is the correct installation of this element in combination with the correct choice of electrical circuit and wire cross-section that is one of the most important elements in the overall security system of your electrical network. Therefore, close attention should be paid to its correct installation.
- Types of junction boxes
- Installation of junction boxes Selecting the installation location of the junction box
- Installation of distribution box
Design Features
Types of socket boxes
Electricians call a box for sockets a “glass” because of its characteristic shape. Products are made for different purposes, devices and walls, therefore they have several design options. For example, if you need to install a power point or switch in a plaster wall, use a glass with “legs” that are pressed to the surface.
The materials used are plastic and metal; they do not differ in shape and appearance, but the latter are stronger and more durable. Installation in aerated concrete, brick, foam blocks and concrete is allowed. Simple items are secured inside the pocket using loose alabaster.
Socket boxes are distinguished by installation method:
- overhead – suitable for sockets near baseboards or other protruding elements;
- hidden – classic baud socket boxes (with and without “ears”).
The external shape can be round, square, oval, rectangular. The former are used more often. If you need to accommodate a large mechanism or a lot of wires, a square product will do. Oval ones are used if it is necessary to place two devices nearby, for example, a socket and a switch.
Based on the depth of the products, depending on the type of mechanism, choose the classic version, deep or narrow. In some cases, non-standard socket boxes are used as a frame for a distribution box.
Types of distribution boxes
Above we indicated the first criterion for classifying boxes - the method of fastening (built-in and external). Regardless of this, the boxes are closed with a tight lid, providing quick access to the contents and integrity of the wiring. If necessary, an electrician can examine the contents of the housing by removing the cover.
The main materials for making distribution boxes are plastic and metal. In the second case, tinned steel sheets and alloys containing aluminum are used. Important condition: the metal box must be reliably protected from corrosion.
If the products are placed at a strategically important site where any damage is unacceptable, then it is recommended to buy a box with a lid with screws and waterproofing gaskets. Metal is more reliable in terms of fire protection, since it is able to maintain the integrity of the contents for several minutes. This time is usually enough to promptly de-energize the network.
Plastic elements are also characterized by certain positive qualities. They are resistant to any oxidation processes and are excellent dielectrics. In both cases, the degree of protection against dust and moisture is at least IP65.
The geometric shapes of the boxes are round, square and rectangular. The former are used in situations where a small number of cables are switched, the latter - a large number. The specific dimensions of the device depend on the cross-section and number of wires.
Advice! If you need to install a distribution box in a concrete wall, then it is much easier to use round-shaped products.
Product sizes
Standard sizes of socket boxes
The dimensions of the boxes vary and depend on the manufacturers and purpose. Glasses with a diameter of 4.5 cm and a depth of 6.8 cm are common, taking into account the walls of the product inside it turns out to be 6.5 cm by 4 cm. Narrow models have a depth of 2.5 cm, and deep ones - 6.5 or more. Such standards are used by the IEK company - high-quality and widespread electrical goods.
There are no standards for square and oval socket boxes. The most common sizes are 7.0x7.0 cm, 6.0x6.0 cm. Therefore, when purchasing, it is recommended to take spare ones. If one type of equipment is used during repairs, the result is safer and more thoughtful.
Choosing a box for sockets and switches
Before purchasing glasses, it is necessary to determine the characteristics of the walls into which installation will be carried out and the size of the outlet. For example, for drywall, the socket boxes must have fixing “ears” or clamps. There are no such requirements for other materials - any options will do.
Electricians advise purchasing sockets and boxes at the same time so that they can immediately compare the dimensions and technical compatibility of the products.
Installation in drywall
Installation of a socket box in plasterboard
Walls and partitions made of plasterboard are increasingly used in repairs. Lightweight, comfortable material has its own characteristics. Therefore, to install access points to the electrical network, it is necessary to take special boxes for installation under sockets in drywall. To select a location, standard rules and requirements (GOSTs) are used - absence of heat sources, humidity in the immediate vicinity, height suitable for users.
Before actual installation, markings are carried out in accordance with a pre-prepared plan. The hole for the box for sockets and switches can be cut with a hacksaw or a strong knife. Difficulties arise with cutting round recesses - to make fairly even edges, use an electric saw with a round attachment (cutter).
The socket box is installed inside the slot and secured with screws. The optimal distance between the centers of adjacent socket boxes is considered to be 7.1 cm for classic glasses.
A feature of the installation is the need to additionally thicken the piece of wall where the device will be located. Usually they use a small layer of the material from which the walls are made.
Drywall is fragile and quite thin; if the outlet area is not reinforced, there is a high probability of breakdowns. For example, a tightly fitting fork will pull the entire mechanism along with it.
Installation of junction boxes
Choosing a location for installing a junction box
The junction box for hidden wiring is designed for compact placement of wire connection points. She must ensure compliance with clause 2.1.23 of the PUE, which requires the possibility of inspecting the place of contact connections.
Therefore, plastering the lids of boxes or otherwise obstructing access to them is a violation of the rules.
Where are junction boxes installed?
So:
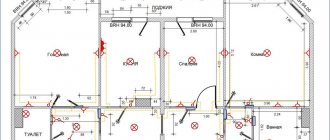
- Our instructions advise placing junction boxes in places where branch wires are most concentrated. It all depends on your electrical wiring diagram for your apartment or house.
- If the lighting network and socket group are powered from two different circuit breakers, it may be necessary to install two distribution boxes. At the same time, if there is a small accumulation of wires, the entire installation can be done in one box. The main thing here is not to confuse the wires of different groups.
- Since Soviet times, installation boxes for hidden wiring have been usually placed above the entrance to the room. This is because the room light switch is located here, which requires connecting three wires. Socket connections are simpler and the likelihood of getting confused is much lower. Therefore, a distribution box was usually installed above the switch. Many people still use this place today. But this is not mandatory.
Installation of distribution box
Although the junction box for hidden wiring is quite simple to install, the process is quite labor-intensive and dusty. Therefore, the installation of new boxes is usually done when renovating a room.
- First of all, you should create a recess in the wall slightly larger than the dimensions of the box. In this case, the depth of the recess should be such that when closed the lid of the product is flush with the wall.
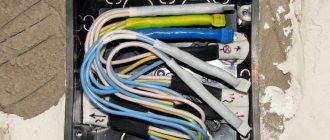
- After this you can install the box. You can do this with your own hands, securing it using special devices. If there is none, then you can use dowel nails, alabaster or cement mortar. After this, you can run the wires into the box.
Note! Wires should be installed in such a way as to ensure a supply of wires. This is required by clause 2.1.22 of the PUE. Necessary for reconnecting wires.
There should be a supply of wire in the junction box
- The next step is connecting the wires. This should be done so that, according to clause 2.1.24 of the PUE, the wires do not experience mechanical tensile forces. To do this, it is better to roll the wire stock into a ring. You will find numerous videos of the correct connection of wires both on our resource and on the Internet.
Note! Wires should be connected by screw connection, crimping, welding or soldering. The twisting method is not acceptable. And no matter how much the “old” electricians speak, the reliability of this connection method is inconsistent and over time can lead to a fire.
- Now our junction box for hidden wiring can be closed and put into operation. At the same time, thanks to the cover, it will provide free access to contact connections and the ability to disconnect the damaged area from the network.
Installation in a wooden wall
Metal mounting boxes
First of all, the installation of a box for sockets and switches depends on the type of wiring in the house: open - outside, on top of the walls; hidden - in the recesses after gating. The latter is an expensive and time-consuming method, rarely used: in addition to financial costs, an accurate calculation of the wiring plan is required by professional electricians - mistakes are unacceptable.
For wooden walls, you cannot use plastic boxes for sockets - only metal ones. In some cases, special non-flammable plastic is acceptable (rarely found, expensive). The socket box plays a protective role if a short circuit, sparks, or ignition occurs.
Installation work does not differ from installation in walls made of other materials. For the hole, take a separate wood crown. It has a different structure, a type of insert. Secure the installation box for hidden wiring with screws. Alabaster or other mixtures are not required.
Types of junction boxes
At the moment, the market offers a wide variety of junction boxes of a wide variety of designs and shapes.
Our article discusses only the box for connecting hidden wiring. Therefore, we will dwell in detail on products of this type.
The photo shows different types of distribution boxes
So:
- First of all, all distribution boxes can be divided according to their shape. For hidden wiring, round ones are most often used. Their diameter and depth can vary greatly. So the diameter usually ranges from 60 to 100 mm, but the depth is usually from 30 to 50 mm. But if you have the right desire, you can find junction boxes for hidden wiring in other sizes.
- Square boxes are also widely used. Usually their sizes are comparable to those of round products. That is, starting from 60×60 mm and ending with products larger than 110 mm. The depth of square boxes usually does not exceed 30 - 50 mm.
- Rectangular junction boxes are also widely used. Here the range of sizes is even greater, but the total area is comparable to boxes of other shapes. Rectangular and square boxes for hidden wiring are used a little less frequently, although here it all depends on your wishes and technical conditions.
- In addition, junction boxes for hidden wiring differ in the material they are made of. According to clause 2.1.27 of the Electrical Installation Rules, they must be made of fireproof and non-combustible materials. When laying wires over combustible materials, metal junction boxes should be used. If the wire is laid using fireproof materials, then using fire-resistant plastic boxes is sufficient.
Note! Almost all distribution boxes for hidden wiring presented on the market have a dust and moisture protection level of IP54 or IP55. But you can also find models with IP 20 and lower. At the same time, the PUE standards for hidden wiring in fireproof structures require a standard of at least IP24. Therefore, this aspect should be paid attention to.
Distribution box with terminal block
- If previously all distribution boxes were made hollow, now models with terminal blocks inside have appeared on the market. This allows for better connection of wires, and also helps to organize them inside the box. And although the price of such products is somewhat higher, their convenience is undeniable.
- Well, the last and very conditional division of distribution boxes is the presence of fastenings. It allows you to fix the products in the wall more efficiently and reliably, but if they are mounted on cement mortar, this advantage is very doubtful.
Installing a new outlet box in place of the old one
Most of the buildings were built during Soviet times. Electrical wiring standards were different, and so were the devices. Soviet boxes for switches and sockets are larger in size than modern ones, they are mounted poorly and move inside - the tabs and ears are not fixed properly.
Work procedure
Replacing a socket box with a new one should be carried out in a de-energized network.
When working with old boxes for installing sockets, you should adhere to the general rules and principles of working with electrical networks: de-energize, use rubber gloves, etc. Stages of work:
- De-energize the area by turning off the circuit breakers on the house panel.
- Check the actual energy supply - try turning on a lamp or other device.
- Remove an outdated or broken socket: remove the cover and unscrew the fasteners.
- Separate the terminals from the “unnecessary” socket.
- Assess the appearance and tightness of the outlet box.
- If the glass is in order, the new mechanism is secured with self-tapping screws for stability.
- If the box is in faulty condition, remove it and attach a new one.
When working with nails and screws, you must carefully monitor the wires so as not to touch or damage them. Electricians advise dulling or shortening sharp ends.
Mounting boxes for hollow walls
For installation of electrical installation devices in hollow (frame) walls or partitions made using sheet materials (gypsum plasterboard, gypsum board), special boxes with a special type of fastening are used. They are pressed against the sheet from the inside using paws, which are initially removed. After installing the box into the wall hole, when the fastening screws rotate, the legs extend and move along their channels, gradually pressing the box against the sheet material. The outside of the box is held in place by a thin rim.
Most often there are boxes with metal legs. However, they have a number of disadvantages: firstly, the metal tabs can damage the drywall sheet if the screws are over-tightened; secondly, dismantling such a box, if necessary, is made difficult by the fact that the legs dig into the sheet and do not return to their original position when the screws are unscrewed.
Sergey Savelyev
Improved boxes have a better design. The wide feet are made of durable plastic and will never damage the sheet material. When the screws are tightened, the tabs move out of the body and secure the box. When unscrewing the screws, the tabs are retracted inside the case and the box is easily dismantled. Single-post boxes can be 40, 50 or 60 mm deep.
Triple holes for fastening screws allow you to align the mechanisms even with gross errors in installing the boxes.
Boxes for installing 2, 3 or 4 mechanisms are available in depths of 40 and 50 mm. Supplied with removable partitions to separate power and low-current lines. There are holes at the bottom of the boxes for convenient marking of drilling points, and the increased internal volume compared to similar products simplifies connecting devices and laying conductors.