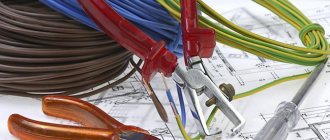
I'm making a housing for the power supply from a wide cable channel. It is thick-walled and difficult to cut. I saw across it with a hacksaw for metal, the result is really not ideal. It seems like you can also cut with a grinder, I want to try it.
Question about cutting the cable channel around the perimeter, or more precisely, its cover. We need slots for several types of network plugs. I did this with a utility knife, broke several blades and it was very tight. Now I tried to wind copper wire onto the tip of a soldering iron (80 Watt), and began to burn it, making a cut, like with a hand jigsaw. The process has accelerated, but the quality leaves much to be desired.
Tell me, what is the best way to do such work?
| Return to top |
| Slabovik | |||||||||||||||||||||||||||||||||
| |||||||||||||||||||||||||||||||||
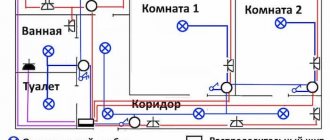
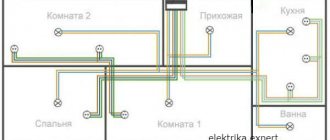
Laying electrical wiring in a box (cable channel)
Electrical wiring is installed in a box when its aesthetic appearance is important and easy access for maintenance is required. Laying electrical wiring in a box is widely used when it is necessary to carry out additional electrical communications without resorting to repairs.
Tools and materials
- construction knife
- scissors
- hacksaw for metal
- screwdriver
- pencil
- cable channel
- fasteners for cable duct
- We fix the cable channel on the wall according to the markings made with a construction pencil.
We lay the cable channel so that the joints look neat. To cut it and put the joints in order, you should use a hacksaw, a construction knife and scissors.
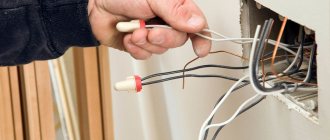
We put the wire in the box.
As you lay the wire, install the box cover. It is rare when it is possible to first lay the entire wire and then cover everything with covers.
Snap the lid of the box, pressing it against the box until a characteristic click appears.
Methods for laying cable ducts
We cut pieces of the cable channel with a fine-toothed hacksaw, using a miter box to ensure an even cut. For better rigidity of the cable channel, when applying the cover (after laying the cable), it is advisable to cover the junction with the cut fragment with the whole cover, and attach a piece of the cover to the remaining intact section.
A 90° rotation is carried out by cutting the ends of the cable channel at 45° (using a miter box) or as shown in the photo: on one piece we remove the wall closest to the joint (to the width of the base), and on the other we cut off part of the base of the near wall (leaving one far wall).
When connecting cable channels in the inner corner, we proceed in a similar way: either cut both ends at 45°, or remove both walls at one end to the width of the cable channel, leaving the base, or, as shown in the photo, remove the top wall at one end by the same width, and on the other - the lower one.
After the ends of the cable channels are secured, we slide the covers onto them (into the corner).
When connecting the cable channel at the outer corner, we do the opposite: we cut off the base at one of the ends, leaving the walls - they will hold the lid. Remove the walls from one of the joined parts of the lids.
Scope of application of the cable channel
Why do you need a cable channel?
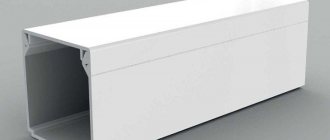
Cable channels are used to disguise electrical wires. They are usually used after repairs are completed. In addition to their camouflage effect, the channels provide free access to electrical networks. Cable ducts are mainly made of self-extinguishing PVC and are designed for a long service life. The channel is an oblong rectangular limiter with a lid with latches. The wires are placed in this limiter and closed at the top. The rigid design allows the channels to be mounted on any surface. The wires are protected from dust and dirt thanks to the cover. All cable channels do not conduct electricity, they are durable, flexible and resistant to chemical environmental influences. The scope of application of the cable channel is wide. Depending on the task, different types of cable channels are used. The following channels are distinguished by purpose:
- Modular cable channel
. The design has a large cross-section and is designed for sockets. - Trunk cable channel
. The design is also made in a large cross-section, as it is intended for laying wires over long distances. - Electrical cable channel
. Has a small cross-section for routing a small number of wires. - Floor cable channel
. This type is designed for running wires along the floor. - Plinth cable channel
. To carry wires along the junction of the wall and the floor, a plinth type cable channel is used. Outwardly it looks like a plinth and hides all the wires perfectly.
In addition to the area of application, cable channels are distinguished by the materials manufactured:
- Metal cable channel
. This channel is suitable for both internal and external work. It differs from others in its wide color spectrum, which makes it possible to choose a color to suit any interior. The metal channels are galvanized, thereby protecting them from corrosive processes. - Plastic cable channel
. It is distinguished by its low cost, which is why it is in demand among most electricians. The plastic channel is flexible and durable. Also available in a variety of colors, most commonly found in white.
Pros and cons of cable channel
Among the advantages of the cable channel
One can note its dielectric capacity, fire resistance, strength and flexibility.
The channels are made from chemically resistant PVC components. Provides mobility to electrical networks. The low cost of components and installation organization are also advantages. Also, the advantages include easy access to the cable, providing additional protection to the electrical conductor. One of the disadvantages of the cable channel
is the need for additional space for the channel. For example, when placing wires behind a chest of drawers, it will not be possible to place the chest of drawers close to the wall. Also, the cable channel is not suitable for every type of interior.
Preparation for installation
Necessary tools and equipment
To install the cable channel, the following tools are required:
The fastening of the channels depends on the surface. For wood, self-tapping screws are used; for stone or concrete surfaces, the channels are attached to dowel-nails. Liquid nails are used to attach the cable duct to smooth tiles or metal.
Before starting installation of the cable channel, it is necessary to perform calculations.
- First, decide on the material and type of channels. Create a plan of your room, which will indicate the necessary types of ducts for all rooms. In the plan, show the route of each cable, the location of additional accessories in the form of connectors or bends. All this should be recorded in footage. Consider outlets and switches in your plan. Also, when drawing up a plan, keep in mind that the main canal should be thicker than the adjacent canals.
- The cable channel can be placed at any wall level. The location of the channel depends on the interior of the room. If you plan to attach the channels with glue, make sure the walls are level in advance. Adhesive fastening can only be used for small channel models containing no more than 3 wires.
- Before starting work on installing cable ducts, prepare fasteners suitable for your surface. For a concrete wall, use dowels; for a wooden wall, use regular metal screws. For gypsum board, butterfly dowels are most often used.
- After preparing the fastening materials and necessary tools, the last preparatory step will be marking the wall. Mark the straight lines of the future channel with a pencil. Use a level to get straight lines.
- Another important preparatory step is to determine the location of the base, as well as an idea of which wires will go into the cable duct. The cables must be freely located inside the channel. A large number of wires can cause them to overheat.
- If the walls are uneven, the base may become bent and the lid may be difficult to snap into place. When installing the system after finishing work, do not stain the channels.
- If you do not have the opportunity to purchase fasteners, you can purchase special channels in the store with adhesive tape attached to the base. These fasteners are considered temporary, as they are not capable of performing their function for a long time. You need to cut such channels with the lid latched.
Cable channel. Types and application. Installation methods
A cable channel is a special box used to create protection for various types of wiring. The box is made in the form of a profile made of aluminum or plastic. If you are going to conduct open electrical wiring, then the best way to hide it is in plastic boxes.
Electrical wiring should not spoil the appearance or stand out. All installation work is done during renovation or construction. There are many types of cable channels that make it possible to install wires in any place with different conditions.
The mini-channels and boxes produced make it possible to install wiring systems of various configurations. Different standard sizes and colors create high aesthetics for any type of premises. All accessories for a systematic approach to creating electrical connections are available for sale.
Standard sizes of cable channels
Types and properties
There are different forms of cable channels available for sale in building materials:
- For outdoor use.
- Flexible.
- For baseboards.
- Stairs.
- Trunk.
- For mini cables.
- Transparent.
- Parapet.
- Angular.
With perforation.
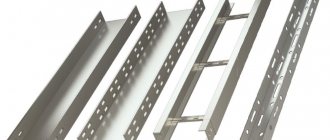
Products are made of steel, plastic, aluminum:
- The most popular has become a plastic box , which has the best properties. These types have become widespread in street installations. Floor cable ducts are used indoors . Their special design makes it possible to install wiring in difficult places. The oval shape prevents wires from damage and has a pleasant appearance. — In the private sector and apartments, baseboard options are used, the advantage of which is their curly shape, suitable for any interior. — The parapet type of wire channels has proven itself in offices for protecting cables from various equipment; it has geometric shapes.
- Aluminum is famous for its fire-fighting properties. They are used in industrial production because they are moisture resistant and durable.
- Steel products are painted in various colors. The galvanized cable channel is coated with a special layer that prevents corrosion. The service life of steel channels is longer than other types. The base of the channel is perforated, which makes installation quite simple.
According to the color scheme, the plastic cable duct is produced:
- White.
- Light.
- Under the tree.
- Colored. The most popular cable channels are made of PVC wood and white. They are most often used for offices.
In order to carry out high-quality installation of electrical wiring, you need to have a certain range of auxiliary accessories, which are available in sufficient quantities today:
- Plugs.
- Angles for connections.
- L-shaped corners.
- T-shaped corners.
- Inner corners.
- External corners. Today, many firms and companies are engaged in the sale of wiring protection boxes.
The main advantages of cable channels are the double lock. It provides structural strength, elasticity, and flexibility. The plastic material allows installation of power cables up to 1000 volts and is self-extinguishing.
The mini-channels are made in a special shape with rounded corners and a special cover fastening, creating the appearance of structural integrity and covering the appearance of seams. This provides an aesthetically pleasing look for offices. The channel cover completely covers the base; no cleaning is required after installation. High-quality cable boxes are certified by Rostest, designed for outdoor and indoor installation, protected from moisture and dust.
When choosing channels, the main criterion is the size of the wire cross-section. A small 10x15 mm model is suitable for an Internet cable; it easily fits into the interior of the apartment and has the following advantages:
- The material used is environmentally friendly.
- Aesthetic form.
- Curved look. There are standardized devices for fastening channels on the sales market, which have different parameters. Installation of boxes is carried out in two ways.
The first method is to mount it with latches. They provide quick installation of the cable channel. The second method is to fasten the box with self-tapping screws. Couplings are used to lengthen channels. They are sold in strips of two meters.
Preparation for installation
Before attaching the box, you need to carefully plan the marking of the cable path, taking into account all the features, turns, and descents of the lines. With proper marking, you can choose the correct size and type of channel for the cable, and purchase the necessary accessories for installation.
Fasteners for installation are selected according to the material of the mounting surface. Most often, the cable is laid on the following surfaces:
- Wooden walls, piers.
- Plasterboard surfaces.
- Brick partitions.
- Concrete walls and ceilings.
- Metal walls. For wood surfaces, self-tapping screws have become a more suitable option. Dowel-nails with a diameter of 6 to 8 mm are suitable for concrete. The same fastenings are suitable for brick walls as for concrete.
To fix the wire channel to the drywall, use ordinary wood screws. If the cables are heavy, then it is better to use “butterfly” or “screw-in” dowels.
To attach the box to metal materials, you need to determine the thickness of the wall. Using metal self-tapping screws, you can attach the box to a wall made of metal up to 2 mm thick. Such self-tapping screws are often used under the name “bugs”.
Installation methods
More often, the cable channel for the wire is fixed to the wall with self-tapping screws. There are other ways: using double-sided tape, liquid nails.
The length of the box blank is measured with a tape measure, or applied to the wall, marked with a pencil. To ensure a high-quality joint, the channel is carefully cut with a knife, scissors, or a hacksaw. The material of the boxes does not fade, does not turn yellow, and is resistant to aging. Plastic is used with self-extinguishing property. This prevents a fire from occurring.
The cable duct is made immediately with holes. There is no need to drill them during installation, this saves time. Using these holes you can level the channel. The profile is attached to the wall in the classical way, or with a special tool using dowels. When making a joint, connecting accessories cover the joint and are glued to the joint.
The procedure for installing the cable channel:
- Unpacking.
- Marking the wall.
- Cutting the workpiece.
- Remove the cover.
- Place the box in place.
- Level.
- Make holes for fastening with dowels.
- Secure the box.
- Place the wires in the channel.
- Close the lid.
At the initial stage of repair, cables are always laid: television, twisted pair for the Internet, telephone cables, power cables, electrical. In plasterboard partitions and sheathing, the cable is laid under the hollow wall structure in a corrugated pipe. After laying the cable, it is advisable to write down where the cable runs and the distance from the ceiling to the cable. It happens that the cable runs at an angle. Although, according to the rules, cables must be laid strictly vertically or horizontally.
Do-it-yourself cable channel installation
When installing electrical wiring, an important step is to camouflage the cables. Exposed wires stand out noticeably on the wall, so they spoil the overall picture of the room's interior. Most often, cables are hidden under drywall or in the thickness of the wall. When connecting an outlet or switch, the wires will definitely end up on the outer surface of the wall. Cable channels allow you to make wiring invisible. In this article we will look at the scope of application of the cable channel, find out why the cable channel is needed, its pros and cons. The article will also discuss preparation and step-by-step instructions for installation work.
Installation of cable channel, step-by-step instructions
During the installation of the cable channel, monitor the room temperature; it should not be higher than 60°C. The step-by-step installation algorithm is as follows:
- Before starting work, turn off the power supply.
- Mark the surface where the channel will be located.
- Measure and cut the required length of the channels.
- Remove the covers from the channels and begin attaching the base. To do this, attach the channel to the surface of the wall and drill an outer hole through the channel to the length of the self-tapping screw. Maintain an interval of 30-40 cm between the holes, then secure the base with self-tapping screws. When installing channels on a concrete surface, the upper and lower holes are fixed with dowels, the remaining holes are secured with nails. Instead of self-tapping screws, you can use a special mixture called liquid nails. In this case, the base is lubricated with the substance twice, after which it is pressed against the surface for 5 minutes. The best fastening effect will be achieved by a design with a combined fastening option.
- After installing the direct channel, proceed to installing additional cable channel accessories. Install corner parts and connectors.
- Then proceed to position the wires in the base. It is important to ensure that the cables are not intertwined, do not have sharp bends, and are insulated.
- Close the base with a lid, install sockets and switches, if they were provided for in the plan.
- Turn on the power supply to the system and make sure it is working. If problems are detected, there is no power supply in sockets and switches, remove the cover of the cable channel and find the source of the problem visually or using a special tool.
When installing a cable channel, at the beginning of the work you need to draw up a plan, carefully outlining all the components of the system. This article discussed the basic concepts of a cable channel. Thanks to this article, you learned why you need a cable channel, its advantages and disadvantages. After reading this article, you will be able to install the cable channel yourself.