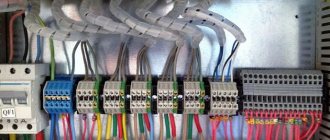
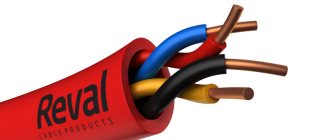
The reliability of the connections of wires and cables through which electric current is supplied must be very high. It can be provided by sleeves for crimping wires, which are specially designed to create high-quality connections of conductive elements of electrical networks for various purposes. Using elements such as crimp sleeves, it is possible to connect even aluminum and copper wires, which is almost impossible to achieve using conventional twisting of conductors.
Crimping with sleeves is a reliable way to connect wires
What are crimp sleeves?
The accessory is a small metal tube with conductive properties. With its help, you can achieve a permanent connection of wires.
This is the optimal method of fixing cores for medium and high currents. It provides high fusion strength.
Scope of application
Crimping is advisable if:
- It is necessary to connect the wires that are under high load.
- Installation of multi-core or large cross-section cables is required.
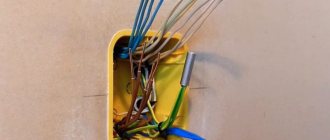
- Electrical networks are laid at height, and the conductors are connected inside the distribution box.
This installation method is suitable if visibility is limited where the network is laid.
Various types of sleeves are used for pressing wires.
Types of sleeves
For pressing wires with sleeves, the following types of devices are used:
- GM. Copper element without a protective layer. It looks more like a piece of pipe.
- GML. The surface of the accessory is tinning (electrochemical sputtering). After the procedure, the product becomes resistant to corrosion and does not oxidize. Copper is used to make the tube.
- GA. An aluminum element designed to connect wires made of the same material.
- GAM. Such sleeves are made from several tubes using the friction welding method and are used for crimping copper and aluminum conductors.
- GSI. A special feature of the accessory is the absence of damage to the protective layer during the joining process. No additional manipulations are required. Such sleeves are made from copper.
Advantages and disadvantages of using sleeves
The crimping method has such advantages as high speed and strength of installation and reliability of the resulting contact.
In addition, it differs in that:
- there is no need to use an electrical network: all work is done with hand tools;
- you can connect cores made of different materials into 1 node;
- there is no need to carry out further maintenance;
- no need to have special skills;
- the procedure can be carried out in confined spaces.
The method of crimping sleeves is characterized by speed and durability of installation.
The only drawback of the process is that it results in a permanent connection.
To replace the sleeve, you will have to cut it out. If the length of the conductors is reduced, they will need to be extended.
Advantages and disadvantages
There are many positive aspects to crimping:
- The tool used to make this connection is hand-held and does not require electricity to operate. In cases where you have to work in a room where there is no voltage, crimping is the only high-quality connection method.
- Using crimping tubes, you can connect conductors from different metals, which is a solution to the eternal problem of switching copper and aluminum conductors in one electrical unit.
- If welding requires a specialist capable of performing welding work, and when soldering it is necessary to be able to use a soldering iron, then anyone can do crimping; you just need to try the press pliers in action once.
- Using a special crimping tool, it is possible to make connections in any, even limited spaces. It is especially convenient when connecting wires in a socket box or box.
- Crimping with press pliers and sleeves allows you to shorten the connected sections of wires to a minimum.
- Due to mechanical force, the most durable contact connection is created.
- As a result of crimping, a permanent connection is obtained that can withstand heavy physical stress when breaking.
- Installation speed is minimal, connection quality is maximum.
- This contact does not require any maintenance.
The one-piece type of crimping is in some way a disadvantage, that is, if necessary, it is impossible to unscrew the connection and replace one of the conductors. The sleeve can only be cut out.
The essence of crimping
The use of standard connection methods can lead to fraying or destruction of stranded conductors. In this case, their functionality is limited. As a result, the fixation areas become very hot and burn out. Copper wiring oxidizes over time and loses its quality. Connection reliability suffers.
The sleeve prevents air from entering the clutch. The wire strands are placed into the tube from opposite ends, after which it is processed with press pliers. Crimping is carried out at 2–3 points. In these places, the materials being connected are deformed along with the tube. After crimping, the area is isolated.
What is the essence of the method?
Crimping is a method of connecting wires using special sleeves. Outwardly, they look like ordinary tubes and serve as a connecting mechanism.
The wire strands that are to be connected are inserted into the tube from two opposite ends, crimped with press pliers, and as a result, a strong and reliable electrical unit is obtained. The tube is compressed in two or three places, depending on its length and the cross-section of the switched conductors. The connected cores and the sleeve are jointly subjected to deformation. At this moment, the tube compresses and squeezes the conductive surfaces of the conductors. Due to this, the wires interlock with each other, which provides reliable electrical contact.
The junction is then isolated.
Most often, this method is used in situations where it is not possible to use another type of connection. For example, welding requires the presence of electricity so that the welding machine can be connected. When working in a small junction box, it is inconvenient to position the bolt connection, nut clamp or terminal block. And reaching up to the distribution box from the ceiling with a soldering iron is also not very convenient. It is in such cases that crimping wires using sleeves helps out.
The crimping method is most in demand:
- if it is necessary to connect wires in power lines with a high current load;
- for switching multi-core conductors;
- if it is necessary to connect large cross-section wires.
Case materials
An important selection parameter is the material of the sleeves.
Copper
Designed for crimping copper conductors. They can only be used in a non-aggressive environment: they do not have a protective layer. Otherwise, the material will quickly oxidize.
Copper sleeves are designed for crimping cores.
Tinned
These types of sleeves are used for switching conductors used in aggressive environments. On their surface there is a protective layer of tin-bismuth composition, applied electrochemically. It prevents copper from oxidizing. Tinned tubes are not used to connect aluminum wires.
Combined
Suitable for connecting cores made of different metals. The element consists of aluminum and copper parts, which are held together by welding. A limiter is installed at their junction to control the depth of insertion of the conductors. The aluminum part has a larger diameter.
Isolated
The advantage of the products is that additional insulation of the formed connection is not required. The tubes undergo a tinning process and are then covered with a protective PVC sheath.
Insulated sleeves do not require additional protection.
Aluminum
They are used to connect conductors made of the same material. During operation, the tubes are cleaned and treated with a protective mixture.
Such sleeves can be put on cables if the voltage in them does not exceed 10 kW.
Features of crimping large diameter wires
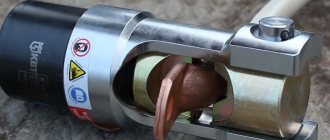
For high-quality crimping of contacts with a line cross-section of more than 6 sq./mm, human muscle strength is no longer enough to do this with an ordinary hand tool. Strippers for removing insulation and classic press pliers and crimpers do not even provide holes of a larger diameter. The insulation is removed with a regular assembly knife, and for the press, reinforced pliers with long handles or a hydraulic press are used.
This tool is ideally adapted for crimping tips and sleeves of domestic standards. There are various modifications of hydraulic pliers for crimping electrical line connections, with a pressure force from 8 to 55 tones per sq./cm; the set includes replaceable dies of various diameters. One of the popular types of this tool is PRG-70V, its main characteristics:
- Pressure force – 8 tons;
- Hexagonal crimp shape;
- Hydraulic piston stroke 100 mm;
- Set of replaceable matrices for wires 4;6; 8;10;16;25;35;50;70 sq/mm.
Working with a hydraulic press
Cleaning the insulation and installing the bare ends into the sleeves is carried out in the same sequence as described above. The matrix of the required size is installed in the press rod, the valve that blocks the circulation of hydraulic fluid is set to the “Closed” position. The structure to be crimped is placed in the hole of the matrix, pressing is performed by swinging the handle until the component parts of the matrix are connected.
The valve opens a quarter turn, the pressure on the rod with the matrix is removed, we advance the sleeve to compress the next section, and repeat the operation along the entire length. In the last section, open the valve and remove the matrix with the pressed sleeve.
The advantage of this connection technology is the high contact strength and reliable electrical connection, the ability to connect lines made of different metals. The disadvantage is that the connection is not removable, the wires can only be bitten off. Hydraulic presses are produced in various capacities, the largest is capable of compressing a cross-section of 1000 sq./mm. This equipment is rarely in demand at home; it is intended for professionals. It is not advisable to buy it to perform one-time work; if necessary, it is better to negotiate a lease with the owner.
Dimensions and design features of sleeves - how to choose the right one
Connecting tubes are used for installation of single-core and multi-core cables. When choosing, take into account not only the material, but also the size of the product.
It is better to use standard data:
| Type | Section, mm² | Dimensions, mm | |||
| Cable flexibility class 2–3 | 5–6th class of wire flexibility | Length | External diameter | Inner diameter | |
| GM 2.5 | 2,5 | 2,5 | 20 | 5 | 2,6 |
| GM 4 | 4 | 4 | 30 | 5 | 3 |
| GM 6 | 6 | 6 | 30 | 6 | 4 |
| GM 10 | 10 | 10 | 30 | 8 | 5 |
| GM 16 | 16 | 16 | 30 | 9 | 6 |
| GM 25 | 35 | 25 | 40 | 11 | 8 |
| GM 35 | 35 | 35 | 50 | 12 | 9 |
| GM 50 | 70 | 50 | 50 | 14 | 11 |
| GM 70 | 95 | 70 | 53 | 16 | 13 |
| GM 95 | 120 | 95 | 67 | 19 | 15 |
| GM 120 | 150 | 120 | 67 | 22 | 17 |
| GM 150 | 185 | 150 | 67 | 25 | 19 |
| GM 185 | 240 | 185 | 75 | 27 | 21 |
| GM 240 | 300 | 240 | 75 | 32 | 24 |
The quality of the formed electrical contact depends on the correct choice of diameter. The conductor must fit inside the tube and sit tightly.
Products can also be classified according to their design features. They can be hollow or with a partition. The first type is used if the connected conductors are made of the same metal. Combined devices are necessary for end-to-end wiring.
General information about using tips and sleeves
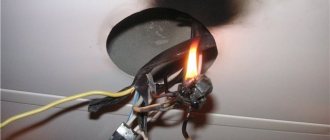
If the connection of the electrical wires is not tight, then the contact point will heat up. The result could be a fire. In addition, a loose connection will not provide the required throughput. This will lead to unstable operation of the power grid and, possibly, failure of electrical equipment.
When crimping wires is performed, the listed troubles can be avoided. The process itself involves crimping electrical cables using special lugs.
Usually craftsmen do the work with crimpers. They provide high-quality connections with the required density. A special tool for electrical wires is also called crimpers. With their help, the connection is crimped using mechanical action, which allows:
- carry out installation and repair work as quickly as possible;
- create, in most cases, a permanent connection that can withstand significant breaking loads;
- ensure a continuous flow of electrical current in a particular circuit even under difficult operating conditions.
The crimper speeds up installation and creates a reliable permanent connection Source kabeltut.ru
The advantages of the method of connecting electrical wires by crimping have influenced the use of the method by almost all professional electricians. In addition, manufacturers of electrical products offer various tips that facilitate installation and repair work.
The use of lugs is not difficult for any professional electrician. A stripped electrical cable is inserted into the empty cavity of these elements of the electrical network. Then the sleeve is compressed. The result is a wire with a lug that is connected to another electrical circuit component.
On a note! Special ferrules are available in a wide range in all specialized stores, as well as tools for crimping them. It is recommended to use the sleeves even when performing one-time work of small volume. Their low price will not significantly affect the allocated budget. At the same time, the use of tips allows you to make the highest quality connection.
One of the lug options Source german-instrument.ru
Crimping of wires with lugs is usually carried out when connecting multi-core cables. In this case, the number of cores matters in contrast to their cross-section. Crimping is used even for crimping very thin wires when there is no need to create significant effort.
However, such work cannot be done without a special tool. Therefore, most homeowners turn to specialized companies for help, which employ experienced personnel who always have all the necessary consumables and devices for crimping available.
Important! Crimping wire lugs is the so-called cold welding. The process is performed without exposure to high temperatures. It is carried out only by mechanical action. The result is fast and reliable switching.
Crimping the metal tip of an electrical wire with a special tool Source 6.allegroimg.com
Due to the strong impact on the junction of the wire with the tip of its metal, it tightly compresses the current-carrying core. That is why it receives a permanent contact. However, during crimping, the maximum possible effort is not applied. There are limits that must not be exceeded. Otherwise, the integrity of the current-carrying conductors will be damaged. Professionals know this well. Therefore, their help is indispensable in most cases.
One of the options for connecting stranded wires is soldering. However, this option is not the easiest way. You need a minimum of skill in this type of work. Only an experienced person can make a quality solder connection.
Without removing the overall braiding and insulation from each core, it will not be possible to ensure contact. This work takes time to complete. An additional tool is also needed. However, not every person in the street will be able to cope with it. Some people don't even have any idea how it's done.
Craftsmen will always come to the rescue when you need to professionally crimp electrical wires Source ad-cd.net
Wire crimping significantly speeds up and simplifies the installation process. This method allows you to quickly make the necessary connection and efficiently solve the problem. The method is used by most professional electricians, who have seen its advantages in practice.
To ensure a high-quality connection, suitable sleeves and tips are selected at the beginning of work. Their compression is performed according to the same principle.
Different materials are used to make connecting elements. The production of such parts is carried out taking into account the characteristics of currents. Only a professional who understands the markings of these products and knows well how they differ can select the appropriate sleeve or tip for a specific type of work.
Thus, the sleeve is used to connect electrical wires to each other. In this case, the cables can have the same or different cross-sections. The tip is used for a convenient and high-quality connection of an electrical wire, for example, with terminals.
Tips of different sizes Source mti.by
Such products are small in size. This feature creates another problem when choosing sleeves and tips. The fact is that products that are too small do not have space for full marking. It may be partial or completely absent. Therefore, there is a high probability that a non-professional will make a mistake by choosing the wrong elements for a particular electrical circuit. In this case, crimping the tips or sleeves will not provide the required level of safety and reliability of the connections.
At the same time, on large-sized products there is enough space to apply full markings. However, they are more expensive both because of their size and the presence of special designations. After all, marking forces manufacturers to increase costs for the production of electrical products.
Important! Marked and unmarked tips or sleeves from a responsible manufacturer do not differ in quality. It is always high for electrical products of well-known brands.
Sleeve tips from well-known manufacturers are always of high quality Source elnow.ru
At the same time, a consultant in a store will not always help you choose a suitable product. Many sellers are not qualified specialists in the field of electrical products. Therefore, it is recommended to purchase it from specialized companies simultaneously with ordering services for the installation of an electrical network.
An important point is also the force with which crimping of cable lugs and sleeves is carried out. Its values are not indicated when labeling products. This is another reason why you need to turn to professionals. After all, they know very well that the tightening force of products depends on their type, of which there are quite a lot.
Thus, popular electrical products include:
- NKI – ring type tips;
- RPI-P, RSHI-P and so on - flat-shaped connectors;
- NVI – fork-type tips;
- OV – piercing couplers;
- NSHKI – round pin lugs.
To carry out high-quality crimping of wires with lugs, you need to use a tool that indicates the appropriate dimensions for making a specific connection. In this case, the jaws of the special device must match the shape of the sleeve.
Press jaws, on the matrix of which the wire sections are indicated Source onlinetrade.ru
Important! The force created by the tool depends on the diameter of the hole between the compressed jaws. This means that the cross-section of the tip or sleeve affects the magnitude of the force.
The well-thought-out design of the special device allows you not to exert much effort during the work if the dimensions of the crimping part fit the hole in the tool.
On a note! The required force is not indicated when marking, because the connection of electrical cable products is carried out by professional electricians.
Crimping of tips and sleeves is carried out with a tool that allows you to clamp standard products. These are universal devices. The technology for their use is not complicated. The use of such a tool allows you to crimp various tips, connectors, sleeves during repair or installation of any electrical networks.
When crimping cable products, additional lubricant is used. Most manufacturers apply it to the inner surface of tips and sleeves. Therefore, they try to choose just such products in order to reduce costs and work time.
It is better to use sleeves with lubricant inside Source 1.allegroimg.com
Important! Tips and sleeves are disposable products. It is not removed after installation. Therefore, it can never be used anywhere else, creating a reliable and secure connection. At the same time, the products allow you to quickly restore an electrical circuit, carry out high-quality repairs, initial installation of wiring and ensure its performance for many years.
See also: Catalog of companies that specialize in electrical work of any complexity
Rules for crimping wires
Crimping of wires with sleeves is carried out taking into account the following rules:
- The materials used to make the tube and conductors must match each other.
- Crimping elements cannot be shortened by sawing. In this case, the protective layer is damaged and the contact reliability is reduced.
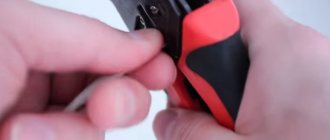
- To carry out the crimping procedure, a special tool is required - press pliers.
Crimping of wires is done with a special tool.
The cross-section of the wires cannot be reduced so that they fit into the sleeve. It is better to take a larger diameter crimping element
How to crimp wire lugs without tools
From the point of view of construction technology, crimping wires without the appropriate tool is prohibited, the only exception being rough installation to check the work performed. However, for any household work with low-current consumers, work without a crimping tool is allowed.
There are several methods for ending cords without tools:
- soldering using refractory high-temperature solders;
- “non-standard” crimping using cores, hammers, and notching the tip
Soldering tip
For soldering, you, of course, do not need serious and expensive press pliers/crimpers, but the following “household” repair tools should be present in your arsenal:
- Soldering iron (from 80 W)/blowtorch/gas burner.
- Soldering kit (fluxes/rosin, various types of solders).
- Heat shrink tubing and/or electrical tape.
- Basic knowledge and skills of working with a soldering iron.
The algorithm of actions is as follows:
- if you have a soldering iron/blowtorch, heat it up to operating temperature, if you don’t have one, turn on the burner on the kitchen stove;
- While the tool is heating up, we perform operations to remove the insulation from our cord (remove with a margin of 0.3–0.5 cm), making sure not to damage the cores;
- we put the thermal insulating braid on the cord and move it to a safe distance until we need it;
- degrease the cleaned area;
- degrease the tip;
- apply flux to the inside of the tip;
- Pre-cut the solder into small pieces so that it covers the inside of the tip by about half to a third;
- apply flux with a soldering iron to the stripped part of the cord, tin it (if there is no soldering iron, then skip this step);
- carefully, holding the tip with pliers so that the solder particles do not fall out of it, place it on the kitchen tile (if you don’t have a soldering iron) or heat it with a soldering iron/lamp/burner for several minutes until the solder inside becomes plastic and liquid;
- as soon as the solder is ready, quickly and carefully take the cord by the insulation and install it into the tip, while continuing to heat the tip, holding it with pliers, if there is an empty space between the tip and the solder does not come out, then add solder to these places until it will not begin to “crawl out”;
- then turn off the soldering iron/burner and give it a few minutes for the solder to completely harden;
- After hardening, we wrap 2-3 layers of electrical tape around the connection between the cable and the tip, move the thermal braiding, securing it at the edges with electrical tape.
Crimping using a core/hammer
This method has many disadvantages, the main one being insufficient pressure, which can lead to heating of such a connection. However, it is often practiced, especially in cases where the connection will not work with high-current devices.
This method requires a minimum of tools:
- Hammer.
- Kern (optional, but recommended).
- A small file for metal.
- Vise (optional, but recommended).
- Conductive paste (highly desirable).
- Insulation tape and/or heat shrink.
To finish with these tools, we do this:
- remove the insulation from the cord (margin 0.3–0.5 cm);
- make sure that the wires are not damaged;
- straighten all the wire strands, twist them slightly (half a turn, no more!);
- take the tip and make a small cut with a file (about 1/5 of the entire length of the tip) on the wire side;
- put on the heat shrink, move it 10–20 centimeters so that it does not interfere; degrease the cord;
- evenly apply conductive paste;
- we clamp the tip in a vice or place it so that it can be comfortably held with one hand;
- after which we completely install the wire into the tip;
- we take a core and a hammer and begin to strike the central part of the tip, which should be “compressed” (if there is no core, then you can use the thin part of the hammer);
- make 4–5 fixation points;
- turn the tip over and repeat the operation;
- check the connection for strength;
- We put heat shrink on the connection, heat it;
- ready, the connection is pressed!
Tools required for crimping
Do not use a hammer, chisel or pliers. They damage the protective shell, which leads to a decrease in the quality of contact.
Press jaws
A hand-held mechanical tool that ensures reliable connection of wires using a metal tube. It is similar to pliers, but is equipped with raised dies. The device is intended for household and industrial use. The device has a ratcheting mechanism: the handles will not open until the crimping is completed completely.
The pliers have long handles, which makes crimping easier. The tools can be diaphragm or operating on the principle of pliers. The second type performs crimping from 2 sides. The first provides 4- or 6-way crimping. You can also use a hydraulic crimper.
Sleeves
Operation requires copper, aluminum or combined tubes of a given diameter. Their number depends on how many connections need to be made.
Tubes of a given diameter are required for operation.
Heat shrinkable tubes
Heat shrinks are plastic tubes needed to insulate the bond of electrical wires. They have thermoplasticity. During the heating process, the material acquires a liquid form, and during cooling it turns into a stretchable mass and hardens. The joint area becomes protected from mechanical damage. The insulating properties are not reduced even under the influence of external negative factors.
Construction hair dryer
The tool is designed for heating heat-shrinkable insulating materials. To do this, it is enough to use household models of low power.
What is wire crimping?
To obtain high-quality connections, crimping is used, which creates good contact between the wires and protects them from oxidative processes.
One of the main parts used in this method are sleeves for crimping wires, with the help of which permanent connections are obtained. This is considered the main disadvantage, since in the future it is possible to separate them only mechanically by cutting the ends of the joined conductors. What is the essence and main advantages of crimping? The fact is that with the usual clamping of stranded conductors, their ends are often crushed, fluffed up and even destroyed. Such wiring is no longer used together with the rest; as a result, the connections heat up and subsequently burn out. In addition, copper wires, under the influence of oxygen and humidity, darken and oxidize over time, which leads to loss of contact quality. The crimping method eliminates all these problems by greatly increasing the reliability of connections. The ends of the wires, crimped with sleeves, are considered inaccessible to air penetration. The sleeve itself reliably protects the wires from damage, and its coating eliminates the aggressive influence of the external environment.
The essence of this method is that during the crimping process there is a joint deformation of the cores of the connected wires and the sleeve itself into which they are inserted. During compression, the sleeve is deformed and compresses the veins as much as possible. As a result, all the irregularities on the metal surface engage with each other, thereby ensuring reliable contact. In addition to sleeves, special crimping devices take part in the crimping process. They are divided into three main types:
- Double-jawed. The appearance resembles pliers. Equipped with two jaws and a compression reinforcement system. Suitable not only for working with sleeves, but also with tips.
- Four-jawed. Designed to work with sleeves only.
- Six-jawed. They are used quite rarely, mainly by professional electricians.
When performing the work, you will also need a stripping tool and a cutter that makes precise, even cuts. Using such a tool can significantly improve the quality of connections.
Instructions for crimping
Proper selection of metal tubes is required to maintain electromechanical coupling.
Preparation
Preparation for crimping involves the following actions:
- Selection of appropriate sleeves and dies for press jaws.
- Removing the insulating sheath from the wire by 2–3 cm (no more than the length of the sleeve itself).
- Cleaning bare areas with fine-grain sandpaper.
- Treatment of aluminum cores with quartz-vaseline paste. It will protect the metal from damage and oxidation.
Preparation for crimping involves selecting appropriate sleeves.
Copper wires do not need to be lubricated.
Crimping process step by step
The procedure is performed according to the following instructions:
- If the crimping is one-sided, then the conductors are placed inside the tube parallel to each other. In double-sided processing, the cores are inserted into the sleeve from opposite sides. You cannot twist them together.
- The connection is processed using press tongs using local indentation.
After completing the procedure, the clutch area is wiped with a solvent (for degreasing).
Crimping of wires with GSI sleeves
Wire insulation
Insulation requires electrical tape or heat shrink. The second one is better. The tube is placed on one of the wires before crimping. After the connection is formed, it is moved to the desired area and heated with a construction hairdryer. After cooling, the heat shrink shrinks and tightens around the joint, making it resistant to external negative influences.
Heat shrink is used to insulate the wires.
Crimping technology
There are two methods by which crimping is carried out:
- local indentation;
- complete compression.
The wire for crimping is copper or aluminum. Therefore, the sleeve can be either copper or aluminum. There is also copper-aluminium. Since an aluminum cable is prone to the formation of an oxidizing film, the aluminum sleeve must be cleanable and treated with a special lubricant. To protect aluminum from oxides, quartz vaseline paste is used. Copper wire is also subject to lubricant treatment. With its help, the likelihood of damage to the core during crimping is reduced and friction is reduced.
If the cores are multi-wire, they are aligned and folded so that they easily fit into the sleeve; you can twist the wires a little. Then the cable is inserted into the cartridge until it stops. The connection can be made not end-to-end, but, for example, with a factory. Then the total cross-section of all wires should not exceed the cross-section of the bushing.
In any case, sleeves are used that are designed for the total cross-section of the cores being crimped. If a press with point (local) indentation is used, make 2-3 pressings evenly distributed along the length of the sleeve to ensure mechanical strength of the connection and good electrical contact. For continuous crimping using hexagonal or square dies, the recommendations are essentially the same
In both cases, it is important that the sleeve does not crack during crimping (if it is too small) and that there are no uncompressed areas or cavities (if it is too large)
After the crimping has been carried out, it is necessary to create an outer insulating layer at the junction using electrical tape or elbow cloth. After insulation, you should carefully fold the wires and the cable itself in the junction box.
The video below clearly shows how to crimp wires with press pliers:
Basic mistakes: how not to do crimping
During the crimping process the following mistakes can be made:
- Cutting the sleeve when the tube length is too long. This will reduce the contact strength.
- Kinked aluminum wires. This cannot be done, because the metal will break.
- Installing a liner of the wrong diameter. If it is large, then it can only be installed on copper wiring, the wires of which need to be bent.
- Reducing the cross-section of the cores. In this case, the resistance will increase and the coupling area will become very hot.
- Selecting the wrong crimping tool. It is better to use special pliers that will not damage the protective layer.
- Excessive or insufficient number of crimps.
- Use of a press matrix of a different diameter.
To avoid mistakes, you need to use standard sleeve size tables and profile tools.
How to choose the right wire and tip
First, you need to find out what cross-section of wire you will be crimping. This can be done by following the inscriptions on the core insulation, or using a caliper. Further, when choosing certain sleeve tips, you can be guided by the color marking of their insulated skirt. Each color must correspond to a specific section and size of the tip sleeve.
True, there are also manufacturers who don’t bother with this and produce single-color products of different sections. After choosing, be sure to physically check how tightly the wire fits into the sleeve or tip. In this case, there is absolutely no need to twist the wires before inserting them into the tip.
The tip at the entrance has a special skirt that will help you put it on even a slightly fluffy wire. In addition, this skirt acts as an insulation retainer. You can compare how many kinks in different directions the wire will withstand and without a skirt. As you understand, the result will not be in favor of the latter option.
Another important point that needs to be remembered: many wires are manufactured not according to GOST, but according to their own technical conditions.
It often happens that a 2.5mm2 wire easily fits into a tip with a cross-section of 1.5mm2. Therefore, choosing from tables is, of course, good, but you can’t do without practical fitting of the sleeved part and wire.
Additional recommendations
For proper crimping, you must use the following tips:
- Make the junction of the conductors in the center of the connecting tube.
- Select the correct sleeve section. There will be fewer voids inside the clutch, and contact will become more reliable.
- Apply the insulation so that it extends 1 cm beyond the connecting tube on both sides.
- Use ferrules if cables with different numbers of cores are spliced.
Crimping is a procedure that allows you to obtain maximum adhesion of conductors when installing electrical networks. However, to carry it out correctly, the appropriate tools and materials are required.
Recommendations for crimp testing
If difficulties arise in selecting a sleeve that is ideally suited for the wires in size, it is better to opt for a tube slightly larger than required. In this case, the void can be filled by cutting bare wire with a slightly shorter length than the sleeve. Compaction in this way will improve the quality of the crimp.
Extending the wire using crimping should imply that the connection joint is located exactly in the center of the tube.
When isolating the joint, the connecting tape must extend beyond the edges of the sleeve by at least 10 mm. If multi-core wires are connected to each other or it is necessary to splice different numbers of them on both sides, then the correct solution would be insulated type connecting sleeves.
In conclusion, we note that crimping as a process is not difficult if you act consistently, use a special tool and suitable sleeves. One way or another, you need to remember that we are talking about a permanent connection, so you will need a wiring diagram. Having a plan at hand will help you avoid mistakes during the work.
Preparation for crimping
To crimp using a cable lug, you need to prepare the wire. See the table below for how to do this.
| Photo | Action |
| Measure the depth of the shank, add 5 mm and make a mark on the cable | |
| Clean the conductors from the insulating layer, check that the edge is smooth | |
| Degrease the wire and put a tip on it, the wires should fit tightly inside the shank |
Procedure for crimping cable lugs and sleeves
For crimping thick-walled tips and sleeves, it is best to use a hydraulic press. The press set initially includes universal dies for any tips and wires.
Under no circumstances use a tool not intended for crimping (hammer, chisel, etc.). A contact pressed in this way will not last long, especially if it constantly experiences heavy loads.
The next question that arises for an ignorant user is: how many times should I press the tip with a press? Once, twice or three times?
This depends on 2 parameters - the length of the tip and the width of the matrix.
In the operating instructions for the press that comes with the tool, there is a sign indicating the required number of crimps. Please note that this table is intended for tips and sleeves made in accordance with GOST.
Insert the tip into the press so that the matrix cross-section markings (35-50-70, etc.) are imprinted on the front side of the tip, and not on the side or bottom.
- do the first crimp test closer to the blade (where the bolt is inserted);
- Perform the following crimps in order, moving from the blade to the tail of the tip.
The same rules apply for connecting sleeves.
This must be done in this sequence, because with each press the tip tends to lengthen (sometimes up to ten percent!).
And if you start pressing from the end (not from the blade), during the last crimp, there is a high probability that you will have a void at the end of the sleeve. And you will not achieve the contact that was necessary. First of all, this applies to all aluminum products. For copper this is not yet so critical.
When crimping from the side of the blade, the tip will seem to fit onto the core, tightening the connection more and more. The insulated tips even have special digital markings that indicate the pressing order.
The crimping ends at the moment when the matrices close together. If you need to perform two or three crimps, step back 2-3 mm from the previous crimping point and continue crimping.
When crimping, the formation of a small flash is acceptable. It can be removed or filed off. A very common mistake is the formation of large “ears” on the tip. This results from an incorrect choice of matrix.
If such “ears” do appear, you should not cut them down to the base of the sleeve. Otherwise, a gap may form in the ferrule and the crimp contact will weaken. After the tip is crimped, it is advisable to insulate the area between where the shank ends and the remaining uninsulated part of the core. It is best to use heat-shrinkable tubing for this.
Crimping solid wires
Many people often wonder whether it is possible to crimp solid wires? Yes, of course, it is not prohibited to do this, you just need to use the appropriate tool for this. Ordinary crimpers are no longer suitable here, since they are designed for less force required when compressing a monocore. You will have to purchase specially designed press pliers PK-16u or PK-35u for this.
This is a universal tool and can also be used for crimping stranded wires.
In order for the compression on the monocore to be high-quality and there is no play inside the sleeve, the basic rule here is to choose a sleeve or tip one size smaller than the cross-section of the wire being pressed. These pliers are also convenient for pressing several conductors simultaneously in one sleeve. This is done, for example, when making connections in junction boxes.
Five rules of crimping
To summarize the above, if you want to get high-quality and durable crimping, you need to adhere to five rules:
- Choose the right tip based on material and size.
- Properly clean the vein.
- Use a specialized tool. Crimping with a chisel is prohibited!
- Select the required matrix.
- Follow the crimping sequence.
Typical errors during the crimping process
Connections of aluminum lines are made with tin-plated products; tin plating does not ensure 100% exclusion of contact of the copper surface with the wire, especially when deformed during compression
This will reduce the reliability and service life of the contact under long-term high current loads; The ends of the cables are ground and inserted into a cylinder of smaller diameter, this reduces the design cross-section and increases the transition resistance, weakening the contact strength; Cut the connecting tube, making it shorter, this will lead to an increase in contact resistance and excessive heating, reducing strength. When using heat shrink material in the insulation process, pay attention to the shrinkage ratio. During heat treatment, the cambric is compressed not to zero diameter, but to a certain size depending on the properties of the material from which it is made
If these parameters are not taken into account, the insulation may not cover the contact surface. Manufacturers indicate a reduction ratio of 2:1 on their products, which means that after heating the diameter decreases by 2 times. The designation can be 10 mm/5mm or 10/5 – 10 indicates the Ø in mm. before heating, 5 after shrinking.
Heat shrink insulation
Table of interchangeable heat shrink tubes from different manufacturers
How to use crimping pliers correctly
Welding electrical wiring
Independent mastery of crimping pliers may initially be accompanied by the creation of a poor-quality connection between the sleeve or tip and the wire. It often happens that what appears to be a reliably performed crimp hides a bad contact. This can happen for two reasons.
If the shape of the terminals is not maintained
A discrepancy between the size of the tip or sleeve and the opening between the matrix jaws can cause distortion of the compressed element. Before you start crimping, you should try on the tip to the opening in the pliers
It is also important that the bare end of the wire fits tightly into the holes of the shank or sleeve.
A bundle of wires or a single core should fit into the connecting element with light tension. If you have any doubts about the reliability of the fastening, you should practice on separate sections of the cable. After crimping by hand, you need to check the strength of the connection. If there is the slightest play, the crimp should be rejected and crimping should be resumed with a different end cap.
Excessive clamping may damage the conductors inside the sleeve. The accompanying documentation for crimping pliers usually indicates the cross-sectional dimensions of the tips directly for each opening of the pliers. The use of connectors made of soft metal alloys should be avoided. Over time, the tip may lose strength and contact will become unreliable.
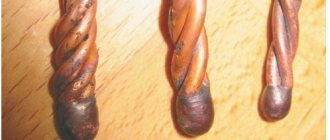
Twisting stranded wires before crimping
A mistake can be made due to the habit of twisting the wires, which is done before insulating or soldering manual connections. This is absolutely impossible to do.
You can check the harmfulness of twisting in a simple way. It is worth squeezing the twisted multi-core cables with pliers to make sure that there is deformation and damage to the integrity of the wiring.
If, when removing insulation from the cable installation section, twisted conductors are found, they must be straightened. Only after this the conductors are inserted into the opening of the tip or sleeve.
Soldering twists
In this matter, some experience is required, since not every electrician is able to irradiate the connection efficiently. I was convinced of this myself when my first twist, connected in a similar way, came apart during testing, making me burn with shame. However, as they say, everything is for the better! For soldering, they usually use rosin or fat (neutral), the soldering iron itself, tin and a special stand so as not to inadvertently damage, for example, a kitchen table with a hot tool.
Having tinned the junction of the wires with rosin, it is necessary to pick up a small amount of solder with the tip of the soldering iron and process the twist with it. This process must be repeated until the joint is completely and evenly filled with alloy. After this, I usually smooth out the twist with sandpaper to remove any protruding sharp edges and isolate the joint.
Tools and materials
To work, you will need manual (or mechanical) press pliers. They crimp a sleeve with conductors with a cross section of up to 120 mm 2. For conductors with a larger cross-section, a press is required, which is driven by a hydraulic drive.
There are pliers with dies for different sections and with adjustment of the punches. A very convenient tool in the sense that you don’t have to constantly reset it to other sizes, just turn the punch screw or matrix to the desired section.
When working with aluminum wires, you will need a special quartz-vaseline paste, which removes the oxide film on the wires and prevents its reappearance.
Copper conductors do not need such treatment, but it is still advisable to lubricate them with ordinary technical petroleum jelly to reduce friction. During deformation, the cores can be damaged, and lubricant minimizes this risk.