The sad truth is that our phone cables break at the most inopportune times. Repairing or replacing them with a new one can be expensive. Also, most replacement chargers are different from the original ones, so it's better to try to fix a cable that's still working than to buy a cheap Chinese knockoff.
Often the cables we use every day are subject to significant stress. They can be twisted, stretched or broken (yes, the cable can break). If the charger begins to fail and the protective material wears out, it can still be repaired and restored in a variety of ways.
Ways to repair a torn or chewed wire:
Twist
It is better not to use twisting in flexible wires
In this case, you will need a minimum of tools:
- side cutters;
- knife;
- insulating tape or heat shrink tubing.
You need to do the following:
- Strip the cord from the polyethylene insulation so that the metal parts of the required length for twisting them together are visible.
- If you need to connect the wiring from the headphones, you must also get rid of the varnish coating, which will not allow contact to take place. To do this, you can carefully clean them with a sharp knife or fine sandpaper.
- Twist the stripped ends of the broken wires together by at least 4–5 tight turns, observing their color markings. After this, use side cutters to remove the frayed ends of the conductors so that the twisting is neat.
- Insulate each wire where it is twisted with electrical tape.
Soldering
When soldering wires, experience and dexterity are required.
This is a more reliable method that will ensure good contact at the rupture site and resistance to mechanical stress.
To perform soldering you will need:
- soldering iron;
- tin;
- rosin or other type of flux;
- insulating tape or heat shrink;
- side cutters;
- knife.
You need to do the following:
- Strip the ends of the polyethylene and varnish insulation.
- Twist the broken conductors according to the color marking into 4–5 turns.
- Using flux, solder the twists so that the tin spreads evenly at the junctions of the wires. A sign of good soldering is the characteristic shine of the solder on the connected conductors, but its matte tint may indicate that the soldering iron was too overheated or, on the contrary, the soldering temperature was insufficient.
- Insulate the soldering areas with insulating tape or heat shrink.
If you compare both methods of repairing a wire, soldering is significantly more reliable than twisting. However, working with a soldering iron requires experience and accuracy, so it is best done by a professional. Twisting is much easier, but this method is short-lived, because the wire can again be broken and damaged.
Tinning method
To connect two parts, solder must first be applied. This also applies to the two wires of the headphones and the wire in the speaker. Tinning in this case helps to improve the contact properties of the parts that are connected. Usually a soldering iron is used for this, but in some cases you can do without it. For this:
- Before you repair a headphone wire without a soldering iron, you need to prepare any metal container. This can be a regular jar lid or any similar vessel.
- Place solder in this container. You won’t need much of the latter substance, and besides, it will be difficult to work with large pieces. Put rosin here too.
- Heat the resulting composition on the stove until completely melted. After this you can start soldering. To do this, the contacts need to be dipped in solder, then passed over the wooden surface to evenly distribute the substance (excess can also be removed with a simple rag).
- Now the wires can be connected and the contact point can be insulated.
The same method allows you to solve the question of how to repair a minijack on headphones without a soldering iron (in this case, you will need to replace the part).
If you need to solder a wire to a flat surface, then you need to pour crushed solder onto the latter, then put a little rosin and heat the mixture, bringing the device back to the fire. When the solder starts to melt, it needs to be spread over the surface with any metal object.
Repairing a stainless steel kettle:
A fairly common occurrence, and a clear example when you need to solder a stainless steel product, is the repair of a stainless steel kettle. And if you have a leak, you shouldn’t throw it away or rush to run for a new kettle. However, it should immediately be noted that stainless steel is very, very poorly soldered, and sometimes it is quite difficult to grab even a small hole (depending on the quality of the stainless steel), but anything is possible.
Kettle made of food grade stainless steel
In order to solder a stainless steel kettle, you will need phosphoric acid or a special flux for soldering stainless steel, food grade tin (it must be safe for the human body! If you need the kettle for drinking water), sandpaper and a 100-watt soldering iron.
All that is needed
First, you need to thoroughly clean the soldering area with sandpaper; if it is a kettle, then you need to remove the scale near the leak.
Cleaning the kettle with sandpaper
And now the fun begins! In order for the solder to “stick” to the stainless steel, you need to warm it up well, but at the same time also treat it with orthophosphoric acid - and it can evaporate, and also leave oxides ingrained in the metal, and again everything will need to be cleaned again . Therefore, the stainless steel itself should not be heated. The secret lies in the soldering iron, or rather, in the soldering iron tip.
As a rule, if you use a soldering iron with a power of one hundred watts with a copper tip, then it overheats very quickly, the solder evaporates, after which scale instantly forms, and soldering is no longer possible (and the heat transfer of the tip drops, because scale conducts heat worse). But there is a way out, use proven, wise advice. First, if your tip is tapered or flattened, shorten it by cutting it straight with a metal saw, leaving about 2-3 centimeters of protruding copper. Then bring the surface of the tip to a copper shine (I used an ordinary fine-grained file for this).
Sharpening the sawn-off tip
Bring the sting to a copper sheen
And then the fun begins, firstly, you need to prepare everything in advance because after heating the soldering iron, you will have to act very quickly and deftly. And that’s why, the temperature of the soldering iron is very high, the tip overheats instantly, and no matter how well you tin it, all the tin evaporates from the surface of the tip quite quickly.
The tin evaporates and the surface of the tip becomes dull
Therefore, do as I did: Apply orthophosphoric acid to the soldering area, rub the tip on a file, tin it, put tin on the tip and do the soldering, and then put tin on the tip again. A thick layer of tin will not have time to evaporate and the tip will not need to be tinned often, but if scale does appear, then rub the tip on the file again until copper appears and quickly tin it
Top articles: Turn gmail into a gtd system using multiple panels
I repeat, everything must be done very quickly, then there will be no scale, and the heat transfer of the soldering iron tip will be sufficient for high-quality heating of the soldering area - which is important!
When soldering stainless steel, the seam may not always turn out aesthetically beautiful. And for greater reliability, it is advisable to completely solder the bottom of the kettle to prevent leakage in another place.
The resulting seam
After you have soldered all the necessary places on the kettle, just for an acceptable appearance, the seam can be polished with sandpaper or a file. After that, be sure to wipe with alcohol to remove any remaining acid, oxides, and scale.
How to find a damaged area?
It is almost impossible to visually find the location of a wire break inside the cable, since the outer insulation remains intact.
But it is still possible to determine the approximate location of the fracture. To do this, connect the headphones to any sound source, for example, a mobile phone, and turn on the melody on it, bend the cable along its entire length.
We look for the place of damage by bending the wire
When bending in a problem area, the sound should change its character, and it should change when bending in different directions or stretching the cable. As practice shows, most often the wire breaks near the entrance to the plug - in this place it is more mobile. If this happens, and the wire is indeed damaged in the location indicated above, the problem can be solved by cutting off the damaged section and re-soldering the plug.
How to repair a broken wire?
So where should you start? Step back about 10 cm from the plug and cut the cable with a knife (a stationery knife is best).
Next, cut the insulation and prepare the ends on the good section of the cable for soldering.
The next stage of work is the plug. There are two options for connecting it to a prepared cable:
- Buy a new, detachable plug and solder the wires to it.
- Use the old plug.
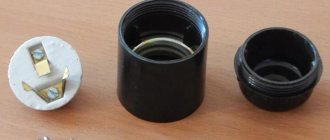
It’s not always possible to find a new minijack, so let’s consider the second option. Take the plug and, using wire cutters, carefully, without damaging the core, remove the insulation from it.
There shouldn't be any problems with this. It is advisable to remove the plastic sheath so that the wires remain at the very core of the plug and you can see their color.
This will make it possible not to mix up the ends when soldering, since the colors of the wires in different models may differ. But most often they are standard: black is common, white is connected to the left channel, and red is connected to the right.
The common one is always located closer to the beginning of the plug
Prepare the cable, the length of each wire should be such that in a straight position it is exactly opposite its contact on the core of the plug.
The length of exposed wires varies
That is, the black wire should be the longest, the white wire should be of medium length, and the red wire should be the shortest. Excessive length of wires at the last stage of work will create problems. Once the wires are cut to length and the insulation has been stripped, tin them.
You can use regular rosin and tin, or prepare a flux by dissolving crushed rosin in alcohol in a ratio of 1/3. This flux will ensure good tinning and soldering.
Dip the ends in soldering acid
Dip the stripped ends into flux and heat with a soldering iron. Place the wires on the plug and solder them.
The wire is soldered
Before doing this, do not forget to put a piece of heat-shrink or vinyl chloride tubing of suitable internal diameter and length on the cable.
Thermocembric
When the wires are securely soldered, carefully, without unnecessary tension, slide the insulating tube along the entire length.
Job is done
The final stage is to check the connector in operation. To do this, connect the headphones to the “mini jack 3.5mm” jack of your mobile phone, and play some melody on it.
Final result test
If everything went well, you should hear loud, clear sound from both speakers, even if you bend the cable in different places.
Let's sum it up
To prevent suddenly broken curling irons from ruining your hairstyle and mood, you need to take the choice of this device very seriously. But since purchasing even the most expensive styler does not guarantee its eternal operation, it is better to immediately acquire the tools necessary for repairs.
Do not try to disassemble the iron after purchase. Firstly, it will still be under warranty. And secondly, there is a risk that you will not put it back together. And instead of a brand new device, you will receive a non-functional set of parts. It’s another matter if the styler is already broken - in this case, you definitely have nothing to lose.
If you cannot repair the tongs yourself, do not hesitate to seek help from a specialist. After all, the main thing is a functioning device, and not who repaired it.
Tags: , beat, sconce, throw, view, harm, choice, house, , capacity, clamp, replacement, protective, sign, isolate, insulation, cable, like, , , multimeter, crimp, soldering iron, principle, wire, project, start, , work, size, regulator, resistor, repair, row, garden, twist, connection, wire connection, resistance, term, ten, type, current, , photo, shield, electricity, effect
How to seal a leak in a pipe: chemical methods (sealants)
The use of chemical methods for eliminating leaks uses various chemical compositions. Most often silicone based. Their use is due to high heat resistance (up to 350 degrees) and increased wear resistance. Fiberglass painting cloth is usually used as a reinforcing element.
The damage repair steps are as follows:
- A 2-3 mm thick sealant is applied to the cleaned damaged surface of the pipe, over which a painting cloth is rolled (back to back, layer to layer)
- On top of the first layer, another layer of sealant is applied and then reinforcing fabric, but with an overlap of 5 mm turns.
- The total number of layers must be at least 4
- The fabric is laid tightly, without “air” layers.
- The last layer of sealant is applied
- The treated section of the pipe must be left to dry. Depending on the type of sealant, this can take from several hours to several days.
Seal a hole in a metal or polymer pipe
Top articles: Portable tripod for travelers
In case of very minor damage to a straight section of a pipe, a bend or a threaded connection, you can use ordinary superglue (eg: “Minute”) and soda. When using this method, the main thing is to properly prepare the damaged area for applying the adhesive. The surface must be completely cleaned and degreased. To do this, use a file (or grinder) and any solvent.
- At least 3 layers of molar tissue are applied alternately to the damaged area, with a layer of baking soda applied to each layer. The last layer will be a layer of glue, which reacts with soda to form a dense waterproof shell.
- If the damage is a crack, then soda is driven inside and glue is applied on top. The chemical reaction will create a dense shell.
Insulating tape
This is the most common material that can usually be found in any home. PVC (polyvinyl chloride) material with an adhesive base on one side. Electrical tape is very cheap and therefore repairing the cord will cost practically nothing. Repair algorithm:
- wrap several layers of electrical tape over it;
- press it gently and firmly;
- cut off the remaining excess.
The quality of protecting the wire with electrical tape is quite high, and after such repairs the charger can be used again. However, when using electrical tape, some nuances should be taken into account.
People who have used this repair option note that electrical tape is not very reliable. To be sure to fix a broken charger wire, it is better to walk a layer of the remaining wire over the entire cable.
Other disadvantages of electrical tape:
- it is quite rough and looks sloppy;
- Over time, part of it may come off, and microparticles of dirt will settle on the remnants of the adhesive, which also gives the device an unsightly appearance.
Connecting broken copper wires
Connecting a broken copper wire in a wall by soldering ensures reliable contact of the wires no worse than an undamaged one and allows you to close the connection with plaster without installing a junction box.
One of the two copper wires is broken
An autopsy showed that one copper conductor was broken, the second wire was not touched and the insulation around it was not damaged.
To repair, you first need to remove the plaster to the sides of the damaged area 3-5 centimeters to a depth of a centimeter under the damaged area of the wire. This is necessary to create conditions for connecting the wires. Next, you need to disconnect the wires and cut the insulation along the center.
10-15 mm of insulation is removed from the damaged ends of the conductors. If the electrical wiring was made a long time ago, then its insulation becomes very hard and it is difficult to remove it with a knife in cramped conditions without damaging the wire. In this case, it is better to remove the insulation by reflow.
The ends of the copper conductors are coated with a layer of solder using a soldering iron. The conductors must be tinned carefully and on all sides. An insulating tube slightly longer than the bare wires is placed on one of the conductors.
Take a piece of copper wire with a cross-section no less than the cross-section of the broken wire. This piece of wire is also covered with a layer of solder. The length of this insert must ensure an overlap of at least 10 mm over the connected ends of the wires.
The insert is soldered to the connecting ends. Solder should not be skimped. Next, the insulating tube is moved so as to completely cover the joint. If a sealed, moisture-resistant connection is required, then before putting on the tube, the soldered joint must be generously coated with silicone.
If silicone was not used, then to eliminate the possibility of displacement of the insulating tube and to ensure greater tightness of the joint, one layer of insulating tape should be wound. Since a large roll of tape cannot be threaded behind the wires, and a strip of electrical tape from the roll will stick together during insulation, it is better to unwind the required length from the roll and wrap it around any rod, such as a match.
As a result of the work done, a connection was obtained from the broken wire of the hidden electrical wiring, whose technical characteristics are practically not inferior to the neighboring surviving conductor.
Such a connection can be safely covered with plaster and forever forget about the trouble that happened.
Both of the two copper wires are broken
If both wires of the hidden electrical wiring are broken at once, then each of the conductors can be connected using the technology described above. But to achieve maximum quality, it is better to splice them in a slightly different way. One of the broken conductors is spliced as described above, and for the second, the insert is made from a wire on which the insulation is partially left.
With this connection method, direct contact of adjacent wires under the most unfavorable circumstances is completely eliminated.
First, one end of the conductor is spliced by soldering, then the other. All that remains is to put on the insulating tubes
Please note that in order to reduce the risk of exposing the wire in the wall, the lower insulating tube is made of two pieces, which are put on the right and left wires before soldering
Before putting on the tubes, in order to obtain a sealed, moisture-protected connection of the hidden electrical wiring, the soldering area must be generously lubricated with silicone.
All that remains is to screw a layer of insulating tape onto the restored connection.
Three out of three copper wires are broken
Three broken electrical wires are connected using the same technology as two. You can place a long jumper with insulation one in the middle, and connect the outer conductors with a short one. But then installation will be more difficult.
After soldering, silicone is applied to the unprotected sections of the wires and insulating tubes are put on. The resulting connection is then wrapped with insulating tape.
You can see how I made double copper wire when moving a socket from one wall location to another.
A legitimate question arises: how to heat a soldering iron for soldering if there is no voltage in the electrical wiring? If the electrical wiring in the apartment is double-circuit, then you can connect the soldering iron to an outlet in another room through an extension cord. You can power the soldering iron from the distribution panel in the entrance, or connect the carrier from your neighbor. As a last resort, you can use a mobile soldering iron, which is described in the site article of the same name.
Top articles: 11 ways to draw cool arrows
How to fix a wire
It is not difficult to repair a damaged twisted pair; to do this, it is recommended to follow a simple sequence of actions:
Find the break point by visually inspecting and feeling the cable. Using pliers, remove the damaged area, moving 3 centimeters in each direction from the break. Carefully strip away the outer insulation. It is necessary to free approximately 10–15 mm of each core. This can be done using a stationery knife. The main thing is not to damage the internal conductors!
Connect the wires by color: blue to blue, orange to orange, and so on. Distribute them so that it is convenient to work with them, as shown in the example.
Using a pipette, apply a drop of flux to the two wires being soldered (ZIL-2 brand is recommended). Dip the soldering iron into the solder with rosin and, connecting the stripped aluminum parts of the cores, heat the connection. Cover the soldering area with a small piece of electrical tape
It is important that the insulation is as thin as possible.
Repeat steps 6–7 for the remaining pairs. Wrap the resulting structure tightly with electrical tape. Done, the wire can be used.
FUM tape
This material is available at plumbing supply stores and is commonly used to insulate and seal pipe joints. The cost usually does not exceed 25-40 rubles per skein. FUM tape is more convenient than electrical tape due to the following advantages:
- thin and flexible, which ensures a reliable and durable fit;
- FUM tape does not contain glue, so it is more reliable and does not dry out or crumble over time.
You can repair a damaged area using FUM tape using the simplest steps:
- find the location of the wire damage;
- cut off the required amount of tape;
- wrap with tension over the damaged area, capturing entire areas around it.
For repairs, a small layer is enough: the material sets well and reliably holds the contact area. Both electrical tape and FUM tape are temporary measures. You will subsequently need to buy a new charger.
Connector repair
For this operation you need to buy several RJ-45 connectors and a special tool - crimping scissors. You can find these things at any electrical supply store.
Repair algorithm:
- Cut off a small section of the cable with the broken connector. Use wire cutters for this.
- Remove 10-15mm of outer insulation using a utility knife.
- Arrange the inner cores in a row by color and trim the length with wire cutters. There is no need to clean them. The most popular crimping scheme is shown in the picture.
- Insert them inside the new connector. Make sure that the wiring sequence does not change. If everything is in order, with gentle pressure on the cable, insert the cores into their grooves until they stop.
- Insert the connector into the appropriate socket of the crimping scissors and squeeze it several times.
- Pull the cable out of the crimp. Assess the strength of the connection.
As you can see, both methods of fixing a cable are very simple, especially if you already have experience working with soldering irons and wires. If this is your first time fixing a twisted pair cable, don’t worry, just follow the sequence of steps and be a little patient.
Who can repair their hair curling iron themselves?
First, it should be noted that fixing a curling iron is quite a serious matter, requiring skills in repairing electrical appliances. If you basically understand the repair of electrical equipment, have experience in such repairs and have the necessary tools - an electrical tester and a soldering iron, at a minimum - then you can cope with this. You won't find anything super complicated or super specific here.
But if you do not have the necessary skills and do not have the necessary equipment, it is better not to get into the inside of the iron, because you may not only not achieve results, but also create new problems, further complicating future repairs for those who will do it.
How to fix a minijack on headphones without a soldering iron?
If the damage is in the area of the plug, then no way. All contacts must be soldered. Therefore, you cannot do without an electric tool.
If there is a break somewhere in the middle, as an alternative, you can carefully twist the wires and seal them with electrical tape or masking tape (not important).
Cut off the tear completely, peel off the plastic insulation and varnish within one and a half centimeters of each edge. Twist the wires by color and insulate each one separately. And only after that you can connect them together. Otherwise, a short circuit may occur and the sound from stereo will turn into mono or one of the channels will disappear completely.
If you have heat shrink tubing (cambric), use it instead of tape. Before twisting, put on a piece of larger diameter and move it to the side. Then connect the wires and put small tubes on each twist.
Heating methods: iron, hair dryer or incandescent lamp. Additionally, press the joint with your fingers for better gluing. Connect the cooled and “packed” twists tightly together and pull the larger piece moved away on top of them. Reheat the area. The broken wire has been repaired.
This method is quite reliable for further use.
Heat-shrink tubing
Unlike the first two materials, heat shrink tubing is more durable and can last quite a long time. In a specialized store, you can select a tube that matches the diameter, size and color of the damaged cord. Such materials will cost more than FUM tape and electrical tape (from 100 rubles per piece). But the cost is compensated by the long life of the charger. For repairs you will need:
- find the location of the wire break;
- put a heat shrink tube on it;
- heat it to activate shrinkage (you can use a hairdryer or hold the cord over a lit stove burner); when exposed to high temperature, the tube will shrink, taking the desired shape of the wire and tightly fixing the damage site. Thus, the break in the outer insulation will remain stationary, which will prevent the contacts from moving away. And thanks to the rigidity of the tube, the rupture will not spread further.
Repairing using these methods will help charge the phone in case of emergency, if there is no other charger at hand, and also extend the life of a broken wire. However, if the shell on the charger breaks more than once or the damage spreads, it is better to buy a new device. A faulty cord can lead to many problems, including fire.
How to fix a headphone wire with a microphone?
The headset has no fundamental differences from the standard system. The only difference in the plug is 3 contacts as in regular headphones and a 4th for the microphone. 4-pin Jack 3.5mm has two standards:
M- and M+ are microphone contacts. The other three: G - ground, R - right, L - left. These are standard colors used by manufacturers to differentiate wires.
Proceed according to the scheme described in the second section of the article. You can use a candle or lighter to remove insulation from wires. High temperatures will melt the plastic sheathing and protective varnish.
Special cable protectors
An effective and durable solution to problems with damaged charger cables is the use of so-called cable inserts. Unfortunately, this solution is quite expensive; a high-quality tip can cost up to 500 rubles. Cable protectors are designed in such a way that the most delicate part of the cable does not break and is carefully insulated.
Remember that if there is a short circuit, the cable is smoking or there is a distinct burning smell coming from it, then it must be replaced. The repair methods described above are suitable for cases where the insulation is damaged, but if problems are noted with the plug or the wiring melts, then using such a cable becomes simply unsafe.
Conclusion
The article details how to fix a broken Android charger cord. The instructions are relevant both for repairing a detachable USB cable and for chargers with a built-in cord. Before repairing, it is worth assessing the extent of the damage. In some cases, it may be better to replace the cable or the entire charger. Since modern chargers are complex and repairs cannot be done with just improvised means. And buying a specialized tool will cost more than buying a new charger.
Have you ever had to repair a charger cable? Share your opinion in the comments below the article.