Each of us gives his own preference in choosing one or another model of table lamp. It is also necessary to think: How will we subsequently repair the table lamp? Should I send it in for repair if it malfunctions or should I do the repair myself?
Table lamp Mantra 1314
To carry out repairs yourself, you definitely need certain knowledge in physics and electrical engineering with additional knowledge of the basics of electronics.
The topic may seem simple at first glance, but not entirely. Why exactly? - Because there is currently a variety of such electrical circuits for various models of table lamps.
Operation of the lighting device
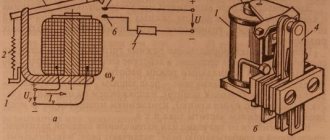
A fluorescent lamp (FL) is a gas-discharge light source in which, due to the interaction of incandescent filaments and mercury, an electrical discharge is formed, creating an ultraviolet glow, which is converted into visible light using a phosphor. It is worth noting that the current that passes through the filaments is evenly distributed along the contours of the lamp, promoting shunting, reducing the heat, so these devices do not heat up, which is one of the advantages. There are the following types of fluorescent lighting devices: 1. LS with chokes and starters. Fluorescent lamps are at the peak of their popularity in terms of mass use. They can save up to 50% of electricity, unlike conventional lamps. To maximize the service life and uninterrupted operation of the device, it is necessary to use elements such as a starter and a choke.
The starter, similar to the one used for cars, plays the role of a starting mechanism. It is needed for the lamp to start working. Often, the voltage at the moment of ignition is much higher than in the network, so a stabilizer is needed. Also, the starter closes and opens the electronic circuit of the lamp network.
The choke plays the role of a transformer and is capable of stabilizing the operation of the lamp. It protects the fluorescent lamp from voltage surges and overheating. This type is characteristic and inconvenient in that when starting, they begin to blink (this effect is produced by the starter, it passes current and gradually fryes the filaments); for the first 2-3 seconds they hit the eyes with sharp flashes of light, and then they light up and burn normally. 2. Fluorescent lamps without a starter with a balancer. Unlike the previous type, such devices do not have a starter. This allows you to avoid flickering of the lamp in the first 2-3 seconds, and start it immediately after turning it on. Looking at the diagram, you can see that instead of a starter there is a balancer. This element refers to ballasts that limit current. But if you compare the balancer and the starter, the latter is better.
3. Energy saving lamps. Conventional drugs are often confused with energy-saving drugs, but this is not entirely true. Of course, when compared with incandescent lamps, any fluorescent lamp is many times superior to them in terms of service life. But if you choose between types of drugs, then among them there are sales leaders - energy-saving models.
A distinctive feature of these lamps is their shape, tube diameter and low mercury content. Due to the fact that the bulb of the lamp is curved (often it has the shape of a spiral) and the diameter is reduced, this allows you to save electricity on igniting the filaments, but at the same time illuminate a fairly large area. All types of modern lamps use new technologies that provide reliable inverter feedback, which makes it possible to control the current strength. Inverters are used in electronic ballasts (electronic ballasts), which guarantees their greater durability, efficiency and practicality.
Dimmer classification
There are two types of dimmers - monoblock and modular. Monoblock systems are made as a single unit and are designed to be installed in a box as a switch. Due to their small size, monoblock dimmers are popular when installed in thin partitions. The main area of application of monoblock systems is apartments in multi-storey buildings.
There are several types of all-in-one devices on the market:
- With mechanical adjustment. Control is carried out using a rotary disk. Such dimmers have a simple design and low cost. Instead of a rotary control method, a push version is sometimes used.
- With push-button control. These are more technically complex and functional mechanisms. Multifunctionality is achieved by grouping regulators controlled from a remote control.
- Touch models. They are the most advanced devices and the most expensive. Such systems fit well into the surrounding interior, especially those decorated in a modern style. Commands are transmitted using an infrared signal or radio frequencies.
Modular systems are similar to circuit breakers. They are installed in junction boxes on DIN rails. Modular devices are used to illuminate stairwells and corridors. Modular systems are also popular in private homes where it is necessary to illuminate the surrounding areas. Modular dimmers are controlled by an external button or a key switch.
Dimmer power is a key parameter when choosing it. The total power of the connected devices should not exceed this figure for the dimmer. There are systems on sale with power levels between 40 watts and 1 kilowatt.
According to design features, single, double and triple modifications are distinguished. In most cases, consumers choose single dimmers.
Additional functions
Older dimmers were designed as electromechanical devices. With their help it was impossible to do anything except adjust the brightness of incandescent lamps.
Modern models have significantly expanded functionality:
- Work on a timer.
- The ability to integrate a dimmer into a larger-scale system - a “smart home”.
- A dimmer, if necessary, allows you to create the effect of the presence of the owners in the house. The light will turn on and off in different rooms according to a certain algorithm.
- Artistic shimmer function. The lights on a Christmas tree garland flash in a similar way.
- Possibility of voice control of the system.
- As standard, commands are issued from the remote control.
Scheme of energy saving lamps
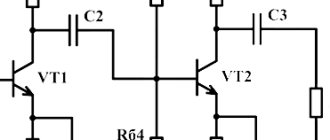
Depending on what kind of drug, there are different types of schemes. Let's look at the most common one for energy-saving lamps in order to understand its internal components.
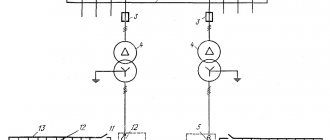
Having examined the figure, it is clear that the power circuits include: L2 (interference choke), F1 (fuse), four 1N4007 diode bridges and C4 (filter capacitor). In turn, the triggering circuit includes the following elements: dinistor, R6, D1 and C2, in the same circuit D2, D3, R1 and R3 are network protection. Some lamps do not have these diodes installed. As soon as the lamp is turned on, the dinistor, R6 and C2 release a pulse, which is applied to transistor Q2, which allows it to open. After this, diode D1 blocks this part. Next, the transistors excite TR1 (transformer), and thus voltage is applied to the threads. The tube lights up at the resonant frequency and at this moment the voltage on C3 (capacitor) reaches about 700 V. After the gas is ionized, C3 (capacitor) is practically shunted. Having examined this diagram, you can understand the principle of operation of the drug and its components.
What's new in the VK SamElectric.ru group?
Subscribe and read the article further:
14. Luxar 11w circuit
15. Maway 11w circuit
16. Scheme browniex 20w
17. Bigluz 20w circuit
Here is a selection of schemes.
Update dated February 27, 2016
I am publishing a diagram and photo from a reader named Ikrom from sunny Tashkent. See his question and my answer in the comments for this date.
Lamp diagram. The + and – signs at the terminals of the diode bridge D1-D4 are swapped.
New ballast (toroidal transformer wire cross-section 0.37mm2)
Typical breakdowns
There are two options in which the lamp breaks:
- Damage to the internal components of the lamp;
- Natural aging. If a lamp fails, it must be disposed of through special collection points for mercury lamps.
Repairing energy-saving lamps with your own hands is possible, but many do not risk doing it, preferring to simply replace broken equipment. At the same time, it is quite easy to repair such lamps; the main thing is to determine the source of the problem. Let's look at the most common breakdowns.
| Type of failure | Cause | Remedy |
| Constant blinking | The way the lamp flashes determines the nature of the floor or the degree of its wear. The first cause of failure may be depressurization of the housing, which allows chemical gas to escape from the main flask, which gives the lighting effect. The second reason for such a breakdown may be the burnout of the electrodes that are located inside the lamps. The third option, if after turning on the light comes on, but continues to flicker, more often the malfunction is a malfunction of such components as the throttle or starter. The fourth option for which an energy-saving lamp flashes after being turned on can be even simple voltage drops in the network. Despite the fact that almost every table or regular lamp has protection, there are times when it is not enough. The fifth option may be the case when the wiring is heating up. | In most cases, the best option is to completely replace the lamp. But on an 11-watt table lamp it is easy to troubleshoot when it is immediately visible, then you need to replace the internal part and everything will return to normal. If the lamp lights up one after another, pay attention to the inductors where the wiring could have broken. You just need to restore the wiring or replace the necessary component, after which the problem will be solved. However, to do this, you should pay attention to such a factor as the energy-saving lamp circuit, which was discussed above. If you make a mistake, serious problems arise, the solution of which will require a lot of time and effort. It is better to check the wiring at each stage of work with a tester. In this case, the 11-watt table lamp is easy to check and repair. |
| Nagar | The main sign of wear or breakdown can be carbon deposits, which are caused by burnout of the coils. | If this symptom is present, the lamp will most likely not be subject to restoration. In this case, the lamp in the lamp should be replaced and it will still function normally. |
| Filament burnout | The main causes of lighting problems: — problems in the ballast; — lamp aging; — wear of the main ballast connections. | It is difficult to solder the filaments yourself at home; it is easier to replace this component of the lamp. |
| When starting the lamp for the first time, there may be a problem with the circuit breaking in the starter. | This is due to the fact that when current passes through the lamp, it is insufficient to cause a normal surge in the ionization of gas molecules. This problem occurs when the network voltage is low. | In this case, it is worth directing your efforts to normalize the voltage in the electricity distribution system. |
| After turning on the lamp, the machine completely knocks out all the wiring. | The reason lies in the fact that the capacitor, which is connected in parallel to the network, is broken. | Such a capacitor must be replaced immediately, while at the same time checking the remaining components using an ohmmeter. |
| The lamp does not turn on | The reason that the lamp does not turn on may be a break in the choke or a breakdown of the lamp itself. | To begin with, check the throttle directly with an ohmmeter. If a break was not detected, replace the starter and try to turn on the lamp. If the previous option did not help, you should check the fluorescent lamp itself. Attention should be paid to the filament. If the thread burns out, short-circuit it. However, you should not repeat this process with two threads at once, because in this case the inductor will burn out. Also, this problem may indicate a malfunction in the lamp as it ages. These are malfunctions in the wiring of the lamp, in the sockets for connecting lamps and the starter. In this case, it is necessary to consider the feasibility of repairing the lamp. |
How to disassemble a table lamp
To repair the lamp it was necessary to get to the driver. To do this, it was necessary to disassemble the base of the lamp.
The heads of several screws holding the halves of the base together were covered with rubber circles, which simultaneously served as legs. The legs were held in place with a sticky layer. To remove the legs, it was necessary to pry them by the edge with a sharp object. After that, using a Phillips screwdriver, the screws were unscrewed and the base was disassembled.
Tips before starting repairs
Tip 1. Before you start inspecting the lamp for defects and breakdowns, you should prepare a workplace for yourself and take the tools: a set of screwdrivers, electrical tape, wire cutters, a multimeter (tester), it measures voltage, current and resistance, and some types are checked and capacitors, diodes and transistors. This device allows you to check the throttle, starter and the lamp bulb itself. In most cases, the reason lies in these elements, however, it is possible that the tungsten filament burns out, but this happens less frequently. If you don’t have such tools, you can easily buy them at any hardware store.
Tip 2. You should study the lamp model and understand its structure, since due to ignorance in this matter, you may not open the lamp, but simply break it. The manufacturer and model are indicated on the base of each drug, so you can easily find out this information.
Tip 3. Be sure to follow safety precautions, since the drug contains a small amount of mercury. Therefore, everything should be done extremely carefully.
Touch switch 220V with modification
After reading a review about a cheap touch switch, I decided to try it and ordered a couple of these directly from the author’s link. I used it in the manufacture of LED lighting for homemade shelves/mirrors, when the lamps were turned on/off by touching a metal pipe—the shelf holder. My joy and that of those around me knew no bounds, but in one of the switches a low-power triac burned out with a crash, without working even 5 times on a 10-watt backlight
( 1 rating, average 4 out of 5 )
Repair a lamp yourself
Repairing drugs at home requires minimal knowledge of electrical appliances. The circuit of an energy-saving lamp is the main condition when eliminating breakdowns of the lighting device yourself. The main causes of existing malfunctions in fluorescent lamps were listed above. Once the cause has been determined, it is necessary to begin correcting it. 1. First and most importantly, turn off the power to the lamp. We open the lamp. We disassemble the case and look at external defects and malfunctions that are noticeable to the naked eye. The lamp is opened with a screwdriver, after which the main cause of the malfunction is determined.
2. After opening, you need to examine the components of the lamp.
3. We inspect the board and notice visible damage on it; this could be the cause of the breakdown.
As you can see in the figure, the arrows show where the board is burned. This means that somewhere the circuit is shorted when the lamp is turned on. If the board is in order, we continue to inspect other parts. 4. Next we check the fuse. Finding it will not be difficult; one end is soldered to the board, and the other to the base. If it is damaged or the contacts are not soldered, then the cause of the failure is the fuse. 5. Next in line to check is the resistor. To determine the malfunction in this part of the lamp, you need to use a multimeter and take measurements with it. If the resistor is working normally, the multimeter will show a resistance of 10 ohms, if not working, it will show one.
6. Next in line for inspection is the filament. If the filaments are disconnected from the board or have deposits on them (traces of burning), then the whole problem of the lamp not working lies precisely here. Once the failure has been identified, it should be repaired. Disassembling each spare part yourself and trying to solder it or do something else is not an option, since it will take a lot of effort, and there may be no result at all. For example, if the problem lies in the filaments, then this part of the lamp should be replaced, since soldering or repairing them yourself is not an easy task, and even an experienced specialist cannot always cope with this task. Therefore, you should not waste time on this. All components of the drug can be purchased at any specialized hardware store. If the breakdown has been identified, but the exact model of the part that failed could not be found out due to carbon deposits or other reasons, then qualified store employees will help you choose exactly what you need.
There is only one conclusion - after the cause has been identified, it is worth replacing the faulty part, and the lamp will again delight you with its bright light.
Dimmer purpose
The purpose of a dimmer is to change the brightness of lighting devices. Adjustable light switches allow you to achieve any lighting intensity: from dim light to extremely bright. The use of dimmers makes double or triple switches unnecessary, and there is no need to buy expensive lighting fixtures with voltage controllers.
Note! To control the light intensity of energy-saving light bulbs, you will need a special device - an electronic starter.
The advantages of dimmers include the following characteristics:
- light brightness control;
- setting the brightness change time;
- remote control control;
- long service life;
- programmed artistic flickering, creating backlit paintings;
- economical energy consumption (some models).
- excessive electricity consumption in some cases;
- creating radio interference that interferes with the operation of electrical appliances;
- small loads cause dimmers to malfunction;
- The operation of dimmers often leads to unwanted flickering of the light.