In this article we will look at how to hide computer wires under the table in an unusual, stylish, practical and interesting way.
Home computer equipment is connected to the network using a considerable number of different wires. Due to the lack of many stationary sockets, you have to supplement this rather large set with extension cords and adapters. All these wires often interfere with work, getting underfoot. As a result, the risk of breaking any of them increases several times. In addition, such a “web” does not look very aesthetically pleasing. It will be better for everyone if the wires are carefully hidden, and we will tell you in detail how to do this in this material.
Slitting process
Why bother with “disguising” the electrical wiring if you can first attach it to the main wall, and then simply plaster it on top.
The technique is called “hidden” and the sequence of actions is not always exactly the same. Most often, a team of plasterers does their job valiantly, and then they are replaced by electricians who begin to reformat the world in their own way, in accordance with the tasks assigned to them. This is strongly reminiscent of the joke about two soldiers from a construction battalion, one of whom was digging holes, and the other was burying them after him (there was no third one, who was supposed to plant trees, but an order is an order). To carry out wiring, electricians are forced to make channels for wires and holes in the plaster with a hammer drill - to punch the surface. Not everyone and not always want this burdensome procedure:
- Scoring damages existing plaster. It is extremely rare to be able to break through neat channels. And even if this can be done, the final layer of plaster in the areas of gating will still have to be restored after laying the cable. It is worth recognizing that the technique is very multi-iterative.
- Grooving is associated with increased generation of dust, which will be everywhere in the apartment. If we are not talking about the initial arrangement, but about repairs, then you will definitely have to re-glue the wallpaper and update the ceiling.
- Long-term unpleasant sound impact of a hammer drill. Even if you carry out repair work at strictly prescribed hours by law, your neighbors will still not thank you.
- The wiring turns out to be completely hidden. There will never be access to it now.
The purpose of the thesis of this section is not at all to discredit one of the most universal construction technologies that provides great opportunities (slating)
In relation to electrical wiring, I would like to emphasize that the design and aesthetic appeal of the method comes at the price of safety. Electricity is not something to joke about, and communications tend to fall into disrepair. It would be good to replace them
But if the wires in the apartment are laid in channels drilled into the wall, then you can simply forget about it. Replacing the wiring is only possible by laying a new cable and disconnecting the old one (from both ends)
It would be good to replace them. But if the wires in the apartment are laid in channels drilled into the wall, then you can simply forget about it. Replacing the wiring is only possible by laying a new cable and disconnecting the old one (at both ends).
In this regard, it would be nice, of course, to get an alternative. There is such a way - it is laying electrical cables in an open way. The features and capabilities of this path are described below.
⇡#Conclusions
To be honest, while writing the article, I couldn’t help but feel that Captain Obviousness was closely watching me - the things that were discussed in this article were too obvious. However, as practice shows, for many users some of the described techniques turn out to be a discovery, and I am sure that this material will be useful - a topic that clearly shows what the user’s system unit can look like externally and how to achieve this should be on our website. Among our (by no means all) readers there is an opinion that all these glasses, lights and other modding decorations are not needed. I hold a different opinion and, taking advantage of my official position, I declare this openly. The main thing is that in the pursuit of beauty, other components of the computer do not suffer: performance, reliability and functionality.
We would like to express our gratitude to representatives of ASUS and Corsair for the equipment provided for testing.
Useful tips
In order not to get confused when masking the wires and not to get into trouble during repairs, they must be marked in advance. This will help you immediately find the right cable later. It is better to separate low-power wiring from power wiring, without connecting it into a single bundle. Wires from the antenna and the Internet should be placed separately from others so as not to spoil the signal quality.
Cables should have the shortest possible length and the minimum number of connections: this increases their safety and reduces the risk of injury. It happens that the braid of hidden cables frays due to poor placement, so in dangerous places the wiring must be checked more often. If you need to mask wiring, you can use any ideas, especially since the range of tools and materials for decoration is now huge!
Crimping with sleeves: technology features
The installation method is based on creating tight contact between metal conductors placed inside a tube made of the same material and compressing the entire structure under a certain force with a uniform distribution of the acting load.
Good electrical contact is created due to the joint deformation of metals.
The sleeve (tube for connecting wires) is produced by industry for specific wire sizes and their quantity. They can be designed to connect cores from:
- copper;
- aluminum;
- and even copper and aluminum.
Copper sleeves (CM) can be produced with additional tinning with tin and bismuth. They are designated GML and are noted for their high resistance to corrosion.
Aluminum sleeves are designated GA. To connect copper and aluminum wires, GAM sleeves are used, and with an insulation layer they are called GSI.
Their sizes can be found in catalogs. As an example, I present the main characteristics of some GML cartridges in a small table.
The dimensions of the sleeve are specially selected for the cross-section of the switched wire. Their correct choice affects the quality of the electrical connection.
For crimping, a special tool is used: press pliers. If you work with pliers, hammers and other improvised means, the contact created will be of poor quality.
Press pliers are produced in various designs and operating principles for crimping different types of sleeves and tips.
Using the same principle, lugs for stranded wires are selected and crimped for connecting them to the terminals of electrical equipment.
This is especially true for automotive equipment, where wiring is subject to increased mechanical vibrations and electrical loads. Yes, and in the household network there is installation with flexible conductors.
As an example, retro wiring in a wooden house. Although this is not the only case.
Crimping of conductors is a rather large and complex topic, which allows you to create a high-quality connection of electrical contacts. Andrey Kulagin explains its technology well in his video. I recommend watching it.
Hide wires from TV
With a TV the situation is a little more complicated, because in this case the wires are always visible. But, here are the following solutions to this situation.
First way
To hide the wires from the TV on the wall, just use the “Cable Box”, in the photo you will find an idea of what it is.
This is the final result.
Second way
Suitable for people who do not want to make repairs. This way you can get a chic design, and the wires in this case will only highlight your interior. The method is chic, however, not everyone likes it.
As you can see, hiding wires on the wall is incredibly easy.
Third option
It is suitable only in cases where repairs are just beginning. After all, all the wires can simply be hidden behind the wall. It looks like this:
If necessary, you can stretch another wire, or get an existing one.
Fourth option
The most popular one is to hide the wires under the baseboard. In order not to be verbose, I found this video for you.
https://youtube.com/watch?v=FaTMwyWp4fA
In this way you can hide wires from: air conditioning, home theater, music center. Although it is better to hide the wire from the air conditioner in a cable channel, because running it under the baseboard is not a good idea; it will have to be removed sooner or later.
Decoration
In addition, electrical cables can be decorated, making them part of the interior. This will require a little imagination and free time. The easiest way to hide the cords is this way:
- disguise them behind a flower arrangement;
- apply silicone pads;
- use decorative panels;
- do a twist.
If you need to remove extension cords, decorative boxes are suitable. They are sold in stores or you can make them yourself. They contain all communications - cords, tees, charger.
Silicone tips
Silicone overlays to match the wallpaper or, conversely, contrasting ones can be purchased at hardware stores. Consider all the colors of the interior so that nothing stands out from the overall design of the room.
There are also sets with decorative elements - birds, flowers. And if you want to make jewelry for silicone pads yourself, then you will need available materials and time.
Plant branches
You can place a composition of indoor plants under the TV panel - the greenery will cover the wires and draw attention to itself. Crafts made from dried flowers or herbs are also a good way to disguise electrical cables.
Decorative panels
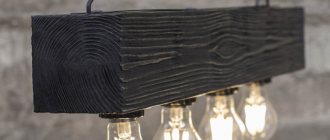
The television cord and connected cables can be hidden behind a decorative panel made of wood, plastic or metal. And the panel itself can be decorated with thick fabric, artificial flowers, branches, images of birds and animals. You can complement the composition with photo frames and indoor plants.
Twisting
If the wires are long enough, you can not hide them at all, but make a picture out of them on the wall. It can be a geometric pattern or a more complex shape.
First, use a simple pencil to outline the contours of the picture, and then lay the cords along the markings. You must first take into account their length, since they should not be overly stretched.
The problem of the aesthetics of television communications today can be solved in many ways. You can hang your TV on the wall without wires by hiding them in the walls, floor or furniture. Electric cables can also be integrated into the interior as decoration.
Due to such an abundance of options, everyone will choose the one that suits them, taking into account their personal requirements and capabilities.
Hiding with furniture
Another way to hide wires is to use furniture, both regular and special. For example, the wire from the computer can be secured under the tabletop using double-sided tape (not very secure, but easy to change position), a construction stapler or self-tapping screws. In the latter case, it is better not to drill the table itself, but to use a metal mesh or perforated screen, and then attach the wires to it with zip ties or ordinary office binders.
Use wire mesh to avoid drilling into the back of the table
The surge protector can be easily hidden in the same way by screwing it under the table or securing it to the back surface of the workplace. The wires that will go to it should be secured with thick tape or using plastic ties.
When there are few wires, you can get by with one such hole.
If the TV is on a cabinet and not hanging on the wall, then the wires can be easily hidden behind the furniture, and the accompanying equipment (for example, a TV set-top box) can be placed inside it.
Drill a hole in the TV stand to hide the wires from the router, set-top box and other peripherals
If you are just planning to buy furniture, then pay attention to tables with niches, plugs, shelves and drawers designed specifically for pulling wires. As a rule, such solutions are found in tables and cabinets designed for offices. . A plug on the table will solve the problem with wires
A plug on the table will solve the problem with wires
You can also consider a completely hidden computer installation - buy or make a table with a closed compartment for the system unit, keyboard and other peripherals.
Another option to hide wires using furniture
Organize your cable storage
Organizing them correctly will help you get rid of tangled wires.
First, collect cords from phones, players, game consoles, and tablets throughout the house. Then take boxes (preferably prettier ones), place cardboard dividers inside them, label the location for each cable (so you don’t get confused later) and lay everything out neatly. To prevent the wires themselves from getting tangled, use regular cable ties. iheartorganizing.com
iheartorganizing.com
iheartorganizing.com
If you don't want to deal with boxes, buy a basket and save up more toilet paper rolls.
onecrazyhouse.com
If the wires don't bother you, you can simply attach a label to each one to make it easier to distinguish between them. For example, like this:
thescoopnewspaper.com
Camouflage covers
You can make your own cover for one or several cords at the same time from plastic bags cut into long, narrow strips. A kind of “sleeve” is knitted or crocheted from them, into which all the necessary wiring is inserted. To hide an extension cord with charges in this way, a handbag of suitable size is knitted or sewn.
Some stores offer decorative collapsible plastic covers in the form of tree branches, colored tubes, and shiny snakes. This design does not have the protective properties of cable ducts, but it is acceptable to cover “ugly” wires with it. If desired, a special spiral braid can be purchased - it is flexible, has an aesthetic appearance, and allows you to hide both one element and many wires.
Bookshelf
To hide your electronics, you can use a special shelf that simply looks like a row of beautiful antique books.
The inside of such a device is hollow, which is why you can easily hide all the existing wires in it. This shelf just needs to be installed next to your computer or TV. To do this, you need to roll up the cables and tuck them behind the spine of the books.
Installation of the junction box
There are some nuances here too. It’s worth starting with the fact that in rooms with concrete walls it is recommended to use diamond-coated drill bits, since the more common models with pobedit coating wear out quickly, and you will have to buy additional drills. They can only be used in houses with walls made of finblocks. Typically, when working with finblocks, it is prohibited to use diamond-coated crowns for the same reasons.
Before milling begins, a hole with a diameter equal to the drill is made in the center of the installation, which will make the work much less difficult. Experts recommend choosing boxes with a diameter of 6-7 cm; this will be quite enough for 6 cores. If you plan to connect several sockets in a row, the place for them is leveled.
Life hack #1: wireless devices
We immediately recommend: if it is possible to use devices wirelessly, use them! Now there are a lot of such gadgets: wireless mice, headphones, keyboards, chargers, speakers and even printers. The average wireless Bluetooth mouse costs about 350 rubles - but this is minus a meter of wire. Therefore, if there is such an opportunity, think about replacing wired devices with wireless ones. Thus, you will free up a significant part of the space from the “web”. And in general, look how great a wireless speaker looks compared to your wired one:
Wiring diagram
Safe wiring cannot be achieved without prior planning in the form of a work plan.
For home use, you can get by with a handwritten plan on paper. It is enough to measure the required distances with a tape measure and put them on the drawing. But to increase reliability, knowledge of electrical circuits and experience as an electrician will be required.
If you do not have the required knowledge, you can always use the services of specialists. Most often they use Elektrik 7.8 software. It greatly simplifies wiring design. There is no charge for using the program. The specialist will quickly build and calculate complex circuits thanks to a well-thought-out algorithm. Visio is also used to design the lighting circuit.
After drawing up the project, the locations of sockets and switches are marked on the walls. It is worth considering the feasibility of such a location. In practice, you often have to give up some connection points.
Life hack #4: plug and cable ties
This method is for desktop PC users whose workplace has long turned into a futuristic cybernest. It is used in almost all offices where they work on a PC, but no one bothers to organize this at home. We are talking about using a plug and cable ties. Simply put, you need to collect all the wires from the back of the PC, weave them into a “maiden braid” using special ties (they are called ties) and pass all this equipment through the hole in the tabletop (it is called a plug).
In its simplest form it will look something like this. The only disadvantage of this method is that you need straight hands: you need to drill the countertop and install the plug. However, no one bothers you to buy a package of cable ties at the nearest Leroy and do without it - then the “braid” of wires will simply hang behind the table.
How to secure wires near a desktop
If the table is installed against a wall, you can cover the hanging wires with a beautiful curtain, panel, or secure them with decorative hammocks. For an extension cord that is constantly getting in the way on the floor, a small box is suitable; it will also protect it from dust. Be sure to make several holes in it to bring the cable out.
If you are a device lover, an interesting idea for grouping wires is to install a decorative stand in the form of an electrical tower on the work surface. You can also put an unusual box on the table with holes for the output of wires, which can be easily connected to the equipment at any time. It won’t take up much space, but at the same time, it will hide the clutter and allow you to conveniently organize chargers for gadgets and headphone cables.
How to weld twisted wires: what is important to consider
This method is based on creating local heating of the end of the twist to the temperature of the metal melt, followed by its solidification in the form of a contact ball.
The work can be done with a homemade step-down transformer with a voltage of about 24 volts and a power of 1 kilowatt.
But it is better to use an inverter that produces direct current. To create an arc, a carbon electrode is used, which touches the welding site. It can be replaced with graphite.
The second contact of the circuit is formed by crimping the opposite part of the twist with pliers near the insulation. Their wide jaws serve as a cooling radiator, removing heat from the dielectric layer, protecting it from overheating and damage.
The current strength is about 30-80 amperes and the duration of its flow is about a second, which is selected experimentally depending on the design of the welding machine, the chemical composition and thickness of the cores.
When working at heights near the ceiling, it is convenient to place the wires down.
At the end of the weld, a drop-shaped alloy is formed in the shape of a contact ball.
To ensure reliable contact, you first need to practice on a control sample. A small current will not heat the joint well, but an excessive current will transfer excessive temperature to the insulation layer and burn the metal.
Evaluate the test welding both for mechanical strength and for the created weld structure.
What to pay attention to
The vertical arrangement of the twist during welding allows the melt to better fill the space between the copper wires, giving the drop of metal the shape of a sphere.
You must work in protective gloves, use a welder's mask to protect your eyes, and special shoes. You can easily “catch bunnies” or “catch” a drop of molten metal on clothes or shoes.
After welding one joint, it is better to wait a short time and let it cool, and then move on to processing the next one. This recommendation will prevent accidental burns.
After welding, the exposed conductors are insulated, put on a heat-shrinkable tube, and treated with an industrial hair dryer.
Then the wires are placed in a junction box and covered with a lid.
Is there a mess under the desk in the office? There is a solution!
Is there a mess under the desk in the office? There is a solution! You just need to call me and I'll fix everything.
Are you tired of wires that keep everyone tripping? Something always doesn't work because someone accidentally pulled it out. And the worst thing is that this horror has already lasted, as clients told me, for 3 years.
It's time to stop this, all you need to do is call the master, that is, here is the number for me
+79221642071 Nikolay
Okay, anyway, do you have a few questions, how to hide wires under the table? Yes, everything is very simple, you just need to stock up on electrical tape, plastic ties (clamps), if you have a hammer in the house or something heavy and hard, even a stone, then you can also buy small clips with nails.
And on a creative journey, my only advice is to turn off your computer or whatever you have or ask to save more often. Otherwise, when untangling the wires, you will have to disconnect something.
Here in the photo, of course, there is a more complex process of hiding the wires in an aluminum threshold, but take note.
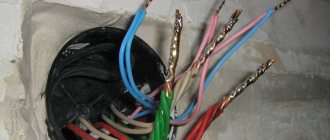
This is what the wires look like for every personal computer user
And like this, after my arrival.
Well, I’ll tell you how to do it, everything is simple, first of all, start from the top of the whole process, from the monitor and using electrical tape or zip ties, just start collecting everything in a bun.
Just leave a spare wire under the mouse and keyboard for a moment, otherwise you won’t be able to move it or move it later. And just like that, we slowly go down to the bottom to the system unit, here I also nailed the wires to the table with brackets, they are available in any hardware store.
If you have any extra length of wire left, fold it into a bundle and wrap or tie it into your existing braid. And here in the photo it turned out absolutely gorgeous, I secured the surge protector using self-tapping screws to the table, and tied the wires in a way we already know. In my opinion, I hid these wires from the computer well, I really like it myself, and most importantly, nothing dangles under my feet and does not collect dust and food debris.
Well, I think I clearly explained to you what exactly needs to be done with the wires under the table? And even more so, the price of such a question is a penny. Here's what the things you'll need look like.
Insulating tape
Plastic ties or clamps
Cable clips on tape, you don’t even need a hammer or a screwdriver, just glued it in and stuck the wire in, an excellent option, just wipe the dust off the table, otherwise everything will fall off in half a year.
The clips for the wires with the nail will definitely not fall off.
Well, that's all, good luck to you in your creative tidying up under the table.
If you don’t want to buy or do anything, just call me in Yekaterinburg.
+79221642071 Nikolay
Wiring Requirements
A closed live cable heats up more than an open one. Everything is explained by a violation of normal heat exchange in the cable cores and the environment. The insulation begins to suffer - it breaks down and wears out faster. The problem is solved in several ways:
- they try to select a conductor material with minimal electrical resistance;
- increase the cross-sectional area.
Material
In apartments of multi-storey buildings, electrical wiring made of two metals is found:
- copper;
- aluminum.
Aluminum cable costs less and is lighter. Massive use in earlier times was explained by the low energy consumption of electrical appliances. Modern building codes prohibit the use of aluminum in electrical wiring. In old houses, such a cable is used to complete its service life and is gradually replaced by copper. Aluminum is ductile and soft, which provokes deformation during installation when compressed with screws. The terminal blocks are made of steel alloy, which differs in its coefficient of linear expansion during thermal loads.
As a result, the steel expands more and begins to deform the soft core even more. After reducing the load and temperature, steel parts regain their original shape, but aluminum parts, after additional compression, do not. The electrical contact begins to weaken, an oxide film appears on the surface and the contact resistance deteriorates. The result is impaired conductivity and increased heating. Aluminum wiring requires frequent inspection, as the likelihood of insulation damage is high, which causes sparks and fires. We can conclude that copper is a more suitable material for electrical wiring in an apartment.
Insulation characteristics
The wires are protected by several layers of insulation. But improper storage, installation or use leads to destruction and changes in the performance characteristics of even high-quality material.
According to fire resistance, insulation is divided into:
- ordinary, which is subject to combustion;
- non-flammable (“ng”);
- reduced gas emission during overheating (“LS”).
It is not difficult to guess that the higher the durability, the higher the cost. The KVVG ng-LS cable has the best fire protection characteristics.
Dangerous brands
For installation work on household equipment, the state standard provides for copper wire PPV and aluminum APPV (single-layer insulation). For several years now, there has been a transition of production capacity to private production; new enterprises began to specialize in PUNP brand wire.
Technical specifications are developed directly at the place of production - at the plant. They allow a reduction in the performance characteristics provided for electrical wiring by GOST. A simplified type of insulation and a low area of conductive conductors negatively affect the quality of products. The two-layer PUNP coating performs worse than the single-layer insulation of PPV.
PUNV wires are dangerous for use in residential electrical wiring! A slight heating of the insulation, an increase in voltage or an increase in load can create a fire hazard at any time.
Method 1: holders and organizers
Not many people know that stores now have various Velcro and organizers that allow you to securely fix wires on any* furniture surface (wall).
Having purchased such a small thing, you can carefully “hide” the wires from the computer (TV) behind the piece of furniture you need (for example, in a place that is not visible).
All this stuff can be purchased, for example, in Chinese online stores (just search for “wire holders”).
We remove the wires from view by securing them to the back surface of the table. Needless to say, this makes connecting equipment easier and faster?! You will immediately and accurately understand where this or that wire leads and what it connects (without untangling the tangles).
Yes, and pets will not get caught and will not carry away anything unnecessary...
If you don’t want to buy beautiful holders and organizers, in some cases you can use regular tape for this purpose (although it will be very difficult to “unhook” it from some surfaces later...).
External camouflage
If the methods discussed above are not available for implementation, do not despair. To beautifully and wisely hide numerous cords, you can use the opposite method, which involves external camouflage. If you approach the issue wisely, numerous wires will in no way spoil the interior, but, on the contrary, will give it exclusivity and an unusual appearance.
Let's look at how to hide the wires outside. The options are as follows:
- Imitate a tree branch. You can easily decorate a computer or television cable by using it to create a small branch decorated with homemade flowers, leaves or birds. This solution will transform the interior, giving it uniqueness and brightness.
- Make a tree. If the wire is one and a half meters long or more, there is no need to cut it - it will turn into a nice “tree”. To fix the cord, special fasteners are used, with the help of which the necessary outlines are set.
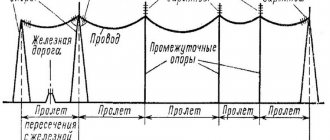
- Power station. Fans of original design can imitate the supports on which the wires will be attached. This method allows you to solve two problems - make the wires invisible to the eye and create a basis for teaching your children.
- Complex drawings. If you have free time and imagination, you can hide the wires on the wall by creating an original landscape. Here the main emphasis is on the contrast between the shade of the wallpaper (paint) and the cable. Separately, it is worth considering elements that allow you to highlight the wiring.
- Fence. One of the best options is to mount the wires at the top of the baseboard. But to hide them from view, you should make wooden blanks shaped like a fence, and then secure them with double-sided tape. This method is suitable for a corridor or a child’s bedroom. For greater originality, each element of the “fence” can be painted in a different color.
- Car track. This option is the most labor-intensive, because its implementation requires time. To create a road, cardboard is used, from which the required object is cut out. Next, the paper is painted in a color that matches the interior.
- Other methods. In addition to the options listed above, wires can be hidden under door frames, behind indoor plants, under the carpet or behind furniture.
Remember that it is better to develop a plan for masking wires in advance, and then strictly adhere to it.
Lots of creative ways to hide wires are shown in this video:
Unusual options for decorating wires
In order to hide wiring from view, it is not necessary to break walls and ceilings, buy panels or decorative boxes.
If you use your imagination, the cords can be beautifully placed on the wall.
For example, here are a few original solutions.
How to decorate on the wall from an antenna or tuner
If you approach camouflage creatively, wires can become an unusual decorative element. They are able to enliven the atmosphere or interior as a whole. To do this, it is enough to purchase special clamps, which are made in various forms. For example, construct something like a tree branch from a cord using leaf-shaped clips.
If the wall is bare and the wire is long enough, then make a drawing on the wall. Draw a car, a cityscape, a road or a fence. Special stickers for the wall will dilute the design and give it completeness.
How to close on the wall
You can cover the wiring using various decorative elements for the wall: photo wallpaper, paintings. A bookshelf with a cord behind it will look original and beautiful. Using design techniques it is possible to decorate a wall in an original way:
- The loft style will be complemented by cable channels, which are designed in the form of bricks.
- The classic interior involves wood finishing. Panels and additional elements made of wood will not be superfluous.
- In a high-tech room, wires in the form of pipes secured with nails or screws would look appropriate.
How to hide a junction box on the wall
Since there must be free access to the junction box, it cannot be completely closed. But there are original solutions that will make it a decorative element:
- hang a decorative plate, poster or small picture on the lid;
- replace the standard box with a decorative one, which can be bought at any electrical store;
- decorate the cover with stickers designed to decorate sockets and switches.
How to hide wires on the wall beautifully from hanging light bulbs
Spot lighting in apartments is now popular, but hanging light bulbs have long cords that spoil the appearance of the room.
They are masked using special panels, which are sold in any hardware stores. They come in different colors and shapes, so it's easy to choose the right style.
If the wire is long, then using special fasteners, they create original patterns on the ceiling or wall. Decorated with additional accessories and stickers.
The block from the LED strip is hidden in a special box that is fixed under the ceiling. This allows you to make hidden LED lighting.
When does it make sense to groove cells on a wall or ceiling?
Grilling a wall or ceiling will be needed in the following cases:
- To lay long cords and cables stretching across the entire apartment, which are not possible to beat.
- If there are too many electrical devices in the apartment.
- For security. Children and pets can reach cords, even those hidden behind panels and stickers.
- Categorical denial of the presence of wiring elements in the interior.
A modern apartment consists of many communications, where electrical wiring occupies one of the first places. It connects not only light sources, but also all equipment and digital devices.
The abundance of cords creates a not very pleasant appearance, and if there are children in the apartment, then it also poses a danger. To avoid troubles, when planning a repair, you should think about how to hide the wires. In addition to internal camouflage, external camouflage is often used. The modern market offers a wide selection of various elements and accessories for these purposes.
Wi-Fi Almighty, or how to cover all devices with the Internet
Of course, you already have a Wi-Fi router. But whether you use it to its full potential is a question.
Use a Wi-Fi adapter
How many times have I seen this picture: I have a laptop, but the Internet works via cable. The reasons are different: some cannot find the drivers, others have a problem with the hardware. But everything can be resolved. Drivers can be selected by any computer technician with straight hands, and a burnt-out Wi-Fi module can be replaced with an external USB adapter.
A regular system unit can also be connected via Wi-Fi. To do this, you will need the same USB adapter or PCI card with external antennas.
Cover all corners
The signal from the router may go out due to improper location, microwave ovens, reinforced concrete structures and other obstacles
Therefore, please take into account the following:
- place the router in the center of the apartment (office);
- place the router at a distance of at least 1 m from the floor;
- do not place near a microwave oven;
- If your gadgets support Wi-Fi 11ac standard, use a dual-band router. It will help avoid interference when working in overloaded airwaves. This is true for apartment buildings, where almost every family has Wi-Fi.
- if the router's power is not enough, use Wi-Fi repeaters to distribute the signal evenly throughout the room.
⇡#Option two - improved
Those who periodically read “Computer of the Month” know that the assemblies offered in each issue are, let’s say, typical. Thus, the components we offer are compatible, the assembled system unit will work and have a certain level of performance and functionality. But then, if you want to change something, you will need to act on your own. For example, if you want to assemble a completely silent system, then with a high degree of probability you will have to replace the fans in the case. Or choose another, more expensive case.
The same goes for when you want a system with nicer cables. I noticed that the topic of beautiful cable management is very popular in the West, but in our country, in my opinion, it is not widespread enough. Well, we will correct the situation.
Making your system prettier is quite simple - for example, it will be enough to buy braided extension cables for the main power supply cables. It is quite possible to find them in our computer stores. A huge selection of similar products is presented on AliExpress and Computeruniverse - I’m sure you won’t have any difficulties purchasing an extension cord of the right size and color. For our black and white assembly, we purchased a simple white set for the main power supply wires (24 pin ATX, 4+4 pins EPS, 6 pins PCI-E and 8 pins PCI-E). Rubber clamps were included with the cables. I’ll note right away: the more clips, the better and more convenient, they can always be ordered separately on AliExpress, as they say, at a price of three yuan per bag.
There will be no problems connecting such extension cords.
And it seems like we slightly added to the assembly with the standard Corsair RM850x power supply, but how it has changed! As the movie character of the inimitable Yuri Yakovlev would say, what beauty, beauty!
This set of cables cost me 25 euros excluding delivery. Yes, it won’t increase FPS in games, but the main message of today’s article is precisely that not everything is measured by performance. I have repeatedly noted in my articles that we only live once. And if you want to buy a specific device, then why not treat yourself to your loved one?
Hiding wires in the wall
Laying the wire in the groove
First, using a wall chaser, after removing the remaining plaster and concrete, you need to cut a groove in the wall in which all the wires will be hidden. The wiring must be placed in a protective sheath - corrugation, which serves to protect against external adverse influences. Then the wires should be laid in the cut channels, after which the wall must be plastered.
To hide the wires in the wall, you have to break its integrity, and you often don’t want to do this, since this will damage the interior, in addition, the work is associated with dust and debris, and subsequently the wall must be reconstructed, which involves certain costs. Therefore, you can use other, more profitable methods, in which you do not need to resort to chipping the wall.
Wire on the wall
Mounted on the wall
If you have artistic taste, you can fix the wire on the wall and make a picture out of it. It is quite clear that a native, one and a half meter wire will not be enough for these purposes. Choose a suitable design and transfer its outlines to the wall, making a light-colored drawing with a simple pencil. Now you need to calculate the required amount of wire. To do this, you can attach a nylon thread to the wall so that it repeats the pattern. Then its distance can be measured. Don’t forget to add the length from the drawing to the outlet and to the source of electricity consumption - add a meter in reserve and you will get the required amount.
Wire manufacturers most often do not offer an abundance of wire colors, so you have to choose from what is available - black or white. If these colors do not suit you, then you can buy an extension cord, which can be pink or red. Don’t rush to rely on your opinion - try attaching a strip of colored fabric to the wall and you will immediately see whether the chosen color is suitable and will harmonize with the overall decor.
Decorated wire is not noticeable
If you decide to do everything simply but tastefully, then you can attach the decor to the wire or come up with your own, something original.
Alternative Methods
Wires covered with cloth
You can find a different approach - to mask the wires rather than hide them, and existing elements of the room will help in this, for example, door frames, baseboards, ceiling moldings, as well as heating risers. With the right approach to work, the laying of wires can be made almost invisible, which will have a beneficial effect on the interior of the room. Typically, low-current wires (Internet and telephone) do not cause any difficulties in laying; they can be hidden in baseboards, under metal thresholds or in platbands. When laying the power cable, a different approach is needed.
Often, all electrical communications in our time are laid using a hidden method, but due to various circumstances this installation option is impossible, for example, when, during repairs, it becomes necessary to install additional sockets or switches.
Hiding the wire in the cable channel
Cable channel
Almost always in the house there is a section of wiring that needs to be trenched into the wall or closed using a cable channel, which is a plastic box - it will protect the electrical wires from mechanical damage. The box has an attractive appearance and in this case it can be used as a decorative element. This option is also a solution to fire safety problems.
Laying the wire in the bathroom can be especially difficult when the walls and floor of the room are completely tiled. If there is a suspended ceiling in the bathroom, the wires can be hidden in it, and if this is not possible, then a cable channel will help in this situation.
⇡#Option three - advanced
I think you have noticed that, while touching on the topic of cable management, we are at the same time touching on such a computer hobby as modding. Previously, enthusiasts independently “cut out” windows in the case; now manufacturers offer such services, essentially, by default. Glass, lighting, non-trivial appearance of computer hardware - these are all echoes of the fact that people are tired of monotony, I’m sure of it.
The option presented above with the purchase of braided extension cords is relevant for non-modular power supplies, that is, for devices that have detachable cables. In the first part of the article, I already drew your attention to the fact that with the advent of cases equipped with a shutter that covers the power supply, you can safely install a non-modular power supply into the system, since a bunch of unused wires will not spoil the whole picture.
Until now, I have not deliberately touched upon the topic of modularity of modern power supplies. With a device that does not have detachable cables, everything is clear: as a rule, other things being equal, such a power supply simply costs less. There will be no problems with it during assembly - you just have to carefully fold the tail of unused cables. In the case of the Corsair Carbide SPEC-06, this is easy to do with or without a hard drive cage.
There are partially modular power supplies on sale - as a rule, among their detachable cables there are 24- and 8-pin wires connected to the motherboard. Indeed, there is no point in unfastening them, because not a single desktop PC will work without connecting these wires. But then we connect only those wires that we need: PCI-E, Molex, SATA.
With completely modular blocks the situation is much more interesting. Indeed, in some cases the ability to unfasten all the cables is very useful - I mainly encounter this need when assembling compact PCs. However, recently the complete modularity of the power supply has become its modding attribute.
Thus, the white version of the Corsair RM850x is equipped with fully braided cables. I think that the person who bought such a power supply will want to assemble the system as carefully as possible. This device is not the first, which by default is equipped with fully braided cables, and therefore we can safely talk about the next trend.
Here I would like to note that Corsair was one of the first to pay attention to modding power supplies. Sets of individually braided cables that fit many of this manufacturer's fully modular power supplies have been on sale for a long time. You can buy them in many places - for example, in the German Computeruniverse store.
| Conventional cable routing | Cable routing when using a glass case |
I have already noted the fact that more and more cases are appearing on sale, in which all the walls are made of glass. Therefore, cable management in such devices must be approached very carefully. Here's a clever trick for you.
Let's imagine that the hero of this article - Corsair Carbide SPEC-06 - has both walls made of tempered glass. In the case of a blank metal door, we did not complicate our lives and laid the cables coming from the body along the rubber plugs. However, these wires can be easily hidden in the opening between the barrier wall and the motherboard. Naturally, this must be done before installing the motherboard, and then immediately check whether the cables are long enough to connect them. In case the length was not enough, I had a plan “B”: “roll up” all these wires in a white braid, which I bought in advance on AliExpress.
There is one more problem left to solve. Most of the Corsair Hydro Series H100i RGB PLATINUM 240 wires were hidden behind the radiator, but there was a SATA cable required for the water block backlight to work - it must be connected to the power supply. Here a 50-centimeter SATA extension cable came to my rescue, which I bought for 80 rubles. There was enough free space behind the barrier wall to carefully lay all the SATA cables along the edge and secure them with double-sided adhesive tape.
I ended up hiding most of the messy wiring. All that remains is to install the white Corsair RM850x and connect all the braided cables. The disadvantages of this power supply package include a small number of plastic clips. The drawback is not critical; I used additional clamps purchased on AliExpress (94 rubles for 12 pieces). I made four more clips myself, cutting them from steel tape and painting them with matte paint.
In the lower part of the case, as you can see, a rather large tail of wires turned out to be uncovered. It, of course, could have been pulled together into a more compact bundle, but I simply installed a perforated steel plate, bought for 60 rubles at the nearest hardware store. In my opinion, it turned out quite nice.
On the other side - even more so.
Hide a cable channel or decorative box in a cable
Using a product like this is a simple and inexpensive method to hide the wiring from the TV. You can find plastic, metal and combination types on the market. This way to hide wiring is not only stylish, but also safe. The boxes comply with fire regulations.
The main thing is to choose the right size of the material, taking into account all the cables that need to be placed in it, and also calculate the length to the outlet. This material is produced in pieces 2 m long, which must be connected with special elements (connectors, plugs, tees, corners in different directions when turning, etc.). The color of the box is selected in accordance with the wall cladding.
Decorative boxes can turn cable networks from your TV into a piece of themed wall decor.
- Lined with brick, they are suitable for decorating a room in a modern style.
- For loft, products in the form of pipes of small diameter are used.
- Those who prefer eco-style should take a closer look at wood-look options.
In addition, such an element can be easily painted to match the color of the wallpaper or decorated with wooden boards that imitate the texture and shade of wall cladding.
Decor with stickers, stickers, improvised means
Decorative elements that help hide or neatly secure numerous cords are sold almost everywhere and are quite inexpensive. In this way you can decorate the cord coming from the sconce above the bed in the bedroom. You can decorate the cable from the TV or the cord from the heater running along the floor using a “toy” mini-fence glued to the baseboard. If you plan to carefully hide many elements behind a fence, tie clamps are used.
Decorative clamps are now sold in all electrical stores. They are an adjustable flexible clip decorated with leaves, flowers, butterflies, birds, and houses. In romantic interiors, laces are decorated with sparkles and feathers, in a children's room - with stickers depicting fairy tale characters and favorite cartoons.
Internal disguise
The best option is to hide the cables at the stage of major repairs. There are several ways here.
Conceal the wires in the wall. This technology can be used before or after wallpapering. To begin with, the paper is cut with a sharp knife, after which the edges are moved apart and fixed with needles. Next, using a puncher or manually, a groove is made for masking. After completing this work, the cable is laid in the prepared recess, and the groove is closed with alabaster or plasticine. The final stage involves applying glue to the wallpaper and fixing it in place.
How to hide wires under wallpaper is shown here:
Hide wires in the floor. There are several options here.
Conceal the wires in the floor plinth, where there is a cell for the wires. When purchasing, it is important to pay attention to the design of the product, in the central part of which there should be a special recess. It is into this that the wires are laid. This method is distinguished by its versatility and ease of execution. Hide the wiring in the groove
The principle here is the same as in the case of wall mounting
Using a hammer drill, a recess is made into which excess commutation is placed. After this, the groove is filled with cement and leveled to the floor level. Fill with cement. If the quality of the flooring in the room leaves much to be desired, you can make a new screed by hiding the wires in it. The latter must be corrugated
The principle here is the same as in the case of wall mounting. Using a hammer drill, a recess is made into which excess commutation is placed. After this, the groove is filled with cement and leveled to the floor level. Fill with cement. If the quality of the flooring in the room leaves much to be desired, you can make a new screed by hiding the wires in it. The latter should be corrugated.
https://youtube.com/watch?v=PRFIgW8aitI
Remove wiring from the ceiling. There are two options:
- Hide the wires in a plasterboard niche installed around the perimeter.
- Hide the wires in the gap between the tension fabric and the main ceiling. In the latter case, it is worth warning the craftsmen in advance about your decision, otherwise you will have to use other options.
Organization of hidden wiring
Before installation, you should study how to organize hidden wiring:
- External wiring in a corrugated sleeve is easily hidden by various structures: sheathing with slats, suspended ceiling, etc.
- You can make hidden wiring along the joints of the ceiling and wall or floor and wall. Then it is removed under the baseboard or molding.
- The internal wiring is laid in grooves in the wall, and then covered with mortar. Or they make electrical wiring in a screed in special boxes.
- The wiring is completely hidden during construction in special channels. This method is not suitable for self-installation.
How to hide wires from charging
Modern people often have to charge several devices at the same time. When they are all inserted into one “tee” or “multi-tailed” charging is used, with three to five cords for different devices, all elements are collected under one office clip and attached to any nearby surface. Some purchased options are separator boxes with four to six shaped holes through which only the “tails” of the charges come out.
A similar product can be easily made with your own hands by upgrading a simple shoe box covered with fabric and wrapped in colored paper.
Don't hide the wires
Seriously, if you get creative with it, cables can be an interesting decorative element.
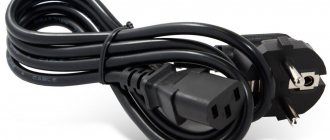
In everyday life, situations quite often arise when the available sockets in an apartment or private house do not allow the use of any electrical appliances or household appliances. The main reason is their inconvenient location, so owners prefer to use an extension cord. In some cases, increased power outlets or a longer cord are required. In this case, home craftsmen make an extension cord with their own hands. A self-made extension cord will be much cheaper than a branded one and much more reliable. If you have the skills to work with the tool, the entire procedure takes from 15 minutes to half an hour.