Installing electrical wiring in an apartment is quite a large-scale undertaking that requires an appropriate approach, so if you are not confident in your abilities, it is better not to attempt to do this work yourself. For those who have decided to take such a serious step, we will try to make the task much easier by describing in detail all the stages. Unfortunately, within the framework of one article it is problematic to present everything necessary without compromising perception, but the missing information can be found in other publications on our website.
Main stages
This type of installation work is usually carried out in three stages:
- Preparatory stage. It includes:
- selection of wiring type;
- drawing up a work plan;
- marking.
- calculations for selecting equipment and cables;
- purchasing everything you need.
- Installation. This is the most labor-intensive stage of work, taking up most of the time. It includes:
- preparation of routes (wall slitting or box installation);
- creation of seats for electrical points;
- installation of distribution boxes and cable laying;
- installation of a shield (if it has not been done previously).
- The final stage, which includes:
- installation and connection of electrical points (sockets, switches, lighting fixtures, etc.);
- assembling a distribution board and connecting internal lines to it;
- connection to input;
- checking all internal lines one by one.
Now in detail for each section.
Connection - a few important points
Your wiring is ready. But that is not all. The most important thing in this matter is connecting your apartment to an external energy source. Many people have several problems at this stage. First of all, due to the fact that this work is mainly carried out by organizations that have all the necessary permits in their hands.
This means that in order to make a connection, you need to have the following documents - a grounding certificate (if we are talking about a new house), a certified wiring diagram and, if necessary, a permit to replace a meter or other network element. Thus, “paperwork” (drawing up diagrams and calculations, obtaining permits) often takes more time than carrying out installation work.
- Author: Mikhail Malofeev
Rate this article:
- 5
- 4
- 3
- 2
- 1
(9 votes, average: 3.3 out of 5)
Share with your friends!
Preparatory stage
The most important part of this stage is planning. First of all, you should decide on the type of wiring. That is, choose what it will be, internal or external. The first option is more labor-intensive and practically cannot be reconfigured without major repairs (carried out before finishing work), but it looks more aesthetically pleasing. With the second option, everything is much simpler; it can be done without major repairs. Wiring can be reconfigured within certain limits, such as installing an additional line or relocating (adding) outlets.
Example of external wiring in a box
As practice shows, external wiring in apartments is not popular, for several reasons: firstly, the living space begins to resemble an office, and secondly, the box is an excellent dust collector. In addition, such wiring indirectly indicates permanent repairs, which reduces the cost of the apartment when selling. Be that as it may, this option has a right to exist and in some cases there is no alternative, but since the hidden type of wiring is mainly used, we will focus on it. https://www.youtube.com/watch?v=UGBLLe7oBy8
Making a plan
Having made a choice, we move on to drawing up a diagram. This must be done for the following reasons:
- the diagram will allow you to determine the amount of necessary equipment and calculate the approximate cable footage, taking into account the cost of the latter; for example, purchasing an extra 50 meters of copper wire will not only be expensive, but also offensive;
- the installation process will take a lot of time, and you can simply forget or not take into account some points, and after finishing work it will be impossible to make adjustments
- The planning process allows you to choose the most optimal option for cable routes and electrical points locations.
You need to start by drawing up an accurate plan with all the rooms; if you don’t want to practice with a tape measure, you can take the drawing from the technical passport of the apartment as a basis. Next, we make a photocopy of the drawing, or alternatively, scan or redraw it. Since we are making the scheme for ourselves, we don’t have to adhere to GOST requirements. Locations for electrical points are indicated approximately.
“Clean” apartment plan
We choose the optimal location for lighting fixtures and determine their quantity. Having decided, we indicate these places on the diagram. We do the same with switches. Next, we draw the lighting lines and distribution boxes on the diagram.
Plan with applied lighting diagram
It is undesirable to make one line for all lighting, since in case of an emergency you can be left in the dark. It is also not advisable to get too carried away with zoning, leading a separate route to each room. This increases cable consumption, requires more circuit breakers, that is, leads to an increase in the cost of the project.
In the plan presented above, two zones were made, one included two rooms and a corridor, the second a toilet, bathroom and kitchen. Ideally, lighting should be planned in such a way that if any of the lines fails, the electrical panel will always remain illuminated.
Now let's move on to the power part. We select places for electrical points (in this case, these are sockets) and draw routes, if necessary, add distribution boxes. All this should be done taking into account the future layout, so that there are no “frozen” (unclaimed) outlets, for example, covered by furniture. The opposite option, in which there will be a shortage of electrical outlets, is also undesirable (extension cords are not the best decoration for the room).
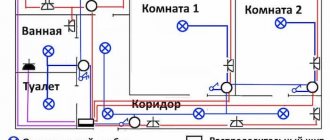
Plan with lighting and main power section
A few clarifications need to be made here. In the diagram presented in Figure 4, four separate lines are used for sockets. This was done so that when the protection on one of the lines is triggered, only one room remains de-energized. The actual number of zones can be halved by combining rooms and a corridor into one circuit. As for the kitchen, it is recommended to make a separate line for it.
Now all that remains is to draw on the plan individual routes for the stove and boiler.
The final version of the wiring diagram in the apartment
Why do you need to change the wiring?
When it becomes clear that the wiring is not made as desired or from the wrong material, the question immediately arises as to whether it is really necessary to replace the wiring in the entire system. After all, you just want to repair and improve, and not change everything at once, even though the second option is often cheaper than the first. And these are not all its advantages.
To answer this question, it's first worth looking at the system that was used to wire homes in the past and likely continues to work in most homes today.
Wiring systems: modern and outdated
It’s worth starting with grounding loops, which were not considered a necessary attribute. All networks were created according to the same TN-C scheme - with it, the working zero and ground were taken to one wire at the station distributing electricity. This method has advantages:
- Easy to install.
- Material consumption is significantly reduced.
*(Using this diagram you can easily understand how the TN-C circuit works)
All sockets were entangled with phase and neutral wires, tying them with the others into knots. And because of this, with excessive load, the risk of a short circuit increased significantly. This also created problems for the operation of the RCD. Due to the high risk, such a system is no longer used and it is recommended to replace it with something more modern - TN-S or TN-CS circuits.
The first is most often used in private homes, where there is its own grounding. But it also occurs in high-rise buildings where there are grounding buses. And here they must:
- Sealed by welding.
- Go from the grounding outside to all apartments and entrances.
However, most often in large houses with many apartments, the TN-CS scheme is still found. In it, the grounded neutral is divided into two conductors:
- Zero worker.
- Zero protective.
The separation occurs directly in the shield, which is located in the entrance.
Both TN-CS and TN-S systems have significant differences from the legacy TN-C. Here three contacts will be used for wiring:
- Null.
- Phase.
- Grounding.
And here you immediately need to clarify and point out the fact that if the wiring in the house is not made according to the TN-CS or TN-S plan, then modern three-pin sockets cannot be installed. How to install homemade jumpers between grounding and working zero directly on the socket. This is very dangerous, as the risk of electric shock increases, as does the likelihood of a fire.
*(Comparison of wiring diagrams, which show their differences better)
How to route the wiring correctly
If we remember how wiring was done before, we also cannot help but mention the principle of load dosing.
To understand it, you just have to look at the signs in the entrances of residential buildings, which were installed until the early 2000s. They only contained:
- Electricity meters.
- Traffic jams.
A couple of cables were pulled into the apartment, and from them, separate small branches were created in the installation boxes to sockets and lighting. This is again economical from a financial point of view, since less materials will be needed. But from a practical point of view, this will not work as well as we would like.
Each branch made had twists, which made the system very vulnerable. And in order to fix something in one room, it was necessary to turn off the power to the entire apartment. And if the cable in the wall broke or burned out, it was comparable to a disaster, so it was extremely difficult to repair.
And all this can be avoided if you make zoned wiring. The principle of its creation is simple: separate lines with suitable sections are laid off from the apartment panel, which correspond to the load in each individual room. For example, you usually need more sockets in the kitchen than in the bedroom, which means the load here will be greater and the type of sockets will be different.
*(This diagram clearly shows how each room receives its own line from the common panel, that is, the principle of zoned wiring)
Of course, this wiring method will require more cables, but, again, wiring is done once and for a long time, so it’s definitely not worth saving on convenience, which is closely related to safety here. Moreover, repairs and modernization will be much easier.
Marking, calculations and purchasing
Having finished with the plan diagram, we arm ourselves with a pencil, a ruler with a level and a mounting (breaker) cord, and proceed to marking. We start by indicating the exact locations of the electrical points.
Location of electrical points
Here it is necessary to make a digression and talk about the basic norms and rules:
- It is recommended to install sockets in residential premises at a distance of 30 cm from the floor. The exception is the bathroom and kitchen. In the first case, a place is selected approximately 50 cm above the level of the washbasin and bathtub (while being as far away from them as possible). In the second, the level of sockets is selected depending on the features of the kitchen unit and the location of the equipment.
- It is rational to place switches at a distance of 90 cm from the floor, next to the entrance to the room.
- The wiring route, as well as electrical points, should not be located close to heat sources (batteries, electric stove, etc.), the minimum distance to them is 50 cm.
- Routes in walls should be laid parallel or perpendicular to the floor.
- It is necessary to make an indent of at least 10 cm from the windows, and 15 cm from the ceiling.
If you plan to install a suspended ceiling, then the main wiring can be done above it; this greatly simplifies the task, but creates a problem with access to the distribution boxes.
Example of ceiling layout
You can also lay the wiring on the floor, but in this case you will need to increase the thickness of the screed. In apartment buildings, this option is practically not used.
Floor layout
How to make lighting in a room: night and decorative lighting
You shouldn’t give up on effective lighting, even if your plan didn’t include additional lighting. Let's consider two scenarios: decorative and night lighting.
Decorative lighting
Beautiful designer interiors often feature creative lamps, bright neon signs, original lamps, LED strips, and garlands. With the help of these elements you can create an amazing ambience in the room and transform the atmosphere.
It is necessary to think about how to organize decorative lighting in a house or apartment. The main thing is to correctly build the layout and connection of the lamps to the electrical network. Devices must exist independently from the main lighting sources so that they can be turned on separately.
Example of decorative bathroom lighting
Night lighting
It is not safe to move around the rooms at night: in the dark it is easy to trip over furniture or trip. To make moving around comfortable, it is worth providing special lighting. For example:
- LED lighting of the floor, stair steps and flights.
- LED ceiling lighting.
- Wall lamps, floor lamps.
- Night lights and table lamps.
Ideally, you don’t have to reach for the switch to turn on the night lighting. You can set up a smart light system and control devices using voice commands or a remote control. Another convenient solution is to automatically turn the lights on and off. To implement the idea, motion sensors should be integrated into the room. They will react to human movements and start the process of turning on the light.
Many people confuse night and decorative lighting. This is not entirely correct. Yes, both scenarios are considered minor. However, the task of the night one is to ensure safety, and the decorative one is to create a spectacular environment.
Night lighting in the hall
Calculations, equipment selection and purchase
Having finished with the markings, we make calculations to select the cable cross-section and characteristics of the protective equipment (circuit breakers, RCDs or automatic circuit breakers). All the necessary information to solve this problem can be found on our website. Recommendations for equipment are also indicated there.
Since the rules for installing hidden wiring require ensuring its replacement, the cable in the grooves must be laid in pipes or corrugation made of non-combustible material, so do not forget to add them to the estimate.
Next, we make an estimate for equipment and cables. We calculate the footage of the latter along the routes; we calculate the number of sockets, switches and distribution boxes according to the drawn up diagram. The number of circuit breakers corresponds to the number of lines; we must install an RCD on individual routes (boiler, kitchen electric stove). In addition to this, we take into account the introductory circuit breaker and the fire protection RCD; if required, we add an electric meter.
Everything is simple with the purchase, we take it wherever it is cheaper, and do not forget to inquire about the availability of the necessary certificates for the equipment.
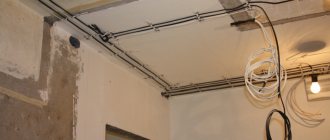
Open way
External installation is carried out on wall and ceiling surfaces. At the initial stage, it is necessary to outline the route for laying the wires and drill holes in the places where they are attached at intervals of 50 centimeters. At the request of the apartment owner, the wires can be laid in cable channels or clips. In places where the wires branch, distribution boxes are installed. The advantage of the open wiring method is that it provides easy access to the wires, but the only drawback is that such wiring does not always fit into the interior of the room.
Types of cable and wire fastenings for open wiring:
- porcelain rollers or insulators;
- staples;
- corrugated pipe;
- cable channels;
- electrical skirting boards.
Advantages of the open wiring method:
- ensuring easy accessibility to monitor the system status;
- most often used in wooden premises.
The disadvantages are expressed by the following parameters:
- the location of wires in plain sight, which leads to a violation of the aesthetics of the interior;
- rarely combines with the design style of the rooms.
The final stage is the process of connecting to the electrical network; this requires the presence of electricians. Connection of meters can only be carried out by specialists with electrical clearance.
Installation
The most difficult thing in organizing hidden wiring is gating the routes, especially in panel houses. This process is labor-intensive and dusty. You can make your task somewhat easier by using special equipment for this purpose, namely a wall chaser.
The wall chaser greatly simplifies the work
In addition, we will need a hammer drill, a special attachment for scoring and a flat chisel attachment, drills and bits for concrete.
It is recommended to start by preparing seats for sockets, switches and junction boxes. It’s easier to follow the following algorithm:
- install a crown of the appropriate diameter on the hammer drill;
- make a sawing with a depth of 5 mm;
- replace the crown with a drill;
- we make holes along the furrow, a little deeper than the cup holder;
- change the drill to a crown and work with it;
- insert the chisel attachment and knock out the concrete.
Having prepared the seats, we proceed to grooves, that is, we make grooves in the wall somewhat wider than the outer diameter of the corrugation or pipe by about 20-25 mm.
We install the cable (do not forget to place it in corrugation or pipes). The easiest way to “grab” the cable in the groove is with a thick gypsum mortar.
At the same stage, the distribution board is installed, if it has not been installed previously.
We recommend labeling the cables, at least in the distribution panel, to avoid confusion.
At this point the second stage is completed, you can begin finishing work.
Shadows from lamps: decorative effect or disadvantage
Designers classify decor with shadows as a type of creative lighting. To create fancy patterns on the wall, just choose lamps with perforated lampshades. Light streams will penetrate through the holes and softly scatter across the surface.
Another important aspect of a home shadow theater is the background where the reflection will fall. If it's dark, it won't have a stunning effect. Shadows look beautiful only on a light, monochromatic surface.
Let's look at the situation from the other side. The shadow of a low-lying pendant lamp falling on a table or bar counter is unlikely to delight. Therefore, when creating a scenario, consider suitable locations for the location of light and shadow sources.
Chandelier shadows as a decorative element
Final stage
This is the simplest part of the work, we install sockets, switches, lighting fixtures and connect them to the wiring. Next, we assemble the distribution board and connect internal lines to it. All information on these processes is on our website.
The input connections are made; this procedure is performed by employees of the electrical company with which an agreement on electricity supply services has been concluded.
After connecting the shield, we turn on the machines one by one and perform a test.
Home electrical network project
A design sketch of the location of cables, sockets and switches is a routine, but extremely necessary work. Without understanding the exact location, it is impossible to arrange safe home electrical installations.
The nuances of the plan are as follows:
- All apartment wiring is divided into groups. So, it’s easier to install, and the system will have more security in case of an emergency. In the sketch, groups of wires are marked with different markers for convenience and are divided into lighting fixtures, sockets, distribution boxes, power cables and emergency shutdown systems.
- The “humidity” of the room is taken into account. For example, increased demands on the home network should be placed in bathrooms, toilets and the coldest places in the apartment - hallways, window sills. There is a high probability of condensation accumulation due to temperature changes in winter.
- The machine responsible for stopping the current is located inside the apartment. Many switchboards are located outside of it, so you will have to tinker to arrange the control machine inside. Its installation is of great benefit - in case of overvoltage, it will not be difficult to supply the apartment with current.
- The entire project is verified in advance, with the accompanying provisions from the safety rules. The wiring is carried out strictly vertically or horizontally. It is advisable to apply the length parameters immediately, this way the orientation will go much faster. If there is no knowledge to draw up a high-quality project, then the document is purchased from specialists.