To create a lighting device, they use almost everything that can be found at hand: wooden sticks, pieces of plinth, containers, wood cuts, metal sticks and pipes, glass items, fabrics. Homemade lamps are made futuristic, classic, glamorous, minimalist. For each type, several step-by-step master classes have been created. Designer rooms are usually decorated with unusual lamps. These can be products with slots, many individual fragments, in the form of a large ball or cube. The same lamps can be made with your own hands, from any material. This is done not only by craftsmen who sell their products, but also by ordinary owners of apartments and houses. Homemade chandeliers can be similar to store-bought ones or made in an unusual way: from graters, tin cans, etc. The shape depends on the characteristics of the material and the imagination of the performer.
What can be used as materials
You will need:
- fat cream;
- PVA glue;
- cotton buckle;
- dye;
- balloon.
There are several interesting options. From ordinary threads you will get a beautiful glowing ball. First you need to inflate the balloon and lubricate it with cream. It is placed in a container with water and PVA diluted in it. Then it is wrapped with threads. The structure is left to dry for 24 hours - all that remains is to place the product on the lampshade. The second method is to use straws. The sheets are twisted diagonally, the protruding ends are glued. You will need two hundred tubes: they are glued together into a round or triangular shape. The next option is a wire lampshade: it is twisted into a spiral or conical shape. You can also create a lamp from plastic bottles: the bottom and neck are cut off. You will need wire, acrylic paints, sealant and a marker. There are many other techniques for creating a lamp with your own hands.
Options for creating wooden lamps
Making a lamp with your own hands is primarily an art, not an economy. Despite the fact that wood is a simple and inexpensive material, products made from it can compete with others in terms of workmanship and aesthetics. The process of making them will not be the easiest. You will need to carry out complex calculations, work with a large number of tools, and remove a lot of garbage. Lighting fixtures are made from saw cuts, branches, veneer, wooden slats, wooden boxes and frames, wheels, logs, beams, etc. A wooden lamp is an ideal solution for an antique-style interior. It can be made from a piece of trunk or from processed materials, for example, in the form of a complex geometric structure of sticks, a ring, a cylinder or a square created from four or eight bars.
Master class: how to make a lamp from wood cuts
You will need a tree trunk, a grinder, a hacksaw, an LED strip (2 m), brushes, wood varnish, glue, and a matte plastic pipe. First, the trunk is cut into slices of equal thickness - about 2 cm. Then a template is made in the center of one of the cuts. It and all other sections are drilled according to the markings. Measurements must be taken carefully; due to poorly marked fragments, the entire process will have to be started again. After this they need to be sanded. The next stage is strengthening with glue and laying on pads to dry. After this, the log houses are varnished. At the same time, you can prepare a matte tube - the rod for the structure. Its surface is processed to maximum matte effect. The cuts are put on the tube and after that there is only one more step left to do. The last thing to do is install the tape. It needs to be folded in your hands and placed in this form in the tube.
Geometric lamp made of wooden slats
The list of necessary materials and tools includes: self-tapping screws, drill, chipboard, brush, acrylic varnish, electrical block, 4 cartridges and 7 two-meter slats. You need to cut out blanks from chipboard, and paste over their edges with edging. The slats are assembled into a single structure in the form of a cross with a diamond shape in the center. A base is cut from a 5 mm sheet of plywood. In places where the slats create intersections, pieces of bamboo sticks or dowels are installed. It is necessary to drill 8 holes in the base: 4 are for the ceiling, and the same number for the main part of the lamp. From a tin you need to bend 4 corners with beveled edges. They are mounted with self-tapping screws so that the open parts of the corners are directed inside the lampshade. The entire wooden frame is varnished twice, with a break for drying. At the end, the cross-shaped structure is screwed with confirmations.
Veneer lampshade
It can be made from twelve strips. For the inner part, take a smaller one - 60 cm, for the outer part - 70 cm. The strips are made from sheets: they are cut along the fibers with a steel ruler and a knife. On a large sheet of paper you need to draw a circle with a diameter of 350 mm. It is divided into sectors of 30°. On the left and right sides of the lines separating the sectors, parallel lines are drawn along the perimeter of the circle to determine the desired position of the veneer strips. Then a disk with a small hole is prepared to place the strips. They are glued clockwise in the shape of snowflakes, first three short ones, then three long ones. After the glue has dried, you will need to make a hole about 1 cm wide in the structure of the strips. A wire is inserted through it, and a sleeve is attached to the disk. The hanging ends of the strips are fixed with a flange and bolts.
Advantages of a homemade lamp
You can find many types of lamps in the store. Each type has its own disadvantages and advantages. Incandescent lamps are gradually losing their position due to high energy consumption, low light output, despite a high color rendering index. Compared to them, fluorescent light sources are a real miracle. Energy-saving lamps are their more modern modernization, which makes it possible to use the advantages of fluorescent light in the most common lamps, with E27 bases, without the unpleasant flicker of the old representatives of this family.
But fluorescent lamps also have disadvantages. They quickly fail due to frequent switching on and off; moreover, the vapors contained in the tubes are poisonous, and the design itself requires special disposal. In comparison, the light-emitting diode (LED) lamp is the second revolution in lighting. They are even more economical, do not require special disposal and last 5–10 times longer.
LED lamps have one significant drawback - they are the most expensive. To reduce this minus to a minimum or turn it into a plus, you will need to build it from an LED strip with your own hands. At the same time, the cost of the light source becomes lower than that of luminescent analogues.
A homemade LED lamp has a number of advantages:
- The service life of the device, when properly assembled, is a record 100,000 hours;
- In terms of watt/lumen efficiency, they are also superior to all analogues;
- the cost of a homemade lamp is no higher than that of a fluorescent lamp.
Of course, there is one drawback - the lack of guarantees for the product, which must be compensated by strict adherence to the instructions and the skill of the electrician.
Lamps made of textiles and threads
To create a lampshade, you can use old clothes: jeans, knee socks, damaged dresses, etc. The products are decorated with bows, pockets, threads with beads. In almost all cases, the fabric must be placed on some kind of frame. You can also make it yourself. It is better to choose metal, sometimes wood, as a material. The basis for a homemade fabric chandelier can be factory lamps, both new and old. The fabric of a regular old lampshade can be removed and replaced with a modern one with stylish patterns. To create and decorate homemade chandeliers, threads of different thicknesses are used. They wrap various jars and frames, connect parts of the lamp and hang the structure. Lampshades made from hardened threads look interesting. In addition to them, twine or ropes are also used. They go well with different fabrics and papers.
Master class: spherical lamp made of threads
To create this product you will need:
- The base is from a table lamp.
- Glue.
- Thick threads (up to 4 balls).
- Air balloons.
First, the balloons are inflated. It's better to have several, because they can burst. Their shape should be perfectly round. On each of them, a ten-centimeter circle is drawn with a felt-tip pen. A stand with a light bulb will be inserted through a hole of this size. The ball is placed on oilcloth. An adhesive solution is being prepared. You need to wear rubber gloves on your hands to dip the threads into it. When they are saturated with the solution, they are taken out; then the glue clumps are removed. The end of the thread is tied to the knot of the inflatable ball. After this, it is wrapped around the entire ball; this must be done evenly over the entire surface, but chaotically. It is advisable to use several threads of different colors. The ball is then suspended until the structure dries. Then they burst it and cut off the knot. The ball is removed through a large hole, into which you will then need to insert a socket with a light bulb.
DIY fabric lampshade
You will need thick paper, glue, fabric, threads to match the color of the fabric, pins, ruler, pencil, iron. You will need to make a template to calculate the required amount of fabric. If the frame for the lampshade should have a cylindrical shape, then measure the circumference and height and alternately draw the corresponding lines, creating a right angle. The opposite sides of the rectangle are drawn. The desired shape is cut out of paper. It is applied to the fabric. From it you need to get a larger rectangle. It is cut after the desired fragment is selected. Then the material is secured to the template with pins (its edges need to be folded). After this you need to use a sewing machine. The treated fabric is ironed. After this, it is glued to the base. Unprocessed sections are hidden. The seam is made so that the base is covered by the stitched edge.
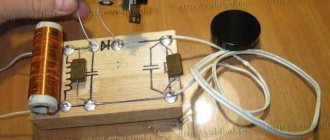
How to solder all electronics
Test assembly of components on a breadboard
Before you start soldering the entire structure, it is better to assemble the components on a breadboard or simply on twisted wires. This way, you can definitely check that you have flashed the control module correctly, and you can also experiment with different firmware and their settings.
Only after you have made sure that everything works and the required firmware with all the changes is loaded into the control unit, start soldering.
Component assembly diagram when using Wemos mini
The scheme is extremely simple and understandable. I quote the original from the author’s website.
Even people without soldering experience can easily cope with the assembly of this project.
Component assembly diagram when using NodeMCU
Do not rush to solder the matrix, because the wiring going to it will need to be routed through other structural elements.
It is best to provide several connectors to be able to disconnect the matrix for assembly or the control unit for flashing.
Functionality check
It is possible to make a lamp without a touch button; it can be controlled via an application. In this case, you will have to make some changes to the firmware. Special lines that need to be commented out are marked in each lamp software version.
Plastic chandeliers and lamps
Plastic has become one of the most popular materials in modern interiors. This also applies to lamps - a wide variety of models are sold. You can make a chandelier with your own hands, which will be in no way inferior to finished products. The lampshade of a lighting fixture can be constructed from anything. These can be disposable cups, various sticks, painted plastic bottles. They are sometimes decorated with decorative devices: figurines, luminous details. Various metal frames can be used as supporting material. The easiest way to make a table lamp. You can use cut-out parts and shapes with holes. Instead of throwing away unnecessary plastic items (used disposable tableware, etc.), it is better to try making a small lamp out of them that can decorate the room.
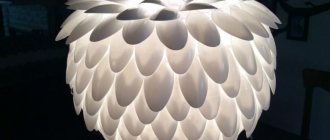
Master class: making a lampshade from plastic spoons
You need to find a large number of identical plastic spoons, up to 200 pieces. It will be more difficult to construct a product from entire devices, but if you cut them, everything will work out quite quickly and simply. The handles of the spoons need to be cut off and removed, leaving only the scoop. Next, you can use the finished lampshade to cover the elements or cut it out of the eggplant. The lower part is made from it and a hole is made for the light bulb, or the top of the neck is cut off, leaving a fairly wide hole. Next you need to decide on the design. The upper surfaces of the cups will create a shell-like pattern, and the lower surfaces will create a “scaly” surface. If you choose the second option, then you need to glue jumpers to the eggplant. First, the top part is finished, laying out rows of spoons one after another. When the process reaches the open part, you need to calculate everything so that the last row hides the cut edge of the eggplant.
The following can be used as fastening:
- glue;
- office plasticine;
- scotch.
Chandelier made of plastic bottles in the form of leaves
You will need steel wire for the frame, thin wire, a soldering iron, scissors, ten plastic bottles of various shades of green. You need to cut leaves of different sizes and shapes from the bottles. Fragments in the form of birch leaves and other leaves with a more or less compact shape are ideal. This will result in a larger number of elements. It is better to process sections simulating plates with a soldering iron to make them slightly bent. You also need to make veins with the edge of the sting: the leaves will take on a more natural appearance. Since the bottles are cylindrical in shape, the blanks will have a curvature. Holes for thin wires are pierced with a hot needle. You need at least two on each leaf, but four is even better to thread the wire through the figure eight. As many sheets as possible are put on each one. Then the flexible wires are securely twisted into a frame made of steel wires.
You need to handle the soldering iron as carefully as possible so as not to burn your fingers or burn the leaves.
Lamps made from laser discs
You can make several types of such lamps. Materials needed: rubber feet, silicone sticks, fluorescent lamp, fiberboard circle, CDs. You will need tools such as a triangle ruler, pencil, compass, glue gun, screwdriver, pliers, pliers, drill. In a round form made of fiberboard, a hole is made in the very center, and twelve sectors are drawn on it. On the lines that separate them, one small hole is drilled. Steel wires will be stretched through them, each of which will house a stack of disks. The design will be quite heavy, so metal wires are needed. A wire with a socket is inserted into the hole in the fiberboard circle, and a light bulb is inserted into it. From the disks you can also make a polyhedron lamp, a lampshade in the form of a ball, petals, or a ring lamp.
Ways to create lamps from paper
This material is popular because of its flexibility. You can design an interesting figure or fold sheets of paper several times and make flowers. Folded paper sheets are joined into round shapes. Paper lamps are made in the form of plants, animals, abstractions. Some people like to make patterns and cutouts. In some Eastern countries, chandeliers made of rice paper are widely used. To make a lamp, you can use the origami technique. Paper lamps are created in two main ways, namely by using one or more large sheets or by gluing together a large number of paper elements. Over the past ten years, table and floor lamps have gained popularity. You can make lamps, carved pumpkins and houses from paper. This material is also suitable for creating a traditional lampshade:
- conical;
- cylindrical;
- elliptical.
Made from rice or parchment paper
Rice paper is useful for creating a Chinese lantern. Additionally, you will need thread, an awl, a stationery knife, a ruler and a pencil. First you need to make markings on paper. The flashlight design consists of many diamond-shaped sectors. Half of them are filled with vertical intermittent markings. After this, the sheet is folded into an accordion. He curls up into a circle. Painted lids can be glued to the top and bottom. To make a parchment paper lampshade, you will need a marking board, a compass knife, two sheets of parchment paper, two rolls of wax paper (similar to parchment paper), scissors, silk ribbon, and a hanging frame. Strips of satin ribbon 18-20 cm long and 40 cm long are attached to the frame structure. The final stage consists of pasting circles of parchment and wax paper onto ribbons. They need to be attached with an overlap.
Origami chandelier made from paper bags
To make such a lamp with your own hands, you will need a wire with a switch, an LED lamp, and two paper bags with a pattern. First you need to learn how to make simple origami. The next thing to do is cut off the bottom of the bags and remove the handles. They are glued together into one large paper bag. It is folded in half. Both parts are “turned” into accordions. You need 16 identical stripes. The outer ones are folded diagonally. A hole is pierced with an awl. One of the two open sides is securely fixed with a thick thread. It is necessary to leave room for regulation. The second one will be open. The LED light bulb is connected to the socket, the top of the lampshade opens and closes back. This kind of lighting is necessary; incandescent lamps cannot be used. The wire is fixed on a branch of a tall decorative tree - the product is ready.
Corrugated paper lampshade
Products made from corrugated paper look very original, which is why the material has become so popular. You will need an LED lamp, cable, thread, glue, knitting needle, ruler, piece of corrugated paper 44x88 cm. First of all, you need to take a ruler and pen and mark the paper on a line with the same width. Using the drawn lines as a guide, you need to make an accordion out of a flat sheet of paper. Using a knitting needle, it is folded diagonally at one end, then returns to its original position and folds on the other side. The paper needs to be unfolded again - the diamond shapes should stand out on it. The entire sheet now consists of double shapes. The first and subsequent folds must be made corresponding to the width of the stripes, otherwise the appearance of the paper will deteriorate. The workpiece is twisted into a spherical shape, and its upper part is fastened with thread.
Butterfly chandelier
There are two ways to create such a lamp:
- One big butterfly.
- A “swarm” of small moths of different sizes.
Preschool children will prefer a lampshade in the form of many hanging figures. Individual parts of the lamp can be lowered up to one and a half meters from the ceiling. An old lampshade or its frame is used as the basis. If there are no such blanks, then you can use a rim made of metal or wood or thick wire twisted into a circle. You need to prepare sheets with butterfly templates to select butterflies of the required sizes and shapes. It is recommended to make moths of at least five different sizes. Then the structure will be visually larger. Butterflies are cut out with small scissors or a stationery knife. It is advisable that the paper be thick. The cut out figures are painted with different colors and decorated with sparkles, but on some templates the butterflies may already be colored. To finish the product, the butterflies are fixed on fishing lines and attached to the base.
The scissors for cutting out the templates must be straight, otherwise the butterflies will be damaged.
Ball-shaped paper lamps
The following can be used as decorative elements:
- fragments from old paper;
- fabric or paper napkins;
- dense matter, felt.
The finished Chinese lamp can be used as a basis for other products. They are cheap. You will need a perfectly round model. The first option: cut circles of different colors from fabric and glue them overlapping. From a Chinese ball you can make something like a round plate-shaped cone. Second method: circles are cut out of square-shaped sheets of paper. They are connected in the center, the edges are raised until the perfect flower is obtained. The elements are attached to the ball in ordered rows. Paper sheets make beautiful tartlets. They should be filled with something. The paper is also folded into square envelopes that can be turned into four conical ramekins. Some people use an old wall map instead of paper. A newspaper lampshade with printed images in gray or brown will look stylish in any interior.
Lamps made of metal pipes and tubes in loft style
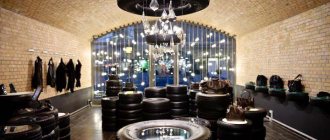
Non-functioning water pipes with taps can be mounted into a single structure, equipped with light bulbs and thus create a stylish and useful thing. It is better to place it on the wall. This is a very popular finishing element in the loft style. Lamps in the steampunk style are created from large and small pipes. These are complex designs; they cannot be made without special training. However, it is possible to design a small robot with a “head” shaped like a light bulb. Beautiful ceiling chandeliers are made from pipes. In addition, there are various models of lamps made of metal pipes. The material often used is brass. Chandeliers are created in the form of compositions from several tubes. Pipes, as a rule, are made in one piece, but lamps with various patterns and openings are also produced. They are not inferior in popularity to lamps in the loft style.
Chandelier made of brass tubes
You can make a beautiful product in the form of diamond faces. In addition to the pipes themselves, you will need sandpaper, a jigsaw, twine or wire, and gloves. To create an original chandelier you will need 20 pipes: 10 short (6 cm), 5 medium (12 cm) and the same number long (25 cm). You need to find several long pieces, mark them and cut them with a jigsaw. After this, you need to start sanding with sandpaper so that the edges of the tubes are perfectly smooth. Then the fragments are collected onto thick wire or twine. First, horizontal rows are created: the bottom of five short ones and the middle one of the same number of medium tubes. Then they are connected by five more short tubes. The upper part of the structure is made of five long fragments that need to be combined with the already prepared part. Long pipes do not come together completely; the cartridge must be secured in this place.
Lamps made from plumbing pipes
It is necessary to prepare such devices as an electrical cable, electrical tape, adhesive tape, various screwdrivers, two-core wire, cartridges, hinges, fittings that match the parameters of the pipes. One of the tubes should be larger - it will serve as an attachment to the ceiling. The assembly process is quite complex. You need to create a diagram on paper, and only then get down to business. At this stage, the design configuration is determined. The splitters must be connected correctly. All parts of the structure being prepared can be polished and painted. It is better to give preference to white, red, gold and black colors. You need to wait about a day for everything to dry completely. After this, all the pipes are assembled together. Light bulbs are screwed onto them. The last stage is connection. Since the scheme is complex, it is better to invite a specialist.
Some tips
When installing, some points are taken into account:
- When installed on a desktop, the fact with which hand the person writes is taken into account (whether he is left-handed or right-handed). The lamp is installed so that the shadow of the hand does not interfere with writing.
- The height of the lamp should be within 35–40 cm.
- If a computer or laptop monitor is installed on the table, then the device should be higher than the top edge.
- The light should not shine into the eyes.
When assembling, you need to consider the following tips:
- the wire must be taken round, in a double insulating layer;
- current-carrying conductors must be flexible and consist of a large number of wires;
- areas through which the cable is laid must be protected with dielectric bushings;
- Unacceptably high tension on the wire.
Using glass to create lamps
You can hang a composition of several empty liquor bottles on the ceiling. Three-liter jars can be hung by metal chains. Glassware is also suitable as a lampshade. A lamp made from many glass fragments can imitate a crystal chandelier. Broken glass objects find a new purpose in the form of an original lighting fixture. Glasses and wine glasses make beautiful table lamps. Various glass boxes, glass from old wall sconces, headlights, and interior doors may come in handy. A homemade glass chandelier can be painted with watercolor or stained glass paints. You will get beautiful stained glass windows. To create pendant lamps, craftsmen use a variety of decorative containers from oils and perfumes. Unlike wood and paper, glass has high fire safety.
Lighting fixtures made from wine bottles and wood
The list of necessary equipment includes wire cutters, screwdrivers, screws, a glass cutter, silicone, a rag or brush, stain, pine boards, hooks, a chain, ten light bulbs, wiring, and wine bottles. The first step is to process the containers. Labels and remaining glue are removed from the bottles. Using a glass cutter, you need to remove the bottom of each bottle: it rests at a height of 1-2 cm, and the bottle rotates around its axis. The cracks must be tapped with a hammer until the bottom falls off. After this, the electrical wires are placed in bottles and connected to the cartridges. Light bulbs are screwed into them. Now you need to prepare the boards. In the lower, larger one, holes are drilled for necks and wires. The top one will collect them in one bun. Hooks for chains are screwed into the bottom board, which will hold the structure. For the kitchen, you can make a table lamp with a bottle base and a wooden shade.
Wooden boards can be stained to give an antique effect.
Using old cans to create lamps
Old jars can find a new purpose. Lamps can be created using threads, electrical wires, and handles for cans. Containers must be equipped with handles. They will need to be tied with threads attached to a pre-prepared iron frame. Electrical wires with sockets and light bulbs are lowered into the jars - the chandelier is ready. You can make an option for the dacha - threads are tied around tree branches, and candles or small lanterns are placed inside the jars. Containers wrapped in multi-colored threads or decorated with patterned napkins look beautiful. The inside of the cans can be painted white, and while it is still wet, apply a pattern in the form of chaotic lines. Some people paint the outside of the container with different paints, and paint an image on top using glitter shadows. Banks can also be lined with small broken glass.
Chandelier / lamp in shabby chic style
Beautiful decorative items are created from beads and fabric, including lamps characteristic of this style. Decorating in the shabby chic style means that the room is designed to accommodate a girl or woman. You will need beads, beads, threads, chains, a socket with a lamp, a finished wooden or metal frame. The first step is to paint the base in one of the soft shades. After this, it can be wrapped with decorative elements or fabric. The top of the lampshade is wrapped with smaller beads, but in larger quantities - up to 40 beads need to be strung on one thread, while on the lower threads - about 20. This is an approximate proportion, it, like the tension of the threads, can be changed depending on the size of the structure. The lamp is usually covered with pink fabric. All decorations are hung so that they flow down.
What components will be required?
All necessary components can be divided into electronic filling and housing. All necessary electronics can be ordered on AliExpress:
▶ diode matrix WS2812B 16x16 – from 886 rubles
▶ power supply 5V/3A – 271 rubles
▶ Wemos D1 mini control module from 124 rubles or NodeMcu v2/V3 – from 153 rubles
▶ touch button – 57 rubles
The body and frame elements can be purchased or ordered at any hardware store.
▶ glass lampshade – 414 rubles
▶ plastic pipe and plug: diameter 50mm - length 250mm, diameter 40mm - length 100-150mm, plug diameter 40mm. In any hardware store, everything together will cost about 100 rubles.
The project turned out to be quite popular, the Chinese offer to buy all the components at once - for 2853 rubles. The set includes everything except plastic pipes, but if you buy the components separately it will be cheaper.
The project budget is up to 2000 rubles . This is 500 rubles cheaper than the most affordable smart night light from Xiaomi.
As a result, we will get a gadget with cooler capabilities, which will be made with our own hands.