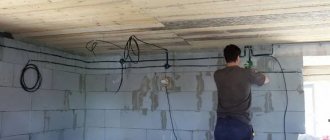
There are two types of organization of electrical wiring in premises: hidden and open. With the hidden version, the wires are placed in pre-made channels in the thickness of building structures. In the case of the open type, they are located along the surface of the wall, floor or ceiling. In order for such wiring to look aesthetically pleasing, and for the wires not to be damaged by mechanical stress, they are placed in special boxes.
Plastic box for electrical wiring
Electrical cable ducts are used for laying the following types of wires: power, telephone, computer, television and low-current.
Application of plastic boxes
Most often, plastic channels are used in everyday life. They have the following positive qualities:
- Low cost. It is associated with the low price of the manufacturing material itself - plastic, and the simplicity of the production process.
- Mass production of plastic products due to the development of modern technologies.
- Resistance to the negative effects of moisture, fire, acids, fungi, mold.
- Resistant to mechanical stress.
- Non-conductivity of electric current.
- Possibility of use in conditions of high humidity.
- Easy to connect and pull wires.
- No special tool required.
- A wide range of colors, thanks to which the box can organically fit into the color design of the room.
Despite the large selection of colors, you should understand that the plastic box will still be noticeable on the wall. For this reason, you also need to think in advance about how to lay plastic boxes for electrical wiring so that they do not spoil the appearance of the room.
How to choose the right plastic box
The determining factor that goes into making the right choice is the size of the box. In fact, a lot will depend on the number of wires that will fit into it. Plus a small amount of space. Therefore, the main boxes (from distribution boxes to branches) should be larger, and those going to sockets or switches should be smaller.
Next, you need to decide on the number of plastic elements. Here everything will depend on the length of the electrical wiring, taking into account that the box itself has a standard length of 2 m. By the way, in stores it is sold without trimming. In order not to make a mistake with the quantity, it is necessary to add 20% to the estimated length of the wiring.
Main dimensions of cable channels
The cable channel is also used as a decorative element that should fit into the interior design of the room. Let's just say that this material is mainly produced in white, so there is a fairly wide range here. With wood-effect models, the assortment is minimal. Although it is the “wood look” that is distinguished by its presentable appearance, which can fit into almost any interior.
Some manufacturers of plastic boxes for electrical wiring offer, as an addition, some decorative elements: plugs, corner adapters, tees, corners (internal and external). Therefore, the advice is to purchase cable channels with decorative fittings that enhance it. Wood-look fittings are also available.
When purchasing, you need to pay attention to the quality of the product. And if uneven ends are a small problem that can be hidden with plugs, then the poor quality of the locking connection between the panel and the lid is the number one problem that occurs quite often. That is, during operation the cover always falls off or, conversely, it is very difficult to install it on the lower mounting panel.
Decorative plastic box to look like wood.
A good quality product should be closed by hand without tapping. But the most interesting thing is the moment when the back of the box is installed, the cables are laid, and the lid does not close or falls out after installation. The most important thing here is not to overdo it. Many installers start hitting the lid with their hands or a mallet, after which not only it, but also the box itself cracks and falls apart before our eyes. So my advice is to purchase boxes for connecting wires from well-known manufacturers.
Installing plastic boxes is not only the correct choice, it is the correct choice of junction boxes, both in size and color. Everything should be in harmony. Pay special attention to the holes in the junction boxes where the wiring boxes will be inserted.
Plinth boxes for laying cables.
How to use it correctly
Before laying communications, it is advisable to draw up a layout plan for future wiring. You need to weigh all the options so that you don’t regret wasting time and money later. Then the necessary cable channels are purchased, and then it is recommended to proceed as follows:
- Unpack cables and box.
- Apply markings to the surface involved in installation.
- Cut off the workpieces.
- Remove the lid from the box.
- Replace the box.
- Level.
- Make holes for fastening.
- Secure the box.
- Place the wires in the channel.
- Close the lid.
Note! After completing the work, it is recommended to write down where and where this or that cable is laid.
According to current rules, all cables are placed strictly horizontally or vertically.
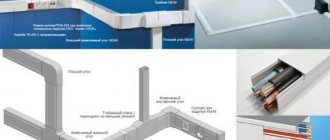
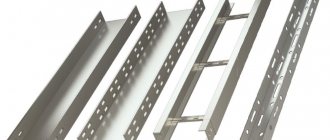
Elements of cable channels
The advent of cable ducts has greatly simplified wiring installation. There is no longer any need to create recesses for wires in painted and plastered walls and then seal them. Cable channels are easy to install and maintain, aesthetically pleasing and durable.
Dimensions of plastic wiring box
Plastic boxes for electrical wiring vary in length, width and thickness. According to section 8 “Dimensions” of GOST R IEC 61084-1-2007 “Cable and special cable duct systems for electrical installations”, it is recommended to produce straight sections of cable channels with a length that is selected from the size range in increments of 0.5 m. Minimum section length should be 2 m.
This section also indicates that the manufacturer must indicate the value of the cross-sectional area (in mm²) inside the box, that is, the usable area that can be used when installing the cable. The width of the box depends on the number of wires that can be placed inside, as well as on the purpose of the product itself.
Dimensions of electrical installation cable channels in cross section
Mini-channels are produced by industry with the following typical cross-sectional dimensions:
- 10x10mm;
- 10x12mm;
- 12x12mm;
- 12x16mm;
- 16x16mm;
- 16x20mm;
- 20x20mm;
- 20x25mm;
- 25x25mm;
- 25x40mm;
- 40x40mm;
- 40x60mm;
- 60x80mm.
Trays of this type are designed to accommodate one or two wires.
Floor boxes are produced with the following cross-section:
- 160x65mm;
- 50x12mm;
- 92x20mm;
- 75x17mm.
Trunk plastic boxes for electrical wiring have the following typical cross-sectional dimensions:
- 20x10mm;
- 30x10mm;
- 40x25mm;
- 25x25mm;
- 40x40mm;
- 40x16mm;
- 80x60mm;
- 100x60mm.
For the plinth type, the size is determined by the width of the cover (diagonal wall) and is usually made 50 or 70 mm. You can also find the sizes of skirting boards with cable channels, which are given according to the height and width of the base. In this case, the most popular are 50x50 mm skirting boards. They allow you to place several wires in one product. Trays measuring 100x100 are designed to accommodate three-wire wires.
Dimensions for corner structures depend on the dimensions of the internal part of the product. The most popular size is 40x40 mm. Depending on the purpose, flexible corrugated models are available in the following diameters: 16mm; 20mm; 25mm and 50mm.
- 16mm pipes are used for laying lighting and telephone cables;
- to create outlets for sockets or switches, use 20mm corrugated channels;
- Corrugated cable ducts with a pipe diameter of 25 mm are used between electrical panels or distribution boxes.
Corrugated metal pipes
A distinctive feature of metal hoses from plastic pipes is the manufacturing method. If the latter are completely solid and sealed, then the metal ones are twisted from galvanized steel tape, which determines the advantages and disadvantages of use.
Dimensions of metal sleeves for cable:
| Outer diameter, mm | Inner diameter, mm |
| 11,6 | 7,8 |
| 13,9 | 9,1 |
| 15,9 | 10,9 |
| 18,9 | 14,9 |
| 21,9 | 16,9 |
| 24 | 18,7 |
| 26 | 20,7 |
| 30,8 | 23,7 |
| 38 | 30,4 |
| 44 | 36,4 |
| 58,7 | 46,5 |
All other parameters are similar to PVC pipes.
+ Advantages of corrugated metal pipes
- More reliable protection of wires from mechanical damage.
- If the metal hose is grounded, it will act as an additional electromagnetic shield - in some cases, when laying information cables, this is a significant advantage.
- Easy to install.
— Disadvantages of corrugated metal pipes
- Since the pipe is not solid, it cannot be used in conditions requiring a hermetically sealed connection.
- Weight and cost are higher than those of plastic analogues.
- Insensitive to negative temperatures.
Calculation of the size of a plastic box for electrical wiring
Before you purchase cable channels for installing electrical wiring, you must first draw a layout diagram of the structure in the room, indicating the type of cable channels and the length of each section. After this, determine the required size of each type of tray. To calculate the size of the box, you need to know the cross-section of the wires and their number.
It is recommended to take a cable channel with a small margin in length (10%) and width.
The length reserve takes into account the additional costs that arise during installation in places with corners, as well as in the event of material damage. It is also advisable to have free space inside the box, which may be needed when laying additional electrical cables.
There is no need to purchase a wide tray if you initially plan to lay only one cable, since its price also depends on the width of the product. Usually the calculation is carried out taking into account an increase in the number of wires by 2-3 pieces.
Also, taking into account the “Rules for Electrical Installations”, in the case of multi-layer filling of plastic cable channels, the sum of the cross-sections of all conductors located in them should not exceed 40% of the cross-section of the product itself in the case of using a box with a lid or 30% in the case of a blind box.
Table for calculating the minimum dimensions of cable channels
| single-section | two-section | three-section | |||||||||
| 10x22 | 10x30 | 10x22 | 10x30 | 15x54 | 10x40 | ||||||
| number of wires in one section | |||||||||||
| 1,5 | 10 | 12 | 3 | 3 | 5 | 5 | 19 | 13 | 5 | 4 | 5 |
| 2,5 | 7 | 10 | 2 | 2 | 3 | 3 | 13 | 13 | 3 | 3 | 3 |
| 4 | 4 | 8 | 1 | 1 | 2 | 2 | 10 | 13 | 2 | 2 | 2 |
| 6 | 2 | 3 | 1 | 1 | 1 | 1 | 5 | 5 | 1 | 1 | 1 |
Cable channels are delivered to hardware stores in packages. Depending on the size of the trays, the packaging differs in the number of products and, accordingly, in the total footage. To calculate the total length of cable channels in a package, the number of products is multiplied by the standard length of one tray (2 m).
A table of parameters for one package, depending on the size of one box, is shown in the figure. Parameters of one package of electrical boxes, depending on their size
When purchasing boxes, it is advisable to purchase fittings for them (plugs, corners, branches, etc.).
Also, for household purposes, it is better to purchase single-lock products, as they will last longer than double-lock ones. This is due to the fact that the wall thickness of single-lock structures is greater, and, consequently, the products themselves are more durable.
Correctly sized cable channels will allow you to quickly install the system, and the additional space inside the box will make it possible to easily add wires to the system without the use of additional trays.
Wall systems and fittings
We mentioned earlier that some systems are equipped with different fittings for connection. Let's take a closer look at what is included here.
A complete set of accessories for cable channels
Such systems are much more expensive than simple cable channels, but they are much easier to install and easier to connect to “sliding” electrical points, which are complete sockets and switches. The entire system includes the following:
- The route itself, which is laid on straight sections.
- Adapters (connectors) are needed for technological joining of cable channels at the ends.
- A tee and T-shaped connection helps to beautifully attach a branch going, for example, to a switch.
- Rotation helps to rotate the cable channel on one plane.
- The internal and external corners are used to transition the route to adjacent walls.
- The plug closes the end of the route from the end.
- Junction boxes are the points where wires converge and connect into circuits.
- Sliding electrical appliances - they are built into the cable channel and can move inside it as if on skids. Having taken the desired position, they are fixed.
Socket built into the cable channel
The use of such systems is convenient because in a short time you can install high-quality wiring throughout the entire house. In this case, there is no need to stir up dirt and all wires remain in the public domain, which any electrician will appreciate if any areas need to be repaired or replaced.
Types of cable channels
Also, the advantages of cable channels will be:
- Light weight for easy installation.
- PVC models are cheaper than metal and wooden solutions.
- The material is chemically neutral, invulnerable to moisture and corrosion, and over time mold and insects will not settle in it.
- It is also of no interest to rodents.
- Caring for plastic boxes is very easy.
- The service life of the product is at least 25 years.
- The material is fireproof and serves as additional insulation for wires.
What color solutions are there for cable channels?
The choice of cable channels depends on the overall interior design. There is a large assortment of white products, but colored wire boxes are also often used. Fittings must be used in suitable colors. Different types of tees, adapters and plugs must match the color palette of the cable channels. Products painted to resemble wood are especially popular. Such designs are used in the arrangement of wooden houses and baths.
The color palette includes more than 10 items. Colors such as beech, pine and oak are often found.
Depending on the interior of the room and the color scheme used, the color of the wiring boxes is selected. The use of a colored cable channel allows you to select the material taking into account the basic design of the room. The most popular products are white or wood-look, as they are used to decorate office premises. An unusual version of the cable channel in black.
The beige color palette is in demand, especially the wood texture.
How to calculate footage
In terms of length, you need to buy a little more boxes than you need for the length of the wiring. It is necessary to add about a third of the length to the calculated footage for various errors and adjustments. The following accessories are also required for installation:
- How to install electrical wiring in a wooden house
Urgent entry into a construction SRO
Gasoline power plants
- The required number of corners.
- Turns.
- Troynikov.
The box and fittings must be in a color combination. To avoid disagreements, it is better to select the required number of details immediately according to the shade.
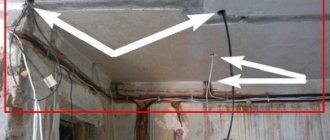
Floor and baseboard cable channels
Floor and baseboard cable ducts are a separate category. All floor and plinth cable channels also have their own additional elements that simplify the laying of highways.
Plinth cable channels are hollow inside and can accommodate many wires. This is an excellent option for laying antenna or computer cables.
Pros of cable channels
- There is no need to groove walls to lay wires.
- The laid cable is always open for inspection - you can always lay an additional line nearby.
- Despite its apparent softness, the cable channel additionally protects the wires laid in it from mechanical damage.
- The installation of the main line is carried out as quickly as possible.
- Various forms of cable channels allow you to fit the external electrical wiring line into most interior solutions.
Cons of cable channels
- Sometimes cable channels do not look at all in the interior of the room.
- The box “takes away” several centimeters of space from the wall.
- It is easy to accidentally snag the cable channel - knock it off the fastening or break it.
- High-quality installation is only possible with the use of a large number of additional accessories - turns, branches, etc.
Why do you need corrugation?
Laying electrical cables and wires in corrugated areas is recommended for various reasons:
- When laid in flammable walls (wooden or frame), behind flammable finishing (lining, PVC boards), when attached to wooden floors - for fire safety reasons. In this case, non-combustible shells are chosen.
- When laying behind finishing materials - behind lining, plasterboard, PVC boards, etc. - for security reasons. To make it more difficult to damage the cable when trying to hang something on the wall. In this case, the most important indicator is the hardness of the shell.
- When laying cables in a screed or under the floor, under finishing, corrugation is used for several purposes. Firstly, to protect against compression when pouring concrete. Secondly, to be able to change the cable if it is damaged without destroying the floor. Third, to protect against damage.
- When laying externally, the sheath is needed to protect the cable from atmospheric influences (ultraviolet) and mechanical damage. When laying open through the air, a corrugation with a wide temperature range (to withstand heat and frost) and durability are required. to ultraviolet. If the cable is suspended, reinforcement is also necessary to increase the load-bearing capacity.
- When laying underground, water resistance as well as rigidity are important.
We advise you to study - Features, types and elements of a flat roof
In general, corrugation, even metal, is not the best protection against mechanical destruction. You can only hope that if you feel that the drill has failed, you will be able to stop in time. And in order to definitely not get into the electrical wiring, it is better to have an exact plan for its installation with measurements and reference to the corners. After all, not every wiring detector detects a corrugated cable, even under load. So, before pouring the screed, before finishing, don’t forget to take photographs, sketches and mark distances.
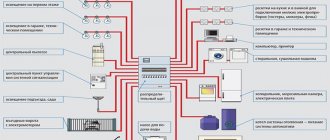
Methods of using cable channels for laying open electrical wiring
A wide range of components for electrical wiring allows you to implement the most complex projects. Installation of the wall box is carried out taking into account the height of the sockets, junction boxes and switches. For open spaces, designs of wall and floor cable ducts made of metal are used. This provides protection from the effects of electromagnetic vibrations. Such options are relevant when installing information wiring.
Before proceeding with installation, it is worth understanding the basic elements of the electrical circuit.
Angled cable channel
Used for mounting LED strip lighting. Most often, such products are made of aluminum, and the lid is made of heat-resistant plastic.
The corner cable channel is used to fill the junction of the main line in the corners.
For the home, a flexible cable channel for wires is often used. Lightweight metal models are also used. There must be enough space inside the case for a certain number of cables. It is important to check the availability of the necessary accessories for the cable products.
Flexible designs allow you to disguise a large number of wires. When choosing products, you need to count all the locks, mounting fasteners and plugs on the spot.
Electrical wiring can be organized according to an open circuit using the following types of electrical boxes:
Wall box for wires with double-sided and one-sided lock.
Wall Channel Installation
- floor plinth with separate sections for low-current wires;
- ceiling material;
- designs of cable ducts on the floor with protection from mechanical impact;
- corrugated pipes and trays used in utility rooms or for external facades.
Outdoor cable channels are used for the local area.
Flexible structures can be used for the street.
Installation of wall boxes is carried out using self-tapping screws. They should be installed at certain intervals. The load is determined by the number of wires inside. To fix it on a wooden surface or on drywall, it is necessary to screw it in every 40-50 cm. If the walls are uneven, then the distance may be less to hide flaws.
To work with a brick or concrete wall, installation is carried out using dowels. To work, you will need a hammer drill with a nozzle with a diameter of 6 mm. The simplest fastening option is liquid nails, which are construction adhesive.
Wall mounting option
Floor channels will allow you to disguise any wiring so as not to spoil the interior. In this case, the structure is combined with the baseboard. Before installation, markings should be made on the walls and floor. Interestingly, plastic cable channels are mounted not to the floor, but to the wall. Installation is carried out using screws, liquid nails and dowels.
Installation of a floor skirting box
Installation of wiring in the channels is carried out after completion of finishing work. Markings for the cable mesh are marked on the walls. Laying is done from the distribution panel. First of all, main lines are installed, and then branches from them. If the channels do not have holes, you can make them yourself.
Installation of a wall channel with wires. The channel section is fixed to the wall. In this case, the line should be positioned in the center of the holes. After this, fastening with dowels is carried out. After installing the connecting parts, the box is cut to the required length.
The features of installing a cable in a box are shown in the video:
Types of electrical installation channels
Types and types of electrical wiring
Cable channels are classified according to purpose, material of manufacture, number of locks, shape, etc.
Depending on the material, the cable channel is:
- metal;
- plastic;
- wood.
Based on location and purpose, the following types are distinguished:
- floor;
- corner;
- baseboards;
- wall;
- ceiling;
- flexible;
- LED
Types of cable channels
Floor-standing models are used when installing electrical wiring directly on the floor surface.
Skirting - used when laying electrical wiring along the corner formed between the floor and the wall. Such products are hollow plinths, in which there are special niches or channels for placing electrical cables. Some types have separate channels, which allows you to separate wires for different purposes.
Placing wires in the plinth cable channel
If the wiring runs along a corner formed by two walls or a wall and a ceiling, then corner models are used, which in cross-section represent a triangle.
When placing electrical cables along walls or ceilings, wall or ceiling profiles are used, respectively.
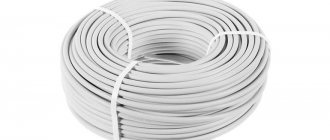
Flexible types are used for laying electrical networks to industrial equipment that is not permanently fixed. They are chain and corrugated. Chain - consist of PVC links connected to each other. Corrugated - they are a corrugated pipe, inside of which wires are laid.
LED trays have a special strip inside on which the LED strip is fixed. Installed in those places where lighting of this type is organized. Such designs have a transparent lid.
Flexible plastic cable channel
Based on the type of wires that can be placed inside the product, there are:
- cable channels designed for laying telephone cables, as well as Internet, signal and television wires (mini cable channels);
- electrical installation boxes for regular and thick cables.
Wall mounting methods
Liquid nails can be used as a temporary fastening method. Correct fixation also affects the life of the product. There are several ways to attach a cable channel to the wall:
- Self-tapping screws. The laying step is calculated in advance, which depends on the load on the box, the number of wires, and the cross-sectional dimensions. The average step is 50 centimeters. If the wall has an uneven surface, the step should be reduced to visually hide the gaps and defects of the wall. There is no need to take long screws; a product 40 mm long is enough. Application: wooden and plasterboard walls.
- Dowel-nails. Typically used for installation on concrete and brick surfaces. On the base of the cable duct, holes should be made every 50 cm with a diameter of 6 mm. The channel should be attached to the wall and, using a pencil, place the places where the fastening will be made. In these places you need to drill holes, then attach the box and drive in dowel-nails.
- Bedbugs. These are special mounting clamps that are used for fastening to metal up to 2 mm thick or to aluminum profiles.
- Liquid Nails. They are used when the methods described above cannot be used. Example - tiles in the bathroom, smooth metal surface. It has poor reliability, so it is used as a temporary method of fastening.
The best method depends on the wall material.
Corrugated plastic pipes
If cable channels, plastic or metal, are more suitable for flat surfaces, then in the case of frequent transitions between planes or turns, their installation will be extremely difficult due to the need to use a large number of additional components. In such conditions, a more suitable material would be flexible pipes that bend at any angle and are attached along the entire length to standard clips.
Externally, a corrugated plastic pipe looks like an elastic channel with a circular cross-section. It is used for laying any cables and wires, providing them with additional protection from moisture and mechanical damage. Mainly used when installing electrical circuits with complex wire routing paths - raised floors, suspended ceilings, electrical wiring behind plasterboard walls.
Dimensions and components
PVC is used for the production of corrugated plastic pipes. Most often, products with an internal diameter from 16 to 32 mm are used, but when choosing, you must additionally pay attention to the purpose of the corrugation - it can be light or heavy.
The first are standard products that are used for installing electrical circuit lines inside buildings. Heavy corrugations provide more solid protection and can be used outdoors, and in some cases, under water.
Since in long highways it is not always possible to push a wire through a pipe without auxiliary parts, additional corrugations can be equipped with probes made of metal single-core “steel”, however, installers usually have their own.
Dimensions of corrugated pipes for cable:
| Heading | Outer diameter, mm | Inner diameter, mm |
| Corrugated PVC pipe without probe | 16 | 10,7 |
| 20 | 14,1 | |
| 25 | 18,3 | |
| 32 | 24,3 | |
| 40 | 31,2 | |
| 50 | 39,6 | |
| 63 | 5,6 | |
| Corrugated PVC pipe with probe | 16 | 10,7 |
| 20 | 14,1 | |
| 25 | 18,3 | |
| 32 | 24,3 | |
| 40 | 31,2 | |
| 50 | 39,6 | |
| 63 | 50,6 |
+ Advantages of plastic corrugated pipes
- Indispensable for laying wires on uneven surfaces or when it is necessary to make frequent turns in the highway.
- Usually sealed along the entire length, therefore they reliably protect the wires from high humidity.
- Additional protection of cables from mechanical damage and people from electric shock.
- Clip-on mounting is one of the easiest to install and maintain - you can insert or remove the corrugation from them without additional tools.
- In addition to fire safety, the plastic from which the corrugation is made contains additives that prevent combustion. When the wiring is shorted, the corrugation will not flare up, but will simply melt.
— Disadvantages of plastic corrugated pipes
- They do not tolerate negative temperatures well - when overcooled, they lose elasticity and break, so they are more suitable for interior work.
- If there are too many turns and bends, pulling the cable inside the corrugation will be very difficult and sometimes impossible, so you will have to first pull the wires inside and then carry out the general installation.
Sequence of work for installing an electrical box
Installation of the mounting box occurs in several stages.
- Preparatory work.
- Box fastening.
- Laying cables.
- Cover fastening.
The lion's share of the preparatory work for installing a box for electrical wiring lies in reasonable planning of the location of the cable network.
Following safety rules, it is recommended to avoid laying the route in places of water supply and gas equipment, near heating devices. Do not also forget that in the event of an emergency, smoke spreads through the cable duct system, which can cause harm to human health. All this must be taken into account when developing an energy supply project.
Directly on the ground, the installation area of the boxes must be pre-marked. At the same time, the vertical and horizontal sections of the route are observed. It is preferable to make turns and additional layers at right angles, over the shortest distance.
Installation of the cable route is carried out in the following sequence:
- Disassemble it by removing the top cover.
- Attach the box to the wall. The distance between fasteners is accepted to be at least 0.5 m. Many products have holes for fastening, they can be used, but it is always worth making allowances for the specific situation. It is best to fasten the box every 50 cm
- For fastening, you can use screws, dowel-nails, anchors or clamps. Thin and light plastic boxes can be secured with glue or double-sided tape. But at the same time you need to ensure that contact with the wall surface is reliable. The surface of the wall must be cleaned and degreased so that contact with the plane of the box is as tight as possible
- Laying wires. The wires can be laid one at a time or in a bundle tied in several places. It is advisable to label each cable or install special tags to make the work easier for those who will deal with the wiring diagram in the future. Wire markings must contain clear symbols and be protected from abrasion over time.
- Installing the cover. It is recommended to lubricate the locking grooves or latches with a special sealant. This will enhance the protective properties of the lid and prevent the entry of dust and moisture. The edges of the mounting box can be coated with sealant before closing.
Installation rules and tricks
The plastic cable channels themselves are easy to install even for a less experienced technician. The installation of these models has standard solutions in most cases. But if the work involves laying main wires, it is better to at least consult an electrician.
Simple gasket
It will not take long to lay a street channel or a telephone wire at the entrance to the house. There are no prohibitive difficulties in solving more labor-intensive tasks. The basic principles here are the same as in almost any work: accuracy and precision.
Cable boxes are installed as follows:
- Mark the walls and, if necessary, the ceiling. Strictly horizontal or vertical lines are desirable.
- Release the first tray from the cover.
- Start attaching the channels one at a time, cutting them to size, taking into account the length of the line and its configuration.
- Adjust each part of the network (using a level, height and to comply with other parameters).
- Make holes for dowels or mark entry points for screws.
- Secure with the first or second fixtures. It is better to take dowels and screws with wide heads. You can also use washers.
- The same can be done using liquid nails, a good fast-setting glue, or reliable double-sided tape.
- Place the wires inside.
- Install the cover.
- Equip an input to the end point (for example, a socket).
It seems that drilling walls is not necessary; it is hard and dirty work. But installing dowels or self-tapping screws is much more reliable than the adhesive method. Such lines will be easier to remove, and those placed on glue will come off along with the wallpaper. Yes, and it will be more difficult to correct errors during installation with glue.
Important subtleties
As with any other work, laying lines has its own subtleties. In particular, metal products can be used at home. It is logical to use them for joining skirting systems through a door. Among other things, this will reduce the overall length of the network.
There are other “little things” that may be useful:
- Fastening a standard-length tray (two meters) on a flat wall is carried out in three places - along the edges and in the middle. If the surface is not ideal, it is better to increase the number of such points.
- When using dowels or screws, there is a risk of damaging the tray. You can lower it: to do this, you initially need to drill holes of a smaller diameter.
- During installation, the tray may slide down or move to the sides. It can be secured temporarily with adhesive tape.
- If the installation itself is carried out on tape, you need to prepare a base for it. The surface must be clean and free of grease. You can use the simplest impregnation.
- The channel base and cover must be cut separately when fitting. They are first connected and aligned. Marks are made with a pencil or felt-tip pen, traces of which can be easily erased. Then they are separated and cut.
- You need to cut with a stationery knife (for small dimensions), or a small hacksaw for metal. The edges can be cleaned with “zero” sandpaper.
Decorative cable ducts for external wiring are now in fashion. An interesting effect can be achieved by using transparent trays. Along with linear wires, it is easy to install LED lighting in them.
The installation of box systems, along with the replacement of electrical wiring, is often only one of the stages of a large complex of works. This, whatever it may be, is a renovation of the premises. An ordinary person can do this, but it requires time and a serious approach. Modern technologies make this work much easier, but how high-quality the result will be depends only on the master himself.
Cabling
It seems like a simple process, but even here there are some nuances. We recommend choosing cable boxes that have longitudinal partitions in their design. You can easily lay cables in them, so to speak, floor by floor, so that they do not interfere with each other. If the cable channel is a box without partitions, then pay attention to the quality of the cover fastening. It is important here that it is not squeezed out under the pressure of the weight of all the laid wires.
Covers cannot be joined at the joints of the rear panels; installation must be done offset.
Advantages of an electrical box
The main advantages of placing wiring in a cable channel are as follows:
- ease of installation work;
- mobility;
- availability of communications for modernization or repair;
- Possibility of installation in well-finished rooms. The electrical network, packaged in a box, has a completely acceptable aesthetic appearance;
- scalability. If you correctly calculate the size of the box, there is always the possibility of laying additional cables and wires if the need arises in the future.
Due to the flexibility of the installation process, the technology of using electrical boxes has become widespread in both the industrial and residential sectors. If any problems occur, the suspicious section of the cable network can be easily opened to eliminate the problem.
Among other things, plastic boxes have a low cost and significantly reduce the risk of mechanical damage to wiring. They reliably protect power lines from open contact with a person for whom electric current poses a danger.
What is a wire box?
The cable channel (duct) looks like a volumetric profile of square, rectangular, rarely of a different cross-section and of various sizes. Minimum size 10×10 mm, maximum 100×60 mm. It is installed on the wall, sometimes on the floor, and, if necessary, on the ceiling. Using the channel allows you to:
- save time when laying communications;
- quickly lay the wiring, thereby protecting it from damage;
- Fix the wires in the required position and quantity.
What does the wire box look like?
Plastic boxes for electrical communications are especially popular. This is a reliable solution to hide a bunch of wires from view, while directing them to the right place. Plus, of course, it is possible to install electrical wires in a room where construction work has already been completed and no changes to the room are planned. Today this fact has become undeniable. It's beautiful, practical, inexpensive.
Using boxes in home interiors
Where to buy cable channels for electrical wiring: types, manufacturers and prices
You need to understand the manufacturers of such products if you want to buy cable channels for your home. Many companies offer high quality boxes. In such a situation, it is important to distinguish a fake. You need to ask the consultant for the necessary documents for the products.
Let's take a look at some branded manufacturers:
- Hager. The German manufacturer specializes in office products, but due to the high quality of the boxes, they are also used in residential areas. The products are made in a modern design and are suitable for many interiors. The tehalit.BRP series is used for laying main lines. Universal models are boxes of the tehalit.LFF series, which are characterized by simple installation;
- Legrand. The company offers profiles in different sizes and widths up to 220 mm. There can be up to three sections inside the case. The cable channel is equipped with two types of partitions. Some are mounted in a special groove, while others are flexible and glued to the wall.
- DKS. This domestic manufacturer produces 4 types of channels. Wall-mounted ones have a flat lid and are compact in size. Floor boxes are equipped with turns. They are easily connected to each other. The mini channels come in dark brown and white;
- Schneider Electric. The manufacturer offers the Ultra series with two types of channels. Switches and sockets are mounted in modular frames. Mini channels have a U-shaped cover. For quick installation, you can choose products with self-adhesive tape.
We suggest looking at some types, sizes and prices of cable channels in our table.
Table 1. Average cost of cable channels.
| Elekor 2m IEK white | Suitable for low-current, information and power communications in offices and residential premises. | 36 |
| Ruvinil PKK 16×16×0.8 m | The texture of the material is wood, the color is oak. The material used is self-extinguishing polyvinyl chloride. | 76 |
| Cable channel 25-25 mm. Mutlusan (pack of 100 m) | The material is made to look like light wood. | 2007 (per package) |
| Cable channel 20×10 mm (160 meters per package) T.Plast | Product material is white plastic. | 1390 (per package) |
| Hager LFF channel 60×110 | The structure is made of white plastic. | 422 |
| Legrand DLP with flexible cover 105×50 | Material white PVC. | 695 |
| Perforated DKC 25x40, 2 meters. | The design has a corrugated structure. Made of high quality plastic. | 456 |
Elekor 2m IEK whiteCable channel 25-25 mm Mutlusan packaging 100 mCable channel 20×10 mm T.PlastLegrand DLP with flexible cover 105×50Perforated DKC 25×40
When choosing a cable box, you need to take into account the size, appearance, manufacturer and cost of the product. Properly selected cable channels will disguise unsightly wires and become a great addition to a modern interior. We hope that our article is useful to you. If you want to add something, write in the comments.