Home » Electrical wiring » Wires and cables » How to make a branch from a wire
There may come a time when it is necessary to make a branch wire to connect a new power line. Now there are many ways, each of them can be called good. I didn’t dare to single out one thing in this article; I decided that it was better to collect all the options for you. You have already chosen the safest and most durable method of branching the wire, based on what you have read.
Solder the garland using improvised means
Problems often arise with garlands that are used to decorate a home or tree. Due to the use of thin wires, they are often interrupted and soldering is required. Among the features of this work, we note the following points:
- In most cases, the problem occurs in the control unit, since the wires are not attached securely.
- A breakthrough may occur along the entire length of the product.
- If all light sources are connected in parallel, then the failure of only one leads to an open circuit of the entire circuit.
It’s quite easy to find loose contacts, but a break is only possible when using a tester. Only after finding the break point can you start soldering. You can solder without a soldering iron as follows:
- The broken wires should be cleaned.
- You can make a small twist on which the paste is applied. It will be used to distribute the alloy used.
- The next step is to melt the solder, which can be done using a lighter or a candle.
- After this, the junction is isolated using a tube, which is also slightly heated to increase its ductility.
https://youtube.com/watch?v=Qdzl7ZskqXo
Similar technology can be used to restore the condition of headphones. The soldering procedure does not take much time.
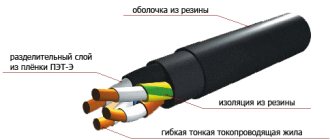
Selecting a cable/wire for a branch
We select the electrical cable for the branch based on where the input device will be installed, on a pole or house line.
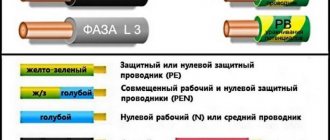
If on a support, we use: for a single-phase branch - 3-core cable (phase - L, neutral - N, ground - PE). With three-phase - 5 wires. If on the wall of a building, single-phase - 2 conductors, three-phase - 4.
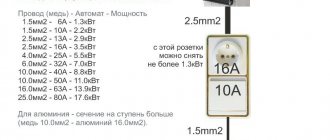
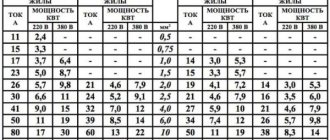
Cable cross-section:
- Aluminum wires - 16/25 mm2
- Copper cable - from 10 mm2
- Calculation of wire cross-section by power => here
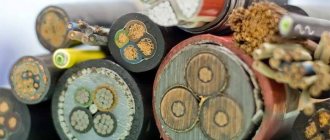
As I wrote earlier, we take into account the method of branching from the overhead line, overhead or underground. For the air branch there are wonderful self-supporting insulated wires - SIP-2A, SIP-3A, SIP-4A . the VBBShV type is no less remarkable .
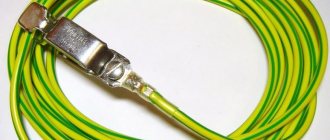
The wires are secured using insulators or special accessories (for SIP). I bring to your attention an interesting video on the topic.
Soldering with a soldering iron
Soldering twists with a soldering iron
The method is very similar to welding, only in this case the wires are connected using solder. For these works you will need a soldering iron. To work you will need:
- soldering iron;
- fine sandpaper;
- rosin (flux);
- brush for applying rosin;
- tin-lead solder.
The operating procedure is the same as for welding:
- Removing insulation and cleaning with sandpaper.
- Twisting.
- Application of flux.
- Direct soldering. The soldering iron melts the solder, which should flow into the twist itself, reliably connecting the wires to each other.
Soldered wiring in a junction box with a soldering iron
Often copper wires are soldered using this method, but if you purchase special solder for soldering aluminum, you can also solder copper from aluminum.
How to connect electrical wires by soldering
Connecting electrical wires by soldering is very reliable. You can solder untwisted wires, but such soldering will be fragile due to the fact that the solder is a very soft metal. In addition, it is very difficult to lay two conductors parallel to each other, especially when suspended. And if you solder on some kind of base, the rosin will stick the soldering area to it.
A layer of rosin is applied to the pre-tinned and twisted conductors with a soldering iron. If another flux is used, it is applied in the appropriate manner. The power of the soldering iron is selected based on the cross-section of the wire - from 15 W when soldering headphones to 100 W when soldering twisted wires with a cross-section of 2.5 mm². After applying the flux, tin is applied to the twist with a soldering iron and heated until the solder completely melts and flows into the twist.
After the soldering has cooled, it is insulated with electrical tape or a piece of heat-shrinkable tubing is put on it and heated with a hairdryer, lighter or soldering iron.
When using a lighter or soldering iron, be careful not to overheat the heat shrink.
This method reliably connects wires, but is only suitable for thin wires, no more than 0.5 mm², or flexible ones up to 2.5 mm².
Connecting electrical cables
Let's start by connecting the electrical wires. Let's assume that we have three wires going into the electrical box, and they need to be connected to each other. How it's done? First, you need to cut off the excess cable and leave the cable at such a length that it does not interfere with the placement of the cables in the electrical box, but at the same time it is not too short, because a cable that is too short cannot be properly stripped and cannot be connected properly. It should extend about 5 cm out of the box, then we will trim it anyway.
Now we do the following: we strip each cable to a length of approximately 2–2.5 cm. We carefully cut it, trying not to damage the inner conductor. Here the technology is the same for all types of conductors - aluminum, copper, single-core and stranded.
We twist the veins. You can twist them in any direction you like.
To do this, you can use pliers or your own hands, if you don’t mind them. Naturally, only multi-core cables are twisted. If you have a single-core cable, then we simply strip it. We perform the same procedure with the second cable, then with the third: remove the insulation, strip it, twist it. Then we take two cables, lean them against the insulation and tightly twist them like this:
Next, we apply the third cable, also insulation to insulation, and as tightly as possible - this is very important for the further operation of your electrical wiring - we wind it onto the other two cables.
Most electricians recommend that after twisting, you cut the twist where the last cable ended. It ends a little earlier than the other two.
Why is this being done? First, we bite off the excess. We don’t need a strongly protruding twist, it’s inconvenient to insulate, and it won’t fit well in the box. Secondly, we get something like cold welding.
Soldering process with an electric soldering iron
The entire technology of soldering wires with a soldering iron can be divided into several successive stages. All of them are repeated in a certain sequence:
- Training of conductors. When soldering wires, they are freed from insulation. After this, the oxide film is removed from them mechanically. You can use a small piece of fine-grit sandpaper. The metal should shine and be light.
- Tinning. Heat the soldering iron to the melting temperature of the rosin (it begins to actively melt when touched). Take a conductor, bring it to a piece of rosin, heat it with a soldering iron so that the entire stripped part of the wire is immersed in rosin. Then take a drop of solder onto the soldering iron tip and spread it over the treated part of the conductor. The solder spreads quickly, covering the wire with a thin layer. To make it distributed faster and more evenly, the wire is turned slightly. After tinning, copper conductors lose their redness and become silvery. This is how all wires that need to be soldered are processed.
- The tinned conductors are folded together, straightening them with your fingers so that they fit snugly against each other. If the soldering needs to be long, you can twist it. Holding the conductors, take solder onto the tip, press it to the soldering site, applying some force. At the same time, the soldering area heats up, the rosin begins to boil, and the solder spreads. When it covers the entire area and flows between the conductors, we can consider that soldering the conductors with a soldering iron is completed. They are held motionless for some time - until the solder cools down (to speed up the process, they blow on this place).
That's all. In the same way, you can solder two or more wires, you can solder a wire to some contact pad (for example, when soldering headphones, you can solder the wire to a plug or to a pad on a headphone), etc.
After you have finished soldering the wires with a soldering iron and they have cooled down, the connection must be insulated. You can wrap electrical tape, put it on, and then heat up the heat shrink tube. When it comes to electrical wiring, it is usually recommended to first screw on a few turns of electrical tape, and then put a heat-shrinkable tube on top, which is heated.
Differences in technology when using flux
If active flux is used rather than rosin, the tinning process changes. The cleaned conductor is lubricated with the compound, and then heated with a soldering iron with a small amount of solder. Further everything is as described.
Soldering twists with flux - faster and easier
There are also differences when soldering twists with flux. In this case, you can not tin each wire, but twist it, then treat it with flux and immediately start soldering. The conductors don’t even need to be cleaned—the active compounds corrode the oxide film. But instead, you will have to wipe the soldering areas with alcohol to wash away the remnants of chemically aggressive substances.
Features of soldering stranded wires
The soldering technology described above is suitable for monocores. If the wire is multi-core, there are nuances: before tinning, the wires are untwisted so that everything can be dipped in rosin. When applying solder, you need to make sure that each wire is covered with a thin layer of solder. After cooling, the wires are twisted into one bundle again, then you can solder with a soldering iron as described above - dipping the tip into solder, heating the soldering area and applying tin.
When tinning, multi-core wires must be “fluffed”
Is it possible to solder copper wire to aluminum
Aluminum cannot be combined directly with other chemically active metals. Since copper is a chemically active material, copper and aluminum are not joined or soldered. The point is too different thermal conductivity and different current conductivity. When current passes, aluminum heats up more and expands more. Copper heats up and expands much less. Constant expansion/constriction to varying degrees leads to the fact that even the best contact is broken, a non-conducting film is formed, and everything stops working. That's why copper and aluminum are not soldered.
If there is such a need to connect copper and aluminum conductors, make a bolted connection. Take a bolt with a suitable nut and three washers. At the ends of the connected wires, rings are formed according to the size of the bolt. Take a bolt, put on one washer, then a conductor, another washer - the next conductor, a third washer on top and secure everything with a nut.
Aluminum and copper conductors cannot be soldered
There are several other ways to connect aluminum and copper lines, but soldering is not one of them. You can read about other methods here, but bolted is the simplest and most reliable.
What is required for soldering
This process does not require special equipment, so soldering can be done by anyone. So, during the work you will need the following tools and materials:
- Electric soldering iron with a power of at least 80 W;
- Cleaning agents (flux, rosin, mixture diluted on their basis);
- Solders suitable for the wire material;
- Wooden or plastic stand;
- File, sandpaper for sharpening;
- Pliers or tweezers for holding wires;
- Alcohol for treating the surface of the cord;
- Insulating tape;
- Heat shrink tubes.
The choice between rosin and flux is determined by the availability of the product and certain points. Thus, it is more convenient to use flux, since the wires are processed quickly, but there is a risk of poor-quality washing and gradual corrosion of the sheath.
Solders are selected taking into account the conductor material. For soldering aluminum wires, zinc products (TsO-12, TsA-15, P250A) are better suited, and for working with copper, POS 40, 50, 60 made of tin and lead are recommended. Solders with the addition of rosin are convenient, which eliminates the need to clean the phases.
Soldering as a reliable alternative to twisting
The closest alternative to twisting, which is prohibited for electrical installation, is to connect wires using the soldering method. It requires special tools and consumables, but provides absolute electrical contact.
You will need an electric soldering iron with a power of 60–100 W, a stand and tweezers (pliers). The soldering iron tip should be cleaned of scale, sharpened, having first selected the most suitable shape of the tip in the form of a spatula, and the body of the device should be connected to the ground wire. Among the “consumables” you will need POS-40, POS-60 solder from tin and lead, rosin as a flux. You can use solder wire with rosin placed inside the structure.
If you need to solder steel, brass or aluminum, you will need a special soldering acid.
- The wires stripped of insulation should be tinned, for which the tips heated with a soldering iron are placed in a piece of rosin; they should be covered with a brown-transparent layer of flux.
- We place the tip of the soldering iron tip into the solder, grab a drop of molten solder and evenly process the wires one by one, turning and moving along the tip blade.
- Attach or twist the wires together, securing them motionless. Warm up with the tip for 2–5 s. Treat the areas to be soldered with a layer of solder, allowing the drop to spread over the surfaces. Turn over the wires to be connected and repeat the operation on the reverse side.
- After cooling, the soldering joints are insulated in the same way as twisting. In some compounds, they are pre-treated with a brush dipped in alcohol and coated with varnish.
But welding is still preferable
In terms of connection strength and contact quality, welding surpasses all other technologies. Recently, portable welding inverters have appeared that can be transported to the most inaccessible places. Such devices are easily held on the welder's shoulder using a belt. This allows you to work in hard-to-reach places, for example, welding from a stepladder in a distribution box. To weld metal cores, carbon pencils or copper-plated electrodes are inserted into the holder of the welding machine.
The main disadvantage of welding technology - overheating of the parts being welded and melting of the insulation - is eliminated using:
- Correct adjustment of the welding current 70–120 A without overheating (depending on the number of welded wires with a cross-section from 1.5 to 2.0 mm).
- The duration of the welding process is no more than 1–2 seconds.
- Tightly pre-twist the wires and install a copper heat sink clamp.
When connecting wires by welding, the twisted wires should be bent and the cut side must be turned upward. An electrode is brought to the end of the wires connected to ground and the electric arc is ignited. The molten copper flows down in a ball and covers the twisted wire with a sheath. During the cooling process, an insulating belt made from a piece of cambric or other insulating material is put on the warm structure. Lacquered fabric is also suitable as an insulating material.
Sources
- https://YaElectrik.ru/elektroprovodka/skrutka-provodov
- https://StrojDvor.ru/elektrosnabzhenie/kak-pravilno-skruchivat-provoda-mezhdu-soboj/
- https://electrik-ufa.ru/provoda-i-kabelya/kak-pravilno-delat-skrutku-mednyh-provodov
- https://domashnysvet.ru/elektroprovodka/delaem-pravilnuyu-skrutku-provodov
- https://ElektrikExpert.ru/kak-pravilno-skruchivat-provoda.html
- https://elektro-enot.ru/kak-pravilno-sdelat-skrutku-provodov/
- https://electrikexpert.ru/kak-pravilno-sdelat-skrutku-provodov/
- https://ProFazu.ru/provodka/montazh/skrutka-provodov.html
- https://ichip.ru/sovety/remont/soedinyaem-provoda-kak-professionaly-kak-pravilno-delat-skrutku-711872
- https://zen.yandex.ru/media/asutpp.ru/kak-pravilno-sdelat-skrutku-mednyh-provodov-poleznye-sovety-5d6a002003bdd400ac889b29
- https://electry.ru/elektromontazhnye-raboty/sposobyi-soedineniya-provodov.html
Soldering wires with solder
An equally wonderful option for connecting wires and ensuring good contact is using ordinary soldering. To use this method, you will need a little soldering skill using an electric soldering iron.
It is best to take a soldering iron with a power of 80 W or 100 W - this is what you need. With this soldering iron you can quickly heat the place (twist) where you will apply the molten solder.
For soldering, POS-30, POS-40 solder is best suited. For such solder you will need rosin or SKF flux (alcohol-rosin flux), which is applied to the soldering area before heating.
In addition to the material listed above, specialists use a so-called solder tube for soldering, which contains rosin inside. This tube is sold in almost every electrical goods store.
And so, to solder wires you will need inexpensive material and an electric soldering iron. This connection by soldering is a more affordable and simpler method.
Using twist
This method is the most ancient of all that we talked about above in the article. Having stripped the necessary conductors, you can twist the conductors of the existing line with the new branch wire.
In this option, it is strictly forbidden to connect conductors from different materials. According to the Electrical Installation Rules, this method cannot be used at all.
According to the rules, it is best to use soldering or welding, or clamps and terminals. You can use twist if you can solder it later.
These are the main ways to create a new line in an existing electrical wiring. Use one of these methods to create a reliable conductor.
We recommend choosing piercing clamps because, in our opinion, they are the best choice among all the options we have given!
Terminal block connection
A development of the bolted connection is the terminal connection. Terminal blocks come in two types - with a rectangular pressure washer and with a round one. When using a terminal block with a pressure washer, the insulation is removed to a length equal to half the width of the terminal block. The bolt is released, the wire is slipped under the washer and the bolt is clamped again. On one side, you can connect only two wires, preferably of the same cross-section and only flexible or only single-core.
Connecting to a terminal block with a round washer is no different from using a bolted connection.
The connection of the wires is reliable, but cumbersome. When connecting wires with a cross-section of more than 16 mm², the connection is unreliable or the use of lugs is necessary.
Spring clamps for connecting wires
One of the most controversial ways to connect wires is using spring clamps. There are several types, but the two most common are wago terminal blocks and PPE caps. Externally and in terms of installation method, they are very different, but both designs are based on a spring, which creates strong contact with the wire.
There is controversy about this spring. Opponents of using wago say that the spring will weaken over time, the contact will become worse, the connection will begin to heat up more and more, which, again, leads to an even more rapid decrease in the degree of elasticity of the spring. After some time, the temperature may rise so much that the body (plastic) will melt, but what can happen next is known.
Spring clamps for electrical wiring - popular connections for wires
In defense of using spring clamps to connect wires, if they are used according to manufacturers' recommendations, problems are very, very rare. Although there are many fakes of both wago and PPE, as well as a sufficient number of photographs of them in melted form. But, at the same time, many people use them, and, under normal operating conditions, they work for years without complaints.
What are distribution boxes for?
There are many factors that speak in favor of the existence of junction boxes:
- The power system can be repaired in a matter of hours. All connections are accessible, you can easily find the area where the wires have burned out. If the cable was laid in special channels (corrugated tube, for example), then the failed cable can be replaced in an hour;
- Connections can be inspected at any time. As a rule, wiring problems occur at the connection points. If the socket or switch does not work, but there is voltage in the network, first check the quality of the connection in the junction box;
- the highest level of fire safety is created. It is believed that dangerous places are connections. Using a box will keep them in one place.
- minimal time and financial costs when repairing wiring. There is no need to look for broken wires in the walls.
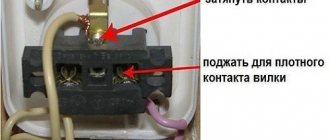
OB taps
This device is perfect for disconnecting wires in an apartment. This product has a simple design and can be installed without any extra effort. Find out interesting information about OM in the article: how to insulate a wire.
We put the cable or wire into a special latch, the OB breaks through it and we get an excellent branch for the apartment in a matter of seconds.
There is only one drawback - the wire cross-section cannot exceed 6 mm. But, for an apartment this option will be optimal. Watch the video: installation of the OV branch.
Tips from experienced installers
There are many controversial issues both in connection methods and in the use of individual mounting products. But a number of rules apply to absolutely all craftsmen who do electrical installations.
For example, it is strictly prohibited to twist aluminum conductors with copper ones. The process of rapid oxidation leads to the destruction of the commutation and the creation of a dangerous point, which can spark or flare up at any time.
A few more important rules:
- Inept use of a knife can lead to thinning of the wire and loss of conductivity qualities. It is better to use a stripper that carefully removes the sheath without causing harm to the conductor.
- If you use the twisting method - as an independent connection or before crimping - take the wires with a reserve. It is better to twist as tightly as possible and then cut off the ends.
- Bare conductors must be inserted into the clamps, terminals and sleeves until they stop and so that the free part is completely covered with insulation - stripped conductors should not be visible.
- When arranging your own wiring, be sure to take into account the color and other markings of the wires - this makes it much easier to make connections without the risk of switching wires for different purposes.
If the conductor is covered with an oxide film, it must be carefully removed using either contact paste or fine sandpaper. It is better to select the diameters of sleeves, tips, caps according to size.
When using electrical tape, overlap the wraps. One layer is not enough, it is better to go along the connection 2-3 times, making sure to make the last turn on the insulation. Single conductors in screw terminals are held loosely. Therefore, it is recommended to bend the stripped end in half or make an arbitrary loop out of it.
At the end of the work, be sure to check the reliability of the connections - lightly tug the wires. It happens that the switching is unsuccessful, and the core simply slips out of the terminal block. If the volume of the distribution box allows, for example, the panels accommodate a lot of wires and devices, then leave the cable with a reserve. Sometimes switching is required and the extra length is useful if the connections are permanent or burnt.
Polyethylene terminal blocks
A more outdated method of branching a wire is to use terminal blocks (they are also called polyethylene terminal blocks). It is not recommended to use compact terminal blocks, because... in this case, it is impossible to do without cutting and tearing the main core. In addition, the terminal block also has such disadvantages as poor sealing and the need to periodically tighten the clamping screw, especially if the conductor is aluminum. As a result, you do not get any important advantages when splicing and at the same time you get several serious disadvantages.
Terminal Blocks Overview
Necessary tool
If you need to solder a wire or something else without a soldering iron, you need to prepare the following tool:
- pliers with thin noses;
- pliers;
- knife;
- scissors;
- sandpaper;
- file;
- needle file;
- brush.
An alcohol lamp or dry alcohol lamp should be used as a fire source.
The question of how to solder without a soldering iron seems absurd only at first glance. Such soldering can be done in very simple ways, or it can be done efficiently using solder paste.
The wire that was soldered has come off the garland, is it possible to repair it without a soldering iron, how else can this wire be attached?
Usually, a broken wire can be returned to working condition if you simply connect its two ends together at the break point - in theory, for electric current, it is not even necessary for the wire to be a single whole and it will flow, even if the wires are just tightly adjacent to each other . Therefore, to restore the working state of our device, it is enough to simply, for example, twist the wires together (only when the electrical appliance is turned off, of course. For extra safety, you can even wear rubber gloves), and then wrap the fastening area with electrical tape.
If you still need to solder the wires, then in the absence of a soldering iron you can use solder paste.
https://youtube.com/watch?v=SqIURUzVeUA
Without a soldering iron, you can firmly attach the wiring to the wiring in order to further use it for its intended purpose.
It’s not news to anyone that wires can be twisted by hand, having first disconnected them from the electrical network. Twisted wires must be well insulated with insulating tape.
But there is a better solution. The electrical cables twisted into a single unit (their connection points) must be covered with molten plastic on top. On the market you can buy special finger plastic, which is melted using a special gun and coated with it on the twisting area. This plastic can be heated with a match or a lighter.
You can also buy a wire connector at an electrical parts store. Insert the wiring into it on both sides and tighten it with clamping bolts, and then insulate this connection.
Splicing electrical cables
The cables have to be spliced in the electrical box or outside it. To do this, you need to strip these cables in the same way as in the previous example. We make cuts, remove insulation, and strip the cables. In order to splice the cables, we lay them crosswise:
We twist them, about 3-4 turns, and we get a fairly strong twist:
You can use pliers for this work. We work with them, trying to ensure that the cable does not diverge.
If desired, if you have a soldering iron, you can also solder this connection to give it additional strength. If you don’t have a soldering iron, you can do it this way. We begin to isolate the resulting twist. We take electrical tape, start about a centimeter before the connection and insulate it.
We also go about a centimeter from the other edge and return to improve the dielectric properties of our connection with a second layer. We bite off the excess electrical tape.
That's it - we spliced the cable.
Bolted connection
A fairly common connection method is a bolted connection. For this type you need a bolt, at least two washers and a nut. The diameter of the bolt depends on the thickness of the wire. It should be such that a ring can be made from the wire. If wires of different sections are connected, then the bolt is selected according to the largest one.
To make a bolted connection, the end is cleared of insulation. The length of the stripped part should be such as to make a ring that fits onto the bolt using round pliers. If the wire is stranded (flexible), then the length should allow, after making the ring, to wrap the free end around the wire near the insulation.
In this way, you can connect only two identical wires. If there are more of them, or they are different in cross-section, rigidity and materials (copper and aluminum), then it is necessary to install conductive, usually steel washers. If you take a bolt of sufficient length, you can connect any number of wires.
Using Terminal Blocks
The use of these elements is considered obsolete. If the terminal blocks are too small, you will have to adjust the conductors to fit them, strip the wires, or make other changes.
In addition, this method of making branches has a number of disadvantages. For example, the terminals are not protected from moisture, and their clamping type sometimes needs to be tightened.
There are more disadvantages to using this element than advantages. However, you still use terminals to create a new line in electrical wiring.
Solder paste for soldering without a soldering iron
Solder paste includes flux and solder. This is very convenient when soldering without a soldering iron. There is no need to tinker with these two components separately. It is enough to apply the paste once to the junction of the wires and then heat it to the melting temperature of the solder.
Solder paste consists of metal powder, flux, and fixative (an adhesive substance to hold the alloy in a liquid state within the soldering area). The paste contains tin and lead powder with the addition of silver. The proportions of the composition vary depending on the purpose of the product.
Soldering with a lighterWhen heated, the flux instantly evaporates, the solder firmly and tightly covers the entire twist of wires. The result is high quality soldering. The applied composition allows you to do without soldering irons and soldering stations.
For food soldering, it is recommended to use the following brands of pastes: POS 63, POM 3 and others. Paste soldering is used to work with microcircuits, where instead of soldering irons, thin metal rods are used, heated by external heat sources.
Solder paste
How to connect wires of different sections?
It often happens that wires of different sections come into the junction box and they need to be connected. It seems like everything should be simple here, as with connecting wires of the same section, but there are some peculiarities here. There are several ways to connect cables of different thicknesses.
Remember that you cannot connect two wires of different sections to one contact in a socket, since the thin one will not be pressed tightly by the bolt. This will lead to poor contact, high contact resistance, overheating and melting of the cable insulation.
How to connect wires of different sections?
1. By twisting with soldering or welding
This is the most common way. You can twist wires of adjacent sections, for example 4 mm2 and 2.5 mm2. Now, if the diameters of the wires are very different, then good twisting will no longer work.
When twisting, you need to make sure that both wires wrap around each other. Do not allow a thin wire to wrap around a thick one. This may result in poor electrical contact. Do not forget about further soldering or welding.
Only after this will your connection work for many years without complaints.
2. Using screw clamps ZVI
I already wrote about them in detail in the article: Methods of connecting wires. Such terminal blocks allow you to insert a wire of one cross-section on one side, and a different cross-section on the other side. Here each core is clamped with a separate screw. Below is a table that will help you choose the right screw clamp for your wires.
| Screw clamp type | Cross-section of connected conductors, mm2 | Permissible continuous current, A |
| ZVI-3 | 1 – 2,5 | 3 |
| ZVI-5 | 1,5 – 4 | 5 |
| ZVI-10 | 2,5 – 6 | 10 |
| ZVI-15 | 4 – 10 | 15 |
| ZVI-20 | 4 – 10 | 20 |
| ZVI-30 | 6 – 16 | 30 |
| ZVI-60 | 6 – 16 | 60 |
| ZVI-80 | 10 – 25 | 80 |
| ZVI-100 | 10 – 25 | 100 |
| ZVI-150 | 16 – 35 | 150 |
As you can see, using ZVI you can connect wires of adjacent sections. Also remember to look at their amperage rating. The last digit in the screw terminal type indicates the amount of permissible continuous current that can flow through this terminal.
We strip the wires to the middle of the terminal...
We insert them and tighten the screws...
3. Using Wago universal self-clamping terminals.
Wago terminal blocks have the ability to connect wires of different sections. They have special sockets where each wire “sticks” into. For example, you can connect a 1.5 mm2 wire into one hole of the clamp, and 4 mm2 into the other, and everything will work properly.
According to the manufacturer's markings, terminals of different series can be used to connect wires of different sections. See table below:
| Wago terminal series | Cross-section of connected conductors, mm2 | Permissible continuous current, A |
| 243 | 0.6 to 0.8 | 6 |
| 222 | 0,8 – 4,0 | 32 |
| 773-3 | 0.75 to 2.5 mm2 | 24 |
| 273 | 1.5 to 4.0 | 24 |
| 773-173 | 2.5 to 6.0 mm2 | 32 |
Below is an example with series 222...
4. Using a bolted connection.
A bolted connection of wires is a composite connection consisting of 2 or more wires, a bolt, a nut and several washers. It is considered reliable and durable.
Here it goes like this:
- we strip the core by 2-3 centimeters, so that it is enough for one full revolution around the bolt;
- we make a ring from the core according to the diameter of the bolt;
- take the bolt and put it on the washer;
- We put a ring of conductor of the same section on the bolt;
- then put on the intermediate washer;
- put on a ring made of a conductor of a different cross-section;
- We put the last washer and tighten the whole thing with a nut.
In this way, you can simultaneously connect several wires of different sections. Their number is limited by the length of the bolt.
5. By squeezing the branch “nut”.
I wrote about this connection in detail with photographs and corresponding comments in the article: Connecting wires using nut-type clamps. Let me not repeat myself here.
6. Using tinned copper tips through a bolt with a nut.
This method is well suited for connecting large cross-section cables. For this connection, it is necessary to have not only TML tips, but also crimping pliers or a hydraulic press. This connection will be a little bulky (long), and may not fit into some small junction box, but it still has the right to life.
Unfortunately, I didn’t have a thick wire and the necessary tips on hand, so I made a photo from what I had. I think you can still understand the essence of the connection from it.
Let's smile:
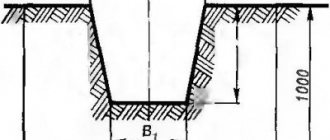
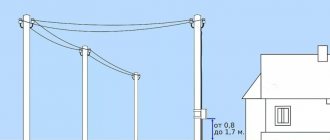
Overhead wire branch from overhead line
The maximum permissible distance from the input device to the overhead line support is 25 meters. If the distance is greater, it is necessary to install intermediate supports, they can be made of wood impregnated with an antiseptic on the base; the diameter of the intermediate support must be at least 12 cm.
The height of the aerial branch above pedestrian roads must be at least 3.5 meters from the ground. Above highways - at least 6 meters.
lowest point of attachment of insulators for cable entry into the house should not allow the wires to sag below 2.8 m from the ground. There should be no tall bushes, trees or piles under the overhead wire branch line.
The distance of current-carrying conductors at the input to protruding parts of the building such as balconies, canopies must be at least 0.2 meters. The connection to the linear wires on the support is made by twisting or special clamps. The cable is inserted into the house using a tube.
into low buildings through the roof. The distance from the roof to the wires must be at least 2 m; the steel pipe stand must be grounded.
The wires from the insulators to the panel with the meter and machines must be solid (no connections) and connected to the main machine, switch or terminals of the electric meter.