How to properly connect an RCD and an automatic circuit breaker is a common question among those people who need to assemble an electrical panel. Electrical energy is dangerous under some circumstances. Thus, incorrect connection of automation can result in malfunction of electrical wiring, equipment, or fire, so such actions must be taken responsibly. Today we will look at the features of connecting electrical panel protective devices.
How to properly connect an RCD and a machine
The need to protect the electrical network
The electrical system of an apartment is a complex network with many branches - sockets, switches, power and low-current circuits. This includes any electrical installations that we use every day.
When using various devices powered by electricity, problems often occur, due to which malfunctions of circuits and devices occur, and sometimes even tragic situations occur. There are certain preconditions for such consequences:
- excessive load on individual lines;
- leakage current;
- short circuits.
A short circuit may cause a fire
Excessive load on the line often occurs when using energy-intensive electrical appliances with outdated wiring. So, the cable cannot withstand the load, which is why it heats up and melts.
Current leakage occurs when the insulating layer of wires and electrical appliances wears out. In addition, this happens due to installation errors, namely the grounding cable.
The presence of an RCD will protect against the consequences of current leakage
The impact of a current of more than 1.5 mA becomes noticeable to a person. Significantly exceeding this indicator leads to shocks. To preserve the integrity of electrical equipment and the lives of apartment owners, it is necessary to install emergency power shutdown devices. It should be noted that their absence is unacceptable, otherwise the electrical network will be considered dangerous.
Financial aspect
And the main thing that distinguishes RCDs and RCBOs in cases of private use at home is cost. It demonstrates well what most users will prefer, especially if we consider the device from the point of view of reliability, which is the same among famous manufacturers.
And here's why price will ultimately become the main aspect when choosing:
- the complexity of the connection will cease to bother you over time, as you gain experience and the installation will no longer be something difficult and unknown;
- finding the reasons for the shutdown will also not become a problem over time, when you have to go through about five unforeseen situations;
- reliability and workmanship will be the main aspect, because it will speak about long-term operation more than anything.
And now, when we come to the cost, taking into account all the connections and purchasing a panel with enough space for everything, the difference in price will not even exceed 4,000 rubles. This is not such a large amount that is worth saving in electrical matters, since you can lose much more due to improper power supply.
The choice between an RCD and an RCD is really worth paying attention to, because the life of not only household appliances, but also people depends on electricity. Negligence and economy can lead to death or fire, which is not worth either one or the other
Features of load shedding devices
If the electrical system is divided into circuits, then a separate circuit breaker is installed for each line in the circuit, and a protection device is installed at the output. However, there are many connection options. Therefore, first you need to understand the differences between RCDs and other automation.
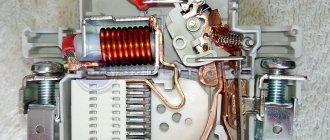
Circuit breakers - improved plugs
Years earlier, when there were no modern network protection devices, when the load on the common line increased, the simplest devices for emergency power outages were triggered.
Over time, they were significantly improved, which made it possible to obtain machines that operate in the following situations - with a short circuit and excessive load on the line. A typical electrical panel may contain one to several circuit breakers. The exact number will vary depending on the number of lines available in a particular apartment.
It is worth noting that the more separate electrical wiring lines, the easier it is to make repairs. After all, in order to install one device, it is not necessary to disconnect the entire electrical network.
Automatic switches are used instead of outdated traffic jams
Installing automation is a mandatory step in assembling an electrical panel for home use. After all, switches instantly react to network overload when a short circuit occurs. However, they do not protect the system from current leakage.
Prices for protective automation
RCD - automatic protection devices
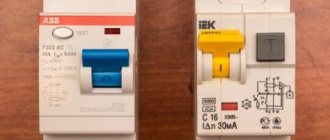
RCD is a device responsible for controlling current strength and preventing its loss. In appearance, the protective device is not fundamentally different from a circuit breaker, but its functionality is different.
RCD in the electrical panel
It is worth noting that this is a multiphase device that operates at voltages of 230/400 V and currents up to 32 A. However, the device also operates at lower values.
Sometimes devices labeled 10 mA are used to connect a line to a room with high humidity levels. There are two main types of RCDs. In order to choose the appropriate option, you need to consider them in more detail.
Table - types of RCD.
| View | Description |
| Electromechanical | Here the main functioning device is a magnetic circuit with windings. Its job is to compare the level of current that goes into the network and then returns. |
| Electronic | This device allows you to compare current values, but only here the board is responsible for this process. However, it only functions when voltage is present. |
It is worth noting that the electromechanical device is more popular. After all, if a consumer accidentally touches a phase conductor while the board is de-energized, he will receive an electric shock. For now, the electromechanical RCD will remain in working condition.
It turns out that the RCD protects the system only from current leakage, but is considered useless when the voltage in the network increases. It is for this reason that it is mounted only in combination with a circuit breaker. Only two of these devices will provide complete protection of the electrical network.
Prices for various types of RCDs
TOP 5 RCD manufacturers
- ABB is a Swedish-Swiss company that produces high-quality electrical equipment;
- Schneider Electric is a French company. The products of this company are popular due to their high quality;
- EKF is a Russian company. It produces high-quality electrical equipment in a budget price category.
- Group of Russian companies IEK. This is one of the most popular manufacturers of budget-class electrical equipment.
- Legrand is a French company that produces high-quality electrical products. Connection of devices from this company is carried out similarly to devices from other manufacturers.
Installation of a residual current device or automatic circuit breaker is necessary when laying new or reconstructing old electrical wiring. This will protect you from electric shock and save your health or life.
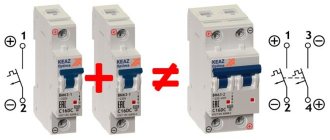
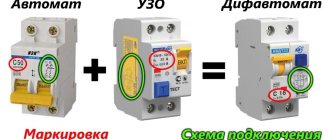
What is a difavtomat and how does it differ from an RCD?
If we talk about how a difavtomat differs from the previous device, then it is necessary to take into account its combination with a circuit breaker. After all, in fact, a differential circuit breaker is a combination of these two devices only in a single housing.
This device performs the following functions:
- protects against current leakage;
- prevents excessive loads on the line;
- Immediately cuts off power in the event of a short circuit.
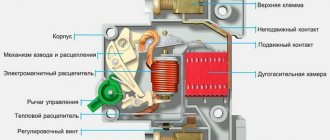
Difavtomats are universal devices
Despite the fact that the device is miniature, it operates in a fraction of a second, but only if it is well assembled by a reliable manufacturer. On its body you can find basic markings that will help you make your choice.
Here, as on the RCD body, the load/leakage current is indicated, which is measured in mA.
Some users may think that the creation of a difavtomat should be a reason to stop using the machine and RCD. Nevertheless, both options remain in demand today.
Prices for various types of automatic machines
Video - Which is better RCD or differential circuit breaker?
What types of RCDs and differential circuit breakers are there based on the type of current leakage?
Electrical circuits use different types of currents, which is why protective devices are usually divided into classes:
- AC type. This is a common class of devices that have a budget price, so they are often used in apartments and country houses. They are calculated for the leakage of alternating current, on which most household appliances operate.
- Type A. Allows you to detect both AC and DC leakage. In recent years, manufacturers have begun to produce devices adapted specifically for such RCDs. Switching power supplies are used here to regulate power. Since these are more reliable devices, they cost a little more than the previous ones.
- Type B. These RCDs also react to any current leakage. However, they are often used only at production facilities and in public places. It makes no sense to install them in an apartment.
The marking by which the class is determined is located on the body of the device
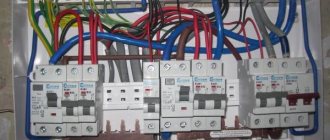
How to assemble an electrical panel with a 3-phase RCD
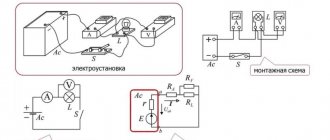
Look at the picture of a photo of an electrical panel with machines and an electric meter. A three-phase AC network uses four (in outdated wiring - three phases and ground) and five wires (three phases, neutral and ground).
When assembling a three-phase shield, a circuit breaker with three contacts is used, to the terminals of which the phase wires are connected. The neutral and ground wires pass by. There are four connected to the RCD - three phase and zero. The ground wire passes past the contacts and is not disconnected. In a four-wire network, only phase wires are connected to the device.
Reference! According to PUE standards, the ground wire is yellow or yellow-green.
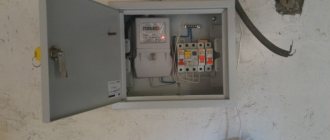
Switch box
Connection methods in a private house or apartment
If you decide to install a protective device in an apartment or private house, then you need to select the parameters in accordance with the rules. First of all, you need to look at the possibility of current loading and why the device is selected in principle.
If you need to install protection on a single electrical appliance, for example, a washing machine, then you can purchase a device with a minimum rated current. If the RCD is installed in the entire apartment, then you must first add up the load of each consumer, and then select the appropriate option. Another value is the differential current, which increases when the protective mechanism is triggered. After that, all that remains is to install the RCD.
Connection diagram
If you look at the presented diagram, you can see that the protective device is installed after the input circuit breaker and the electric meter. Then, after the RCD, the phase conductor goes to the circuit breakers, which are responsible for controlling groups of different loads. Next, the conductor goes to energy consumers (lamps, sockets).
Along the zero line, the cable goes to the clamping blocks, and then branches out to consumers. In this image there is no zero bus, which is often found in apartments and houses of early years of construction. A scheme using several protective devices at each point of consumption will be relevant here.
Features of connecting to a single-phase network of single-pole and four-pole protective devices
Based on the diagram presented above, it will not be difficult to connect a single-pole RCD, because this is the simplest and most popular option if you have a single-phase network. Thus, installation can be done both in an apartment and in a private house.
The main thing here is not to confuse the connection points of the zero and phase wires. Most often, the designation “1” is used for the incoming phase cable, and “2” for the outgoing phase. Neutral is usually designated “N”.
Important point! A four-pole RCD is extremely rarely used for a single-phase network, because it is impractical. It is installed only in the case of a temporary device or if further upgrading to a three-phase network is necessary.
Next, you have to act on the same principle as in the case of a single-pole device. To do this, the neutral is connected to a terminal marked “N”. The phase wire is connected to the terminal in a chain where the “Test” button is turned on. Most often it is located next to the neutral circuit. Using this button, you must check the serviceability of the equipment at least once every 30 days.
Four-pole protective device
How to connect a 3-phase difavtomat at home
Look at the picture for the connection diagram of the difavtomat. A three-phase device has four terminals. Phase wires are connected to three of them, and neutral wires are connected to the fourth. If there is no neutral wire in the network, only three phases are connected.
Attention! It is forbidden to break the grounding wire, so it does not pass through the device.
Connection diagram for a difavtomat in a three-phase network
Where to install?
As a rule, the protective device is installed in an electrical panel, which is located on the landing or in the residents' apartment. It contains many devices that are responsible for metering and distributing electricity up to a thousand watts. Therefore, in one panel with an RCD there are machines, an electric meter, clamping blocks and other devices.
If you already have a shield installed, then installing the RCD will be easy. To do this, you will only need a minimal set of tools, which includes pliers, wire cutters, screwdrivers and a marker.
The process of installing automation in an electrical panel: step-by-step instructions
Let's consider the option of assembling an electrical panel for a one-room apartment; a switch, a protective multifunctional device will be used here, then a group of RCDs will be installed (type “A” for a washing machine and dishwasher, because such a device is recommended by the equipment manufacturer). After the protective device there will be all groups of circuit breakers (for air conditioning, refrigerator, washing machine, dishwasher, stove, and also for lighting). In addition, pulse relays will be used here; they are needed to control lighting devices. A special module for wiring will also be installed in the panel, which resembles a junction box.
1: First, you need to place all the automation on the DIN rail, in the way we will connect it.
This is how the devices will be located in the panel
In the panel there is first a switch, then an UZM, four RCDs, a group of circuit breakers of 16 A, 20 A, 32 A. Next are 5 pulse relays, 3 lighting groups of 10 A and a module for connecting the wiring.
2: Next we need a two-pole comb (to power the RCD). If the comb is longer than the number of RCDs (in our case, four), then it should be shortened using a special machine.
Cut the comb to the required size, and then install stops along the edges
3: Now all RCDs should be fed together by installing a comb. Moreover, the screws of the first RCD should not be tightened. Next, you need to take cable sections of 10 square millimeters, remove the insulation from the ends, make crimping with lugs, and then connect the switch to the UZM, and the UZM to the first RCD.
This is what the connections will look like
4: Next, you need to supply power to the switch, and accordingly to the UZM with the RCD. This can be done using a power cable, which has a plug at one end and two crimped wires with tips at the other. Moreover, you first need to insert the crimped wires into the switch, and only then make a connection to the network.
Next, all that remains is to connect the plug, then set the approximate range on the UZM and click on the “Test” button. So, you can check the functionality of the device.
Here you can see that the UZM is functioning, now you need to check each RCD
5: Now you need to turn off the power and continue assembly - you should power the group of circuit breakers on the central rail with a comb. Here we will have 3 groups (the first is the hob/oven, the second is the dishwasher and washing machine, the third is the sockets).
We install the comb on the machines and transfer the slats to the panel
6: Next you need to move on to zero buses. There are four RCDs installed here, but only two zero buses are required, because they are not required for 2 groups. The reason for this is the presence of holes in the machines not only at the top, but also at the bottom, so we will connect the load to each of them, so a bus will not be required here.
In this case, you will need a cable of 6 square millimeters, which must be measured in place, stripped, clamped at the ends and connected to the RCD with its groups.
Using the same principle, it is necessary to power the devices with phase cables
7: Since we have already connected the automation, all that remains is to power the pulse relays. They should be connected to each other with a 1.5 square millimeter cable. In addition, the machine phase should be connected to the junction box.
This is what the assembled shield will look like
Next, you need to take a marker to mark the groups for which this or that equipment is intended. This is done in order to avoid confusion in case of further repairs.
Safety precautions when working with RCDs and automatic machines
Video - How to connect an RCD
Step-by-step wiring diagram
Let's look in detail at how to make electrical wiring in an apartment with your own hands. Proper design and thoughtful wiring diagram is the key to the safety of apartment residents. In the process of developing a circuit, you can optimize the arrangement of internal network elements, correctly calculate the required amount of materials, and select the type of wire. Having a wiring diagram and plan will also protect you in case of future repairs, eliminating the risk of accidental damage during repairs.
For an example of a wiring diagram in an apartment with your own hands, see the photo:
If you lack experience at this stage, it is better to turn to qualified electricians, but it is quite possible to draw up a connection diagram yourself. The plan and calculation of the internal electrical network is subject to approval by the energy inspectorate, so if there are serious errors, it will have to be redone.
How to properly organize electrical wiring in an apartment with your own hands from scratch, watch the video:
To prepare the diagram you will need a drawing and apartment plan. The plan should indicate the expected location of furniture and large household appliances. Guided by the requirements of the PUE, lighting points, sockets and switches are marked on the drawing.
In modern practice, connections are made in groups of points. In each room (except for the kitchen) there are two such groups: lighting and socket. In the kitchen there may be more connection groups, since it is recommended to connect the electric stove and some other powerful electrical appliances as a separate group.
To save materials, connection groups may look different:
- Lighting group of rooms, corridor and kitchen;
- Bathroom lighting group;
- Outlet group of the corridor and rooms;
- Kitchen outlet group;
- Electric stove.
If there is a heated floor system or other stationary heating electrical appliances, a separate connection group is provided for each of them.
At the wiring design stage, the power consumption and expected current in the network are calculated. This is necessary for the correct selection of RCD and wire cross-section. When calculating the total power, absolutely all electrical appliances in the apartment are taken into account, including a hair dryer and electric razor. The wiring must be able to withstand the simultaneous switching on of all current consumers. To determine the calculated current strength, the result obtained is divided by 220.
A residual current device must be installed on the highway to each connection group.
Mistakes that electricians make when connecting automation
It is worth noting that equipment often fails prematurely due to the following errors during installation work:
- Incorrect connection of output contacts. The neutral conductor is often confused with the neutral conductor.
- Supplying supply voltage to the bottom of the device leads to loss of operation of the device.
- It is prohibited to connect the outputs of the neutral conductors of several devices with each other. This causes the device to lose sensitivity. Because of this, the RCD does not turn off the power when a danger occurs.
- You should not connect the neutral wire to the ground wire in the socket, which also provokes interruptions in operation.
- Power contacts are not allowed to be connected from different sides. For example, the power phase is at the bottom, and the outgoing zero is at the top. This will also lead to the equipment not functioning properly. Every electrician should know the rules for connecting an RCD.
Every electrician should know the rules for connecting an RCD!
If you follow the instructions, you will be able to connect circuit breakers and protective devices in the panel without the help of a professional electrician. However, all actions should be performed step by step, slowly, to eliminate mistakes.