If the task is to check the electrical circuit for breaks (leaks), then you need to familiarize yourself with how to test the wires with a multimeter. A specialized measuring device is indispensable when testing wiring. And even if you are not a professional electrician, once you understand the basic rules for safe use of a multimeter, you can easily identify problem areas in your home electrical network.
What is used for wiring
Professional and homemade testers are used to check for broken wires or to detect a short circuit. Self-produced devices are presented in the form of a battery and a light bulb attached to it.
Professional testers are multimeters, with which you can not only test wires, but also perform a number of other diagnostic work on the electrical network.
This is a convenient and easy-to-use device that is always in the electrician’s arsenal.
What does it mean to ring wires and when may it be necessary?
Quite often you can hear the term “cable continuity”, but it may not be clear to people not involved in electrical engineering. In the general sense, “continuity” means checking the integrity of electrical circuits and the absence of short circuits between conductors. Determining the integrity of conductors is carried out not only by electricians, but also by people involved in the repair and diagnostics of various electrical equipment and electronics, as well as by signalmen when laying communication lines.
When installing power and lighting networks in industrial conditions or in everyday life, upon completion of all work (or any stages), a mandatory check of each installed line is carried out. This is important for the correct and durable operation of the entire installed system.
How dialing works
The multimeter has its own power source, and with its help voltage is supplied to the de-energized conductor.
Voltage is applied to the conductor through a multimeter.
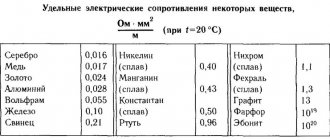
Every material has a resistance that can be measured or calculated. A multimeter set to the “resistance determination” position is used to test the wire. The display of the device indicates the resistance value of the material.
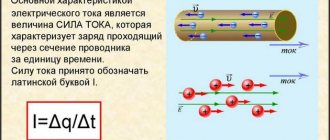
The current strength I is directly proportional to the voltage U and inversely proportional to the resistance R. Many people remember this formula from physics lessons.
I=U/R
This means that the voltage that is in the multimeter is supplied to the conductor being tested. The material data is analyzed and the result is displayed.
The very fact that it was possible to find this value explains that the conductor is not damaged.
Methods of elimination and prevention
- It is better to replace sockets, power cords and other shorted network elements.
- To eliminate short circuits in electrical appliances, use the services of specialized workshops, or repair them yourself (if you have knowledge and experience).
- Fix a cable break by replacing the damaged section with a new wire. In this case, make sure that the insulation resistance coefficient corresponds to the current value.
For preventive purposes, check the serviceability of the contacts. Change sockets in a timely manner. Use only standard electrical appliances. Do not exceed load levels. Connect only working power tools and other household appliances to the power source.
In Fig. Figure 5 shows the consequences of operating an electric generator with a faulty cord.
Figure 5. Short circuit of a faulty cord
Remember that your safety largely depends on the reliability of the electrical supply system for residential and domestic premises. This is one of the few cases where savings are not appropriate.
In what cases is an inspection carried out?
Testing is used when it is necessary to ensure the integrity of the circuit.
There are different cases:
- broken switch or socket;
- failure of household electrical appliances;
- checking printed circuit boards;
- car wiring diagnostics;
- searching for the required core among a large number of other conductors;
- diagnostics of communication lines, as well as lighting and power networks during their installation.
They resort to checking the wires when the socket breaks down.
Checking the wires with a faulty switch or socket should be carried out only after other possible failures have been ruled out.
For example, a broken connection or a defective electrical current receiver.
The causes of damage to wires can be mechanical impact (during repair work) and overloads that cause a short circuit. It can also be determined with a multimeter.
Need to do
The check is carried out in the following cases:
- malfunction of the socket or switch;
- lack of power supply to electrical appliances connected to the network;
- incorrect operation of components on electronic boards;
- failure of electrical equipment on vehicles;
- determining the purpose of the core in a multicore cable;
- diagnostics of networks built on wires with a metal central part.
The test is carried out in cases of socket malfunction.
Setting up the multimeter
To diagnose the integrity of the wires on the multimeter, you need to set the continuity mode. The measuring device comes with two wires with probes: red and black. They need to be inserted into the corresponding sockets: “COM” - for black, “VωmA” - for red. In this way, polarity is observed when measuring.
To check the serviceability of the tester, the probes of the red and black wires must be connected to each other. A characteristic bell is heard - the multimeter is ready for use.
Indicators and their interpretation
When checking conductors, digital values appear on the tester’s display, which determine the presence of resistance in the conductor.
While checking the conductors, digital values appear.
A signal sounds and the number “0” (or close to zero) is displayed on the screen - the conductor is not damaged.
If there is no sound and the device shows “1”, there is a break in the wire.
Limits of values
If you check the integrity of the conductors in the “resistance determination” mode, then it is necessary to set the limits of the values.
Values entered manually are always multiples of 2. For testing long wires - 20 ohms. The minimum figure that can be specified is 2 ohms.
Connecting the tester
The multimeter, set in the desired mode, is connected with two probes to the contacts of the conductor being tested. For convenience, the probes and ends of the wire are sometimes secured with metal clips - “crocodiles”. The tester immediately displays diagnostic results on the screen.
Dial mode on a multimeter
It is designated as follows:
Using this function, the meter provides a reading that determines how much millivolts the voltage has dropped in the circuit under test.
The multimeter creates a current that is approximately 1 milliampere. So it is necessary that the downward tendency of the voltage in millivolts is in accordance with the value in Ohms.
This means that when we call an electrical circuit and an electrical material, we see how much the voltage drops, which equates to the Ohm value in a given area.
Checking the heating element
Before checking the device, you need to calculate its resistance. This is easy to do if you know the power of the heating element. It is indicated in his documents or on the back of the case.
You can calculate the resistance using the formula:
R=U²/P,
where U is the network voltage, P is the power of the heating element, and R is the resistance.
If the heating element has a power of 2000 W, and the mains voltage is 220 V, then the resistance calculated using this formula is 24.2 Ohms.
Before checking the heating element, its resistance is calculated.
Next you can proceed to the measurement process:
- Before checking the heating element circuit, you need to turn it off from the network and disconnect the wires.
- On the multimeter, set the “resistance measurement” mode and indicate the range up to 200 Ohms.
- Using the probes of the tester, touch the terminals of the heating element. If the device being tested is working properly, the multimeter display displays a number close to what was found using the formula. If the multimeter shows “1”, then there is a break. If “0” there is a short circuit inside the heating element.
In the continuity mode, the heating element can be checked for the presence of a breakdown on the body. To do this, connect one of the tester probes to the terminal of the device, and the second to its body or to ground. If there is a breakdown, the tester will beep.
Possible results of checking the socket with a multimeter
There can be three of them:
- normal voltage;
- emergency;
- no tension.
Normal voltage
It can be 220 - 230V, although previously the voltage value of 220V was considered standard, and electrical appliances were manufactured and electrical networks were installed in accordance with it.
At a later time, 230V became standard. Therefore, in modern buildings the voltage is likely to be close to this value. Therefore, before measuring voltage, find out what standard your electrical network meets so as not to be alarmed when you see the results. Thus, measuring the voltage with a multimeter in a 220V socket does not at all mean getting exactly the same result.
Modern standards allow deviations from the nominal voltage value by ±10%. Therefore, relative to the 230V rating, taking into account deviations, values from 207 to 253V can be considered normal.
If you notice a constant voltage deviation even within these figures, this is a reason to contact the service organization with a request to check the causes of these deviations.
Emergency voltage
Any result outside the specified conditionally normal limits of 207 - 253V is considered an emergency. A lower number indicates network losses, a higher number indicates overvoltage.
The reasons for such deviations could be:
- errors in the design of the electrical network;
- problems with contacts.
Problems may also include the following:
- wear and tear of external electrical networks and equipment;
- incorrectly selected generating or distribution electrical equipment;
- overloads in the power grid.
These troubles are located outside the apartments and even the buildings themselves. In such a situation, other than measuring the voltage in the outlet with a multimeter, you cannot do anything yourself. You need to contact the organizations serving the house.
To weed out issues that can be resolved independently from those that are required to be resolved by special organizations, it is necessary:
- Open the electrical panel where the circuit breaker entering the apartment is located and measure the voltage on it. If it is standard, then it is worth checking the internal electrical network.
If you cannot diagnose yourself, contact a professional. Identifying the cause and eliminating it is a much cheaper option than the hypothetical probability of replacing all household appliances if they burn out.
- When the voltage on the cable entering the apartment does not correspond to the nominal value, contact the organization that provides power supply to the house, or notify the management company.
Safety when using a multimeter
When working with the tester, you must remember the precautions and follow the safety rules:
- Before testing the circuit with a multimeter, turn off the power to the network.
- Place a warning sign near the switch that is turned off indicating that work is being carried out.
- Do not touch exposed wires with your hands.
- Work in specialized clothing and rubber gloves.
- If there are capacitors in the circuit, they must be discharged. Otherwise, the multimeter will be damaged. During the test, experts recommend:
- use “crocodiles” (these are clips that are attached to the ends of the tester wires; the contact becomes more reliable and your hands are freed);
- Do not touch bare wires or probes with your hands, otherwise the measurements will not be correct.
When using a multimeter, you need to turn off the power.
But if you have doubts about your diagnostic abilities, it is better to trust the specialists.
Checking one long wire
What if you only need to check one core? It can be done like this. For example, there is a 2-wire cable, and I wonder if only one line is broken, and if so, which one.
Basically you should do the same as in the previous step, only using an additional wire with any cross-section.
We take an additional cord and screw it on one side to the wire that we want to examine. We lead him to the second place where the second end of the wire is located.
We touch with probes and measure. If everything is good, the measurement result will be close to 0 Ohm, if something goes wrong, the measurement will be several kΩ, MΩ, or even the display will simply show 0L - an open circuit.
How to test wires with a multimeter
To check the wires, you must first turn off the power.
Then:
- bring the multimeter into working condition;
- set the desired mode;
- attach the probes;
- check the readiness of the tester.
After preparation, you can begin checking. Connect the multimeter probes to the bare ends of the wire. There is a signal - the conductor is intact.
Wiring in the apartment
In this case, each room has separate electrical wiring, which is powered through a circuit breaker from the panel.
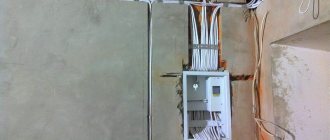
If there is a power outage in your apartment, the first thing you need to check is the distribution board.
The electrical wiring in the house is powered through a circuit breaker.
If the machines do not turn off, the breakdown most likely lies in the receiver or in the room lamp switch. And if the protection has worked, you need to check all the wiring.
Dialing is allowed only in a de-energized network. Before diagnosing, it is necessary to check whether there is current in the circuit.
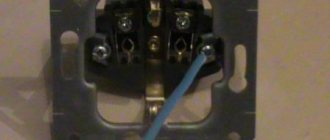
The first thing that fails is the outlet itself. You can identify defects in it visually by removing it from the socket. But it is better to perform diagnostics using instruments.
If it is in working order, the junction box is checked. It is located close to the outlet. The box contains twisted conductors: phase, ground and neutral. With one multimeter probe you need to alternately touch the contacts in the socket, and with the other, touch the bare ends of the twists. This is how a damaged conductor is identified.
Circuit continuity check
To test the continuity of the chain, it is necessary to check each element included in it. The multimeter probes must be connected to different ends of one wire, thus short-circuiting it. A sound was heard - everything is in order with the conductor, otherwise replacement is required.
Continuity of a long conductor
There are times when it is necessary to find out whether a wire whose ends are far apart is damaged. Then grounding is used for testing. You need to connect one end of the core being tested to the ground using a metal rod, and use the multimeter probes to touch the other end and the ground wire.
To test a long conductor, you can use grounding.
This results in a closed circuit in which the ground is the conductor.
How to ring a wire in a car
Testing the electronics in a car is carried out in the same way as in other cases: by touching the tester probes to the ends of the conductor. It is important to turn on the engine at idle speed before checking. In the case when only one contact is available for dialing, the second tester probe is placed on ground (the metal body of the car). It performs the function of grounding.
Fuse
This is a device that prevents elements in the circuit from overheating. It looks like a small plate or cylinder with a thin cable inside. To test it, multimeter probes are applied to different sides. In the “continuity” mode, if the fuse is intact, a sound should be heard.
In the “resistance determination” mode on the tester screen: “0” – no break, “1” – conductor damage.
Lamps
When checking, you need to connect one tester probe to the central contact, and the second to the side. Diagnostics also takes place in dialing mode.
Such a check can only be carried out with a screw base.
Diodes and LEDs
In a diode, polarity is determined by the anode and cathode. Therefore, it conducts current in one direction. To check an element, the appropriate mode is set on the tester. The poles of the diode are touched with the probes of a multimeter, and then they are swapped.
If, as a result of one test, the tester showed “0”, and during another “1”, the element is working.
The LED has reverse polarity. When the positive contact touches the anode and the negative contact touches the cathode, it lights up. When the position of the tester wires is changed, the voltage disappears. This determines that the LED is in working condition.
A break is an endless resistance
A circuit (wire) continuity test is actually a resistance test. As you know, each wire has its own electrical resistance, but it is very small over a few (tens) meters. Thus, if there is the same wire on one and the other side of the multimeter probes, the resistance between its terminals should be no more than a few ohms. In home networks it is usually below 1 ohm.
When the resistance is tens of kΩ (kilo-ohms) or MΩ (mega-ohms), it means either there is a break in the circuit, or we are checking two different wires :)
Before checking anything, make sure that the cable or wire is not live. This is very important because otherwise this will be the last measurement taken with this multimeter. It is best to completely disconnect the cable from everything before checking, so that the work is more convenient and safer.
Some features
Experts pay attention to points that must be taken into account when testing wires.
In adjacent rooms, sockets are installed in the same place opposite each other.
The sockets are installed opposite each other.
They do not always refer to the junction box that is nearby.
Sometimes the multimeter probes are not long enough to ring the wire connecting the junction box and the socket. To check the integrity of the conductors, the contacts in the socket itself are closed, and measurements are taken in the junction box.
In the absence of a tester
If you don’t have a multimeter at hand, you can ring the wire with a homemade device. It consists of a self-contained battery, a light bulb and two conductors. The ends of the battery leads, by analogy with a multimeter, are connected to the ends of the conductor being tested. The light bulb serves as a light indicator. If it lights up, the wire is not damaged.
If the machine does not work
If the light in the room goes out and the circuit breaker does not work, you need to perform a number of actions:
- Check if there is current at the output and input of the machine. If this is okay, move on to the next step.
- Unscrew the lamp and check it by touching one probe of the tester to the metal thread of the base, and the other to the main contact of the element. If the multimeter signal indicates that the device is working properly, the search for the problem continues.
- The cartridge is inspected visually; you can additionally call its contacts. If it is normal, check the switch.
- The outer housing of the room switch must be removed from the box and inspected. Check if there is charring on the wires or plastic, and if the fasteners are tight. Then the equipment is called.
If the circuit breaker does not work, you need to check the current at the input and output.
Often, the search for a defect in this context is limited to the above actions.
If the machine worked
In the event of a short circuit or network overload, circuit breakers cut off the power supply to the apartment or house.
After checking the light bulb, socket and switch, you need to check the wiring.
The algorithm of actions looks something like this:
- Set the multimeter to dialing mode.
- Connect one probe to the zero contact, the other to the working conductor. If the tester beeps, there is a short circuit in the circuit.
- In this situation, it is necessary to open the junction box to which the switch belongs and disconnect the wires.
- All contacts are called to find out which of them have shorted.
Thus, circuit diagnostics are carried out along the path from the receiver to the panel until the damage is identified and eliminated.
Detailed instructions and sequence of actions
To perform the check you must:
- Turn on the multimeter and select the required mode (ringing or ohmmeter). If the symbol in the form of a battery icon lights up on the device screen, you should install a new battery. To turn on the device, simply turn the mode switch from the Off position or press the button on the side of the case.
- Install probes whose insulation is not allowed to break.
- Proceed with testing, taking into account the characteristics of the electrical wiring. Bare areas are cleaned of contaminants or oxides, since deposits do not conduct current and do not allow correctly checking the integrity of the line.
Continuity of a long conductor
To check a long single cable:
- Determine the length of the line and purchase a thin wire of the appropriate size.
- Strip the ends and connect with a screw or spring terminal.
- Connect the probes to opposite terminals. An audible signal indicates that the cable is working properly.
Example of cable testing
Before checking the cable, it is necessary to strip all its cores at both ends. After setting up the multimeter, you can begin testing.
The tester's probes are applied to adjacent wires at one end of the cable and ring them. If there is no short circuit, the tester should not indicate the presence of resistance and emit a sound signal. If it beeps, it means the wires are not connected to each other (shorted). This is how all conductors are checked in pairs.
Damage to the wires is excluded as follows:
- twist all the cable cores together at one end and the same at the other;
- place the multimeter probes on the twists;
- The entire cable is ringing.
If the test is accompanied by a sound signal, then everything is in order.
Safety precautions, tips for convenience and efficiency
The main thing that you should never forget about when checking wires with a multimeter is that ringing is carried out only on de-energized networks! You cannot examine the integrity of a wire if it is live.
There are other useful tips before searching for a cliff:
- Advice regarding the necessary de-energization: If you are testing the device, remove even low-current power supplies. If there are capacitors in the network, discharge them by short-circuiting them. Otherwise the device will burn out.
- Do not touch the bare ends of the conductor with your hands.
- To keep your hands free during the inspection, use alligator clips.
How to identify problems
Wiring Diagram
Troubleshooting is easier if you have a basic wiring diagram. The plan is attached to the technical passport of the housing. If not, a drawing is drawn up - if the rules are followed, the routes run in a straight line (vertical, horizontal).
Regular testing with a multimeter will help identify problems. It is not difficult to determine in which area the breakdown occurs. For example, if the sockets and switches connected to the box do not work, the problem is here. If there is only one, there is a breakdown between the box and the socket.
Modern technologies and systematic checks will ensure safety during operation of electrical wiring in the apartment and increase service life. The main thing is to follow the principles and rules of work.
Initial inspection after purchase
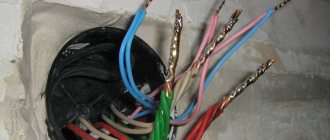
Wiring in a new building with a rough finish
Checking the condition of the electrical wiring is the first thing you need to do after purchasing a home. Even minor problems can lead to short circuits, fires and other unpleasant consequences.
New building
In new housing, the wiring is examined before major repairs and finishing work. First, the power of the devices that will be in the room is calculated, the cable cross-section is determined, and compared.
If the value is less than required, the wiring should be replaced. Otherwise, overloads, short circuits, and fires cannot be avoided.
External visual inspection, compliance with laying rules are mandatory. To check the wiring in the house if it is already covered with plaster, you should use a multimeter. The circuit of the outgoing ends of the cables is closed and checked with the probes of the device.
Old housing
“Secondary” or older buildings are more difficult to verify. First you need to find distribution boxes, find out the location of sockets, switches, lamps. The wires in the boxes must not be damaged, rust or other contamination must not be allowed - such electrical equipment must be replaced.
Sockets and other devices are inspected in a similar way. The protective covers are removed and the resistance is measured with a multimeter.