In order to properly crimp a wire, you must follow 3 main rules:
- First, choose the right connector or tip so that its size matches the cross-section of the wire being pressed.
- Secondly, use a professional tool. These are press pliers equipped with a ratcheting mechanism that will allow you to perform a full crimping cycle.
- And thirdly, select the desired matrix. Its geometry and shape must correspond to the crimp part of the tip.
Crimping or crimping wires with insulated or non-insulated lugs has become very accessible recently. This process even has a number of advantages over tinning wire cores:
- faster
- more reliable
- cheaper
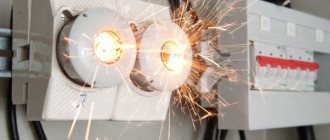
When the wire is tinned and used for a long time, due to temperature changes, the contact may weaken. This causes the tinned connection to heat up.
And since the melting point of solder is low, it easily burns out or melts under load, weakening and significantly reducing the contact area. Next, sparking occurs with all the current negative consequences.
Where are cable lugs used for crimping?
We can talk endlessly about the areas of application of crimp wire lugs. In order not to overload the reader with unnecessary information, we will consider only the main ones:
- in production. Not a single connection of power lines to each other or to electrical equipment is complete without crimping the cable lugs. This ensures tight contact and, as a result, reliable operation of electrical appliances and equipment. The shape and size of such elements are selected according to the cross-section of the cores and the material of manufacture;
The main advantage of such connections is reliability.
- household sphere. A home craftsman rarely thinks about the benefits of tips, but in vain. If we disassemble any household appliance, we will see that not a single connection is complete without them. In everyday life, elements that differ from industrial ones are used. But they perform the same function: tight contact, no heating and no need for periodic tightening of the terminals.
Do-it-yourself crimping of wire lugs
In theory, wire crimping is not a complicated process. The presence of a tool, appropriate consumables and some physical effort is all that is needed. In reality, connections may leave much to be desired, and sometimes you even have to repeat the procedure. This sequence of actions when crimping wires will be useful for those who are ready to do the termination with their own hands:
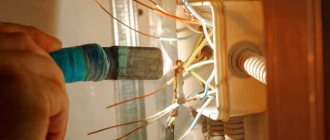
- It is necessary to process the cable, remove the insulation using a special device, leaving a margin of 0.3 - 0.5 cm. If stripping was done with a knife, you should make sure that the core is not touched. If damage is found, the area will have to be removed.
- Place a piece of insulating braid over the wire. Wipe the open part with alcohol, degrease and apply a special paste to it.
- Set the desired section size and tip type in the matrix. Insert the tip all the way.
- The cable cores in the straightened state should be inserted into the tip until they stop.
- Press the crimper handles. After a characteristic click, compression can be considered complete. The handles should return to their original position.
- Return the piece of braid to the joint and heat it with a hair dryer.
Crimping of wire lugs is performed in a certain sequence
There is an opinion (and some do) that crimping is easy and without special tools, using ordinary pliers. To a certain extent, this is acceptable, but only for small cross-section wires and, if necessary, make a temporary connection. A tight fit of the tips to the core can only be ensured by a matrix. And then the entry of air, water, and metal oxidation is eliminated, and the connection functions for a long time and reliably.
Marking and decoding
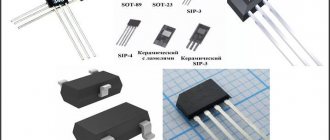
The industry produces a large number of all kinds of tips, which differ in design and materials.
Color coding option
There is a special marking system that allows you to distinguish the material and use it for its intended purpose. Here is a breakdown of some of the symbols:
- A – the sleeve is made of aluminum;
- L – brass is used;
- M – the base of the product is copper;
- T – the element is made of tubular metal;
- U – the connector is made in the shape of an angle.
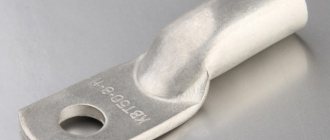
There is also a designation in the form of the letter O, which indicates the presence of an inspection window through which you can make sure that the cables are correctly located in the sleeve inside.
If the marking is TML (O), then it means tinned tubular copper with an inspection window. NSHVI - means a pin sleeve tip, and NKI - a ring one. In this case, the numbers indicate the cross-sectional area or diameters of the rod. To make it easier to find suitable connectors, for example, NShVI or KVT, you can use a special catalog or tables.
After the letter designations in the markings there are usually numbers that contain information about:
- nominal section;
- diameter of the contact rod;
- internal diameter of the shank.
For example, the product is marked TML (O). This means that this wire termination is made of copper tubing and is tinned. Its distinctive feature is the presence of a small hole - an inspection window, with which you can verify whether the wire is inserted correctly for crimping.
Such contacts are used mainly in production, so not all electricians are aware of their existence.
What does the tip marking mean: full explanation
Each type and type of product has its own alphanumeric marking, without knowing which it is impossible for a home craftsman to explain in the store what he needs. Let's look at popular markings:
- TML is a tin-plated tip, to work with which you need a special tool - a crimper. Looks like NSP. The only difference is that NShP is copper;
- TA – the same tip, but made of aluminum;
- SIP is a self-supporting tip that has its own insulation along the tube and an annular mounting plate;
- NSHVI - common in household use, sleeve pin;
- NKB - used in industry as geophysical cable;
- RFI-M is already a flag tip;
- IEK – copper fork;
- TMD – double blind connectors;
- NKI - isolated ring.
Aluminum products are regulated by GOST-9581-80, copper - GOST-7368-80.
Products for crimping are made of copper, aluminum or bimetal
Types of tips by design
Depending on the design of the terminal and the connected electrical appliance, the shape of the tip is selected. It comes in several types.
| Photo | Name |
| Ring | |
| Fork | |
| Power | |
| Tubular or sleeve | |
| With pin | |
| Socket for quick connection of wires |
The lugs can be used to connect one or two wires; for the second case, special parts are produced. Fixation is carried out by crimping or a bolt built into the shank. The first option is most applicable in everyday life and in production; it is intended for flexible wires made of multiple cores. The second is suitable for rigid cables.
How to choose the right tip for crimping
The correct choice of this electrical installation element depends on the material of manufacture, flexibility, cable cross-section, as well as the method of connection to the device or equipment:
- Cable cross-section is an important aspect. If it is larger, the cable simply will not fit into the sleeve, and if it is smaller, the crimp will not be tight, and there is no point in such a tip.
NShVI are usually sold in such sets, but can also be purchased individually - Flexibility of the wire – this can also lead to a loose connection. For example, we use a product with a bolted connection and a flexible electrical cable. When screwed in, the bolts push the wires apart, pressing only a few “hairs” in the middle. There is no talk of any contact anymore.
- The method of connecting to the equipment may also differ. If switching is not possible with a direct connection, it is necessary to use.
Tip material
Another relevant point in choosing a tip is the material of manufacture. When purchasing, make sure that they are selling you copper or tinned tips. To do this, it is enough to first purchase one tip and file it with something foreign.
With copper material, especially if high-quality copper is used, the cut will be reddish in color. If ordinary copper alloys are used, which is most often the case, then the cut will be a pale yellowish color.
When exposed to air, copper may darken and lose contact quality. Copper tinning is a long-known method that makes the contact durable and reliable.
Advantages of crimping wires with lugs
- the crimped end of the wire is considered airtight
- the ferrule sleeve prevents individual wires from being damaged or excluded from contact
- tinned tip surface – reliable protection from environmental influences
Main types of lugs for crimping
Depending on the material from which the tips are made, there are several types of these elements:
- copper – used for cables made of copper conductors;
- tinned copper – tinning treatment provides protection against corrosion;
- aluminum – suitable for aluminum wires;
- aluminum-copper - allow you to connect aluminum and copper wires.
Elements can have different cable connector diameters and bolt mounting holes, different blade sizes and shapes. Some of them are equipped with an inspection window that allows you to adjust the position of the cores inside the part.
Types of tips by material
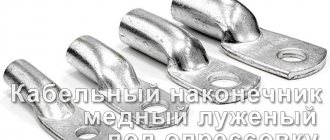
Copper cable lugs: general information
Copper cable lugs for crimp testing are made from copper pipes of a certain diameter. The pipes are cut and flattened on one side. A hole of a certain diameter for a bolt is made in the flattened part. Produced at special enterprises.
There are two types of copper cable contacts:
- uncoated cable lugs;
- with tinned coating.
Tinned contacts are considered more practical to use. Tinned coating protects the part from corrosion and extends its service life. In addition, tinned contacts are resistant to solutions of nitric, sulfuric and hydrochloric acid.
They are not afraid of exposure to air, moisture and other aggressive environmental factors. Due to the coating, the electrical conductivity of the terminals is reduced. However, it consistently maintains excellent performance.
But uncoated copper contacts will oxidize very quickly. Because of this, the conductivity indicator decreases, the resistance increases, which leads to heating of the connection.
The lugs are used for terminating cables with copper cores. For their installation, special press pliers are usually used, which are used to crimp the end onto the cable.
Copper cable lugs for crimping are used for:
- establishing communication between the power grid and the device;
- establishing contact between devices or a group of devices;
- splicing several electrical wires to increase the length.
Homemade copper
Today there are many cable copper crimp terminations, which, in particular, are very easy to decipher. But there are cases where it is impossible to select a cable lug of the required volume. Then it is possible to use a non-standard option - to create one yourself.
The creation process is simple. To do this, you need to take a copper tube with a certain size. Next, flatten the end and make a hole with the desired diameter.
Homemade copper
NShVI pin lug
NSHVI - insulated pin sleeve end. The sizes of NShVI tips are from 0.25 to 150 mm. Made from tinned electrolytic copper. Designed for household use, suitable for any multi-core wires.
Sleeves for wires for crimping
Sometimes there is no need to use a ferrule, but crimping the wires with sleeves is required. They can be of two types - GML (tinned copper sleeve) or GAO (copper-plated aluminum sleeve). The choice depends on the cable material.
Good to know! When connecting aluminum wires, it is advisable to use quartz vaseline paste. It prevents the oxidation process from occurring.
Twisted pair cables are crimped in a similar way. The only difference is in the matrices
Why crimping?
Soldering a stranded wire is not the easiest operation, because you need to expose all the wires, make sure that they are clean in terms of contact, and only then start soldering. Any core in a stranded wire has insulation, and this often creates difficulties in establishing reliable contact.
Just crimping the cable lugs solves all these problems, because with the help of mechanical force (compression) not only the insulation of individual cores is destroyed, but also a strong connection of the entire cable is created for better contact.
This is where the moment arises of how to choose the correct sleeves for crimping wires, because they are made from different materials and have very precisely specified current characteristics.
The problem is that the size of these cartridges is small, and the markings are unclear to those who are not specialists. But before that, let's define the difference between a sleeve and a cable crimp lug.
Another point that is not even in the markings is the moment of tightening the sleeve or tip during crimping. And they are completely different for different types of tips, such as:
- ring (NKI).
- fork (NVI).
- pin round (NSHKI).
- flat (plug) connectors (RPI-P, RPI-M, RSHI-P, RSHI-M, etc.).
- piercing type couplers (OV).
Here it is necessary to return to the tool that is used to crimp the wires, because on each tool the dimensions are indicated for the standard shape of the jaws, and the force itself is accurately measured by diameters. So, unless you made a mistake with the diameter, you cannot apply excessive force.
And, despite the fact that the lugs for wires for crimping are different, with the same diameter both the force and the standard of the tool will be the same. It's a pity that this parameter is not reflected on the labeling. Apparently because such work is usually done by professionals, not home electricians.
But it is precisely the standards that allow home electricians to stock up on universal crimping pliers and crimp cable lugs for their own purposes without any problems. This procedure is quite simple to master, and technologically it is the same for crimping an RG-45 connector and a tip for a three-phase machine.
When crimping a multi-core cable, you cannot do without special lubricants. Therefore, use sleeves and tips that already have this lubricant inside. In any case, this is a one-time operation. It is not possible to remove a part to move it to another location.
As a result, having mastered the installation of sleeves and tips, you will be able to quickly restore the desired connection, carry out repairs without problems, as well as a connection that, in fact, will not need repair for many years.
Why do you need crimping and crimping wires?
Is it even possible to do without sleeves and crimping? What's wrong with simply attaching wires to machines and other devices?
With a simple clamp, the bundle of wire fluffs up and is crushed to the sides. Some individual conductors may even be damaged. Such conductors, destroyed and separated from the main bundle, no longer take part in contact and the passage of current load through themselves.
All this leads to the fact that the remaining cores are not enough and the connection points heat up. In addition, the bare copper from which the wire strands are made remains accessible to moisture and oxygen. And this leads to its darkening and oxidation. By crimping the conductor once with a tip or sleeve, you will save yourself from all these problems in the future.
Preparation for crimping
To crimp using a cable lug, you need to prepare the wire. See the table below for how to do this.
| Photo | Action |
| Measure the depth of the shank, add 5 mm and make a mark on the cable | |
| Clean the conductors from the insulating layer, check that the edge is smooth | |
| Degrease the wire and put a tip on it, the wires should fit tightly inside the shank |
Procedure for crimping cable lugs and sleeves
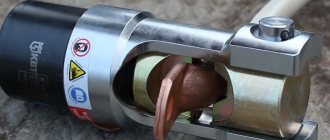
For crimping thick-walled tips and sleeves, it is best to use a hydraulic press. The press set initially includes universal dies for any tips and wires.
Under no circumstances use a tool not intended for crimping (hammer, chisel, etc.). A contact pressed in this way will not last long, especially if it constantly experiences heavy loads.
The next question that arises for an ignorant user is: how many times should I press the tip with a press? Once, twice or three times?
This depends on 2 parameters - the length of the tip and the width of the matrix.
In the operating instructions for the press that comes with the tool, there is a sign indicating the required number of crimps. Please note that this table is intended for tips and sleeves made in accordance with GOST.
Insert the tip into the press so that the matrix cross-section markings (35-50-70, etc.) are imprinted on the front side of the tip, and not on the side or bottom.
- do the first crimp test closer to the blade (where the bolt is inserted);
- Perform the following crimps in order, moving from the blade to the tail of the tip.
The same rules apply for connecting sleeves.
This must be done in this sequence, because with each press the tip tends to lengthen (sometimes up to ten percent!).
And if you start pressing from the end (not from the blade), during the last crimp, there is a high probability that you will have a void at the end of the sleeve. And you will not achieve the contact that was necessary. First of all, this applies to all aluminum products. For copper this is not yet so critical.
Rules for working with insulated tips
- Only stranded wires can be crimped with insulated lugs. Mono-core ones should be used for their type of non-insulated lugs.
When choosing, be sure to pay attention not only to the diameter and cross-section, but also to the shape of the contact blade. Do not use fork lugs on moving or vibration-prone contacts!
- the insulation from the core is removed exactly to the length of the compressed tube into which the core is inserted. Unlike bushings, it will be extremely inconvenient to bite off the excess with a cable cutter.
- When pressing, insert the tip into the press matrix so that the seam of the shank is on top and strictly in the center
- follow the color markings on the matrices with the colors of the tips themselves
- When pressing insulated tips with pliers, make sure that each circuit of the matrix is crimping its part of the core and insulation, and also insert the tip into the matrix only from the marked side
- If the dies are not completely closed at the end of clamping the handles, then you have not selected the correct tip size. If the insulating sleeve is damaged, the tip must be replaced.
Life hacks for working with NShVI tips
How to make a simple NShV from an NShVI tip? How to make an extended NShVI tip using scrap materials? Several life hacks for working with sleeve tips can be found in the video below:
https://youtube.com/watch?v=gdxORC47Esk
A crimper is essentially a press that gives the terminal a certain shape.
The quality of terminal crimping is determined by two factors:
- the terminal antennae should dig into the wire insulation, then the terminal will not fly off
- it is necessary to ensure good contact between the terminal and the wire
If you don’t have to think about the first factor when crimping with a crimper, the shape of its jaws is designed in such a way that the tendrils will definitely dig into the insulation, but it’s worth thinking about how to make good contact, especially if the wire is very thin.
Regardless of whether the wire is thick or thin, you can ensure good contact by bending it, as shown in the photo below.
When bending the wire, good contact is guaranteed.
I would like to note that it is capable of crimping a wire with a cross-section of 0.5-1.5 mm2, which is quite enough for me, but not enough for an auto electrician, the latter needs something more powerful and more expensive. I bought the crimper here.
Hi all! I continue to introduce tools that make the work of an auto electrician easier. The first part is here.
In this part I will tell you about crimping pliers for automobile and other terminals of a similar design. Another name for such a tool is crimpers, from the English crimp - to bend, crimp.
When working on a car, you often have to make various electrical connections using connectors or terminals. The photo below shows an example of such terminals:
You will find a lot of debate online about which connection method is better - soldering, crimping, twisting. I decided for myself this way - if the connector is not sealed, but works in conditions of high humidity - only soldering. If the connector is sealed or located in the passenger compartment, then crimping can be used. I don’t accept twisting in principle; I consider it too unreliable in vibration conditions, so I only use soldering to connect wires in a car. But we digress a little, let's get back to the instrument.
A set of crimpers for various types and sizes of terminals was ordered from China:
For non-insulated terminals, crimpers with a special jaw profile are used, which bend the ends of the metal inward during crimping. Such crimpers crimp the wire and additionally fix the insulation so that the wire does not break off due to kinks and vibration.
Ferrule crimping
To find out which tool is best to use for crimping various types of tips, watch this video:
As you can see, you don’t need any special intelligence or experience to use the tips; everything is done easily and quickly. The only thing you will need are special devices - a stripper and press pliers, but they are affordable and can be purchased. When connecting multi-core conductors, be sure to use lugs and make the power supply as reliable and safe as possible.
How to crimp a wire: instructions for single and double NShVI
The wire with the tip must be installed in press jaws in a matrix of a suitable size. During the crimping process, you need to ensure that the wire does not move inside the sleeve. The first crimp is done with an indentation of 1–2 mm from the edge, if necessary, the second at the same distance from the first.
The handle of the press pliers is compressed until it is in full contact with the surface of the part and the matrix is connected, then the sleeve is moved and a second crimping is done. If the shank is long, work continues until the colored skirt.
The crimping scheme for a double tip is practically the same. You only need to insert two wires into one hole in the shank at the same time.
Stages of wire crimping
Visual instructions for crimping a wire with an NShVI lug are presented in the video:
Crimping power cable lugs
When crimping power cables, tinned copper lugs are used, which are well protected from corrosion. If, when cutting the cable, its cores “fluff” significantly and become larger in diameter than the rest, then perform the work on a sharpener. When unrolling the cable, make sure that the circle removes excess knots along the cores and does not bend them.
Soldering is absolutely not suitable for crimping a power cable, since single tin contacts cannot be used on such wires.
Crimping solid wires
Many people often wonder whether it is possible to crimp solid wires? Yes, of course, it is not prohibited to do this, you just need to use the appropriate tool for this. Ordinary crimpers are no longer suitable here, since they are designed for less force required when compressing a monocore. You will have to purchase specially designed press pliers PK-16u or PK-35u for this.
This is a universal tool and can also be used for crimping stranded wires.
In order for the compression on the monocore to be high-quality and there is no play inside the sleeve, the basic rule here is to choose a sleeve or tip one size smaller than the cross-section of the wire being pressed. These pliers are also convenient for pressing several conductors simultaneously in one sleeve. This is done, for example, when making connections in junction boxes.
Why can't you twist the wires?
The wires inside the bushing are crimped under very high pressure, so that they can even change their original circular shape if they lie parallel to each other. From a circle they turn into a hexagon, and this increases the area of their contact surface with each other.
And when you twist them, during crimping, in those places where the veins intersect, they can be pressed against each other.
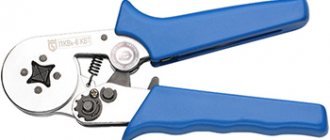
Required Tools
Crimping is carried out with a special tool that allows you to create the necessary force. The following tools are popular:
- Press pliers for crimping PK2 and PK2M lugs are used for terminating cores with a cross-section of up to 10 sq. mm;
- PK1 and PK1M brand tools are a more powerful version of hand pliers;
- hydraulic pliers allow you to crimp wires up to 10 sq. mm;
- In industrial production, a hand press is used. It is suitable for wires up to 240 sq. mm;
- hydraulic press with electric drive is used for cables up to 300 sq. mm.
Types of instruments
Press pliers with hinges increase the pressure of the tool, which makes the manual crimping process easier. Devices with a ratcheting mechanism are especially convenient. They prevent the instrument from unclenching until the procedure is completed.
You can watch how to crimp a wire without tools in this video:
Types of press jaws
The manual crimper is used for crimping non-insulated cable lugs, contact connectors, terminals and contact sleeves of various sizes. If a manual crimper has special blades (usually they are located where the handles are attached), then this tool can also be used for cutting cables and wires.
Electric pliers are a multifunctional tool for professional use. They can do almost any work with wires. Electric pliers are mainly used for cutting and stripping wires, but they can also be used to crimp uninsulated and insulated cable ends.
A crimper is a tool for crimping wire lugs, twisted pair cables, and connectors. It has two long handles (one or both can be movable) and a massive working part in the form of metal jaws, which have holes for cables.
When the handles are brought together, the jaws close and the cable connector is crimped using forceful pressing. Some models have a blade on the working part, which simplifies the work - no additional tools are required to cut the cable.
How to choose press jaws
The choice of crimping tool is determined by the cross-section of the wire. The larger it is, the more powerful the device should be. Human effort is not enough to create a tight and uniform pressure, even when using household tips.
Crimping of cable lugs is performed using one of the following tools:
- Press pliers of brands PK2 or PK2M - for manual use, suitable for wires with a cross-section of up to 10 sq. mm.
- Hydraulic pliers – designed for terminating cables up to 10 sq. mm.
- Press pliers for crimping terminals, brands PK1 or PK1M - similar to the first tool, but reinforced with long handles, due to this they are capable of crimping a wire up to 50 sq. mm.
More powerful devices, such as manual and hydraulic presses, are used in production. With their help, you can crimp wires with a cross-section of up to 30 sq. mm.
Hand press pliers for home use
Ferrule crimping pliers: professional and household tools
Electrics is a field that requires impeccable implementation of rules, adherence to precise technologies, and the use of special tools. Wire connections deserve special attention. Any inaccuracies and half-measures will certainly lead to damage or broken contacts.
Crimpers are professional tools for electrical installation, and they are produced by many manufacturers of hand tools.
Twisting is a thing of the past. They are strictly prohibited by the Rules for the Technical Operation of Consumer Electrical Installations. Today there is a special tool - wire crimping pliers. They consist of handles and a replaceable matrix, when choosing which you need to take into account the purpose of the connection and the cross-section of the cables.
According to technical features and method of operation, pliers can be divided into two categories:
- mechanical (manual);
- automatic (driven by electric drives).
Division is also carried out within categories. Mechanical pliers can be household or professional. Using household wires, wires with a small cross-section are crimped: 1-2.5 mm – copper; 2.5 mm – aluminum. It is possible to use a cable with a cross-section of 4 mm to power powerful household electrical appliances.
A powerful, professional tool for crimping wires with a cross-section of 6 mm or more is used. Thick power wires and cables in industrial installations are crimped automatically.
Ferrule crimping pliers are available mechanical and automatic
How to crimp wire lugs without tools
What to do if you don’t have special tools for crimping on hand or you just don’t want to buy them if you only need to crimp one or two tips?
Many, faced with this problem, resort to incorrect methods, which in the future only worsen the contact, without ensuring a reliable connection. They begin to flatten the tip with hammers, simply squeeze it in a bench vice, crush it with pliers, and press it in with a chisel. All these methods are incorrect and do not bring the desired result. After such amateur activity, poor contact is obtained with its further heating during operation.
Crimper for crimping insulated ferrules
High-quality electrical installation cannot be performed without high-quality tools. Not everyone has a crimper for crimping tips, so in practice, colleagues often show ingenuity and sometimes you see miracles of engineering. For example, use tinning of wires (I mean stranded wire). This is of course a good way, but it doesn’t always work everywhere. In addition, this whole process takes a lot of time, if the amount of work is large, you also have to constantly carry a hot soldering iron, which is not always convenient.
A masterpiece that I have often seen are tips crimped with pliers. The essence of this method was to bite the tip with the wire with the cutting part of the pliers, making several dents along its entire length. By “crimping” the lugs in this way, there is a risk of damaging the cable cores. Friends, we all understand that this is the Stone Age and a couple of decades ago such installation conditions would have been suitable, but not today.
It is not at all necessary to buy an expensive tool; you can buy a good and reliable tip crimper for a reasonable price in accordance with price and quality. Moreover, today there are a lot of universal tools that combine several functions in one design.
Where to buy cable lugs for crimping
Before you go to the store, you should familiarize yourself with the options offered on the market in advance. The table shows prices for some cable lugs for crimping.
Photo Products Characteristics Average price, rub.
| Tinned copper tip GPH (w = 29 mm) 120 mm.sq.*M 16 | The flange shape is ring. Material copper. | 320 | |
| Tinned copper tip GPH (w = 29 mm) | |||
| Sealed insulated tips NIM 25 (CPTAU 25) IEK | Combined material - copper and aluminum. Cross section 25 sq. mm. Longitudinal sealing available | 268 | |
| Sealed insulated tips NIM 25 (CPTAU 25) IEK | |||
| Tinned copper tip TML 2.5mm.sq. x M5 (W=10mm) | Material copper. Cross section 2.5 sq. mm. Ring flange shape. | 433 | |
| Tinned copper tip TML 2.5mm.sq. x M5 (W=10mm) | |||
| Navigator NShvi 10-12 NET-E10-12 isolated 4670004710920 155767 | Material tinned copper. Polyamide insulation. | 536 | |
| Navigator NShvi 10-12 NET-E10-12 isolated 4670004710920 155767 | |||
| Pin sleeve insulated tip NSHVI2 2.5-10, 50 pcs Peredovik 26685 | PVC insulation. Material tinned brass. Wire cross-section 2.5 sq. mm. | 87 | |
| Pin sleeve insulated tip NSHVI2 2.5-10, 50 pcs Peredovik 26685 | |||
Pin sleeve insulated tip NSHVI2 2.5-10, 50 pcs Peredovik 26685
To choose a quality product, remember that each tip must have a specific wire. The discrepancy between these two elements most often leads to errors when performing crimping. You cannot use homemade tips or cut the sleeve into two parts to save money. We hope that our advice will be useful to you and help you make the right choice.