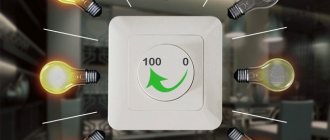
Modern electrical devices provide a number of additional capabilities. Many users have already appreciated dimmers that allow them to smoothly dim the lighting, creating an atmosphere of coziness and comfort in the room.
When choosing such devices, it is important to pay attention to their compatibility with the category of the light source. For example, a dimmer for incandescent lamps is designed specifically for this type of lighting fixture.
In order not to get confused in the store and not to get confused in the variety of offers, you should first find out more information about dimmers, don’t you agree? All the necessary information is collected in our article.
We described the principle of operation, the pros and cons of using dimmers, provided a detailed classification of devices and outlined the rules for connecting them. A review of the best manufacturers and models will help you choose a practical and high-quality dimmer model.
Dimmer connection diagram
The dimmer switching circuit is incredibly simple - it couldn’t be simpler. It turns on in the same way as a regular switch - through an open circuit in the power supply circuit of the load, that is, the lamp. In terms of installation dimensions and mounting, the dimmer is identical to the switch. Therefore, it can be installed in the same way as a switch - in a mounting box, and installing a dimmer is no different from installing a regular switch.
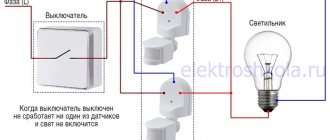
Turning on a light bulb via a switch
Physics textbook for 5th grade... But this is for consistency of presentation.
How to connect a dimmer instead of a switch
Recently, people are increasingly replacing conventional switches with dimmers. Changing a switch to a dimmer is very simple. The switch has two outputs (two terminals), and the dimmer also has two terminals. We simply connect the dimmer instead of the switch, using the same wires that were connected to the switch.
Polarity doesn't matter. However, if you have determined where the phase is using a phase indicator (indicator screwdriver), then it is better to connect the phase conductor to the L terminal of the dimmer. Just for order.
Turning on a light bulb through a dimmer
The only condition that the manufacturer imposes is to comply with the connection of the terminals to the phase and to the load. Although, as practice shows, you don’t have to worry about this - everything works well with any connection.
If previously the chandelier was turned on through a two-key switch, then through the dimer all the bulbs will light up (glow) simultaneously. We connect a phase to one terminal of the dimmer, and the other two wires to the second.
Monoblock CVTs
ARL-FINE-DIM Black
A simple product that supports remote control. The maximum output power is 120 W. Installation method: overhead. Adjustment requires minimal effort. The design is standard for this type.
The average price is 800 rubles.
ARL-FINE-DIM Black
Advantages:
- Possibility of remote control;
- Durability;
- High-quality assembly;
- Reliability.
Flaws:
- Not found.
ARL-MINI-DIM-1x11A
A popular device that is small in size but highly efficient. Made from durable material that can withstand all negative influences. A special remote control with a clear interface is used for control.
The average price is 2,000 rubles.
ARL-MINI-DIM-1x11A
Advantages:
- Small sizes;
- Easy connection;
- Nice interface;
- Smooth adjustment.
Flaws:
- Not detected.
SMART-D32-DIM
An excellent option for incandescent lamps. The body is made of ABS plastic. Resistant to minor mechanical impact. It is controlled using special panels, which are supplied separately, which is important to consider when purchasing equipment.
The average cost is 2,200 rubles.
SMART-D32-DIM
Advantages:
- Reliable assembly;
- Easy installation;
- Withstands power surges;
- Durable housing;
- Nice design;
- Cost considering functionality.
Flaws:
- The control panel is supplied separately.
Types of dimmers
All dimmers that are currently on sale can be divided into 2 groups - rotary (with a regulator - potentiometer) and electronic, controlled using buttons.
When adjusting (dimming) with the potentiometer knob, the brightness depends on the angle of rotation. And one rotary dimer works like one switch; it is impossible to achieve more from it. I'm talking about pass-through switches, parallel-series connection, etc. My not entirely successful experience is described on SamElectric in the article Connecting two dimmers in parallel.
A push-button dimmer is more flexible in terms of control flexibility. You can connect several buttons in parallel and control the dimmer from any number of places. Of course, this is theoretical, in practice the number of control places is limited to 3-4, and the maximum length of wires is about 10 meters, and the circuit can be critical to interference and interference. There are also remote dimmers controlled via radio or infrared.
The price of dimmers with a regulator and with buttons differs by an order of magnitude, because a button dimmer (for example, a Legrand dimmer) is usually assembled using a microcontroller. rotary dimmers are much more common , which we will consider below.
There are also industrial varieties of dimmers in the form of solid-state relays with resistor control; this type of dimmer is discussed in the article about solid-state relay connection diagrams.
Conclusions and useful video on the topic
The presented video describes in detail three modifications of dimmers from the famous French company Schneider Electric, and also describes how to connect them:
Dimmers designed to work with incandescent lamps are convenient devices that increase comfort and quality of life. There is a wide range of products on sale, which may differ in technical solutions, the presence of various functions, and a variety of designs.
Dimmers of different types are extremely easy to install, allowing you to install them yourself. It is only important to strictly follow safety rules and carefully perform all manipulations.
Do you have experience choosing or using a dimmer for incandescent lamps? Or want to ask questions on the topic? Please comment on the post and participate in discussions. The feedback block is located below.
Dimmer device for incandescent lamps
Here are some photos of rotary dimmer designs.
Gunsan dimmer device
Gunsan dimmer – view from the soldering side
Makel dimmer device
Makel dimmer device - view from the soldering side
As you can see, the dimmer device is very simple, but may differ from one manufacturer to another. The main difference is the quality of assembly and components.
Review of the best manufacturers
- Simon is a Spanish company. Offers a wide selection of dimmers in different price categories - from budget to premium models equipped with backlighting. Regardless of the cost, the devices are distinguished by high quality workmanship. Plus a wide model line - from classic to modern.
- Berker is a German brand with its own production in Germany. The devices are presented in a strict, classic design, without frills. The prices are moderate, but at the same time consumers are offered real German quality - durable plastic housings that are resistant to fading and have a long service life.
- Makel is a manufacturer from Turkey that has been producing electrical equipment for more than 40 years. Products are manufactured using German equipment and undergo strict quality control. The devices are of good quality and affordable.
- TDM ELECTRIC is a Russian company registered in 2007. The founder is businessman Vadim Morozov. The company specializes in the production of electrical goods. The products are of reasonable price and good quality.
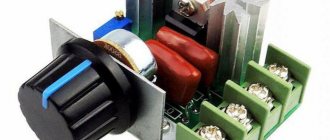
Triac dimmer circuit
The circuit of triac brightness controllers is basically the same everywhere, differing only in the presence of additional parts for more stable operation at low “output” voltages and for smooth regulation. Also, details are introduced into the circuit to reduce the level of interference generated by the dimer into the network.
The simplest dimer scheme
The operating principle of the circuit is as follows. In order for the lamp to light up, the triac must pass current through itself. This will happen when a certain voltage appears between the electrodes of triac A1 and G (which one - see in the datasheet, can be downloaded at the bottom of the article). This is how it appears.
At the beginning of the positive half-wave, the capacitor begins to charge through the potentiometer R. It is clear that the charging speed depends on the value of R. In smart words, the potentiometer changes the phase angle. When the voltage on the capacitor reaches a value sufficient to open the triac and dinistor (see datasheet for dinistor), the triac opens. In other words, its resistance becomes very small, and the light bulb burns until the end of the half-wave.
The same thing happens with the negative half-wave, since diac and triac are symmetrical devices, and they do not care in which direction the current flows through them.
As a result, it turns out that the voltage on the active load represents “stubs” of negative and positive half-waves, which follow each other with a frequency of 100 Hz. At low brightness, when the lamp is powered by very short “pieces” of voltage, flickering is noticeable. The same cannot be said about rheostat regulators and regulators with frequency conversion.
This is what a real light controller circuit looks like. The parameters of the elements are indicated taking into account the variation among different manufacturers, but this does not change the essence.
Practical diagram of a rotary dimmer
More details about the operation of the dimmer can be found in the video:
Requirements for installing a dimmer
When installing a dimming device, you should pay attention to several important circumstances:
- Fluorescent and energy-saving lamps are not dimmable in the standard way. Both types of light bulbs can work with a dimmer, but their service life is sharply reduced. Sometimes the life of a light bulb is reduced to 100–150 hours. In addition, the risk of damage to the dimmer itself increases.
- Dimmers require a certain minimum load. Most often its value is 40 watts. A decrease in load occurs due to the burnout of one of the light bulbs, deterioration of contacts, and the appearance of flickering with a frequency of 50 hertz. When the load drops below the minimum permissible, the protective system is triggered or the device becomes faulty.
- Dimmers are sensitive to ambient temperature conditions. At temperatures above 25 degrees, overheating is possible, which can lead to damage to the dimmer.
- The maximum permitted load on the device should not be exceeded. If necessary, it is recommended to add power amplifiers, which can be used to switch devices up to 1.8 kilowatts.
- Capacitive and inductive loads cannot be connected at the same time. This can cause damage to the device.
As for the installation location, experts recommend proceeding from the following information:
- Dimmers should not be installed in rooms where there are usually a lot of people. In crowded areas, the equipment will operate with interference.
- It is necessary to avoid installing dimmers in rooms where there is no permanent place for installing lighting equipment.
Attention!
Another, more detailed dimmer diagram and a manual for repairing dimmers are given in another article - repairing a rotary dimmer on a triac.
And if you are at all interested in what I write about, subscribe to receive new articles and join the group on VK!
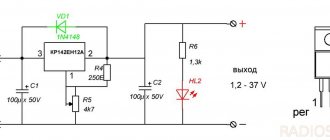
You can install any triacs in this circuit, depending on the load power. Voltage - not lower than 400 V, since the instantaneous voltage in the network can reach 350 V. Dinistor - DB3, in extreme cases DB4. The starting and ending points of ignition and the stability of the lamp’s combustion depend on the size of the capacitors and resistors.
At the maximum resistance of resistor R1, there will be minimal lamp burning, since the triac will open at the end of the half-wave, or will not open at all.
DIY brightness control
Buying a regulator does not put a big strain on the family budget, but sometimes you have to make such equipment yourself. The main reason is problems finding a model that is suitable for the lighting fixture. The presented option is designed to regulate the brightness of an incandescent lamp operating on a 220 V network.
What will it take?
To make a simple model you need:
- Dinistor DB3.
- Triac VT134 for 700 watts, it is also possible to select other options, for example, VT138, MAS212-8.
- The resistor is 10 kOhm, its permissible power is 0.25-2 W.
- Compact variable resistor, resistance from 470 to 500 kOhm.
- Soldering iron and consumables.
- Wire cutters.
- Cable cut, with a cross-section of 1 sq. mm.
- Electrical tape or HERE of suitable diameter.
The elements should be connected according to the diagram below.
Alternative uses of a dimmer
The fact that a dimmer can only regulate the brightness of incandescent lamps is the narrow-mindedness of marketers; it has many more applications.
A dimmer is not only a lighting regulator, it can be used as a voltage regulator in general, connecting any active load through it - an incandescent lamp, a soldering iron, a kettle, an iron. But the main thing is that the maximum power of the dimmer (in other words, the maximum current of the triac) must correspond to the load.
It is not a fact that the load will behave adequately and will not be in danger of failure. For example, try dimming your TV) No, better not!
In addition, you can, for example, regulate the temperature of underfloor heating. This eliminates the need to purchase a temperature controller, which costs 3-5 times more.
The downside is that there is no feedback and protection against overheating, but in many cases this is tolerable. After all, there is no feedback from the chandelier either - only through the eyes. And from the warm floor - through the legs, right? I installed dimmers on heated floors, they work great for many years.
Varieties
There are many options for regulators on the market; they have the same operating principle, but the control methods differ:
- Turning. Its design is the simplest, which is the reason for its affordable price. The distribution of rotary regulators is the largest among other types. The main mechanism is a variable resistor, when turned, the lighting intensity changes. Most often, they also combine a switch - if you set the minimum value on the dimmer, this will turn off the light in the room.
- Turn-push. The essence of its work is the same, but to turn on/off the light in the room you need to click on it. Moving with the wheel gives brightness control.
- Key. It’s a fairly recent development, so it hasn’t yet gained popularity. In appearance it is very similar to a standard switch. Light intensity is adjusted using keys. The actual adjustment occurs due to different pressing forces.
- Sensory. An innovative development that appealed to many customers almost immediately. It has an attractive, modern design - there are no buttons, wheels or other control mechanisms presented above. Control occurs using a sensor, similar to navigation on a smartphone or tablet.
- Wired. The device is almost the same as the rotary one. The variable adjustment resistor itself is located on the cable.
Rotary and touch dimmers
The design of dimmers depends on the circuit used by the manufacturer. The difference also lies in the quality of the parts themselves and the assembly. Some mechanical variators contain components that are responsible for stable operation of the device, improved smoothness of regulation and the ability to operate at low power.
There are models that have buttons (touch or regular), with their help the user can make adjustments. Possibilities:
- Connecting remote controls to control CVTs in different areas of the room.
- Remote brightness control.
- Organization of lighting according to a preset program.
- Connecting a dimmer to the light sensor, due to which the brightness of the lamp will be adjusted automatically.
Nuances of choice
Using a dimmer is convenient and practical, but this is only possible if you choose it correctly. You should pay attention to:
- Compatible with lamps. As already mentioned, any regulators are suitable for incandescent lamps.
- Appearance. There will be no difficulties in selecting a device that is suitable in appearance; you will be able to choose, including options with an atypical design. It is important that the style matches the design of the room as a whole.
- Price range. When choosing a model for incandescent lamps, there is no point in purchasing an expensive touch controller.
- Elements of protection. To do this, the device must have a circuit breaker or fuse.
- Power. Very often, the power in reality turns out to be less than in the product data sheet.
- Manufacturer. It is necessary to purchase only regulators from manufacturers that have proven themselves. At the same time, you should not rely only on price, because the savings will be questionable. Popular brands – Legrand, Derne Group, Simon, ABB.
When choosing, you should also pay attention to the type and power level of the lamp, and take into account the total load. Experts advise adding a power reserve of 10–20% to the total load, and based on the result obtained, look for a dimmer.
Important! When choosing, be sure to check the functionality in the store, otherwise returning the device will be problematic.