Corrugation in the walls
As they say, the rules of the PUE, clause 7.1.37, embedding a bare cable in a groove is allowed. But in the same rules there is an explanation of what the word allowed means:
It turns out that theoretically you can use the cable in walls without protection, and the rules leave you a loophole for this. The main thing is to legally justify why you did it this way and not otherwise.
Moreover, in the updated set of rules SP 256.1325800.2016 “Electrical installations of residential and public buildings. Design and Installation Rules” plainly states:
That is, it is possible to plaster not only the cable, but also separately the wires in the protective sheath.
What about laying on the ceiling, without plaster? Here we look at paragraph 15.15 from the same code:
And here, too, it is clearly stated that it is allowed to lay individual cables along the ceiling on brackets, i.e. without any corrugation.
In fact, both the PUE and the joint venture say the same thing in two ways - without corrugation it is possible, but with corrugation it is necessary.
At the same time, there are several practical considerations that clearly show that laying a cable without corrugation cannot be considered a durable installation.
Basic rules for installing wiring in the ceiling
Electrical installation is carried out only on the basis of a pre-drawn plan, divided into parts and combined into one project.
When preparing papers, perform the following steps one by one:
- They determine the place from where electricity is supplied to the local area.
- Points where electricity is consumed are identified.
- Select an installation location for the protection components.
- Draw up diagrams for laying cables between entry points and consumers. The components from the previous paragraph are taken into account.
At the preliminary stage, you need to choose the method of work that will be optimal. The brand and cross-section of the cable are selected from special tables.
The installation method itself can be hidden or external.
The following additional recommendations help to avoid mistakes during work:
- It is advisable to lay electrical wiring in special protective corrugations. If this requirement is not met, there is a high probability of short circuits.
- Electrical appliances in the apartment are prohibited from being connected to one protection device. This is a bad option for further operation, even if the load does not exceed the standards. The appliances will turn off simultaneously when a short circuit occurs.
- Only the phase wire is broken by all switches. Otherwise, even the procedure for replacing light bulbs ends with an electric shock.
- It is unacceptable for the wires to touch or intersect each other.
- It is important to choose correctly not only the main type of wires, but also the cross-section.
- Special electrical boxes are used in bathrooms and kitchens.
- The cables are laid so that further stages of work do not cause problems.
Tree
Cables under such circumstances are pulled through steel pipes. Then fixing the products does not cause any trouble. The diameter should be such that the wiring fits easily inside.
For distribution pipes, it is important to use materials that are resistant to fire. Metal becomes the best choice for any situation. A layer of insulators is placed on the inner sides of such products, which will prevent the box and the current carrier from coming into contact with each other.
The work is carried out by performing the following actions:
- The drawing is transferred to the surface from a paper drawing. Cable installation lines are marked as accurately as possible.
- Next, distribution boxes are installed.
- The tubes are cut until the length is sufficient. At the next stage, these structures are fixed to the base on the ceiling.
- The individual parts of the pipes are connected, the standard option is welding.
- Cables are laid through pipes using pulling.
- Then they are discharged into the distribution box. The main thing is to leave the ends free, at least 20 cm.
- All wires are connected. The structure is wrapped with electrical tape and fixed.
- Afterwards, a functional check is allowed.
Concrete
In this case, cutting grooves.
A special cutting tool equipped with diamond discs is used to help process the stone. Slotting types of devices (hammer, impact drill) are also needed, but only for hard-to-reach surfaces. The wider the groove, the better. Other tips:
- Compared to the thickness of cables without protection, the depth of the groove is 2-3 times greater. Let us assume that the diameter of the protective shell is ½ larger.
- Cable laying is free. There is no tension.
- It is easy to check the depth indicator using a spatula attached to the wall.
- The groove section is covered only after the wiring is finally secured to the section. And on each side there is 1.5 meters in reserve.
Cables are sometimes installed in an open way, when the grooves are not cut through. But in this case you will need special fasteners. Cables are laid in protective boxes to avoid local fires.
Drywall
Restricted access to the base base is the main feature of ceilings made from this particular material. It is important to think in advance about where the points for prevention and inspection will be. Taking into account the type of base floor, the installation method is selected.
With a suspended ceiling made of plasterboard, the rack systems are successfully hidden inside. Therefore, open installation is allowed. The main thing is that all the wires in this case are located outside the structure.
Stretch ceiling
The stages of work are the same as in the case of drywall. Create a surface, subsequent access to which is limited. Not forgetting that there must be sufficient distance between the fixed corrugation and the ceiling. Otherwise, the corrugated surface of the structure installed on the ceiling opens to the eye.
Pass-through and distribution boxes are located outside the structure.
Wall deformation
Many walls tend to crack over time. This is especially noticeable in secondary housing.
If you have seen walls cleared of wallpaper, be it a panel house or a brick one, then you have probably noticed various kinds of cracks. They may be no thicker than a hair, or vice versa, a thumb can easily fit there.
In addition, cracks are also found in new buildings, even in those that have not yet been occupied by residents. Now think about what happens to the cable tightly sealed in the wall when it moves apart.
Most likely, nothing good. Will you be able and will you want, 15-20 years after such cracks appear, to tear off the wallpaper and change all the supply wiring?
Tips and tricks
When drawing up a diagram, it is important to take into account where the main elements are installed, including distribution boxes and sockets, switches.
As for wires, it is recommended to choose the variety designated as VVGng.
Suitable even for those who do their own work, even in wooden houses.
What is recommended to pay attention to?
The use of suspended ceilings will solve many problems at the same time.
- There is no need to level the surface.
- Maintaining an attractive appearance.
- Easy dilution of components using a separate method.
But problems often arise. Especially when the wiring requires maintenance and was initially done incorrectly.
What problems do you encounter most often?
Often they encounter incorrect placement of the mounting molding. Installers do not pay attention to the fact that the junction box intersects with the mounting profile. Such errors are considered gross violations of standard rules.
The installers are doing the work even though they don't have all the equipment in stock. For example, there is no detector. There is a high risk of damaging hidden wiring if you do not check in advance for invisible elements inside the structure.
There are options when installation is carried out without the use of standard corrugated pipes. This option is only permissible when installing low-voltage systems to which a step-down transformer is connected. Where the voltage is up to 24 Volts. In other situations, you cannot do without corrugation during installation.
Lamps are the main consumers of electricity, which are connected to the ceiling, and wiring installation is organized for them. PVC coatings require less powerful devices. The film will melt if the indicator does not meet the standards.
LED lamps are the best choice for owners of suspended ceilings. They do not require special skills during installation and are not capable of melting the canvas. But the tension remains the same as in other situations.
There is no universal answer to the question of which installation option is better. You should not initially concentrate on only one option and ignore others. The choice is made depending on the material of the ceiling base. Each option has negative and positive sides; you need to understand which characteristics are preferable for a particular consumer.
If you don’t have confidence in your abilities, only professionals are hired to do the work. After all, increased voltage poses a health hazard and can cause harm if handled incorrectly.
The main thing is to comply with the requirements and technology, from the first to the last stage. In this case, the result will be safe. And the design will last a long time without the need to open access to specific elements within the system.
Replaceability of electrical wiring
Imagine that you needed to hang one or more paintings on the wall a few years after the renovation.
You take a hammer drill, mark the fastening points, start drilling and hear a characteristic pop with the release of a large number of sparks.
And only then do you remember about the cable going to the socket hidden behind the bedside table. It is useless to turn on the machine; there will be a stable short circuit on the line. And all the other sockets in the room can hang on this group.
If you have suspended ceilings installed, then in principle there is no question of replacing the damaged area, but under one condition - if the cable is laid in a corrugated area.
You can easily replace this piece by simply unfastening part of the ceiling, running a new cable and zipping it back up. At the same time, there is no chiselling or breaking into walls.
So that you understand, if someone talks about the replacement of wiring in a corrugated cable, we are primarily talking about vertical sections from the ceiling to the sockets.
On the ceiling itself, when turning at 90 degrees, this trick is unlikely to succeed.
Imagine that with all of the above, the cable is embedded in the plaster? You can, of course, not open the walls, but simply abandon this outlet (by biting off the connection to it under the ceiling).
But then get your longest carriers and extensions ready for unsheathing.
Wiring in the ceiling: pros and cons
There are several situations when such installation remains the only solution that can solve the problem:
- During subsequent installation of suspended ceilings made of plasterboard.
The corrugations and cables running along the top will be hidden behind the suspended ceiling. Drywall does not have to be used over the entire area. Let us assume that such a scheme is used in some areas.
- The room has already been filled with ready-made screed, which satisfies the characteristics.
There is no point in re-flooding the floor or ceiling if the quality of the surface is initially at the required level.
- There is no desire to change the floor covering that is already installed.
The main disadvantage is that the height of the room is reduced when using suspended ceilings. But this method has many more positive aspects:
- Easy distribution of components throughout the room.
- Trouble-free maintenance, replacement of parts if necessary.
- Safety. You don’t even need to remember the location details.
- Simplification of further connection of lighting devices.
Many people prefer this method.
Cable marks on wallpaper
Very often in old houses you can find dirty cable marks on the walls. These are dark rusty stripes along which the wiring routes can be easily traced.
These stripes can be so visible that they sometimes even show through several layers of wallpaper.
Of course, the Gost cable VVGnG-Ls does not necessarily have to give such an effect, but you will not get a definite answer until you are convinced of the quality of this or that product from personal experience.
Moreover, the effect may not appear immediately, but after 10-15 years. In addition, don't forget:
- about an increase in natural current leakages of bare cables under plaster
- and about the possible influence of plaster components on insulation
The procedure for fastening, pulling and laying cables
For high-quality and quick installation of cable lines, it is recommended to mark the planned route. To do this, you can use a regular pencil. Further actions will depend on the installation method.
It is recommended to continue installation of external electrical wiring in the following sequence:
- Secure all feedthroughs and junction boxes using fasteners appropriate for the base material.
- At this stage, you should cut pipes, corrugations, cable channels (depending on the installation method used), fix them to the ceiling and make a connection by welding for metal pipes or soldering for plastic pipes.
- It is advisable to lay the wiring at a right angle for all branches.
- Using a broach, lay the wires into prepared boxes or pipes, moving from box to box. You will need to leave about 25 cm of hanging end of the cable in the junction box. This is necessary to make a high-quality connection of individual conductors.
- Make connections in the boxes and insulate the wires. To obtain high-quality contact, it is better to solder the wires.
Laying hidden electrical wiring is more labor-intensive. To do this, you will first need to perform gating. After preparing the necessary cable channels, they are fixed using alabaster. Upon completion of installation work, you will need to plaster the ceiling surface.
Possible installation errors
When carrying out installation work to create a distribution diagram of electrical conductors on the ceiling, the following errors are encountered:
- The cable is of poor quality or of the wrong size.
- No thought has been given to how to further gain access to the electrical wiring.
- Conductor connections are made by twisting, which is accompanied by a fire hazard.
- Inappropriate materials are used for drawing and fastening conductors on a certain type of surface.
- Spotlights, lamps, chandeliers are connected with a switch break in the neutral wire. This leads to a constant voltage on the lamp socket.
The switch must be placed in the break of the phase wire. The fastening and placement of current-carrying conductors along the ceiling must be carried out in compliance with safety measures and certain rules. This will avoid many problems in the future.
Corrugation on the ceiling
Proponents of laying electrical wires along the ceiling without protection give three arguments:
- installation of the cable on the ceiling without corrugation is allowed
- saves a lot of money
- saves time on the work itself
In this case, we almost always mean laying cables in bundles.
And along with the beams, you immediately need to remember about the reduction factor. Regulatory documents GOST R50571.5.52-2011 table C.52.3 actually oblige the installation of circuit breakers with a lower rating when laying cables in bundles.
That is, for example, you will no longer have a 16A switch per socket, but only 10A. Or you will have to increase the cross-section of the cable and use not 2.5mm2, but all 4mm2.
As a result, you end up with unrealized power reserves on sockets or cables.
Is it necessary to use corrugation when laying electrical cables and wires?
Is corrugation needed when laying cables or can electrical wiring be done without it? This simple question, although it has a fairly firm answer in the regulatory documentation, in particular in the PUE (Electrical Installation Rules), still causes a storm of fierce debate, which often misleads many people who are faced with replacing electrical wiring for the first time.
Moreover, this situation is fueled, it seems, by experienced electricians who receive a lot of money for their work and often, consciously or not, impose on their customers a method of laying cables that is not always justified.
Induced voltage
Induced voltage is a faithful companion of bundles of wires. It can negatively affect the operation of inexpensive LED lamps, causing backlighting or flickering.
In this case, an inexperienced user will have to call a specialist to deal with a phenomenon that is incomprehensible to him. And for every call you have to pay.
Although, of course, you can try to delve deeply into the problem and figure it out yourself.
Therefore, having saved once on corrugation from one master, get ready to pay others in the future, or spend money on alterations and independent modernization.
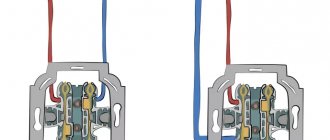
Final installation. Sockets and switches
Sockets and switches are installed last, after clean finishing (painting or wallpapering). The most important rule of good installation is good contact!
Most of the outlets in your apartment are pass-through, that is, through them the cable goes in a loop to each subsequent outlet. To avoid problems with wiring in the future, firstly, do not buy cheap sockets (for example IEK), they have a very poor (to put it mildly) clamp and subsequently such sockets and switches can simply burn out. And secondly, pull all connections a second time! Check each pinched or twisted wire by tugging on it. If the wire jumps out of the clamp, it means you did not clamp it properly or the clamp was defective.
Among professionals, it is believed that the best clamps in sockets are produced by LeGrande and Schneider.
To ensure that the frames lie flat and tight, install a group of sockets or switches level, joint to joint, and screw them to the socket boxes with small self-tapping screws on two opposite sides, close to the wall. Then tighten the spacers inside the socket (if any)
It is important not to touch the wires inside the socket with spacers or screws!
Monitor the position of the cable in the socket so that it does not fall on the spacers. Also, do not use screws that are too long, as they may touch the wires.
At each stage of repair, it is necessary to check the lines for operability, since after the final finishing it will be impossible to fix anything without damaging the finishing.
Mounting method
When laying without corrugation, the cable is usually secured with ties, or the dowel is secured with clamps containing these same ties.
By securing it in this way, you influence it mechanically in any way. If at first glance nothing seems to happen to it, then over time, this method of fastening can play a cruel joke on you.
Even without using ties, but using special expensive fasteners, you still make the cable sag under its own weight.
Such fasteners negatively affect its insulation. This is not a SIP, which was originally manufactured taking into account sagging under its own weight.
And this, in a few years, will certainly lead to false alarms of the differential protection.
As you can see, all the methods that are presented by installers as simple and fast do not really fit into the definition of “durable installation”.
False ceiling
Various types of false ceilings have become widespread. Thanks to their installation, it is possible to carry out high-quality and safe electrical wiring along the ceiling space, which will be hidden behind a false partition.
Laying cables over a false ceiling Next, the most popular types of false ceilings will be presented, as well as the nuances of laying electrical wiring for each of them.
Drywall
Plasterboard ceilings are in wide demand due to their low price and the possibility of do-it-yourself installation. They are of the hanging type. For installation, a metal corset is pre-formed, which serves as the base for attaching the electrical wiring. It is allowed to lay cables in plastic or metal corrugations. The disadvantage is that access to the installed electrical wiring is limited, which leads to the need to take additional measures.
Wiring in a plasterboard ceiling
Reiki
This type of ceiling covering is accompanied by the use of a hemmed type of installation, which also limits further access to the wiring. The slats are fastened to a wooden frame, which is pre-formed on the base. The method of laying conductors depends on the material of the ceiling. In this case, it may be necessary to make additional holes in the sheathing to allow cable lines to pass through.
Lighting fixtures in the slatted ceiling
Cassette
They belong to the category of suspended false ceilings. They are assembled from individual rectangular or square elements made of compressed paper and fiberglass. They are installed in pre-prepared places made of plastic or metal sheathing.
Installation of suspended ceiling Armstrong
Tensioner
The use of decorative framing of the ceiling space using a tension ceiling allows you to apply any color scheme. For this, thermal rubber of a certain structure is used. Installation is carried out to the walls, which helps to create space between the facing partition and the main ceiling.
It can be used to route electrical wiring by attaching it to the base coat. In this case, it is recommended to maintain a height that will prevent the wiring from being close to the tension covering. The type of false ceiling in question also limits further access to the electrical circuit.
Electrical wiring above a suspended ceiling
Electrically conductive panel
Conductive panels made of polyurethane foam (acting as an insulator) and two layers of foil isolated from each other (conductors of electric current) allow you to beautifully and unusually design the ceiling. Their installation can be carried out using suspended technology or by gluing directly to the ceiling. When laying wiring you will need to use an open or hidden method. Both options will not provide access to hassle-free electrical wiring maintenance.
LED lighting using conductive panels
Subtleties of laying wires in a screed
Wiring on the floor under a concrete screed has its own tricks and subtleties during installation that need to be taken into account.
Marking and diagram
Before starting work, you should make a marking to indicate where under the floor the corrugation with the electrical cable will be located. Consider those elements that will be placed on the wall or floor; they also need to be noted.
For convenience, create a diagram on paper where the location of the wires will be marked. This will come in handy if you need to drill into the floor: you can avoid getting caught in a wire.
The diagram should show the dimensions of the wires, as well as the distance at which they are removed from the walls. If possible, mark the depth of the wiring under the floor.
It is much more convenient to groove walls or install socket boxes using markings. You will be able to carry out the work more accurately, check how evenly all the structural elements will be located without starting work, and evaluate whether their location is convenient.
Cabling
To prevent the wires from moving during installation on the floor, they can be secured using special plastic clamps. This will come in handy when pouring concrete. If you neglect the clamps, there is a high probability that the wiring will move and no longer correspond to the diagram drawn on paper.
In order to protect the corrugation and make the floor screed more durable, it is recommended to use reinforcement or polymer mesh.
It is better not to skimp on cable channels, using durable, high-quality materials. You need to start driving them from the switchboard. Each cable must have its own channel. If there are branches, it will be difficult to remove the damaged area; you will have to open the floor.
After the cables are routed into the channels, the passages made under them must be covered with plaster, you can use a cement mixture or plaster the voids.
After this, you can directly screed the floor. Make sure that the corrugation is recessed into the cement mixture by at least 30 mm. There should be no physical impact on the box, for example, from the mass of the screed, otherwise it will deform or collapse.
In general, installing electrical wiring under the floor will not cause difficulties if you follow the instructions. This is an inexpensive and convenient way to disguise wiring, in which the integrity of the walls is not affected, and there is no need to re-glue the wallpaper or carry out additional finishing work after installation is completed.
Distinctive features of modern electrical wiring
At the end of the 20th century there was a breakthrough in modern household technologies. In addition to televisions, other devices began to be used inside homes:
- Wireless connection.
- Powerful household appliances.
- Video surveillance and security systems.
- Computers.
Therefore, work with the installation of electrical networks has become more complicated. The principles of operation and arrangement remain the same. Even the first stage - design - causes difficulties. It is necessary to know the locations of household appliances and the power they absorb. The lighting system for each room is thought out at the same stage.
Now they use not only power, but also low-current systems. These are wires for TVs, telephones, and computers. This also includes acoustic and security equipment. Power and low-current systems are not separated. The power source for the devices is a classic 220 V network.
The number of devices and devices with simultaneous operation is changing upward. Previously, one chandelier was enough, now local or a system of spotlights is added to the overhead light. The total power consumed by the devices also increases.