Setting up a new connection point
The cables should not bend when installing the electrical point
. After installing the new glass, you need to clean the ends of the wires from debris and dirt, and check the integrity of the insulation. If there is damage, they are repaired using cambrics, insulating tape or heat shrink tubing. The veins must be cleaned of oxidation. It is advisable to solder the copper wires, since over time they oxidize, the contact becomes worse and the socket begins to heat up, which is fraught with fire.
Installation is carried out in the following sequence.
- We check the new product for integrity and completeness.
- Let's see how tightly the plug fits into the terminals. If necessary, make adjustments.
- We loosen the expanding legs and fix them with a rubber band so that during installation they do not cling to the walls of the sleeve.
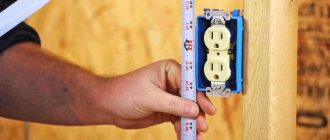
- We insert the cores into the contacts so that they protrude from the other end by 2-3 mm. You need to insert it on the left side of the bolt so that when it rotates, the wire does not push out of the socket.
- Tighten the bolt tightly. It is desirable that it be slightly flattened when twisted. The quality of tightening is checked manually by pulling the wire by hand.
- We fold the slack of the cable like an accordion, recess the socket into the hole, checking its correct horizontal position.
- When the bracket rests against the edges of the glass, we begin to twist the bolts of the legs. This must be done one by one, several turns at a time, so that the product does not warp.
- Install the cover. Some models have bolts, some are held on by latches.
- We check the functionality of the outlet using an indicator or any electrical appliance. The fastening strength is tested by inserting and removing the plug.
After this, you can turn on the package switches or screw in the plugs.
Safety regulations
Strict adherence to safety regulations is an integral part of the preparatory work that must be carried out before disassembling any type of outlet. The first step is to de-energize the part of the room where the work will be done.
Typically, in older residential buildings, electrical wiring can be divided into three groups: lighting, sockets, and electric heaters. Therefore, in order to de-energize the sockets, it is necessary to turn off the circuit breaker in the electrical panel, which is responsible for supplying voltage to the sockets. Next, you need to make sure that there is no voltage in the electrical network.
You can check this in several ways:
- Use a screwdriver - voltage indicator.
- Use the switch button to turn the lights in the room on and off.
- Connect any household appliance and check if it works.
If the outlet is disassembled at night, care should be taken to ensure that it has a good source of artificial lighting.
Any work related to electrical wiring must be done with dry hands.
Repair features
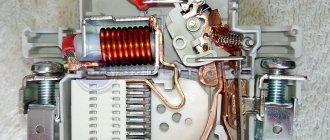
When all the preparatory work is completed, you need to disassemble the light switch and carefully examine it. If the contacts are oxidized, they need to be cleaned. Oxidation can also prevent the passage of electrical current, so if there is severe contamination of the contacts, then most likely that is why the mechanism did not work. After cleaning, you need to connect all the wires, mount the device back into the hole in the wall and secure the frame and keys in place. To check its operation, electricity is supplied.
If the contacts of the switch are melted, this indicates that a short circuit has occurred, as a result of which the mechanism overheated and became deformed. In this case, only replacement will help; such a switch can no longer be repaired. In order for the new device to fit, you need to take the old one with you to the store, then there will be no problems with choosing accessories.
https://youtube.com/watch?v=FP3_fqpoNdQ
Carrying out repairs
Once the preparation is complete, it is time to carry out the main activities. The screws are removed and the decorative casing is removed. Next, the contacts are checked. If they look ugly, turn black or change color, then the entire structure is dismantled. The presence of a green color indicates oxidation. What to do in this case? The contacts are cleaned using a knife.
It also happens that the contacts are completely worn out. How to fix an outlet? In this case, a completely new design must be ready. What to do if the contacts are weakened? There are simple manipulations. Need to:
- Remove the cover.
- Pull out the entire structure carefully, without disconnecting or breaking the wires.
- When using a screwdriver, secure the screws.
- The charred wires are removed, and the rest are twisted and insulated with tape.
Next, the parts are installed in their places. When the structure is severely damaged, it is better to replace it immediately. These are simple manipulations, the basis of which is de-energizing the electrical wiring.
Installation and assembly of the shield
The installation of the panel can be rescheduled at any time during the wiring replacement. It is best to install the panel after rough finishing (for example, plastering the walls). The panel is assembled at any time, but before installing sockets and switches, for the convenience of commissioning.
The assembly of the panel is carried out by a qualified electrician with a permit. For the switchboard we use only high-quality certified materials (automatic circuit breakers, RCDs, differential circuit breakers, voltage control relays, switches, meters). At the customer's request, cheaper domestic analogues can be used. Also, for an additional fee, it is possible to connect a voltage stabilizer to the switchboard (the stabilizer requires additional space next to the switchboard).
How to remove a switch or socket before wallpapering walls – Blog Stroyremontiruy
If you want the wallpaper to look beautiful on the wall, then before pasting the surface, remove all sockets and switches from it. No amount of precision will help you get around the fixtures without removing them - the wallpaper around the perimeter will be uneven, and after the repair there will be a bitter aftertaste.
Below is a brief instruction with a photo; after spending 5 minutes on it, you will not receive an electric shock, and the wallpaper will look beautiful in the interior of your apartment.
Degree of protection
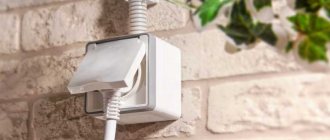
There are external sockets for open wiring with varying degrees of protection of the housing from moisture and other substances.
Devices with IP 21 protection do not have a housing that is sealed on all sides. The back side is open and during installation it leans against the plane of the wall.
Basically, outdoor sockets with open wiring with a completely closed housing with protection class from IP 44 to IP 68 are intended for wet and other hazardous areas.
Such devices have, as already mentioned, a molded plastic housing, a cover for insulating live parts and rubber inserts for better sealing. All this should protect people from electric shock and fire - inside and outside the building.
Step-by-step dismantling instructions
Dismantling the socket step by step
After checking that there is no voltage in the network, you can begin dismantling.
To disassemble the socket, proceed in the following sequence:
- Remove the cover of the old outlet. To do this, unscrew the bolt or screw located in the middle. If the cover is stuck to the wall, you need to carefully pry it off with a flat-head screwdriver.
- Once again we check that there is no voltage on the line. We place a dielectric mat under our feet, arm ourselves with safety glasses and a headlamp.
- Unscrew the bolts that regulate the position of the legs. If they are stuck to the block, you need to lightly press them with a screwdriver, after trimming the wallpaper.
- We take the block out of the glass and unscrew the wires from the contacts. If the threads on the bolts are rusty and do not give way, you need to drop a little machine oil on it. If this does not help, the wire must be cut off if there is sufficient margin for this.
- Disconnect the ground wire. If it goes to another device, it cannot be cut, as this will negatively affect the grounding parameters.
- We remove the old socket box. The iron sleeve can be crushed with plumbing pliers, and the plastic sleeve can be pulled out by the edges with pliers. To avoid tearing out a piece of plaster, you need to make a groove around the sleeve with a knife or drill several holes.
- Clean the hole from crumbs and debris. We check that the new glass matches the existing hole. If it is small, expand it with a hammer and chisel. You can use a diamond crown. The diameter and depth of the recess should be 4-8 mm larger than the size of the glass. Again, clean the hole from debris and dust. It is advisable to cover the bottom with felt to prevent the penetration of noise, bedbugs, fleas and cockroaches from neighboring apartments.
- We mix the starting putty, coat the socket box with it, thread the wires through the hole and insert it into the niche. The product must be aligned so that its edges are in the same plane with the wall.
Before continuing work, you need to wait 2 hours for the solution to set. After the putty has completely hardened, it is necessary to grout and polish the wall. Then you need to treat it with a deep penetration primer to strengthen the surface.
If you plan to replace the wiring, you should firmly fasten the old and new cables and pull the new wiring through the channels, using the old line as a pull cable.