When independently laying various communications in a panel house, the question arises whether it is possible to groove its walls for electrical wiring, water pipes, sewerage and other communications. Despite the high strength of concrete structures of such buildings, an incorrect approach to this operation can lead to negative consequences - the loss of load-bearing structures of their original characteristics, the appearance of cracks and various deformations. In case of very gross violation of the rules for laying communications, gating can lead to the gradual destruction of panels and floor slabs, which will subsequently lead to the collapse of walls or the entire building.
Significant differences between panel houses
Buildings of this type are assembled from large reinforced concrete blocks - panels. At the production stage, channels are cast into them for hidden wiring.
There are several varieties of such buildings, 2 of them are most widespread. The main difference is the design scheme.
Series 1-464
The structural design of the facility is cross-wall. This means that almost all interior walls are load-bearing. Partitions separate only the bathroom (2 pcs.).
This series is recognized by the windows on the interfloor landing in the entrance, repeating the two-leaf apartment windows.
Series 1-335
The structural design is semi-frame and frame (later modifications). Loads are carried by columns and longitudinal walls. All transverse ones are partitions.
The hallmarks of this series are elongated windows on the landing and end walls without balconies.
Example of an apartment redevelopment project
Description 2Description 1
Back
Forward
An idea of the cost of any work and operations related to the reconstruction and redevelopment of apartments can be obtained from the calculator presented here.
What are the load-bearing walls of a panel house made of?
The panel is a reinforced concrete structure. There are several layers in it.
Outer layer
Protects the reinforcement frame from corrosion. The thickness depends on the location of the panel:
- internal - 15 mm;
- external (enclosing structure) - from 20 to 70 mm depending on climatic conditions.
In the second case, finishing is applied to this layer - tiles, gravel screenings, etc.
Rebar frame
The structure is assembled from longitudinal and transverse rods with a diameter of 12-14 mm, fastened with knitting wire. The frame absorbs tensile forces that concrete is not designed to withstand. The rods are located where such loads are most intense - near the surface of the wall or ceiling immediately behind the outer protective layer.
Destruction of reinforcing bars is unacceptable.
Inner finishing layer
Available on some panels. The thickness is 15 mm, the material is a solution of the same strength grade as in concrete. This layer allows you to do without plastering the panel.
Protective layer of concrete
In the absence of a finishing layer, the frame is followed by concrete 1.5 cm thick. Its function is to protect the reinforcement from corrosion.
How to distinguish between finishing and protective layers
Due to the use of the same solution in both cases, it is impossible to recognize the outer layer.
Therefore, they assume the worst case scenario: the reinforcement is located 1.5-2 cm from the wall surface.
How to properly groove a wall for wiring and sockets: progress and sequence of work
The stages of work will be as follows:
- Drawing up a plan on paper and drawing contours with markings on the wall.
- Cleaning and preparing the work area.
- Carrying out a work operation.
- The final stage, cleaning.
brick wall
You can easily and quickly make cuts on a brick wall according to the intended lines using a hammer drill or grinder.
Options for how to hammer a concrete wall with a hammer drill without a lot of dust
To avoid the formation of large volumes of dust, you should cover the room with film and humidify the air before starting work. It is also recommended to crush the wall surface according to clearly marked contours.
Is it possible to ditch walls and ceilings?
Federal and regional regulations prohibit striking fines in load-bearing structures. The weakening of the section leads to a loss of strength, as a result of which the building or part of it may collapse. To lay the cable along the ceiling, you need to look for another way. There is no point in slotting the crossbars: they are covered with decorative overlays, behind which it is convenient to place the wires.
SNiP 3.05.06-85 contains a clause that allows furrows to be made in load-bearing structures if agreed with the author of the project. In reality, this is almost impossible to do.
Creating grooves in partitions is permitted.
Skirting boards and baguettes
One of the traditional ways to hide wiring. Since its appearance in our homes, this has become the second utilitarian purpose of skirting boards (both below and above). Modern skirting boards are, of course, much more suitable for this function:
- they are made of non-flammable plastic;
- they have sufficient internal volume to accommodate several different types of wires at once;
- their construction ideology includes the possibility of dismantling. Those. their installation is provided on brackets that are already permanently attached to the wall or floor;
- they have a full line of accompanying fittings (such as corners, joints, transitions, plugs, etc.)
Wooden skirting boards are less convenient in this regard, and their fire resistance raises certain concerns. However, in some cases, such skirting boards significantly outperform plastic ones:
It is enough to treat a wooden plinth with a special compound that gives the wood fire-fighting properties, and such a part will not only not catch fire, it will not even maintain a flame if thrown into an open fire.
A plinth made of expensive wood has two advantages:
Finally, it is difficult to imagine that the walls, which are covered with natural wood panels, would be trimmed along the perimeter with plastic skirting boards.
Baguettes repeat the features of baseboards with one exception. If there is molding in the decoration of the room (and the baguette is its component), then this is a permanent decorative element, and the wiring laid through such a channel will forever remain inaccessible.
The legislative framework
According to Art. 7.21 of the Code of Administrative Offenses of the Russian Federation, gating of load-bearing structures is classified as illegal redevelopment. The housing inspection will force the violator to do the following:
- Pay a fine of 2.5 thousand rubles.
- Restore the strength of damaged structures (clause 3 of article 29 of the RF Housing Code).
To fulfill the second requirement, it is not enough to fill the fine with mortar. This will not restore the load-bearing capacity of the structure. Special measures will need to be taken in accordance with the strengthening design. Only the author of this building has the right to develop it - this is written in the law. For such a service they can ask for up to 800 thousand rubles.
In case of failure to comply with the instructions of the housing inspection, the apartment, by court decision, may be put up for auction (Clause 5, Article 29 of the Housing Code of the Russian Federation).
Norms and restrictions
For horizontal grooves in partitions, SNiP 3.05.06-85 establishes the following maximum permissible parameters (mm):
- Depth - 25.
- Width - 20.
- Length - 3000 (total).
Vertical furrows are made without restrictions.
Minimum distances from grooves to structural elements (cm):
- Floor slabs (for horizontal channels) - 15.
- Edges of the opening (for vertical) - 10.
- Gas pipelines (for any) - 40.
The device of fines diagonally is prohibited. They are made parallel to the corners of the building.
The groove for the wire in the area from the distribution box to the electrical point can have only 1 turn.
How to make grooves correctly
So, to make the instructions clear even for electricians dummies, we provide a step-by-step technology that will allow you to quickly and correctly wire walls in a house or apartment:
- We protect the remaining rooms from dust. To do this, on all doorways you need to hang a damp cloth from the inside of the work area, which will completely cover the entire opening. You should not rely on closed doors - through the gaps on all sides, dust can easily pass throughout the entire apartment.
- We clean the surface on the ceiling and walls from pieces of wallpaper, because... Even small pieces of paper can block the movement of the discs and prevent the wall chaser from working properly.
- We transfer the electrical wiring diagram in the house to the walls using a marker and a building level. By the way, you can make a laser level with your own hands, which will allow you to quickly and accurately mark horizontal lines for scoring.
- If you are replacing the electrical wiring in your house, you additionally need to make sure that the old wiring is no longer running under the markings. If, when you are working on a wall, you come across a live wire, you cannot avoid an electric shock, not to mention a short circuit. To find a wire in the wall, you can use a homemade metal detector or a special cable detection tester. If you come across old wiring, you need to either dismantle it, or insulate it and go around it, stepping back at least 10 centimeters to the side.
- After this, you need to groove the wall for the wiring according to the markings. This is not difficult to do, as confirmed by the videos provided above. As for grooves for installing distribution boxes and sockets, it is better to make them with a drill with a special attachment - a crown of a suitable diameter (usually 80 and 65 mm).
- When the entire network of grooves has been drilled, we recommend capturing the picture with a camera so that later you can easily find the location of the damage, focusing not only on the wiring diagram, but also on the photo.
This is where do-it-yourself wall slitting for wiring ends. All that remains for you is to clean the hole and secure the cable in it with a dowel clamp, gypsum plaster or alabaster. We talked about this in detail in the article: how to properly install electrical wiring in a house.
If the instructions provided seemed complicated to you, you can always call a specialist so that he not only drills the entire network of grooves, but also disconnects the wiring himself. However, keep in mind that such a pleasure will not be very cheap. Today, the price of gating 1 meter of route can range from 100 to 500 rubles, depending on the material of the walls.
In addition, a fine for each socket, switch and distribution box will cost you 300 rubles per point. As you can see, the prices are not very cheap and if you add up the amount for the entire house, the price will be quite high, so it is better to try to do the gating yourself.
How to make channels in wall panels
The correct way, which does not contradict technical standards, is as follows:
- A corrugation with a cable inside is laid along the surface of the structure.
- Build up the wall using plaster or drywall.
As a result, the corrugation will be inside the false wall. The disadvantage of this method is the loss of usable area due to an increase in the wall thickness by at least 2.5 cm.
Do-it-yourself wiring replacement
The sequence of actions does not depend on whether the electrical wiring in the apartment is being replaced without grooves or with a groove device. First you need to mark the walls. Using the previously prepared diagram, transfer the locations of boxes, sockets, and switches. If the line changes position, it is also shown on the wall. Having finished the preparations, begin the actual installation:
- electrical products (box, plinth) are fixed on the walls;
- lay the cable;
- close the channel, inspect the quality of execution;
- check the integrity of the insulation by measuring its resistance;
- supply voltage.
To calculate the approximate cost of replacing electrical wiring in a one-room apartment, it is necessary to take into account the costs of purchasing wire and cable products, consumables, fasteners, and electrical products intended directly for installation. Experience shows that installation without gating is often slightly more expensive than without it. The bulk of the costs are spent on electrical installation products. You can only save on labor costs if you install the circuit yourself. Knowing the specifics of reconstructing the electrical network of a particular premises will help determine the exact cost.
The least hassle when repairing electrical wiring in an apartment building will occur when using old channels. The method is suitable for short sections; all you need is a new cable. Procedure:
- find the ends of the wire in the junction box and socket;
- a new one is tied to the old core;
- pulling out one cable, pulling out another;
- connect the terminals.
When laying, we must not forget the basic rule: the position of the lines is only vertical or horizontal. It is forbidden to pull the net at an angle or make indentations. By adhering to the rules, accidents from getting hit by a drill or nail on the wiring are excluded. Recesses for distribution boxes and socket boxes are made using a hammer drill with a special crown. You can get by with a chisel, but then you will have to work hard.
The wiring without gating the walls is ready. Now it is checked for integrity by a tester. Then voltage is applied. After making sure that the electrical network elements are working properly, the channels are sealed and the boxes are finally closed.
Wiring without wall grooves - replacement. Panel house
Wall gating technology in a panel house
The boundaries of the future channel are drawn with a pencil or marker. The optimal width is 2 cm. It is convenient to lay vertical sections along a plumb line.
It is necessary to ensure that the fine does not cross existing electrical lines. If the location of the cables is unknown, they are found using a wiring detector.
Further actions depend on what tool is available.
Hammer
The so-called is fixed in the cartridge. spatula Next, turn on the shock mode and use the hammer drill as a jackhammer, knocking out the solution.
With this method it is difficult to control the depth of the furrow. Therefore, you should proceed with extreme caution and use a limiter. In the absence of such, tape is wrapped around the blade 1 cm from the edge.
Drill and chisel
The work is carried out in the following order:
- A concrete drill is installed in the drill chuck and switched to impact drilling mode.
- A series of holes 1 cm deep are made along the future furrow. You must first install a limiter on the drill.
- Use a chisel or chisel to knock out the solution between the holes.
Hammer and chisel
The most labor-intensive method. The chisel is placed against the wall and, striking the opposite end with a hammer, knocks out the concrete.
Manual work takes a lot of time, but is distinguished by delicacy: the master easily controls the depth of the channel.
Wall chaser
This is the name of a special tool for chiselling walls. It is equipped with 2 discs, the distance between which is adjusted according to the width of the furrow. The immersion depth is also adjustable.
After making the cuts, the remaining material is knocked out using a hammer and chisel. In order to reduce the amount of work, you can move the disks and once again walk the tool along the channel.
The wall chaser allows you to quickly create neat, even furrows. But it is a specialized device that is not advisable to purchase just for once. It is recommended to look for a company or workshop that rents out the device.
Bulgarian
A common alternative to a wall chaser. This device has a wide range of applications, so it can be found in almost any household.
The method of application is the same: with a diamond disc “on stone”, cuts are made at the boundaries of the groove and inside. The remaining concrete is knocked out with a chisel and hammer.
The disadvantage of this method is a large amount of dust.
And if it’s a little, is it possible?
There are opinions that in general it is impossible to groove load-bearing floors, but if you make a small groove that does not affect the reinforcement, then there is nothing wrong with it. Another option is if you already have one groove (it was made by the developer), you can make another one. All wrong.
Load-bearing walls cannot be tapped at all, no matter how deep. If you find an existing groove, it may have already been in the project and therefore is “legitimate”. But this does not give you the right to cut additional grooves.
Grilling in partitions
The maximum depth of the horizontal groove in the septum is limited to 2.5 cm, width - 20 mm, length - 3 m. Vertical grooves are cut without restrictions.
In order to save money and time, it is recommended to make a through hole and install 2 electrical points facing different sides of the partition. This will allow both supply lines to be laid in one hole.
Work order and groove location rules
Grooving walls for wiring begins with drawing up a plan for laying cables. The most convenient way to do this is according to plan:
- We determine where switches and sockets will be located, where to connect wires to connect lighting fixtures (chandeliers, sconces, built-in lamps).
- Having a plan for the location of points to which wiring needs to be laid, we develop routes (about the rules for laying grooves below).
- We transfer the developed plan to the walls. The most convenient way to do this is with a pencil or marker. We work like this: We mark the locations of sockets/switches, lamps.
- From them we draw lines vertically upward that end not far from the corner formed by the ceiling slab.
- Junction (distribution) boxes are installed in these places. They are all connected by a horizontal straight line and go to the electrical cabinet.
After this, you can begin laying and fixing the cable in the grooves. First, the cables must be checked for the integrity of the insulation, and after installation, repeat the test (preferably with a megohmmeter, but you can also take measurements with a tester - ring all the wires not “short” and to “ground”). If everything is in order, you can seal the grooves with mortar. After the solution is laid, the electrical parameters of the cables are checked again.
Rules for laying grooves
Often in a house or apartment it is necessary to hang a mirror, a cabinet, or a picture. When driving a nail, you need to be sure that there are no wires hiding in the wall. Therefore, all wiring must obey certain rules. So that by looking at sockets/switches you can guess where and how the wires go and not get caught in them. Therefore, when planning grooves for laying cables, the following rules must be observed:
- The grooves are laid strictly vertically and horizontally. Sloping areas are possible only on attic floors - areas located near the slopes are made parallel to the slope of the roof. All other grooves are either straight down or strictly horizontal.
- It is necessary to plan so that there is no intersection of grooves.
- When laying at the top, along the ceiling, 15-20 cm are removed from the corner formed by the floor slab and the wall.
- At least 10 cm should be removed from any other corner, door and window opening.
- It is necessary to retreat at least 500 mm from gas, sewer and water pipes.
A little about the dimensions of the wiring grooves. The depth of the groove is usually 20 mm, the width depends on the number of wires, but usually it is also 20-25 mm. Walls for wiring should always be done according to these rules.
Features of reinforced concrete walls
This is what concerns the rules for drawing fines for wiring. They are universal and applicable to all construction materials. There are also features of gating reinforced concrete structures: they contain reinforcement. It is absolutely impossible to cut through it.
In reinforced concrete walls, the steel frame must not be disturbed
The parameters of the groove, if it is necessary to install it in reinforced concrete structures, depend on the depth of the metal frame (it can be found using universal wiring detectors). Sometimes in panel houses it is better to make only a small recess and hide the wiring in a layer of plaster. The second way out is to make open wiring - lay the wires in cable channels or in the form of retro wiring. Wall grooves for wiring in load-bearing walls are only possible with permission. And it can be obtained from the design organization that designed the house.
Additional recommendations
In panel houses, it is necessary, whenever possible, to use standard channels made in the panels specifically for laying wires. They tend to place new sites in the following way:
- In the seams between wall panels and floor slabs.
- In electric baseboards.
- Behind a suspended ceiling and plasterboard paneling on the walls. The profiles for gypsum boards have special holes for wires.
Behind the suspended ceiling and wall cladding made of gypsum plasterboard, the cable is laid in a corrugation attached to the permanent structures with dowel clamps. Here it is allowed to place lines diagonally.
Safety regulations
Before ditching walls for wiring in a panel house, you need to take care to follow safety rules, protecting your respiratory organs, eyes, and skin of your hands from exposure to cement dust and pieces of chipped concrete. You will need:
- protective glasses;
- respirator;
- gloves;
- headphones.
To improve working conditions, during breaks between cutting channels in concrete, the resulting cement dust is removed using a powerful vacuum cleaner, and if possible, the room is ventilated.
Correct installation of wiring in grooves
Safety Notes:
What to do with the old cable? When carrying out repairs, old wiring can remain in the wall, provided that it is completely disconnected from the power source and does not follow the routes of new wiring. If it is not possible to make a complete replacement, and you will partially use the old aluminum wire, you need to take care of the correct connection of the two types of metal. When laying cables in old grooves (even partially), the old cable must be removed. Before starting work, it is necessary to draw up a map of the existing wiring. You may not know where the cable was laid. Then you need to ring the walls with a cable finder. After laying the cable in the grooves, caulking must be done as tightly as possible. If the wall is concrete, the groove is closed with cement
Before installing the drywall sheet, it is important not to leave any air pockets. This is a kind of guarantee against fire in the wiring insulation in the event of a short circuit. Laying lines are only parallel and perpendicular to the ceiling
The exception is the option with a sloping level (attic). Then the groove is laid along the bevel line. The distance from existing and planned utility networks (heating pipes, water supply, gas) is at least half a meter. The distance from the ceiling, corners, window and door openings is 15–20 mm. The depth of gating depends on the cross-section of the wire and the method of installation. Usually a 20 mm recess is sufficient, except for corrugated installations. If a thick layer of plaster is applied to the wall, 3–5 mm from the plane of the rough wall to the wiring is enough. The same applies to the ceiling. The depth may be less. Consider a temporary power supply scheme. If you live in this room and did not have time to complete the replacement of electrical wiring on time, you will no longer be able to connect the old lines. Important! Check the serviceability of the input machines. There should be no bugs or direct connections. Everything is just normal. Communication (telephone, Internet) cables are laid at a distance of at least 50 cm from power cables. Intersection only at right angles.
If desired, you can lay the cable corrugated. This will make it possible to replace the wiring without opening the wall.
The danger of hidden pipes
Many owners of apartments and houses, in order to save available space in their premises, seek to lay pipe communications inside the walls. In this case, the width and depth of the groove is at least 30 mm.
The design of walls made of reinforced concrete slabs requires the presence of internal vertical reinforcing bars, which are located near the surface. Their laying depth depends on the series of the panel house and the brand of slabs used. Therefore, it becomes clear that when making a channel for pipes, the row of the reinforced plane will be disrupted.
When the structure of the wall is damaged under the influence of static and dynamic loads, a shift in the distribution of the mechanical stress field will occur. This will cause concrete deformation with subsequent destruction of the object. Moreover, the time of irreversible structural changes in each case will depend on many technical factors.
Attention! If we assume that the loss of load-bearing capacity was insignificant and is within the safety margin, then cracks may appear along the wall.
If one of the load-bearing supports loses its strength, there is a possibility of partial or complete collapse of the entire structure located above the room. The building becomes hazardous for operation.
When horizontally chipping brick walls, the cohesion of the blocks along the seam or along the body of the bricks is disrupted. In this case, the thinner the wall, the higher the probability of a building collapse.
It is also worth considering a number of the following possible dangers:
- when laying pipes with hot water, condensation may form inside the material, which can cause freezing or the appearance of mold and mildew;
- In the event of a leak, it will take a lot of time to dismantle the finishing; there is a high probability that the apartments located below or the basement will be flooded with water.
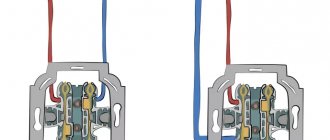
Installation of wires in grooves
There are two main ways to lay groove wires. The first consists of laying cable channels.
That is, first special pipes for the wires are laid in the groove, and only then the wires themselves are laid in them (in the tubes). The method is quite complex and time-consuming.
Video:
To tighten the wires into such a tube, you must use a special wire. You can, of course, lay the wires in a groove without a pipe. This is the second way.
Then the grooves are then secured (after laying the wires) and covered with plaster or putty. It is recommended to install the socket in a special box.