Connecting a private home to the electrical network involves installing a metering panel in which an electricity meter and protective devices will be mounted, an input from the electrical network and an outgoing cable that powers the home wiring will be connected. Often, one of the requirements of the supplying organization that connects to electrical networks is the installation of a metering panel on a support (pole). In this article we will provide readers of the Sam Electric website with basic recommendations on this issue.
Classification of shields
The metering board can have different designs: in the form of a small box designed for installation of a metering device and a protective device, or in the form of a full-fledged cabinet in which several protective devices and other auxiliary elements for the distribution of electricity can be installed (metering and distribution and group metering). distribution boards).
Shields are also classified according to the degree of protection of the housing from the negative effects of moisture and foreign objects, including dust. In this case, the shield is installed on a support (pole), that is, outdoors, so the body of such a shield must have a protection degree of at least IP54. Also, when choosing the housing of the metering and distribution panel, you need to take into account the possibility of its operation in the temperature range of local environmental conditions.
The housing of the metering board for installation outdoors must have a locking device, and on the housing itself there must be a transparent window to allow energy sales representatives to easily take readings.
Fastening elements
You can attach wooden boards to the fence vertically or horizontally.
Vertical arrangement.
Two (in rare cases 3) crossbars, wooden or metal, are welded onto the support, onto which the wooden fence boards will then be strung, respectively.
You can leave large or small gaps between them, or attach them end-to-end.
In the latter case, you need to leave small gaps of 2-3 mm so that the wood has the opportunity to expand when temperature or humidity changes, otherwise the fence will stand on end.
Horizontal arrangement.
The following mounting options may be available:
Regular mount. The two crossbars are placed diagonally and intersect in the middle. Boards are nailed onto the crossed crossbars.
In this case, the boards will be fastened to both the posts and the crossbars. The gap between the boards is allowed arbitrary.
A “barcode” type model (different thicknesses with the same gaps), as an option: two 15 cm boards in a row with a 3 cm gap, and two 50 cm boards with the same gap, after which the order is repeated.
In this case, fence boards are attached directly to the posts. In the middle of the span, if it is too long, you can fasten the boards with a vertical strip (slat).
“Chess”: for example, a 100 mm board with a 60 mm gap is fastened in an even order on one half of the span, and in an odd order on the adjacent half.
You can choose other artistic options. You can make large gaps, or you can attach the boards with an overlap. The main thing to remember is that the closer the boards fit to each other, the higher the material consumption.
Electrical panel design
Electrical panels used to supply power to country houses and cottages have the following components:
· electricity meter;
· zero bus;
· RCD;
· grounding bus;
· several automatic machines (introductory, for high-current and low-current sockets, for lighting devices).
The complete set of the switchboard, as well as its installation, should be entrusted to an experienced electrician. The presence of errors in this case is unacceptable.
How does the work of installing an electrical panel on a pole proceed?
1. Selecting a support for the shield. Installation can be carried out on an existing pole, having received permission for this, or by concreted a new one. The support must be strong, rigid and free from significant mechanical damage.
2. Marking the post. The master performs calculations and lines the surface of the support, checking the size of the metal cabinet.
3. Fixation of the bracket. The structure must wrap around the pole. The shield body is attached to its ends using bolted connections.
4. Installation of DIN rails. They are necessary for attaching neutral and grounding busbars, electric meters and automatic machines.
5. Installation of equipment. The master connects the input cable, installs the circuit breakers, zero and grounding buses, groups of fuses (connected to each other using jumpers), and an RCD.
After completing the installation of the electrical panel, electricity is connected. The master makes a control assessment of the quality of work.
Pit preparation
Digging a hole more than one and a half meters deep is very labor-intensive, so it is better to use a drill for this purpose. The stand is installed in a hole, after which it is filled with soil or crushed stone with obligatory compaction and checking the vertical position using a spirit level or plumb line. If possible, it is better to fill the pipe stand with cement mortar or concrete, but you should give the time, at least one day, necessary for the solution to form.
In parallel with the work of preparing the hole for the rack, you should think about arranging a grounding device. According to the requirements of the Electrical Installation Rules (PUE), the pipe rack and the cabinet mounted on it must be grounded. As a grounding conductor, you can use a conductor inserted vertically into the ground to a depth of at least 1.5 meters. It is difficult to drive a pipe or angle to such a depth, so there will be a need to dig or drill, so it makes sense to combine excavation work to prepare holes for the stand and for the ground electrode.
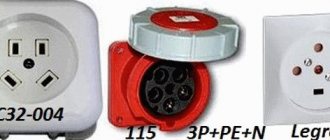
Types of boxes by type of design
Foreign and domestic manufacturers offer boxes of different sizes and capacity. The option is selected depending on the parameters of the equipment that is planned to be placed in the box.
The dimensions of the shield are also selected for the type of meter. Single-phase metering devices are smaller in size than three-phase ones, sometimes two times
There are also certain markings that indicate the type and purpose of the box. Example:
- Control panel is the usual and simplest one;
- ShchVR - a box built deep into the wall;
- ShchRN - distribution-mounted box.
If it is just a metering panel, it usually contains only a meter, an input machine, grounding and neutral buses. Residual current devices, as well as circuit breakers, are installed in the “home” box. But you can combine all this in one box.
The design of the shield can be:
- floor;
- built-in;
- invoice or mounted;
- hidden or open;
- whole or collapsible.
What kind of equipment, in what quantity and with what parameters should be installed in the box - all these points are prescribed in the power supply project for a private house. If there is no such document, you need advice from relevant specialists.
Fastening the board to metal using self-tapping screws
Fastening boards to metal using self-tapping screws is often used during the construction process. In the material presented, we will tell and show how this is done.
- Metallic profile.
- Padding material.
- Wooden block (detail).
- Round washer for wood DIN 440.
- Self-tapping screw with drill without washer DIN 7504 K.
- Wooden cork.
It should be remembered: Wood, when humidity changes, can change its original volume towards decreasing or increasing, so always leave a small gap to compensate for linear changes in size.
Geometric dimensions of the connection.
H – thickness of the wooden workpieceh – depth of the fastening hole L – length of the screw Sp – thickness of the metal profile St – thickness of the wooden plug Ss – thickness of the spacer material Sw – thickness of the metal washer K – height of the screw head D – diameter of the fastening hole d – diameter of the metal washer
Using the formulas we determine:
Mounting hole depth h = Sw + K + St + 2…3 (mm)
Mounting hole diameter D = d + 2…3 (mm)
Self-tapping screw length L = (H - h) + Sw + Ss + Sp + 6...8 (mm)
Help: If (Sp) of the metal profile is large, it is necessary to drill a hole in it with a diameter two millimeters less than the diameter of the self-tapping screw.
Basic criteria for choosing a box
The main task of the consumer is to find a durable, practical box that will withstand long-term service in outdoor conditions. The box should be convenient for installation and operation.
What is important about the design itself? The presence of holes of the appropriate diameter for the wires that come from the support and lead out to the building. It is desirable that these elements have rubber seals and plastic couplings.
The electrical panel must accommodate all necessary outgoing cables and additionally leave space for upgrading or expanding the installation
A convenient detail is the window. It eliminates the need to open the shield to take readings and reduces the frequency of contact of the internal contents with air and moisture. Pay attention to the sealing lugs.
Another important point is the degree of protection from dust and humidity. It is determined by the IP index and the number next to it
The IP20 index means that the box is protected from dust particles larger than 12.5 mm, but is vulnerable to moisture. The IP65 protection degree guarantees complete isolation from these negative factors. The higher the number, the more expensive the design. The optimal option is with a score of 54.
When choosing an electrical panel, you also need to look at the thickness of its walls, operating temperature range, number of doors, and type of lock. The box can be locked with one individual key or equipped with several identical ones.
Advantages and disadvantages of using SIP
These wires allow:
- ensure the required electrical safety class;
- increase network reliability during operation;
- reduce the cost of maintaining the electrical network (up to 80%);
- reduce installation time and reduce labor costs;
- place electrical lines on the walls of buildings;
- reduce losses during electricity transmission (due to low resistance);
- connect objects without disconnecting the main supply line;
- lay and connect lines on your own.
- cost 20-25% more than conventional wires without insulation;
- many energy suppliers are not ready to use SIP (outdated equipment and no tools for installation);
- Only overhead power lines can be laid.
DIY wardrobe
If you have experience and desire, you can arrange a cabinet for an electric meter yourself. You will need to buy the structure itself, arm yourself with the necessary tools and assemble the electrical panel in accordance with the specifics of the home electrical network.
If you come across a cabinet of the required dimensions, but it lacks a window, lugs for seals or some holes, it is permissible to add these elements. But the work must be carried out in accordance with safety regulations and the requirements of regulatory organizations.
All necessary equipment is mounted on DIN rails. Many models of metering devices come with parts that may be useful during installation (stickers, caps, fasteners). The main task is to assemble the devices and connect them correctly with each other.
Models of external meters
If you are buying a new meter and not removing the existing one from the premises, you need a device suitable for use in outdoor conditions.
Please note the following points:
- Induction models are much more sensitive to temperature changes than electronic ones.
- DIN rail is preferable as a mounting method.
- Go to the website of the electricity sales organization and see which models are allowed for installation in Russia.
- For a multi-tariff payment system, choose a device that can take into account more than three tariffs.
Don't miss: Laying tiles on the bathroom floor with your own hands: step-by-step instructions
Brand recognition and the presence of service centers also matter. A trusted manufacturer means quality, maintainability, and loyalty of inspection organizations.
Consider purchasing a counter and a box from the same manufacturer: this will make it easier to fully integrate the devices and the shell
Among the commercially available domestic brands, we can consider the following: INCOTEX, Taipit, Energomera, EKF. Particularly popular is the model “Mercury” 230 AM-03. It has a single tariff and is capable of giving accurate readings at temperatures ranging from -40 to +55 degrees.
Of the foreign manufacturers that have proven themselves well: Swedish-Swiss ABB, French Schneider Electric, Turkish Legrand. But European brands often have operating temperature ranges that do not correspond to Russian realities.
It is advisable to consult with specialists from the service organization in your region. Usually they have a list of devices that have already shown their best performance during operation.
Automatic and heater
An automatic switch is installed in the box before the meter. Its parameters must be calculated from the total power of all consumers - electrical appliances installed or planned in the house and on the street/garage and other domestic buildings.
If, for example, the total power is 25 kW, then a 63 A automatic machine is optimally suitable for this value. In addition to the input one, you need an outgoing line automatic machine, protective for the heater and modem (if any). Using the latter, the readings are automatically transmitted to the processing center. But such a scheme cannot do without a heater.
The heater for the electrical panel can be turned on and off manually or automatically. It is needed to maintain optimal temperature in cold weather - electrical appliances need heat to work without errors
Heaters for electrical panels are made of aluminum, which is coated with non-flammable thermoplastics.
The main functions of the element are to prevent the appearance of condensation, which prevents corrosive changes in current-carrying busbars and contacts and protects devices from high humidity.
Transfer input device and SPD
If the electrical installation includes an autonomous power source, a backup device must be installed after the meter. This device is needed to manually switch consumers from the external network to the generator and back.
The reserve input device eliminates the simultaneous use of two different power sources (external network and generator), which is its task
To protect the installation from lightning strikes, high-voltage surges and fires from these impacts, an SPD (surge protection device) is added to the panel. It is placed after the input circuit breaker and through a separate fuse. An SPD is required if entry into the building is carried out via an airway.
Additionally, a fire protection RCD and a cross-module for distributing electricity to different groups of consumers can be installed in the panel. Sometimes a differential machine is also added to the box.
The socket is one of the optional elements. But if construction is just underway on your site or you need a street connection for some equipment, you can’t do without it. And don’t forget about the zero rail, it combines all the zero cables and is used for connecting cores.
Smallest cross-sections of protective conductors
| Section of phase conductors, mm2 | Minimum cross-section of protective conductors, mm2 |
| S ≤ 16 16 S ≤ 35 S > 35 | S 16 S /2 |
It is allowed, if necessary, to take the cross-section of the protective conductor less than required if it is calculated according to the formula (only for shutdown time ≤ 5 s
— cross-sectional area of the protective conductor, mm2
;
- short circuit current, providing the time to disconnect the damaged circuit by the protective device in accordance with Table. 1.7.1 and 1.7.2 or in no more than 5 s
in accordance with 1.7.79,
A
;
— response time of the protective device, s
;
— coefficient, the value of which depends on the material of the protective conductor, its insulation, initial and final temperatures. k value
for protective conductors under various conditions are given in table. 1.7.6-1.7.9.
If the calculation results in a cross section different from that given in table. 1.7.5, then you should select the nearest larger value, and when obtaining a non-standard cross-section, use conductors of the nearest larger standard cross-section.
The maximum temperature values when determining the cross-section of the protective conductor should not exceed the maximum permissible heating temperatures of the conductors during a short circuit
in accordance with Ch. 1.4, and for electrical installations in explosive areas must comply with GOST 22782.0 “Explosion-proof electrical equipment. General technical requirements and test methods".
1.7.127. In all cases, the cross-section of copper protective conductors that are not part of the cable or laid not in a common shell (pipe, box, on the same tray) with phase conductors must be no less than:
— with mechanical protection;
- in the absence of mechanical protection.
The cross-section of separately laid protective aluminum conductors must be at least 16 mm2
1.7.128. In the TN
To meet the requirements of 1.7.88, it is recommended that neutral protective conductors be laid together or in close proximity to phase conductors.
There are 3 ways to place the structure.
On the roof of a building
Such a stance can also be called a gander. Due to the complexity of installation and the inaccessibility of the cabinet, this option is the least desirable. It is rarely resorted to when there is no opportunity to implement other methods.
Select a counter
All meters that can be installed to account for energy consumption are classified according to three criteria:
- Device design;
- How to connect it;
- Type of measured quantities.
Currently, two types of devices are installed in apartments, private houses and SNT: electronic, which records and controls consumption at differentiated rates, and induction, which makes measurements by rotating the disk.
The second option is not very reliable, so it is gradually being replaced by electronic ones.
Induction and electronic meters
Electronic devices are best suited for outdoor installation, as they are convenient and accurate and do not react to temperature changes. However, operating conditions with a temperature of 40 degrees below zero are the ceiling for them, and in regions where such weather occurs, it is still better to install meters indoors.
How to buy an electronic meter
The most important element for the meter is the seal. After leaving the assembly line and passing quality control, two of them are installed: the first is installed by the quality control inspector, and the second is installed by the state representative authorized to carry out verification.
Places for installing seals
The date of verification is put on the seal and entered into the product passport, so the first thing you need to do when purchasing is to check them.
If it suddenly turns out that there is no verification seal, or there is a date on it that does not correspond to the one in the passport, we do not recommend buying the device. Then you won’t be able to prove anything to anyone.
Verification seal
The date of verification is also important. At the time of purchase of a two-phase meter, it should not exceed two years, and for a three-phase meter this period is completely reduced to one year.
You can find all the necessary data in your passport
Features of wood
The more unreliable link in this duet is the tree. Some of its features (in relation to connections with metal) need to be given attention.
- Since wood can expand with temperature changes and changes in humidity, it is necessary to provide a gap between the elements being connected. This will avoid problems in the future.
- Pre-treatment of material that can become a victim of various pests, mold, moisture or fire is required. In this case, it is better to use compounds that penetrate deep into the wood structure.
The choice of method for connecting dissimilar elements depends on the characteristics of the future structure, as well as on the location where it will be located. For example, for maximum protection of a street structure, it is recommended to lay roofing felt between wooden and metal parts, or coat the wood with bitumen mastic.
Selection of materials for installation
The implementation of the 15 kW specification consists of installing a meter on a pole at the border of the site. The electricity metering circuit is assembled in the switchboard. We were faced with the task of choosing an electrical panel that was protected from atmospheric influences, as well as from corrosion.
Plastic electrical panel for TU 15 kW
Electrical panel for outdoor installation Outdoor plastic electrical panel
In this work, we used an electrical panel made of plastic cross-linked with fiberglass. The advantages of such an electrical panel when performing 15 kW specifications:
- Protection against moisture and dust IP 67
- Corrosion resistance
- Rugged housing
- Ease of installation
- Sealed cable entry
- Low price
- Stylish design
The cable entry is made using sealed leads, which provides protection from moisture.
Circuit breakers were selected based on safety and reliable operation, as well as workmanship. ABB machines meet these parameters.
Meter Mercury 231 AT 01 I, multi-tariff 3-phase for current 60A.
Box for 4 modules for sealing the power supply organization. Mounting wire Pv1 with a diameter of 6 mm.
The cable used is SIP 4 4*16 wire, as well as SIP fittings for its installation. Anchor clamp SIP DN 123 and branch clamp P 645.
The bracket is made of metal perforated profile 40*20. The profile is secured using pins with a diameter of 8 mm.
Connection methods
When organizing the entrance to the house, you may be faced with the fact that the minimum cross-section of the core is 16 mm2, as a result of which difficulties arise when bending when organizing the connection in the input panel. Therefore, when connecting SIP to a house, they organize a transition to another type of cable:
via terminal block;
using nut clamps;
installing a box under the circuit breakers on the descent of the overhead wire, using the terminals of the circuit breaker to clamp the wire.
insert the SIP into the electrical panel and into the input machine;
connect directly to the meter (also through machines).
A disconnected connection to the introductory metering device is very painful for inspectors during the acceptance of the meter and the introductory SIP. Utilities may see “bad intentions” in your actions in the future. Therefore, you first need to find out and agree on the method and location of connection.
Now let's look at each method separately. Remember that the wire through the wall, according to the PUE, must be routed through a piece of metal or other fireproof pipe in order to be able to replace it in the future.
The advantage of connecting SIP to the house through a sealed terminal box is ease and simplicity of installation. The disadvantage is that any connection requires periodic maintenance, and the box is sealed, which will make it impossible to service the terminal.
Nut terminals are a simple and affordable way to transition from a self-supporting insulated conductor to another type of cable. The disadvantages include access to the terminals and wires, as well as poor protection of the junction from the influence of the external environment.
Installation of an automatic transmission on the descent and transition. The terminals on the circuit breaker have the ability to clamp a large cross-section wire; in addition, the circuit breaker can perform a protective function. The disadvantages of connecting an SIP to a machine are described in the first paragraph: the impossibility of servicing the connection and in the event of automatic protection tripping, it is necessary to go up to the box to restore the voltage supply.
Inputting SIP into the switchboard is also one of the available connection options. The main advantage of this option is that the wire is connected in one piece to the input device. The disadvantage is that you need to choose a larger input box so that the loop fits inside and there is an opportunity to install an electric meter with automatic machines right there.
Installation of a box for an input circuit breaker
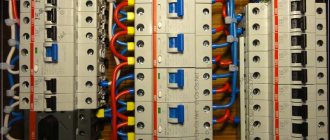
One of the main differences between the metering board of a private house and a multi-storey one in an apartment building is the presence of means of protection against possible unauthorized connections.
All automatic protective equipment and switching devices located in the circuit before the electric energy meter must be closed in boxes (No2 in the diagram) and sealed. So that no one, including yourself, can change the agreed upon scheme and connect bypassing the meter.
Don't miss: Using aluminum blinds for window treatments
That is why, first of all, we install a special box for the input circuit breaker (circuit breaker). Its main feature is the presence of “ears” that allow you to put a seal.
Since the network is three-phase 380V, a three-pole input circuit breaker is used, which means the box must have at least three modules.
Assembly of a 380V metering board with a fire protection RCD for a private house | Grounding system TN-CS
Currently, the metering board of a private house with an RCD installed is basic , providing a minimum acceptable level of security.
On its basis, more complex circuits are built, with the addition of additional protective automation, for example, surge protectors, or modular sockets. In this article we will look at the step-by-step assembly of a metering panel with the installation of a Residual Current Device (RCD) . The assembly is designed for a 3-phase connection of 380V and 15kW of allocated power - standard conditions most often issued in technical specifications for private houses when connecting to electrical networks.
The circuit uses the TN-CS grounding system , as the most common and most often used in modern house construction.
The second most popular grounding system, TT, which is also quite common, has important differences. How to assemble a 380V metering board with an RCD with a TT grounding system - read HERE.
All the most common metering board diagrams, including those with surge protectors or sockets, for different grounding systems are available HERE.
Installation of other devices in the panel
Then the remaining equipment and devices are installed in the electrical panel. The entire assembly is shown in the image below and includes:
1) Steel electrical panel (protection rating IP54 or higher)
2) Box/casing for installing input AV for 3 modules
3) Three-pole circuit breaker 25A
4) Three-phase electric energy meter 380V
5) distribution block for DIN rail
6) Selective RCD from 40A, leakage current 100mA or 300mA
Electrical panel grounding
Very often the question arises about how to ground an electrical panel. In this case, first of all, it is also necessary to be guided by the requirements of the supplying organization.
If there are no requirements, it is necessary to ground the panel taking into account the grounding system of the electrical network. Most consumer networks have a TN-C grounding system, which involves combining the neutral and protective conductors into a PEN conductor along the entire length of the line. The point of separation of this conductor into protective grounding and neutral conductors is carried out in the shield up to the electric meter, and after separation the grounding system is called TN-CS. According to the rules, the PEN conductor has several repeated groundings on supports along the entire length of the line and at the end, in the metering panel itself on a support (pole), it is also grounded.
The PEN conductor is connected to the metal body of the electrical panel, and the panel, in turn, is connected to a pre-installed grounding conductor (grounding circuit) using a grounding conductor. The cross-section of the grounding wire must be no less than the cross-section of the input power cable.
But it is important to consider that grounding home wiring and the PEN conductor in particular can be not only useless, but also dangerous. If the supply line is in unsatisfactory technical condition, and the repeated grounding of the PEN conductor on the supports (poles) of the line does not meet the requirements, then in the event of a rupture of the PEN conductor, a dangerous potential may appear on the body of the grounded switchboard. In this case, an equalizing current will flow through the grounding conductor and the grounding loop, which can lead to damage to the input cable.
Consequently, if the grounding of the supply line does not meet the requirements for the declared grounding system of the electrical network, then it is better to use the combined PEN conductor of the input cable exclusively as the neutral input wire. In this case, you can implement a CT grounding system with your own hands, that is, install an individual grounding circuit of the wiring and ground the metal body of the electrical panel to it.
Finally, we recommend watching a video that clearly shows the installed grounded shield on a pole:
That's all the recommendations we wanted to provide you with. We hope that now you know how to install a metering panel on a support in accordance with the PUE and what requirements apply to this type of work. We hope the information provided was useful and interesting for you!
Options for supplying power cables from power lines
In the process of installing electrical wiring at the dacha, the owner will certainly be faced with the question of how to connect the power supply to the household. The cable line will need to be pulled from the nearest overhead power line support, naturally after obtaining the necessary permits, together with representatives of electrical network services. You can use one of the following options for connecting to a power line support:
- by air;
- underground.
Cable supply to a country house by air
Next, we will consider in detail the advantages, disadvantages, as well as important nuances during installation for each of the options.
Air supply
Supplying power to a country house by air can be done using two methods. The first involves the use of SIP cable, which means self-supporting insulated wire. It stretches directly from the power line to the facade of the house. The second option is accompanied by pre-tensioning of the metal cable from the support of the centralized electrical network to the walls of the house using special hooks or talpers. This allows you to use any cable cables that are subsequently fixed to the cable.
Regardless of the chosen method, you will need to use additional insulating fasteners to secure the conductive wires. The following factors will need to be taken into account:
- If the distance from the power line support to the construction site is more than 25 meters, intermediate support pillars should be installed.
- In winter, the load on the wires will increase due to the accumulation of ice. In this regard, it is necessary to correctly calculate the load-bearing capacity of the cable.
- Ultraviolet radiation contributes to the mechanical destruction of the insulating layer of conductor cores. Therefore, it is necessary to use additional protection in the form of corrugation.
Standards for connecting a house to a power line
Connecting electricity to a country house from a pole via air is carried out in the shortest possible time. You will need to purchase special fasteners and also use a tower. This comes with additional costs.
Power supply underground
When powering a country home with a cable laid underground, it is recommended to adhere to the following rules:
- The wires are laid in a trench at least seventy centimeters deep. Except for the case when the cable line is laid in a protective pipe, and the length from the power line support to the input panel is less than five meters. Under such conditions, it is possible to prepare a trench 50 cm deep.
- The trench must be dug at a distance of at least 60 cm from the foundation. If there is a need to lay a cable through the foundation, then you will need to use an additional pipe in it. It is prohibited to pull conductive conductors directly under the foundation.
- When excavating a trench, the following distances should be maintained from various objects:
- 75 cm - bush plantings;
- 100 cm - sewerage, water supply;
- 200 cm - trees, gas pipeline.
- The cable must be armored and have appropriate insulation protection.
Electricity supply to the house underground
The listed instructions are determined by the requirements of PUE, PTE and SNiP, regardless of the selected cross-section of current-carrying conductors.
The main advantage of this option for connecting a country house to a centralized power supply is the minimal cost of the required material. You can also do without using special equipment. Laying the power cable underground will be difficult if the area is tiled or concrete is poured.
Now recommendations from energy companies
As you understand, energy companies that sell electricity are only interested in one thing, so that their electricity is not stolen, hence the recommendations.
- The electricity metering unit must be installed outdoors, on the facade of the house or on a special stand, including a support;
- The metering unit cabinet must be locked;
- The metering cabinet and rack must be re-grounded;
- The neutral wire is also re-grounded;
- A circuit breaker must be installed in the metering cabinet, after the meter, to protect the supply line;
And now the very desirable advice from energy companies:
- The cabinet should contain an electronic electricity meter with a pulse output and a controller that automatically transmits data to the transformer substation.
- In addition, the cabinet locking device must have a reed switch relay, which also transmits data when this metering cabinet is opened. This is what I described, the desire of all selling companies and regulatory authorities to install an ASKUE system (automatic electricity metering control system) everywhere.
Installation of ASKUE system in a cottage village
Aerated concrete
This material has its own characteristics, so the following fasteners are used for it:
- Special nylon dowels, which can have different configurations, to use them you need to read the recommendations given in the instructions on the package; it will indicate which drill and how deep you need to make the hole and which screws to use for fixing. This is the simplest and fastest option, and the photo below shows some configurations of products of this type.
- For more massive structures, it is recommended to use metal fasteners; they have teeth, which, when tightened, a self-tapping screw of the required diameter diverges and cuts into aerated concrete, ensuring the highest reliability.
- If a wooden staircase is attached to an aerated concrete floor, then additional reinforcement may be necessary using a threaded rod, which goes through and ensures the highest reliability.
conclusions
- If there is a desire and a strong recommendation from the selling organization to “install a meter outside the house,” it is placed in the input device cabinet and taken out of the site.
- The input device cabinet is re-grounded.
- A switching device or fuses are installed before the metering meter.
- After the metering meter, circuit breakers are installed, which are called input circuit breakers;
- As additional protection, SPDs are installed in the water shield installed on the support;
- The VU cabinet with a metering unit must have a window for reading meter readings, and the cabinet door must be locked and sealed.
Sources
- https://RozetkaOnline.ru/podkljuchenie-i-ustanovka/item/219-sborka-shchita-ucheta-380v-s-protivopozharnym-uzo-dlya-chastnogo-doma-sistema-zazemleniya-tn-cs
- https://samelectrik.ru/kak-ustanovit-shhit-ucheta-na-opore.html
- https://profelektrika.ru/uslugi/montazh-avtomatiki/na-stolbakh.html
- https://sovet-ingenera.com/elektrika/schetchiki/ulichnyj-yashhik-dlya-elektroschetchika.html
- https://Proekt-sam.ru/proektsistem/ustanovka-sshetchika-elektroenergii-na-stolb-lep.html
- https://electric-stupino.ru/%D1%83%D1%81%D1%82%D0%B0%D0%BD%D0%BE%D0%B2%D0%BA%D0%B0-%D1% 81%D1%87%D0%B5%D1%82%D1%87%D0%B8%D0%BA%D0%B0-%D0%BD%D0%B0-%D1%81%D1%82%D0% BE%D0%BB%D0%B1%D0%B5/
- https://ehto.ru/elektrika-chastnogo-doma/elektrika-derevyannogo-doma/ustanovka-vvodnogo-shhita-na-opore
[collapse]
Important nuances when attaching corrugated sheets with self-tapping screws:
- We tighten the screws with a washer and a rubber gasket strictly perpendicular to the plane of the sheet.
- According to the characteristics, the screws are suggested to be screwed in at 2500 rpm, but it is difficult to calculate the force by touch. We tighten the screws so as not to crush the rubber washer. A flattened seal will crack over time and will not create a tight seal.
- We do not use rubber seals where monolithic fastening is required.
- In places where unauthorized access to fasteners is possible, we use anti-vandal screws or use self-tapping screws with a notch that prevents arbitrary unscrewing.
Sources
- https://dom-i-remont.info/posts/obshhie-voprosy/kak-prikrepit-dosku-k-metallicheskoj-trube-populyarnye-sposoby/
- https://domunit.ru/zabor-iz-dosok-na-metallicheskix-stolbax.html
- https://tvertorgles.ru/stroitelstvo/kak-zakrepit-derevyannyj-brus-k-metallicheskoj-trube.html
- https://specgidromir.com/kak-prikrepit-brus-k-metallicheskoy-trube/
- https://stroyido.ru/kak-prikrepit-brus-k-metallicheskoj-trube.html
- https://orpro.ru/sposoby-krepleniya-derevyannogo-brusa-k-metallicheskoi-trube-kak/
- https://stroypodskazka.com/kak-krepit-dosku-k-profilnoy-trube/
[collapse]