A socket with a double connector will provide the ability to simultaneously power two devices connected to separate electrical points. In addition, for each of them there is no need to pull a cable, and it is more convenient to use thanks to the grouped arrangement.
You can handle the installation yourself without any problems if you take into account the recommendations we have given. We are ready to share the intricacies of electrical installation work. We will tell you in detail and show you how to connect a double socket, how to arrange a socket for an electrical outlet and ensure safe operation.
The information offered for review is supplemented with step-by-step photo guides, visual illustrations and videos explaining the nuances of installing and connecting power devices.
Types of double sockets
In addition to double sockets, there are also single and multi-socket ones. The type of equipment depends on the number of plug connectors included in it. Regarding the modification of the device, there can be two types:
- Closed - devices that have shutters covering the contact part. Suitable for apartments where children live.
- Open – standard type sockets.
Types of double sockets
Also, the product may or may not have a ground connection. Grounded outlets have grounding pins that protect electronics from power outages.
Equipment without grounding is installed in premises where it is not provided (offices, old residential buildings). In such buildings, connecting a structure with a grounding contact will not make sense, because there will be nothing to connect it to.
In modern houses and high-rise buildings, where grounding is provided, sockets with grounding are installed.
These types of devices are easy to distinguish.
Double sockets with and without grounding
There are designs protected from moisture, as well as dust and dirt.
Other types of structures:
- external;
- hidden (internal);
- standard;
- polar.
Prices for double overhead sockets
Double overhead socket
Device installation features
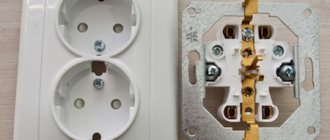
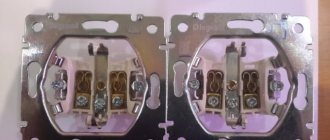
A double socket has one socket box with two separated terminal blocks and one mounting part for wires.
A double socket is a monoblock consisting of two plug connectors, and therefore the diagram for connecting it to one socket box will be somewhat more complicated
If desired, the installation of an electrical point can be done on your own, without resorting to the services of a specialist.
The use of jumpers is allowed only if it is planned to connect not very powerful devices to the electrical points. When connecting powerful equipment, technicians recommend connecting two outlets in parallel, creating a branch of wires for each point.
But in any case, to prevent emergency situations, the total load on this type of outlet should be no more than 16A.
If it is necessary to install a socket with two different socket boxes, the niches for their installation will need to be pre-drilled with an electric drill, while maintaining the same distance between the holes.
Installing a double socket in one socket box
A double socket consists of two plugs, but is installed in one socket. Using certain tools, it is not difficult to install the product yourself; you just need to follow some rules.
Dual Socket Installation Tools
Set of tools required to connect a two-socket socket:
- a screwdriver comparable in size to the screws of the structure;
- a screwdriver coated with a dielectric;
- cable (not required when replacing the product);
- perforator;
- socket;
- knife;
- self-tapping screws;
- wire cutters;
- multimeter
Video - How to replace a single socket with a double one
What do you need to know before connecting a double outlet?
Before proceeding with the installation of the structure, it is necessary to carry out some preliminary measures:
- choosing a location for an outlet;
- cabling;
- installation of a socket box;
- selecting a specific type of outlet.
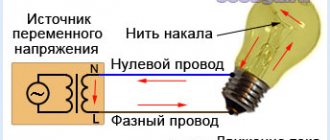
It will be problematic to install the device yourself without an idea of what phase and zero are in electrics. This is the name given to the conductors of electricity in an outlet. Current is supplied through the phase electrical wire, while the zero current is used to protectively ground the structure. In new types of sockets, there is also a third cable - a protective neutral cable, which additionally protects the product and prevents short circuits.
Usually the phase is located on the right, but it is a good idea to check its position. To do this, use a special tester screwdriver or multimeter. Hands must be protected with rubber gloves. When testing, the screwdriver will indicate the location of the phase wire with a light signal. After taking measurements, the line must be de-energized.
In a room where grounding is provided, the outlet also has a grounding contact. “Ground” is connected only to the central terminal of the device.
Visual diagram of socket connection
Prices for double sockets with grounding
Double socket with grounding
Tools and materials
The craftsman will need a Phillips and flathead screwdriver, pliers, a device for stripping the braid (for example, a stationery knife), and a level. If you plan to install the device in a new location, you will need a hammer drill to drill drywall, concrete or wood.
To install the socket, additional materials are required:
- insulating tape;
- socket box;
- self-tapping screws
A cable made of the appropriate material will be needed if you have to make a new outlet rather than replace the old one. If possible, it is recommended to lay wires in corrugation - this is an additional fire safety measure.
Step-by-step process for installing a socket yourself
Removing the old structure
- We de-energize the outlet by turning off all switches in the electrical panel. To make sure that there is no current in the outlet, use a multimeter - an electrical measuring device.
- When starting to disassemble the old structure, the first thing you need to do is unscrew the screws and remove the upper part of the body. The device cover is made of plastic and is usually secured with two screws.
- Under the cover there is an internal socket mechanism, with which further work is carried out.
- The working part of the product is also removed by unscrewing the screws. In this case, you should carefully hold part of the old socket.
- Using a knife, you need to expose the wires by 10 mm.
- The new device also needs to be divided into 2 parts - the base and the cover.
Replacing the socket box
Sometimes it is necessary not only to install the structure, but also to replace the socket box at the point. The need to replace equipment may arise for a number of reasons: the electrical outlet has become cracked, broken, or it turns out that it did not perform its functions properly.
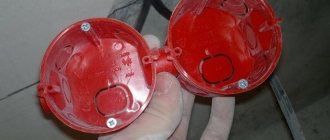
Types of socket boxes
Installing a new device will not cause any particular difficulties. After removing old equipment, a certain procedure must be followed:
- You can remove the old device by unscrewing the screws that secure it to the wall.
- To pull it out of the wall, you need to pry it with a knife (when installing a socket box in a plasterboard wall). If the room has concrete and brick walls, you can remove the mechanism using pliers or a screwdriver.
- Wires are inserted into the new socket box. It is important before purchasing a new device to measure the diameter of the hole or the old design, since the dimensions of the socket boxes may vary.
- To fix the device in the wall, use a gypsum solution, which is prepared according to the instructions included with the product.
- After the solution has dried, you can begin installing the socket.
Installing a new outlet
When working with a double socket, actions are performed by connecting both structural elements to the same wiring line. 6 wires are fed into one of them, and a loop of 3 main wires into the second.
This means that one element of the socket will receive current and subsequently transmit it to another.
Connection diagram
Socket connection diagram
- Before installing a new device, experts advise cutting the ends of the wires again. Using wire cutters, they need to be shortened by about a centimeter, and then the ends should be cleared of insulation.
- If the wire is stranded, it must be twisted more tightly.
- The inside of the new product must be carefully inserted into the socket box so that the socket fits evenly into the hole.
- Pressing the part firmly against the wall, you need to tighten the screws and fix the device in the socket.
Video - How to install a double socket
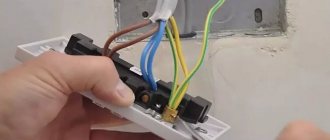
Connecting wires to the socket block
Please note that the wires are connected in a special way (as shown in the diagram below). Failure to follow instructions may result in a short circuit.
Connecting wires to the socket block
When installing the equipment, a neatly rolled wire is first placed in the socket box. It should not come into contact with the spacer legs of the box, otherwise the socket will not work properly.
Important! To ensure safety, the grounding wire must be unbroken, i.e. connect to the elements through a branch wire.
When installing a socket at a new point, it is recommended to check the length of the wire. It should not exceed 20 cm, otherwise it may not fit into the socket box.
How to make grounding?
What to do if there is no grounding in the house? This issue can be resolved in the following ways:
- The ground loop frame, consisting of 3-4 metal corners, should be buried in the ground near the house. For wiring, a copper wire with a cross-section of 1.5 m² is used; in apartment buildings, the cable should be pulled separately to the grounding panels. The twisted copper pair from this shield will extend into the apartment. For a country house building, the wire will have to be pulled directly from the circuit frame.
- The second method is safer; it involves grounding the wiring. Through the distribution panel you need to connect the conductor via the neutral cable and the bolt, after which the wire should be brought into the house.
When connecting a double socket from two single
Sometimes, instead of a paired product, a double version is used, that is, two single devices (separate electrical points) are combined into one socket box. In a double device, the sockets are connected to each other by jumpers.
One socket box has two single sockets
In this case, the wires will be connected in a different way, depending on the presence of grounding:
Connection diagram for two single sockets
When working with a socket mounted in this way, it is not recommended to use powerful electrical appliances.
Check out the diagram and instructions for correctly connecting a socket from a switch from our new article - “How to connect a socket from a switch and vice versa.”
Prices for double waterproof sockets
Double waterproof socket
What is better to choose
As a result, the use of double and triple sockets is an excellent alternative to the need to connect into ordinary carriers, tees and other devices that allow several devices to operate from one point at once.
The only rule that you need to remember without bothering yourself with calculating kilowatts is not to plug several powerful devices, such as heaters, into one outlet or group of outlets. In everyday life it is very difficult to imagine a situation when this might be needed, but if such a need arises, then it is better to choose sockets on different, or better yet opposite, walls.
Basic rules for wiring sockets
The rules for installing sockets and the tools that may be needed in the process are regulated by SNiP (building codes and regulations) and GOST.
When installing electrical wiring and working with sockets, you must familiarize yourself with the Electrical Installation Rules (RUE):
- wiring elements (distribution box, meter, sockets, switches) must be easily accessible;
- sockets are installed at a distance of 50-80 centimeters from the floor. The rule is taken for safety purposes when the premises are flooded;
- if there are gas or electric stoves in the room, as well as heating radiators and pipes, sockets are installed at a distance of 50 centimeters or more from grounded equipment;
- wires to devices are laid from bottom to top;
- sockets in the room are installed at a rate of no more than 1 per 6 square meters. You can connect more sockets only in the kitchen;
- equipment cannot be installed in the toilet;
- The wiring is laid at a distance of 10-15 centimeters from pipes, floor beams and ceilings. The height of the wiring from the floor should be 15-20 cm;
- wiring and connection of wires are carried out inside the distribution box;
- “Ground” and “Zero” are connected to the devices with a bolted connection.
This is all the information you may need when connecting a double socket yourself. Having mastered the necessary rules, anyone can connect a new device with their own hands. Experts recommend that beginners pay special attention to following safety rules, since they will have to work with contacts that conduct current.
You can once again familiarize yourself with the features of the double socket installation process by watching the video:
Preparing the wall
Installing a double socket is a little more complicated than a single socket and depends on the type of equipment:
- To attach a double socket of a non-recessed (open) type, you only need to screw the housing to the wall with screws.
- To attach the housing of a double socket of a recessed or internal type with distribution strips (described above as the first type of socket), you should drill one hole in the wall with a hammer drill with a special attachment (slightly larger than the socket box). If the wall is concrete, you need to use the hammer drilling mode. If the wall is made of brick or plasterboard, then only drilling. It is attached in the same way as a single one in one socket box.
- To attach a double socket with parallel connection (described above as the second type), you must first drill one hole for the first socket. Then attach the device to the wall and mark the drilling location for the second socket using a level. Make a second hole. Next, you need to take a drill with a diameter slightly larger than the diameter of the corrugation for the jumper wires, and drill a hole between the two socket boxes.
Versatility
Nowadays, sockets with two or three seats appear almost everywhere. This is noticeably better than single samples, where tees then need to be inserted. They are reliable, high quality and simply comfortable. At the same time, you do not need to significantly change the electrical wiring, which reduces your costs in the end. Manufacturers have now released closed and open versions onto the market. All you need to do is choose the right overhead double socket.
Most often the situation is as follows. Friends have come to visit you. They all urgently need to charge their tablets, cell phones and laptops. The number of connectors needed is significant. You can't please everyone with single sockets. This is why experts recommend installing a double internal socket everywhere.
When you can’t, but really want to
There are quite a few ways to install a grounded outlet, bypassing the provisions of the PUE. All of them are, to a greater or lesser extent, a violation - to use them or not - this decision is made at your own peril and risk, but in any case you need to be aware of the possible consequences. The fact is that many of these methods are used happily ever after, but sooner or later something happens that is why they were banned. As a result, neglect of electrical safety rules endangers the life or health of not only the owner of such wiring, but also other people living with him in the same house.
Zeroing
This is one of the most common ways to ground an outlet if there is no separate PEN conductor. To make a grounding, you need to connect the working zero to the grounding contact - this is done by installing a jumper in the socket itself. The connection diagram for this method of “protection” is based on the fact that even in old wiring, the working neutral conductor is grounded in the distribution transformer. After short-circuiting the zero and grounding, if a phase appears on the device body, a short circuit will occur and the input circuit breaker will turn off the electricity.
- When a phase “breaks through” the housing, the device, although not for long, is still energized and if at that moment a person touches it, he will receive an electric shock.
- If on the way to the socket the neutral wire in the wiring burns out (a fairly common fault in electrical wiring), then in most cases there will be a phase on the body of the devices. To do this, a single light bulb or power supply of any device that is not turned off is enough. In this case, the circuit breaker does not operate.
Connection to a lightning rod
If there is a lightning rod installed on the roof of the house, and the metal strip that connects it to the grounding passes close to the apartment window, then in this case you can connect to the grounding loop and conduct grounding to all sockets.
An excellent way to solve the problem, as a result of which the apartment will be connected to high-quality grounding. This method has only one drawback - grounding works well until the lightning rod is used for its intended purpose, or more precisely, until lightning strikes it. It is better not to know and not experience from personal experience what voltage will appear on the housings of devices connected to ground.
Grounding through heating pipes or water supply
Another common way to ground an outlet yourself is to strip a piece of water pipe and connect a grounding wire to it. On the one hand, it would seem a logical solution - the pipes in any case have contact with the ground. On the other hand, it is unknown to what extent this contact meets the grounding requirements, and if voltage appears on them, then there is a possibility that the current will not go into the ground, but will hit the person who is holding onto the pipe (washing his face or drawing water from the tap).
An additional disadvantage of this solution is the plastic water supply, which is often laid instead of rusted iron pipes. If the pipes on the fifth floor are metal, and on the third floor they are already plastic, then instead of grounding the pipes will simply be energized.
Principle of operation
Unlike a standard two-gang switch, the pass-through switch does not have an “on” and “off” position. Due to the different principle of operation of the mechanism, each key in it controls a changeover contact, that is, voltage is supplied to one outgoing contact and the power is simultaneously turned off from the other outgoing terminal. Two two-key devices control two different lamps/groups of luminaires from two different locations in the room.
The main feature of installing a pass-through switch with two keys is that one four-wire cable or two two-wire cables are laid between such switches. At the same time, it is enough to lay a two-core cable between single-key pass-through switches.
Dismantling
Replacing single types is considered a minor repair. Now you can easily connect a double type using an outdated socket box. If you change it, there is enough space left for new samples. This will save you from the hassle of installing new wiring, and the interior will not be damaged in any way. It may have to resort to some cosmetic repairs, but this has never been a critical condition for anyone.
Always keep safety in mind first. Turn off the power to the panel. Check that there is no voltage at the outlet. Only use a screwdriver with an indicator.
You can quickly uninstall the old version yourself. Unscrew all fasteners, remove the cover, disconnect the wires and unscrew the fastener tabs. Do the same with the outlet you are going to install.
Final stage
The photo of the double outlets does not show any protruding wires. They are all neatly placed inside. There should be nothing unnecessary under the fastening tabs. Otherwise, the entire insulation system may be damaged. Bend the wires with a regular accordion. The installation is simply perfect in this case.
Then you slowly bury it inside. Everything is fixed using self-tapping screws or fastener tabs. Using a level you can always choose the optimal place. Its auxiliary part is then attached to the installation box.
At the end, all decorative elements must be installed. The socket should lie flush against the wall so that there are no gaps on all sides.
Never forget that although this is a double outlet, the load on it does not exceed the standard 16 Amps. The load cannot be increased 2 twice after connecting. When turning on a variety of electrical appliances, it is worth remembering these data.
Two single sockets are placed side by side if there is no extra space when working according to the European standard. Study the question carefully so that you can do everything yourself later.