"A-Iceberg" - 27 years with you. 5,700,000 repairs completed.
Repair of electrical wiring in an apartment at an affordable price and with a guarantee of quality. The technician will arrive on the same day!
Burnt out electrical wiring is always a big nuisance. In this situation, not only individual rooms, but the entire room may be de-energized. Then the problem must be solved quickly, and not everyone can do this on their own. Experience, knowledge, and special tools are the minimum that will be needed to carry out repair work, so we recommend seeking help from qualified specialists. The service department has everything necessary for this, and our technicians will carry out electrical wiring repairs efficiently and in the shortest possible time. To do this, you need to fill out an application on our website or call 8(495) 213-33-33
and the arrival of the master will not keep you waiting long.
Two types of electrical wiring repair work
I divide electrical wiring work in an apartment into two main types.
- complete replacement of electrical wiring;
- partial repair of electrical wiring.
Complete replacement of electrical wiring
The first, most labor-intensive type of work is a complete replacement of electrical wiring . Typically, such electrical installation work is carried out during a major or at least major renovation of an apartment. Complete replacement of electrical wiring is, of course, the most effective way to get rid of all the problems associated with old electrical wiring. But this method is often not applicable for many. And there can be many reasons for this, starting with its high cost and ending with the physical impossibility of carrying out a major renovation of the apartment. What to do?
Partial electrical wiring repair
Partial repair of the apartment's electrical wiring, without major work, will help solve problems with old electrical wiring This article will talk about repairing old electrical wiring in an apartment. With this article, I plan to begin a series of articles specifically covering electrical wiring repairs without major capital investments, as they say, do-it-yourself, including the third type of electrical wiring work, minor repairs (repair of sockets, switches, etc.)
So, repairing old electrical wiring in an apartment, where to start. Let's start with diagnostics.
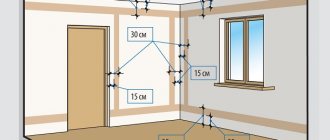
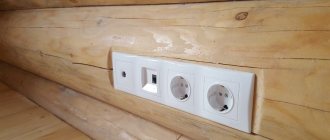
Wall chipping
If the situation is such that it is not possible to lay a cable on bare rough walls or the layer of plaster is too thin, then the walls will have to be tapped. A groove or rectangular recess in the wall for cables is called a groove. It is simple to do, but often very labor-intensive.
You should start with markings. After this, a tool for this job is selected: an angle grinder, a hammer drill or a wall chaser. Due to its high cost, not everyone uses an electric wall chaser, although it is very convenient. Much more often a grinder or a hammer drill is used. Wear safety glasses and clothing when working with these tools. The dust raised may be so thick that you cannot see anything at arm's length. If you don’t have a power tool, you will have to chisel and hammer. This is very labor-intensive, and besides, the excavation will be uneven, and there is a danger that part of the plaster will fall off.
Groove in a concrete wall
The depth of the groove must be sufficient for the cable to be hidden in it with a reserve. Please note that in this case the socket box is usually installed in the wall. It is more careful and easier to work with an angle grinder, especially if there are several wires in the groove. For cutting plaster or brick, replaceable stone discs are used; for hard reinforced concrete, diamond bits are used. Along the entire length of the cable, 2 parallel lines are cut to a sufficient depth to hide the wire, and another couple of millimeters are taken in reserve (you still need to hide the fasteners).
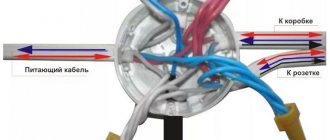
After the cable is fixed in the groove, it is covered with plaster - cement or gypsum
The width of the groove depends on the number of wires. It must be remembered that they should be located at a distance of 3–5 mm from each other. Having cut through these 2 lines, using a regular chisel or hammer drill, knock down the jumper between them - and the groove is ready. Now you can install the cable into it. The wire is secured with the same hooks. Now the groove can be covered with plaster. Before doing this, you need to check again that everything is in place and that the ends of the wires are extended to a sufficient length.
After the wiring is laid in the groove and plastered, you can proceed to other types of finishing
Before plastering, you need to clean the dust from the grooves with a brush and cover the recess with a primer. After this, dilute the required amount of plaster mixture and apply it with a spatula, pressing the grooves inside. Then, use a wide spatula to remove excess plaster and leave the mixture to dry for about a day. In the places where the junction boxes will be located, the wires remain hanging in bundles.
The ends of the wires are twisted together and insulated
The boxes are installed after the grooves are sealed, since it is not always clear at what depth to install them.
Determine what kind of electrical wiring you have now
Important! Before describing the work, I must warn that any work related to electricity should be carried out only when the power supply to the apartment is turned off.
So where to start. Of course, from the beginning, namely from the place where the power supply to the apartment comes from. Depending on the type of house, this may be a floor switchboard or a separate one, an apartment switchboard or a symbiosis of floor and apartment switchboards.
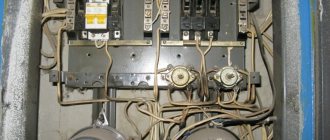
To begin with, let’s open the floor panel and find the circuit breakers that are “responsible” for your apartment. There must be one device that turns off all power to the apartment. This is an introductory device. It could be a circuit breaker, then it is located on the left in the row of your machines, or a switch, then it is located separately at the top or bottom, although there may be options.
Photos of old floor boards
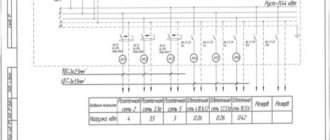
You will not be able to replace the input device yourself, since you need to turn off the power supply to the entire (or part) of the entrance, and this can only be done by an employee of the operating organization. But you can see the nominal value of the introductory machine. Watch and record.
Let's move on. Let's see how many circuit breakers are installed for your apartment. There should be at least two of them. Three with electric stove. One machine is lighting. Second automatic socket. The third automatic electric stove. If you have more machines, then you need to determine which machines are turned off.
Note : The circuit breaker is designed to protect electrical wiring from overvoltage, short circuit and simple communication (turning on and off the power supply).
To determine which machines are being turned off, turn on the lights in the apartment, plug in the lighting fixtures into the sockets and simply turn off the circuit breakers and see what will turn off in the apartment when the machines are turned off sequentially. Do not use complex household appliances for such diagnostics to avoid their damage if the machine is abruptly turned off.
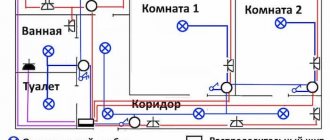
Let's analyze the situation and determine what to do next. So, after such a simple diagnosis, you have a diagram of your old electrical wiring.
It may well look like this:
We will determine the stages of electrical wiring repair.
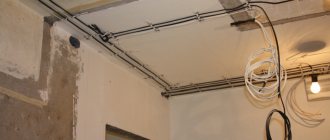
Hidden cable routing in partitions, floors and ceilings
If the room has a suspended ceiling made of plasterboard with a metal frame, then cable installation is greatly simplified. There is no need to groove the walls horizontally; all wires are hidden under drywall, brought to the walls and dropped vertically down to the required electrical points.
Laying wiring in a plasterboard ceiling
You can avoid drilling holes for junction boxes by placing them there. The only “but” is that in this case, plastic hatches will have to be inserted into the drywall opposite the boxes. By installing such a hatch, you can at any time gain access to electrical equipment located behind a partition or suspended ceiling. Lighting wires can be attached to the ceiling with clamps or hangers.
The pipes located below will later be under the floor
A good option is when the wiring is enclosed in plastic pipes attached to the ceiling using clips. This increases the fire safety of the plasterboard structure. If desired, the cable can be laid in the floor. Floors made of wood and gypsum fiber boards are well suited for this installation method.
| Hidden cable laying in a corrugated pipe: the depth of the groove must be such that there is at least 5 mm from the corrugation to the edge of the recess | The pipe is secured in the groove using ordinary nails or pressed by tightening screws (if the wall material allows) |
| Before covering the groove with plaster, it is necessary to moisten the groove with water and treat it with a primer | The groove is covered with plaster using a spatula |
| After applying the plaster, wait 10 minutes for it to dry. | Remove excess mixture with a spatula, leveling the surface |
In the first case, holes are cut or drilled in the joists, into which plastic pipes are inserted, and a cable passes inside them. In the second case, the pipes are simply laid on the floor, attached with staples to it and covered with expanded clay or other filler, on top of which the floor covering is laid.
Hidden installation option: wiring is embedded in a concrete screed
There is an option when the wiring is hidden in pipes and filled with cement mortar - placed under the screed. However, this is not recommended, especially if the layer of solution above the pipe is quite thin.
Attention! If the wiring is hidden in partitions, behind cladding or in the floor, then wires cannot be connected in these places. This can only be done in boxes, outside the boundaries of hidden wiring.
Combined detectors
This group of devices for searching for a break in wiring hidden in the wall requires special attention. First of all, because they have a rather high price due to their advanced functionality. Combination detectors can use several different methods to detect network faults.
Multi-detector for searching hidden wiring
This makes it possible not only to determine the location of the break with high accuracy, but even to find out the depth of the cable in the wall or the magnitude of the network voltage. Some multi-detectors easily detect non-ferrous metal, plastic or wood that is impossible to see with the naked eye.
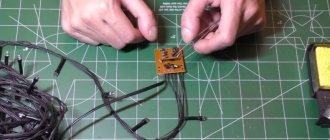
How to check switches and sockets
To identify and fix the problem in this case, you will need an indicator screwdriver. With its help, it is easy to understand which wire is broken: “phase” or “zero”.
Indicator screwdriver
When inspecting the contacts in this way and the power supply is turned on, only one cable is energized in the sockets - in the off position. In switches this will be one (in the “off” position) or three wires - when it is on.
In any case, if the phase is present, this means that the zero is broken. Next, proceed to inspect the wiring and find the break point using a special device - a tester.
Tester
First, the electricity is turned off, and then notches are made on the cables at a certain interval - about a meter. By measuring the resistance between these points, you will see that the values will be approximately the same. Finding a big difference or almost complete absence of resistance will mean that you have found a break in the wiring in a certain area.
Now you will have to divide the cable into two more smaller sections and check them with a device. And so on until you establish the location of the break with high accuracy. Although it often happens that at a certain moment it is visible even with the naked eye.
When the search ends and the fault is eliminated, carefully insulate the exposed wires. That's it, the work is completed in a short time - which is what you wanted.
Installation of electrical wiring in a concrete screed
| Step one: marking electrical points (it is necessary to take into account the thickness of the future screed so that the sockets are at the required distance from the floor) | Step two: the length of the pipe sections is measured and the cable is pulled into them |
| Step three: after the pipes are laid on the floor, they are covered with reinforcing mesh and attached to this layer with clamps | Step four: cement mortar is poured and the screed is leveled |
| Step five: the pipe in the grooves and the boxes are covered with plaster | Step six: install sockets |
Wires are often hidden in partitions or behind plasterboard structures. The most common mistake is installing them without protective shells. Holes are simply punched in metal profiles.
A cable laid behind a plasterboard lining is a clear violation: the wiring was laid without protective plastic pipes
Before sewing drywall, the wires are pulled through them. This is a gross violation of all norms. The edges of the profile can damage the wiring insulation, and the current will flow to the metal parts of the structure. In addition, it is almost impossible to remove such a wire for replacement or repair. It will get entangled in burrs of profiles and sharp edges of hangers.
The correct option for laying a cable through a plasterboard partition: the conductors are enclosed in a corrugated pipe
There is a simple solution to this issue - the cables are enclosed in plastic pipes or boxes, and they, in turn, are pushed into the holes in the profile. When laying lighting wires, voids in ceiling tiles are often used. They have been there since the floor was made.
Laying cables in a plasterboard partition
Hiding wires in them is a great idea because no gating is required and the wires are well protected. Two holes are punched in the ceiling: one near the wall, the second in the place where the lamp will be located. Using a stiff wire probe, the wire is pulled through a channel in the slab.
Laying pipes through insulation in plasterboard partitions: in the picture on the left - mineral wool, it is easily compressed and does not require additional work; on the right is foam plastic, in which channels are cut to accommodate pipes and cables before laying it in place
These articles may also be of interest to you:
- Wire routing
- Installation of open electrical wiring
- Soldering copper pipes. Soldering restoration
- Crane seat repair
What to look for when purchasing
In electrical goods stores you will find a lot of different models of detectors, differing in both functionality and price. The simplest of them do not give an idea of the location of the break as accurately as more expensive devices, but this is enough for successful troubleshooting and troubleshooting with your own hands.
Well, the best and most advanced detector models can easily distinguish energized wiring from de-energized wiring, and can also indicate the presence of certain materials in the wall. It all depends on the technologies used in a particular device.
Do-it-yourself wiring in an apartment: diagrams on how to do the wiring yourself
If, for example, an area is calculated where it is likely that a computer (750 W), a heater (1.5 kW), a table lamp 100 W will work simultaneously, and an electric kettle will be turned on periodically (another 1.75 kW), then we get a total power consumption reaching 4.1 kilowatts at peak load. Substituting this value into the formula, we get a consumption current of 18.6 A.
First. A wire that is too small may not fully cope with its task. It will begin to heat up, which over time will lead to damage to the insulation, failure of contacts on the terminals or in the twists. This is a direct path to a short circuit, that is, the cause of electric shock or fire.
Electrical installation work price list
- Main lines of force
- Price of electrics in the kitchen
| Equipment | GOST cable | Connection price |
| Power shield | VVG ng-LS 3x6 | 1500 rubles |
| Hob | VVG ng-LS 3x4 | 1500 rubles |
| Oven | VVG ng-LS 3x4 | 1500 rubles |
| Dishwasher | VVG ng-LS 3x2.5 | 1000 rubles |
| Refrigerator, freezer | 3x2.5 | 1000 rubles |
| Sockets | 3x2.5 | 500 rubles |
| Electric hood | 3x2.5 | 1000 rubles |
| Water leakage protection | 3x2.5 | 1000 rubles |
| Warm floor | 3x2.5 | 1500 rubles |
| Light | 3x1.5 | 500 rubles |
Types of hidden wiring detectors
They are quite simply designed, but reliable and widely used.
Their disadvantage is that they only work with live wiring. In addition, electrostatic detectors may give incorrect readings if the wall is metal or the room has high humidity. For example, in a bathhouse or metal garage they are practically useless.