Intercoms are one of the types of access control systems.
Older people may have seen intercoms for the first time in foreign films of the 70s. The characters in the paintings approached the entrances of houses, selected a button with the name of the person they needed, pressed it, and talked with the resident. With his permission, the front door opened and people entered the building. In the 90s, foreign wonders turned into a familiar attribute of our lives. First, apartment buildings, and then private households began to be equipped with intercom systems. The use of intercoms has increased the level of security for citizens. In this material we will try to introduce the reader to the structure of intercoms, the principle of operation and the purpose of its main components.
Intercom device, operating principle
Types of intercoms:
- digital - a two-wire line transmitting a signal. Apartment numbers (addressing of the call) are fixed by jumpers in the subscribers' handsets, which are all connected to one line stretched along the riser (cable channel in the shaft) of the house with taps for each room. The tubes are connected in parallel. The system is much easier to repair and install, since there are fewer wires: it is easier to detect the break point, and so on. But it is more difficult to repair if the electronic board is faulty. Minus: a break in the main line will lead to a malfunction of all subscriber handsets;
- coordinate (coordinate matrix, analog). Popular for apartment buildings (MCD). The signal is transmitted by a switch, from which a loop of wires goes to the objects. For each apartment there are separate cores, the system cable is multi-core (the number of wires depends on the number of objects served). A more reliable system, but more difficult to repair, especially when replacing wires.
All intercoms of access systems, be they the most popular brands Cyfral, Eltis, Vizit or any others, are based on a similar principle and design.
Device:
- call panel with control unit, keyboard, speaker, microphone, indicator showing apartment number, reader for electronic (magnetic) key;
- power supplies: for the system, for subscriber panels (in apartments);
- the coordinated intercom system includes a switch - a device responsible for delivering the signal to the selected user;
- routing of wires in protected (corrugated) sleeves, cable channels;
- in the subscriber’s apartment: a speaking handset or a unit with access control buttons (door unlocking) for communication;
- Repairing a video intercom with your own hands becomes more complicated if the camera and monitor microcircuits have failed, but for other points the repair principles are standard: in the handset, power supplies, switches, microswitches, contacts, holders, wiring are checked, the presence of voltage, the absence of breaks, breakdowns, short circuits;
What is the difference between Digital models?
Thanks to expanded production and the manufacturer’s constant attention to consumer needs, the Digital series of tubes has a wide range. On sale you can choose equipment that varies in size, shape, design and functionality.
There are devices that allow you to install not one, but two tubes in an apartment, spaced in different rooms.
Exclusive models that are valued by extraordinary people can be made to order.
The equipment is manufactured to operate in audio or video communication mode.
The production of Cifral pipes is presented in a video by the owner of NTP Cifral LLC.
Like any equipment, the tube can break. This is a typical equipment drawback of intercoms of any system.
However, the Cifral tube is not that difficult to restore without the involvement of outside specialists.
How does an intercom work?
The principle of operation of the coordinate system of negotiations and admission of an apartment building:
- Dialing a number or pressing the buttons on the external panel. The signal goes through a control unit (CU) common to the entrance, the switch goes to the subscriber’s handset.
- A signal is heard in the room, the user negotiates via a handset or intercom, and presses the input unlock key on it.
The switch in the CU coordinate systems recognizes the room number and sends the signal specifically to the selected subscriber. The latter answers the call, and if he decides to open the door, he makes a response manipulation - by pressing a button on the block (handset) on his own, which unlocks the lock (usually magnetic) on the door through the control unit. The digital system has the same principle, but it is not the switch that is responsible for signal delivery, but the microcircuit in the main control unit.
Knowledge about the structure and operation of the intercom will help you understand which parts may break. Most often this is:
- panels (calling, subscriber);
- wires (incorrect connection, short circuit, loose contacts, break);
- Power supplies.
Possibility of use
An intercom is a device whose main purpose is to control and provide access to premises, be it a private cottage, an apartment in a multi-storey building or an office. Intercom users gain access to their premises using a PIN code or a special key, and visitors can only enter with the owner's permission. Identification of the visitor is carried out through two-way communication between the visitor and the owner and remote opening of the door lock (if such a function is available). Two-way communication is carried out using a special intercom made in the form of a telephone handset. In addition to the main function, providing duplex or simplex communication, the handset can be equipped with a button for remotely opening the front door.
Despite the fact that the operation of an intercom is extremely simple and the device has a minimum number of functions, an intercom is the most affordable means of solving numerous problems of protecting any premises.
Where to buy an intercom
You can resolve the issue as quickly as possible in the nearest specialized store. The optimal option, in terms of price-quality ratio, remains purchasing from the AliExpress online store. Mandatory long waits for parcels from China are a thing of the past, because now many goods are in intermediate warehouses in destination countries: for example, when ordering, you can select the “Delivery from the Russian Federation” option:
| Video intercom, 1080P, Wifi for smart home | Smart Doorbell with Camera, 1080P, Wi-Fi | IP video intercom, 4G, call, Wi-Fi, camera, alarm, SD card |
| Video intercom system with Wi-Fi and 9-inch screen | IP video intercom, 1080P, cameras, motion sensor | Homefong video intercom, wired, with lock |
Call panel
Here we have a device that is reliably protected from water and dust. The front panel contains a call key, a microphone and a loudspeaker speaker. The design features of such devices require installation on a wall or directly in the front door.
The calling panel body is made of plastic or metal. There are also more advanced ones - anti-vandal solutions with an increased level of protection.
What can you fix in an intercom yourself, types of breakdowns
If the MKD intercom, controlled by the management company, housing office, is faulty, then for repairing with your own hands only what is located near and inside the user’s apartment is available, namely: the supply of wires (contacts, terminals), the receiving unit (intercom control tube), its power supply. Sometimes it is possible to inspect and repair a switch with a power supply if it is on a staircase, indoors.
A subscriber in an apartment building does not have access to the remaining parts - the common control and power unit, wiring, cable ducts, panels on the entrance doors and its elements - or manipulations with them are not desirable, since they may affect the interests of all residents.
In private households, the entire system is available for self-repair and dismantling, and it is also simpler, since it is usually digital and covers few subscribers. You can disassemble not only the internal unit, but also the external panel, check and replace any wires.
All breakdowns can be divided into the following groups:
- relating only to mechanics;
- malfunctions of the electrical and electromechanical parts.
What to look for when choosing
Before choosing a handset for an intercom, you should consider the main types of similar devices that are on the market and choose a compatible option for the intercom in your home. Particular attention should be paid to the following characteristics:
- Internal structure and installation method - according to the design parameters, the tubes are stationary, attached to the wall, and portable - wireless.
- The material of the body assembly - this affects the durability and reliability of the equipment during operation.
- Device type – handsets can be analog or digital.
- Build quality – affects the longevity of the system.
Construction and breakdown of the intercom handset
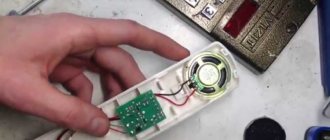
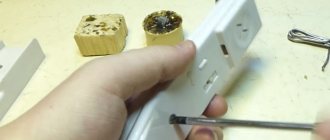
Let us separately consider the design of a device for negotiating and unlocking a lock - block or handset - located at the subscriber's disposal. This element is the easiest to repair and is always accessible. Intercom handsets are interchangeable: if the part cannot be repaired, you can buy a new one for a small price.
Installation of a subscriber intercom handset:
- small electronic board;
- tact button (microswitch, “mikrik”) for the unlock button;
- contacts (terminals), wires;
- a reed switch or mechanical assembly connected to the holder for closing/closing the contacts when removing/fixing the tube;
- microphone and speaker;
- plastic case with buttons, holder.
Usually the tact button, reed switch fails, and the contacts also fall off. The negotiation unit is the elements that break most often; first of all, you need to check them. The remaining parts fail less frequently, since they are better protected (for example, the external panel is standard vandal-proof) and are in a stationary state.
Mechanical faults of the intercom handset
As a rule, the intercom handset has plastic body parts; the weak point of most models is the holder, the tab that presses and snaps off when removing/fixing the part with the speaker and microphone.
In some models of intercoms at home, the holder only has a “hook” function for fixing the handset on the base: you must additionally press the button on the body to start negotiations, that is, removing/not removing does not affect the contact in any way.
For other product options, the tongue interacts with an additional element (with a mechanical or reed switch), turning the circuit on/off. It is then that the failure of the holder directly affects the functionality of the system.
If there is no connection, you need to inspect the intercom. If turning on the device is tied to the mechanics of the holder that closes the communication chain, and it is broken, then the reason is in this unit. It can be glued or the plastic can be fused at the fracture site with a heated soldering iron. In this case, soldering must be done carefully so as not to damage the mechanics, otherwise the system will be constantly turned off or on. You can solder other plastic elements in the same way.
Electrical faults in the intercom handset
There is a large group of problems that directly relate to the electronic and electrical aspects of the intercom. The main types of breakdowns: breaks, short circuits of wires, contacts, as well as incorrect polarity, damage to power supplies, speakers, microswitches.
Lack of communication due to broken microswitches
A sign of a problem - when you pick up the handset, there is no connection with the caller. The possibility of mechanical failure of the holder is discussed above. But the microswitch can also be a reed switch - this is a small bulb with contacts that close/close when a magnetized element approaches.
If there are no visible mechanical damages, then you can connect two wires (the part itself does not need to be soldered) before and after the reed switch and close them directly, thus checking whether the connection has appeared. However, any switches are checked in the same way. To repair it, you need to buy and solder a new part.
Door unlock button does not work
The essence of the malfunction in more detail: call, call, the subscriber negotiates, presses the open key, but the entrance (lock) remains blocked or several presses are required.
The reason is the microswitch (SB1 or 2, tact button). To repair, you need to remove the cover and inspect the mounting location and this “microphone”. If the part is located separately from the board, then check how the contacts are soldered - they can come off, but if they hold securely, then most likely the clock button itself has broken.
Separately, it must be said that the “micrik” is a very unreliable part; over time, its contacts oxidize or it itself fails. This element, like the reed switch, is easy to replace: it is cheap and sold in all radio stores. Resoldering will require some experience, but the manipulation will be possible for those who have even minimal skills in handling a soldering iron.
The diagnostic process is standard: solder the contacts of any switch, for example, from a table lamp, before and after the “micrik” and, by turning it on/off, check the functionality of the tube. You can simply use wires and open/close them. If unlocking occurs, then the problem was in the tact button.
No voice communication, reset when pressing a button
Description of the problem: when the button grants access, instead of unlocking the lock, the call is reset, the entrance remains closed. You need to check if there is a break in the wires or loose contacts near the speakers. The remaining wires are soldered. It is important to observe polarity.
There are also cases where there is no connection, but the lock unlocks when a button is pressed. The problem is associated with a break or short circuit in the speaker winding. Such a malfunction cannot be detected visually - you need to use a multimeter.
Some models, for example, the domestic Digital KL-2, are equipped with a part that turns off the speaker (sound indication) when calling. The option is practical if the subscriber does not want to be disturbed. In models with the described function, due to wear and contamination of the contacts, the connection sometimes resets instead of unlocking the door.
The call is dropped when the handset is picked up or when the number is dialed
If the device is in good working order, a reset occurs when the intercom part is placed on the base without pressing the open key, and if it breaks down, the reset occurs when it is lifted. The circuit is turned off (opened) by a switch - mechanical (under the tongue holder) or reed switch. The solution to the problem is to replace the microswitch, check and solder its lagging contacts.
A breakdown occurs when there is no connection, the call is dropped immediately or while dialing a number on the outdoor unit, often appears after installing an intercom indoors. The reason is the mixed up position of “+” and “–”. This is especially true when the main wire going into the room is used in the form of an ordinary telephone “noodle” with ends indistinguishable from each other.
The contact points connecting the base to the main line are standardly marked “+” and “−”, but problems sometimes arise with the difference in wires, so it is recommended to mark them additionally. Failure to comply with the polarity results in a reset instead of an audible signal. The solution to the problem is to “reverse the polarity”, swap the wiring in the handset connecting it to the outside calling panel.
Hearing defects (weak sound, interference)
First of all, pay attention to the speaker and microphone. First, they check the basic points - contacts, soldering. You can easily tug on the cord or connector - if there is significant interference and a periodic increase/decrease in volume, then the contacts are probably loose.
As a rule, there is a trimming resistor on the board (some products do not have it, for example, Digital KL-2), which adjusts the balance of the microphone and speaker. Before touching it, you need to remember (take a photo with your smartphone) the position of the slider. Then you need to move the regulator in different directions and return it to how it was. Perhaps dust or dirt has come into contact - movements will eliminate these shortcomings.
Another factor in the malfunction is the capacitors on the chip, but replacing them will require the skills of a radio amateur.
Intercom power supply failure
Symptom of a malfunction of the power supply unit of the house communication and access system:
- the call panel produces a too weak (quiet) sound signal;
- There is no tonal or light signal at all (the diodes do not light up);
- The electromagnetic or electromechanical lock does not work well or does not work at all.
As standard, the system has two channels for 12 and 18 V from the power supply: for the electronic part and the lock. In this case, if everything is in order with the contacts and wires, then pay attention to the fuses and change them. Such repairs will require the experience of a radio amateur and correctly selected new parts, so specialists are often called in.
Breaks in the power supply cable are checked with a multimeter: the tester is tested for continuity, serviceability is indicated by a sound signal (if the tester has such an option) and “0” on the display, if “1” and the device does not beep, there is a break.
Video intercom breakdown
Repairing a video intercom is complicated by the presence of a lens and a monitor, but in general the principles of repair are as described above: analysis of the condition and position of contacts, microswitches, and so on. To check the functionality of the video camera, it must be dismantled and connected directly to the internal panel. If the device works, then the cause of the problem is most likely a broken wire or contact. If all power and communication cables are checked, but there is no video, the problem is in the device’s microcircuits, and then repair is only available to users with experience in electronics repair.
The “call” goes through (the bell rings), but when the handset is picked up, the “call” is dropped.
This reason is the switch “ SA3
”, which the “tongue” presses on when you put the handset back in place. This is exactly the switch that needs to be pressed to start a conversation when the “tongue” of the handset sinks. It can also be the reason when the “call” is dropped.
It can be cured by pouring alcohol inside and clicking the key several dozen times. But this doesn't last long. At one time I disassembled and cleaned these switches, and let me tell you, it didn’t last long. Out of ten cases, seven started to work, but after some time they failed again. Therefore, I advise you to replace this switch.
It has six legs, and therefore for an untrained user it will not be easy to desolder this switch, but there is no need to despair, everything is done for the first time, and you are no exception.
Take a screwdriver and insert it between the board and the bottom of the switch housing, for example, on the right side. Now, lifting the right side with a screwdriver, use a soldering iron to heat up all three of its side legs.
To do this, we lean the tip between any side and central legs. As soon as the solder has melted, we immediately transfer the tip to the other outer leg, while the central leg constantly warms up along with the outer ones. That is, it turns out that the switch legs heat up in pairs, preventing the solder from hardening. This should be done until you feel that the soldered side has moved slightly upward.
Now we go to the right side of the switch, and thus, melting the solder, we try to lift it up. Don't try to lift too much at once. Do it gradually.
When the switch is raised above the board, but not yet completely soldered, you can already lift it with your fingers. Also melt the solder on the right side, lifting it, then move to the left, and so on until the switch is in your hands. All this takes me about a minute. If there is any solder left in the holes, remove it. You insert the switch, solder it, assemble the tube, and connect it.
How to diagnose and identify a breakdown of the intercom
Something as simple as inspecting the contacts and wires of your apartment intercom can solve the problem. The case can be easily disassembled - to do this, unscrew 2-4 bolts.
If there is no response to pressing the buttons on the magnetic key applied to the reader, it is necessary to analyze the power supply. The described measure is especially relevant when there have previously been short failures: somewhere there was a short circuit, a weakening of the core or contact, which progressed over time.
Checking the tube if there is access to the shield
The switch wire and itself are one of the most sensitive areas. If there is access, inspect it and the terminals, check for open circuits and short circuits. A simple diagnostic method: a working tube is connected there to the line with a short wire. If there is voltage, the handset will make a characteristic click, like when you press the door unlock button. If there is no contact, there is no sound or it is very weak. If the handset works, you need to look for a break or short circuit in the segment from the panel to the apartment.
In more detail, how to check the wire of the intercom handset to the panel (switching unit):
- Disconnect the handset from the intercom, twist the two wires going to it.
- In the junction box, disconnect the second end of the wire. Check it with a multimeter (“continuity test”).
- To clarify the location of the break, strip the insulation, connect the wires in different places and close the ends of the line connected to the junction box, making sure that the rest of the line is intact. Using this method we will find the exact location of the break.
Checking with a multimeter
The consequence of incorrect switching or damaged connections is interruptions in communication between the external unit on the door and the subscriber's intercom. Reasons: short circuit of the bus to the panel body, incorrect connection of the tube in the switch to the “ones” and “tens” terminals. The repair will consist of replacing the specified unit, finding breakdown points, replacing wires, and correctly changing their position.
If the system is coordinated, on the switch a tester (the function of an ohmmeter for measuring resistance) analyzes the buses “E”, “D” (responsible for “units”, “tens”).
Each switch pair is analyzed for each subscriber unit. Multimeter readings:
- the standard resistance of a working device is 600–800 Ohms in one direction, in the other (swap the probes) - tends to infinity (there is no finite value);
- if the tester shows 1200–1300 Ohms, it means there is a break or a faulty tube;
- 0–260 Ohm - short circuit.
Repair consists of changing the polarity, replacing the wire, inspecting, and re-soldering the contacts.
The tube (for example, model KL-2) should have a resistance of about 140 Ohms, and the speaker should have a resistance of 40 Ohms. The line voltage is usually from 1.5 to 2 V. If the intercom displays the message “lin”, you can check the line yourself. You need to unscrew part of the tube holder, measure the readings in dial mode if the voltage is zero or 0.03; 0.4; 0.6 - line is faulty.
Useful resources from the manufacturer
When I needed a circuit diagram for the Digital intercom handset of the KL-2 series, I had to spend quite a lot of effort and energy searching for it. Now the situation has changed.
The Cifral company has published on its website diagrams of all brands of intercom systems that it has released for sale. Their number approaches two hundred.
All these documents are in *.pdf format. You can download them from this link. For the convenience of subsequent work, I recommend printing them on paper.
If you still have questions, ask them in the comments. You will definitely receive an answer.
Video intercoms
In addition to simple analog and digital devices, the market offers video intercoms. It is very convenient to have a conversation with visitors and at the same time see what is happening behind the door. In addition to the basic parts that we described above, such devices are equipped with additional elements: a display or a separate monitor for the owner and a camera on the call panel.
The visitor communicates with the subscriber as in the case of a regular intercom. He only sees the key block, microphone, speaker and camera (if it is not hidden). But here you need to take into account that such devices are noticeably more expensive, as well as installation. In addition, to install a video intercom, you will need to lay an additional cable, through which the video will be broadcast.
You will also have to buy monitors. There are both hidden and remote solutions on sale. The latter have noticeably better display quality and picture integrity as a whole. If the option of purchasing a separate monitor does not suit you, then you can organize broadcasting through a desktop computer.
There are devices that support more than two cameras, which significantly expands the range of intercom capabilities. One can monitor the situation in front of the door, and the second can monitor what is happening on the landing. Manufacturers are trying to expand such capabilities and are working to increase the number and quality of cameras.