Typically, independent construction of a country house involves a large number of nuances and issues that require consistent solutions. One of these issues is conducting electricity to the house from a pole or replacing old wiring.
This installation is usually carried out by air. In this case, the input wires are usually replaced with new ones over time. For replacement, I often use self-supporting insulated cables (in short they are called SIP).
Pole-to-house installation is usually carried out by a specialist, as replacement requires a large number of special tools. In addition, due to the passage through the air, it is necessary to climb onto poles.
There are times when people still decide to replace the cable from the pole with their own hands. In this case, we must not forget about caution and attention. We will tell you about the correct installation of SIP from the pole to the house in this article.
Selecting the type of electrical installation
The first thing you need to start with is to decide on the method of installing the line. Today, open and hidden wiring is used. Open electrical wiring involves fastening all the constituent elements on top of finished walls (the routes are laid in special cable channels).
Open line routing
The advantage is as follows:
- the damaged area can be repaired without any problems (no need to cut wallpaper, destroy plastered walls, etc.);
- simpler installation and preparatory work (no need to trench walls for electrical wiring in the house);
- convenient to add new branch points.
This installation method has one disadvantage - very often it does not fit into the overall interior of the rooms since the cable channels do not have a very attractive appearance.
Hidden electrical wiring in the house is becoming more popular. In this case, wires and cables are laid in the walls; for this purpose, grooves are drilled - grooves in the walls, ceiling and floor or behind the suspended ceiling and wall cladding.
Advantage:
- does not spoil the interior of the rooms with its appearance;
- is fireproof;
- cheaper than outside.
- the likelihood of damage is much less;
- high durability of all elements.
Among the disadvantages are:
- complexity of repair and operation (to replace the electrical wiring in the house or connect a new point, you need to open the wall decoration;
- when a breakdown occurs, it is very difficult to find the exact location of the breakdown unless you use special devices, for example, a homemade metal detector;
- prohibited in a wooden house, according to PUE 7.1.38.;
- Electrical installation work requires more experience and a set of tools.
We recommend that you still opt for the latter method, since it is more durable and the entire line is not striking! When choosing high-quality components and correctly installing electrical wiring in the house, the likelihood of a breakdown is extremely low.
Rules and procedure for the construction of VLI
The construction of overhead lines is carried out by a specially trained team of electricians. Installation begins with preparatory work, including clearing the route from vegetation and other obstacles. Before rolling out the wires, all supports must be installed, passages through engineering structures must be protected, and, of course, drums with the wire itself must be delivered. If VLI is supposed to supply electricity to the house, anchors must be installed on the building in advance for hanging SIP wires.
Installation of the drum and auxiliary mechanisms
Wire rolling begins by installing the drum. It is placed near the support where the final adjustment of the booms will be made. Moreover, the optimal distance between them is considered equal to the height of the support itself.
For manual rolling of wires, a special leader rope is used. This is a kind of synthetic cable with a length of 30 to 50 m and a diameter of 10 mm. The rolling out of the rope is carried out simultaneously with the fastening of the rollers and intermediate hangers on the supports. As the rope rises, the intermediate suspension is fixed to the pole with a special metal tape. If the support is equipped with a hole, the suspension can be secured using a bolted connection.
The intermediate suspension bracket is equipped with a hole. The rolling roller is attached here. The number of hangers and rollers depends on the number of complex pillars, intermediate, corner and anchor supports
It is important to maintain the correct position of the rollers so that the axis of the cable being laid is at the level of the recess of the support clamp
The videos have some differences.
- The RT 5 mechanism is installed on complex and anchor poles. They are secured with a belt;
- The RT 2 mechanism is designed for intermediate supports. They are attached to the hole in the intermediate suspension bracket.
After completing the installation of all mechanisms, the leader cable is connected to the end of the SIP wire. To connect the cable and cable together, use metal stockings with a swivel. Moreover, stockings differ in purpose. At the same time, a mechanism is used that is put on the cable itself and the neutral core, and the entire harness is crimped with a synthetic stocking. A double bandage made of electrical tape helps to increase the reliability of the connection. The main stocking is equipped with a weight ring. The leader rope is attached to it.
Manually rolling out wire between supports
Manual rolling of SIP wires is carried out in sections limited to 100 m or between spans up to 50 m. The team performs the work in the following order:
- When everything is prepared for work, the team is divided into 3 units. The first and second links each include one electrician. Their duty is to monitor the operation of the unwinding mechanism motor, the uniform winding of the rope onto the reel and the smooth rotation of the wire drum. The third link monitors the passage of the connecting node of the rope with the cable along the unrolling rollers.
- The rolling continues until the connecting knot passes through all the posts and approaches the reel itself with a fully wound leader rope. At this time, a command to stop the engine is given. The cable is fixed to the anchor post with a nylon cable, after which the connecting unit is disconnected. A free piece of cable is left at the end supports for subsequent connections.
When rolling out the SIP wire, it is important to monitor its passage on the corner supports and prevent friction of the sagging cable on the ground
Fixation and tension of SIP
SIP fastening is first carried out on the anchor supports of the span. Here the cable is fixed using anchor clamps. Next, the SIP is fixed to the intermediate posts. The tension of the neutral core is carried out according to the installation tables, but not more than 5% of the force of the design values. The sag of the arrows is determined visually, after which they are left to sag a little.
The next shift crew begins adjusting the booms:
- On the first anchor support, the clamp is installed on the zero core. A plastic clamp is placed near the clamp on the entire wire harness. It will not allow the tourniquet to unwind.
- The next clamp is placed on the final support bracket. A dynamometer is fixed to the load-bearing core away from the pole with a clamp. The cable of a hand winch, which is pre-attached to the first pillar of the span, is attached to it.
- While pulling the SIP wire towards you with a winch, look at the force on the dynamometer. When the desired value is reached, the zero core is fixed with a clamp on the bracket of the final support.
The wire tension is completed, all that remains is to tighten all the wires with a clamp and unhook the winch.
Create a schema
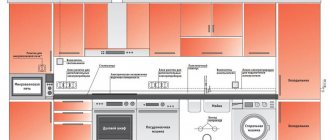
We will briefly tell you the most basic things you need to know. In order to draw an electrical wiring diagram, you must first provide for the locations of the following elements in a private house:
- determine where the input cable enters and where the electrical panel will be located;
- automation (RCD, circuit breaker, voltage relay, automatic devices, possibly SPD);
- powerful household appliances (for example, a washing machine, electric boiler, stove), since they require a separate power line;
- ceiling lamps;
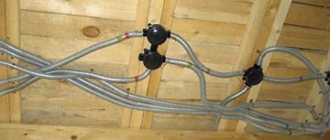
- sockets, switches, distribution boxes.
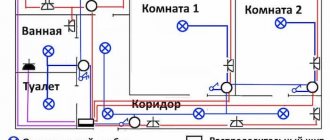
The following requirements and recommendations should be noted when creating an electrical wiring diagram in the house:
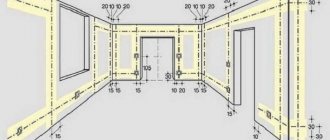
- Wires should pass along walls and ceilings only strictly vertically and horizontally. The turn must be made at right angles. You can also conduct electrical wiring along the floor if you use a special electrical baseboard.
- The place where the wiring is laid on the wall should be at a distance of 20 cm from the ceiling, while the lines go straight down to the places where sockets and switches are installed.
- The network should pass at a distance of 10 cm from door and window openings.
- Switches must be placed at a distance of 80 cm (or 150 cm) from the floor, on the side of the door handle.
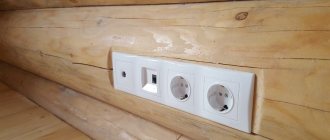
- The sockets are installed at a distance of 30 cm from the floor, while the sockets above the kitchen countertop must be installed at a height of 10 cm.
- It is not recommended to place switches and sockets in rooms with high humidity. According to GOST R 50571.11-96 (IEC 364-7-701-84) Electrical installations of buildings. Part 7. Requirements for special electrical installations. Section 701. Bathrooms and Shower Facilities.” It is best to move all the necessary elements outside the room.
Based on the recommendations, proceed to create your own electrical wiring project.
As an example, you can use one of the following wiring diagrams in a residential building:
It is best for such purposes to use a photocopy of the plan of your house, since this documentation contains the exact dimensions of the rooms and the location of windows, doors, and walls.
After the design diagram is made, we move on to marking work.
Photo of replacing electrical wiring with your own hands
https://youtu.be/su5kAHMOLeshttps://youtu.be/su5kAHMOLes
_
Did you like the article? Share 
0
Marking work
Marking work involves marking the cable route on the walls with chalk or charcoal, as well as the installation locations of its elements. To quickly and smoothly make an electrical wiring route, it is recommended to use a rope pre-painted with chalk (or charcoal). Such a rope is correctly called a marking or painting cord; you can see how to use it in the photo below:
All you need to do to create one of the sections is to secure one end of the rope in its original position and carefully pull it to the end point (so that the painted rope does not touch the wall). After this, the rope must be pulled tight and released sharply so that the mark remains on the wall. You can learn more about how to mark walls for wiring in our separate article.
After completing the marking, it is recommended to photograph the walls in a private house. This will allow you to quickly find electrical wiring when replacing or repairing it.
Why change the wires from the pole to the house.
The issue of connecting electricity from a pole to a house worries many residents of the private sector of the city of Krasnoyarsk. In our city there are many private houses, cottage and holiday villages, villages that, with the development and construction of the city, have become part of it.
Electricity supply to such houses, as a rule, is carried out from overhead power lines, which are made of bare wire laid over insulators fixed to supports. Many of these lines are outdated and in poor condition, or are overloaded, as electricity consumption increases every year.
An electrician is replacing the wires to the house with SIP.
Often in bad weather with strong winds and rains, short circuits and wire breaks occur. The power supply organization servicing these networks is in no hurry to respond to emergencies. And if the “emergency crew” arrives, they do everything poorly, just to get away as quickly as possible. Common situation?
Selection of electrical installation products
At this stage, it is necessary to select all planned electrical products for wiring installation. Don't skimp on materials if you want your wiring to last a long time. This issue is discussed in detail in a separate article: materials for electrical installation. In this article we will highlight the most important.
We recommend that you choose the following elements:
- Distribution boxes, corrugation and cable ducts are made of non-flammable or self-extinguishing materials that do not propagate combustion.
- Copper cable (its service life is much longer than that of an aluminum product). In addition, copper conductors can withstand higher loads. We recommend giving preference to brands such as VVGng or NYM;
- The cross-section of the cores per socket group is at least 2.5 mm. sq. (withstands current up to 25 A, but is usually protected by a 16 A circuit breaker, which is sufficient for home use, although it is better to calculate the cable cross-section for individual application conditions). To install lighting, you can choose a cable with a core cross-section of 1.5 mm2, but to connect powerful household appliances you will have to purchase a thicker conductor - 4 mm2.
Conduct electricity from the pole to the house - standards
All standards are specified in the PUE - rules for the construction of electrical installations. StroyMontazhBur, as a specialized organization, performs all work strictly according to the rules. As for the conduction of electricity from the pole to the house, it is enough for the average person to know the following points:
- for branches from the electric pole to the inputs, it is allowed to use SIP 2x16 - for single-phase input, SIP 4x16 - for three-phase
- Reinforced concrete SV-95.2 and impregnated wooden poles with a length of 9.5 m are used.
- the depth of the support is at least 2.2 m
- The support is secured in the ground by layer-by-layer compaction
- the distance from the house to the nearest support should be no more than 25 m, otherwise an additional support is installed.
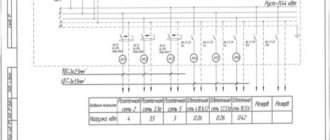
Material calculation
In addition to the fact that you need to calculate the exact number of sockets, switches, installation boxes, you also need to take care of the length of the wire for installing all the electrical wiring in the house.
Be sure to purchase a length with a margin, otherwise during the work a problem may arise when literally 10-15 cm is not enough for you to reach the end point.
We advise you to calculate the length taking into account the following rules:
- For installation boxes, add 10-15 cm + box depth to the length.
- To install lamps, add 10-20 cm, depending on what kind of lamp will be installed. Select the length so that the end sticking out from the ceiling can be hidden in the lamp, but also so that it is convenient to make the connection.
- We add 10-15 cm to the length of each segment to connect the wires to each other.
Possible installation errors
When installing an input into a house using a SIP cable, difficulties may arise, and in order to avoid mistakes, the most common of them are listed below:
Weak tension: a dynamometer was not used when tensioning, and installation was carried out “by eye”
This error can lead to increased load on the cable, especially in winter, and its breakage. Strong tension: also has a negative effect on the cable, especially its insulation. An attempt to reuse piercing clamps: they are disposable, since the head breaks off and re-installation is not possible. Damage to insulation during work: It is important to use a solid cable; damage to the insulation may result in a short circuit or electric shock. The clamps are not fully secured: the conductors must be correctly and securely fixed in the clamps and not dangle in them. A bad clamp will lead to poor contact, sparking and cable damage.
Preparation of documents
There is no collection of documentation packages as such. Based on an application from the owner of the site, the network organization issues technical specifications with specified obligations for the applicant and CO, according to which:
- the applicant performs work within the boundaries of the site;
- Networkers are engaged in work up to the boundaries of the site, including regulating relations with third parties and other authorities.
That is, the energy company solves the problem of how to supply electricity to a private housing plot or other type of land from the nearest power line, and the owner carries out t entrance to the house.
Appearing at the network company for technological connection
The owner must know what documents are needed to connect electricity to the site and where to submit them. A letter of application is sent to the nearest regional electrical network for the issuance of conditions for connection, indicating:
- Full name and passport details of the applicant;
- location of the land plot;
- estimated maximum power.
Attachments to the application:
- plan for the location of the object on the site (cadastral map);
- the design scheme of the applicant's electrical network, implying the location of buildings and utilities on the site;
- a copy of the applicant's title documents - certificate of ownership of the land plot and house.
Within 15 days, power engineers prepare and send to the applicant a standard agreement with the attached technical conditions (TU) and the listed measures for the TP. Within a month from the moment of receipt of the agreement, the applicant is obliged to sign it.
Attention: if the applicant fails to send the signed documents back to CO within 60 days, his application will be cancelled.
Project development
As soon as the contract is signed, you can begin designing the power supply system for the site. Drawing up a project requires specific knowledge. Lack of experience in design work is a reason to turn to specialist power supply system designers.
As a contractor, you can choose either an independent design bureau or a network organization.
Important! Choosing a competent designer is a guarantee of obtaining a competent project and its further coordination in an energy company that requires compliance with norms and standards in ready-made systems chetax.
The agreed project is a direct indication for installation work. You can’t deviate from it so that you don’t have to redo anything later.
For reference: an individual project is not required for applicants when connecting power up to 15 kW, if the technological connection of the facility is made to electrical networks of class N voltage up to 20 kV inclusive.
Cost of technological connection
The contract determines the cost of the TP. If the allocated power does not exceed 15 kW, the size of the board will be no more than 550 rubles. subject to the following conditions:
- the distance from the border of the land plot to the power line does not exceed 0.5 km for plots in rural areas and 0.3 km for cities and urban-type settlements;
- The connected object belongs to the 3rd category of electrical reliability.
For reference: the indicated price only includes the construction of a line from the existing power supply to the connection point from which the cable will be extended to the applicant’s house. Work on the site is paid according to a separate price list of the network company.
In the absence of the specified conditions, preferential connection is not provided; the cost of the TP is calculated based on the location of the facility relative to the existing power lines ac. The exact amount is calculated in each specific case.
Commercial organizations providing turnkey connection to a site establish the total cost of all work, including preparation of documents, price of materials and installation labor oty. Capital investments in the installation of electricity supply with the involvement of third parties can reach 300 and 500 rubles.
Power output
The energy supply organization allocates a certain amount of electricity according to the instructions of the Ministry of Energy:
- up to 15 kW;
- from 15 kW to 150 kW;
- from 150 kW to 670 kW;
- over 670 kW.
For household needs, up to 15 kW is allocated, regardless of the size of the dacha plot and the area of the house on it. In addition, a limit can be set for one-time electricity consumption: 3–6 kWh. This means that it will be impossible to turn on several energy-intensive devices at once. Provided that household appliances operate alternately, such a limitation does not affect the general functioning of the electrical system of the country house.
Timeframe for implementation of technological connection
Within 4 months, network engineers must solve the problem of how to supply electricity to the site. Provided that the energy company’s plans do not include measures for reconstruction or construction of new facilities:
- included in the list of investment programs of an energy company or related organizations;
- producing electricity.
Everything that is needed to bring light to the site - equipment, poles and other auxiliary buildings - is installed independently and through a network organization.
In all other cases, the period is extended to six months.
Deadlines of 4 and 6 months are established for objects whose distance from the existing line does not exceed 300 m within the city, and 500 m outside it. If the specified conditions are not met, the network organization sets deadlines, considering each specific case on an individual basis.
Similar questions
Should a category M 3 bus driver have a copy of his license with him when working on the line?
Answers to the question:
He must not have any copy of the license with him. Information about the license is indicated on the bus waybill.
No, the bus driver is not required to carry a copy of the license with him
All the best, I wish you good luck and all the best!
If I replace the meter myself, but in the presence of a Water Management employee, as I was allowed, then why should I pay money? For sealing? Isn’t it free according to paragraph 5 of Article 20 of Federal Law 416-FZ
About water supply and sanitation. Please explain the situation.
Answers to the question:
No, sealing is a free service, but paperwork and commissioning are paid.
DECISION of September 19, 2013 N 824 ON CHANGES IN THE RULES FOR THE PROVISION OF PUBLIC SERVICES TO OWNERS AND USERS OF PREMISES IN MULTIPLE BUILDINGS AND RESIDENTIAL BUILDINGS
The resolution obliges public utilities to respond within three days from the date of filing the application and agree on a date for the visit, and within 15 days to seal the device completely free of charge.
What is the length of vacation for ambulance drivers in the Krasnodar Territory in rural areas, if the driver transports patients with a paramedic (the team consists of two people: a driver and a paramedic)
Answers to the question:
The total duration of vacation is 28 calendar days, but it is possible that the terms of the collective agreement provide for additional days.
As a general rule, the duration of the main regular annual leave is 28 calendar days. Additional vacations may be established by local regulations of the organization, as well as by the employment contract. Study these documents.
Good luck and all the best to you!
Your employment contract states how much vacation you have. In addition to 28 days, the employer has the right to establish additional leave for the traveling nature of work
I wish you good luck and all the best!
According to the Resolution of the State Committee for Labor of the USSR, the Presidium of the All-Union Central Council of Trade Unions dated October 25, 1974 N 298/P-22 (as amended on May 29, 1991) “On approval of the List of industries, workshops, professions and positions with hazardous working conditions, work in which gives the right to additional leave and reduced working hours” additional leave for ambulance drivers is 6 working days. All the best!
I was diagnosed with diffuse toxic goiter. thyrotoxicosis. Heavy current. Recurrent form. Decompensated. I have been on sick leave for 2 weeks, plus I spent 1 week in the hospital, when the hormones come into shape they will operate. How long should I be on sick leave and stay in the hospital so that I can collect documents for disability.
Answers to the question:
the total duration of sick leave, both inpatient and outpatient, must be at least 2 months. Thank you for your contact to our website, good luck to you and all the best.
What is the amount of state duty when filing a supervisory appeal to the regional court in a civil case.
Answers to the question:
1. In cases considered by the Supreme Court of the Russian Federation in accordance with the civil procedural legislation of the Russian Federation and the legislation on administrative proceedings, by courts of general jurisdiction, and justices of the peace, the state fee is paid in the following amounts:
1) when filing a claim of a property nature, an administrative claim of a property nature, subject to assessment, with the price of the claim:
up to 20,000 rubles - 4 percent of the claim price, but not less than 400 rubles;
from 20,001 rubles to 100,000 rubles - 800 rubles plus 3 percent of the amount exceeding 20,000 rubles;
from 100,001 rubles to 200,000 rubles - 3,200 rubles plus 2 percent of the amount exceeding 100,000 rubles;
from 200,001 rubles to 1,000,000 rubles - 5,200 rubles plus 1 percent of the amount exceeding 200,000 rubles;
over 1,000,000 rubles - 13,200 rubles plus 0.5 percent of the amount exceeding 1,000,000 rubles, but not more than 60,000 rubles;
2) when filing an application for a court order - 50 percent of the amount of the state duty established by subparagraph 1 of this paragraph;
3) when filing a claim of a property nature that is not subject to assessment, as well as a claim of a non-property nature:
for individuals - 300 rubles;
for organizations - 6,000 rubles;
4) when filing a supervisory complaint - in the amount of the state duty paid when filing a claim of a non-property nature;
5) when filing a claim for divorce - 600 rubles;
6) when filing an administrative claim to challenge (in whole or in part) regulatory legal acts (regulatory acts) of state bodies, the Central Bank of the Russian Federation, state extra-budgetary funds, local governments, state corporations, officials, as well as an administrative claim to challenge non-normative legal acts of the President of the Russian Federation, the Federation Council of the Federal Assembly of the Russian Federation, the State Duma of the Federal Assembly of the Russian Federation, the Government of the Russian Federation, the Government Commission for Control of Foreign Investments in the Russian Federation:
for individuals - 300 rubles;
for organizations - 4,500 rubles;
6.1) when filing an administrative claim to challenge acts of federal executive authorities, other federal government bodies, the Central Bank of the Russian Federation, state extra-budgetary funds containing clarifications of legislation and having regulatory properties:
for individuals - 300 rubles;
for organizations - 4,500 rubles;
7) when filing an administrative claim to recognize a non-normative legal act as invalid and to recognize decisions and actions (inaction) of state bodies, local governments, other bodies, officials as illegal:
for individuals - 300 rubles;
for organizations - 2,000 rubles;
 when filing an application in cases of special proceedings - 300 rubles;
9) when filing an appeal and (or) a cassation complaint - 50 percent of the amount of the state duty payable when filing a claim of a non-property nature;
10) has become invalid;
11) when filing an application for the issuance of writs of execution for the forced execution of arbitration court decisions - 2,250 rubles;
12) when filing an application to secure a claim being considered in an arbitration court - 300 rubles;
13) when filing an application to cancel the decision of the arbitration court - 2,250 rubles;
14) when filing an application in cases of alimony collection - 150 rubles. If the court makes a decision to collect alimony both for the maintenance of children and for the maintenance of the plaintiff, the amount of the state duty is doubled;
15) when filing an administrative claim for an award of compensation for violation of the right to legal proceedings within a reasonable time or the right to execution of a judicial act within a reasonable time:
for individuals - 300 rubles;
for organizations - 6,000 rubles.
2. The provisions of this article are applied taking into account the provisions of Article 333.20 of this Code.
To create comfortable conditions in a country house, you should know how to bring light to a summer cottage and avoid any contradictions with the law.
IMPORTANT! The methods of conducting electricity to a site described in this article are also suitable for other land plots, including within populated areas.
Studying the rules and regulations for performing electrical installation work will help with this. And in order to correctly calculate the project budget, you will need to be familiar with the cost of connection.
Where to contact
Permission to connect is given by the network company, which is in charge of the local electricity supply. You can do work in three ways:
- Submit an application in person and continue to communicate with representatives of the network organization.
- 3 conclude an agreement with power engineers for technological connection (TP) of a turnkey country site.
- Transfer authority from a commercial company.
Communicating with the bureaucratic machine takes a lot of effort and time, but the payment for the TP will be only 550 rubles (if you solve the problem of how to install light on a dacha plot according to the federal new program).
The fastest and most expensive way is the second one. Power engineers, as a monopolist, will complete all work without delay, but they also value their work highly. The third method is less expensive than the second, but it is inferior in terms of time. This is due to the fact that a network organization can put a spoke in the wheels of its competitors represented by merchants.
If the owner of a country house has sufficient financial resources, but does not know how to install light on the site and where to start, it is recommended to choose the 2nd or 3rd SP osoby. If the money issue comes first and the deadlines are tight, option 1 will do.