Expert author of the article
Yuri Grigorievich F.
Energy Engineer. 40 years in the profession, head of the bureau, deputy chief power engineer of the plant, chief specialist.
A modern electricity meter is a fairly reliable device. He can do his job for years without causing problems for his owners. But if suddenly the amount shown on the receipt has increased significantly, then reasonable doubts arise about its objectivity.
It is urgent to check the meter for correct readings. Otherwise, you will have to spend money on overpayment or a fine for concealing a fault.
When to check the accuracy of your electric meter readings?
You can check the operation of the electric meter at any time. But there are cases when this is necessary:
- Energy consumption has increased sharply. But you did not purchase new electrical appliances, and the same number of people live in the apartment. Pay attention to seasonal features: in summer you can use the air conditioner for a long time, and in winter you can use the heater (they can increase electricity costs);
- Consumption did not decrease during your long absence (you went on vacation for 3-4 weeks) or decreased only slightly;
- You don't have many powerful home appliances that can use so much energy.
Attention! If you do the check yourself at home, it will not have legal force. It can only show whether the counter is overinflating. And if the check shows that this is the case, then an official verification will be required at a special institution, which will give an opinion on the accuracy of the readings of the counting device.
In what cases is it worth checking the meter?
It must be said: the electricity meter must undergo periodic verification. That is, it is checked for the correctness of the readings within a certain time frame specified in the technical data sheet of the product.
Otherwise, payment will be calculated according to the standard. A similar situation arises if the device:
- Has mechanical damage.
- The verification stamp is not sealed or it is not possible to see it.
- Does not show measurement results.
- Exceeds the permissible error. It is not in its accuracy class.
- The deadline for the next inspection has passed.
- Service life has expired.
Electricity meter verification is an official procedure, it is carried out by licensed companies. However, there are times when there is an urgent need for an informal technical check of the electric meter. Let's look at them in more detail:
- A sharp increase in fees for light, although there were no changes in the operation of electrical equipment;
- On the contrary, a significant reduction in the amount of the invoice. Make no mistake, the network company will quickly find losses. In this case, all the blame will fall on you as the person who did not inform you about the problem in time. To avoid a conflict and a fine, we inform the energy sales or management company.
- Electricity consumption remains the same, despite the reduction in the number of operating equipment. Or the residents went on vacation, but the meter readings remain at the same level.
- Biased high consumption of kilowatt-hours, in comparison with similar consumption of neighbors or acquaintances. It would be logical to perform small approximate calculations of the installed power of electrical energy receivers, multiplied by the number of hours of operation.
While complying with safety requirements, you can independently inspect your own metering device.
Checking that the meter is connected correctly
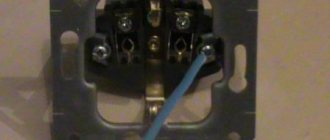
Before checking the accuracy of the electricity meter readings, you need to find out whether it is connected correctly. City apartments are powered by a single-phase network, so below we attach the correct way to connect a single-phase meter.
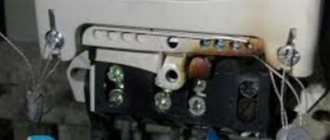
Four terminals are used for connection, designated 1, 2, 3 and 4, respectively. It will be correct if the phase wire goes from the power line to the meter through terminal 1, and through terminal 2 goes towards the apartment. And it will be correct if the neutral wire from the power line enters through terminal 3, and exits towards the apartment through terminal 4.
If you live in a private house, then there is a possibility that the meter is three-phase. The correct connection diagram is below.
The circuit changes only in the number of wires and terminals. The principle is the same: phase “1” should enter terminal 1 from the power line, and exit to the house from terminal 2. Phase “2” - from terminal 3 to 4. Phase “3” - from terminal 5 to 6, and the neutral wire - from 7 to 8.
Self-propelled test
Self-propelling means increasing the meter readings, even if you are not currently using electricity. To identify this problem:
- Disconnect all current consumers by pulling out the plugs;
- Turn off group machines if they are located after the counting device;
- Leave only the introductory machine turned on.
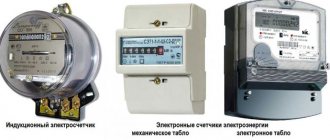
If you have an induction meter, then make sure that the number of revolutions does not exceed 6-12 times per hour: the less, the better. If you have an electronic energy meter, then you need to count the number of indicator flashes. If it lights up more than 12 times per hour, then checking is no longer required: you have already found the reason for the cheating. Otherwise, please use the verification methods described below.
Reconciliation frequency
Meters must be periodically checked for serviceability and reliability of transmitted data.
All meters for metering consumed resources are subject to periodic checks, both for serviceability and for the correctness of the readings given. The need to inspect meters is explained by factors such as natural wear and tear of mechanical parts or possible software failure.
In most cases, RES initiate this procedure themselves by sending written notifications to citizens. The papers indicate the date and place of delivery of the device, as well as the order and method of its dismantling. If a notice is not received for several years, property owners should find out about it themselves.
For diskless electronic meters of the Mercury and Neva types, the control period is no more than 10 years. Old type devices are checked more often - every 5-8 years. Based on the results of the inspection, a report is drawn up.
Pincer check
The method is good because of its measurement accuracy, but it is bad because current clamp meters are a professional tool. It’s expensive to buy just for one check, and it’s difficult to get it for a while.
The current that powers the appliances in the apartment does work. To find out whether an electric meter accurately counts energy, you need to compare two works: real (which is actually performed) and calculated (which is shown by the counting device). All measurements are compared in watt hours.
Calculation of actual work
For a single-phase meter:
- With electrical appliances running, measure the current on the phase wire coming from the second terminal;
- Additionally measure the voltage;
- Multiply the current by the voltage. Let's get the power in watts;
- Use a stopwatch to record the time during which 10 flashes occur on an electronic counter or 10 revolutions on an induction counter;
- Multiply the power by this time in seconds to get the work measurement in Joules;
- Divide the resulting value by 3600. And get the actual power consumption in Wh.
Example. Phase measurements: 20A and 220V, then the power is 4400 W. 10 revolutions were completed in 20 seconds. Then the work is 88,000 Joules. In Wh it is 24.
The formula works here: A1=UIt/3600 .
Where U is the measured voltage in volts, I is the measured current in amperes, t is the time of 10 revolutions (flashes) in seconds. A1 – the required real work in W*h.
Attention! If the meter is three-phase, then you need to take measurements on each phase, then calculate the power from them. And then - the total power. Example: phase 1 – 5A and 220V, phase 2 – 9A and 210V, phase 3 – 10A and 230V. Then for phase 1 we get 1100 W, 2 – 1890 W, 3 – 2300 W. Total – 5290 W. After this, follow steps 4-6.
Definition of calculation work
Let's start with a description of the gear ratio. It is designated on each meter by the letters r or A and shows how many revolutions or pulses are made each time you consume 1 kWh of energy. There is no need for special measurements here. Immediately the formula: A2=1000n/r .
A2 is the calculated work, n is the number of revolutions, the time of which was measured when determining the actual work. r – gear ratio (see on the meter).
Example: The gear ratio is 1400. A2=3600*10/1400. We get about 25.7 Wh. It’s the same with a three-phase meter.
Comparison of works
Compare works A1 and A2. The meter is considered to be in good working order if the calculated performance does not differ from the actual performance by more than 10%. How to calculate how much it differs?
Formula: |A2-A1|*100/A1 (answer in percentage).
Attention! The straight lines around the work difference are the modulus. It is necessary if A2 is less than A1. Then we take the modulus of a negative number, which is always positive (the minus is removed in front of the number).
Example. Let's take our values and calculate: (25.7-24)*100/24=7.08%.
Result: in our example the counter is working. If you get more than 10%, then do an official check so that the meter is changed for you.
Mechanical methods of paint removal
Usually, first of all, they try to remove the coating mechanically. It should immediately be noted that these methods are the most labor-intensive, but at the same time one of the most accessible. A variety of tools are used, starting from the simplest. Before starting work, it is necessary, if possible, to clear the room of furniture or cover the surfaces with film, which should remain clean and free of dust and paint particles. Let's take a closer look.
No. 1. Using a spatula
This is the very first tool you might want to use to scrape off peeling paint. A spatula can definitely be found in almost any home. The advantage of the method is the complete absence of dust and the fact that it is possible to remove paint even in corners and other hard-to-reach places - around switches or sockets. Disadvantages include the relatively slow speed of work, the need to exert considerable effort and the inability to cover a large surface area in one approach. During operation, small particles of paint break off and can get into your eyes, thereby injuring them. Therefore, be sure to think about personal protective equipment. This rule applies to absolutely all methods of removing old coating.
No. 2. Using a chisel and hammer
When you reach a section of the wall where there are no cracks or blisters of paint and the spatula is no longer effective, you can try to remove it with a chisel. It does not bend during operation, unlike a spatula, and if necessary, you can tap its handle with a hammer. It is necessary to sharpen the tool periodically. It will quickly become dull from constant friction on a hard surface.
No. 3. Using an ax or pick
This method is incredibly labor intensive. You will have to swing the ax for a long time, so we advise you to choose a tool that is not too heavy. At the same time, it should not be too sharp. The essence of the method is to apply notches to the wall. The blows must be directed tangentially to the wall. The length of the notches can reach several centimeters, and they should be located at a distance of no more than 10 mm from each other. Only on such a surface will the putty or adhesive composition lie quite reliably. But the main drawback of the method actually lies a little deeper. Think about how many blows you will have to hit the wall and understand that each of them will little by little destroy the integrity of the base that you want to rid of the hated paint. Not all walls can withstand such torture and remain strong and reliable.
No. 4. Using a drill with various attachments
This method can be called optimal in terms of speed and safety. Plus, due to the fact that a drill is not the heaviest hand tool, your hands will get much less tired when working. Safety is achieved due to the fact that work is performed at low speeds. Before you start, be sure to check the functionality of the tools - whether the wire is broken, whether the cartridge is holding well, whether the device is sparking. In order not to be distracted by trifles, make sure that the cord is long enough to move freely along the entire length of the room, use an extension cord. Be sure to wear a protective mask, closed clothing and shoes, and a hat. Never leave the sleeves of your clothing unfastened and do not wear gloves. When working with torquey tools, their use is unacceptable - the reliability of fixing the tool in your hand deteriorates and you simply may not be able to hold it. In the best case, the instrument itself will suffer if it falls; in the worst case, it will injure the performer.
Now you need to adjust the speed of rotation - turn on the drill without an attachment and select the minimum mode. Now attach the attachment, tighten the chuck well and get to work. It is necessary to touch the wall only with the surface of the nozzle and do not move too quickly. The most commonly used is a wire brush. But in practice, it is less effective than an attachment in the form of several connected chains of 3-4 links with a washer at the ends. In addition, sometimes the metal bristles come off and can dig into unprotected areas of the skin;
No. 5. Using a grinder
This method can be called the fastest and at the same time the most dangerous. The grinder is a high-speed tool. If you do not have the skills to work with it, you can be seriously injured. No one is immune from the destruction of a disk during operation, the fragments of which fly at incredible speed in different directions. The disadvantages include a high noise level and a huge amount of dust. The work is usually carried out using a wide range of tools.
To summarize, we can say that mechanical methods are suitable for removing absolutely any type of paint - both acrylic and oil. It’s just that some of them will need to be wetted periodically and then removed with a spatula, wire brush or power tool.
Testing with incandescent lamps
How to check the electric meter at home if there are no current measuring instruments? Incandescent lamps - consumers of known power - will help. You can take any number of 100 W lamps. In our example there will be 5 of them. This means the power is 500 W.
What to do:
- Turn off all devices, including the refrigerator, chargers, energy-saving lamps (they cannot be used during the test at all);
- Turn off all circuit breakers in the panel;
- Connect incandescent lamps (we have 5);
- Record the time t during which 10 revolutions of the induction counter or 10 flashes of the pulse counter are completed (we have 20 seconds);
- Calculate the time T of one full revolution or the interval between flashes. To do this, t by 10 (it turns out 2 seconds). It would be possible to immediately calculate the time for one revolution, but then it would be inaccurate. The more revolutions you counted, the more accurate the calculation;
- Look at the gear ratio on the meter (indicated by A or r , in our case it’s 3200);
- Convert the lamp power from watts to kilowatts (0.5 kW).
Then apply the formula to calculate the measurement error of the meter E :
E=(PTr/3600 – 1)*100 (in percent).
Example: (0.5*2*3200/3600 – 1)*100=11.11%
Bottom line: there are doubts that the meter is working correctly, since the maximum permissible error threshold of 10% has been exceeded. A legally binding verification is required.
Illegal actions on the part of the owners
Sometimes apartment owners themselves use various methods in order to reduce the speed of electricity consumption by illegal means. Outside interference in the system may damage the device. In this case, inspectors will definitely find additional devices. Illegal interference with the meter system is indicated by:
- A hole drilled in the body. It is used to use a needle to slow down the rate of counting consumed kilowatts.
- Lack of glass on the electric meter. Instead, they can insert photographic film. But such material leaves a mark. This will definitely be revealed during the examination.
- Connecting additional wiring, due to which some of the electricity is not recorded. Such a wire can be easily found using a detector. It usually hides behind plaster or baseboards.
- Loose tension screw. This can be done if there is no seal on the meter.
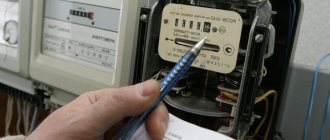
To avoid problems with the inspection company, you need to periodically inspect the device for damage. Checking the electric meter for proper operation necessarily begins with a visual inspection.
Electricity theft check
If the check shows that the meter calculates the energy expended correctly, but it still charges much more than your electrical appliances at home can consume, then you have a thief. One of your neighbors connected to your electrical circuit: and you pay for him at least part of the energy that he spends. In the worst case, you pay for it completely. How can you tell if your electricity is being stolen? And if so, who?
The easiest way to check
This method is only suitable for those electricity meters that definitely do not have self-propelled motors:
- Turn off the lights and all electrical appliances in the house, including the refrigerator;
- Remove all plugs from sockets (sensitive meters can “see” them);
- Go to the meter and watch for 10 minutes.
Ideally, it shouldn't spin. But 1 revolution is allowed every 5-10 minutes. If you are confident that the electric meter is working (there is no self-propelled one), but it still generates energy, then you have a thief. But this way you won't be able to find out who he is.
Comparison of real and measured power
This is a more accurate method of checking an electricity meter for theft. In the section on checking readings, you have already learned how to measure actual and calculated work using a multimeter and clamps. This method is similar, only you need to compare not work, but power: real power (measured in a phase) and the power of all electrical appliances currently working.
Example:
- In the whole house, only the following work: a washing machine (in the kitchen) 2 kW, a refrigerator (in the kitchen) 0.3 kW and 7 incandescent lamps (living rooms) of 100 W each are on (translated into kW this is 0.1);
- The total power is: 2+0.3+0.1*7=3 kW. This is the power needed to power your appliances;
- Measure the current and voltage in the phase, multiply them by each other and divide by a thousand. If the measurements showed 20A and 220V. Their product is 4400. And if divided by 1000, then 4.4 kW.
Now compare the total power of the devices and the actual power consumed: 4.4-3 = 1.2 kW someone spends for you, and you pay. To determine who might be stealing energy, look at pass-through and hidden outlets that neighbors might connect through.
What are smart electricity meters and how do they work?
The sensational Russian law on smart meters - Federal Law No. 522-FZ of December 27, 2018, was approved on December 29, 2022. This law amends the Federal Law dated March 26, 2003 No. 35-FZ.
The innovations, which will come into force in July 2022, will affect only the electricity metering system for now. Smart water meters are still used today, but they are not required for everyone. Lawmakers promise that after some time it will be the turn of water, heat and gas meters. But this will not happen in 2020, but much later.
A smart meter is a new generation metering device that can independently transmit information to the energy supply organization. At the same time, a smart electricity meter does this in a timely and error-free manner. Eliminating human factor problems, that is, the need will disappear:
- Remember the date the readings were taken.
- Write down numbers.
- Call the management company or transfer data over the Internet.
Which eliminates many tedious problems. In addition, the smart meter can automatically:
- Change the hourly rate.
- Protect equipment during accidents by signaling to dispatch.
- Inform about failures and malfunctions in the operation of apartment and communal metering devices.
- Transmit information about attempts of unauthorized access to the electric meter and illegal connection.
- Show the owner the level of debt.
- Save the information received.
New meters, unlike old induction or electronic meters, are additionally equipped with a controller. A device that allows you to achieve smart goals in the field of awareness and controllability of electrical energy flows.
The controller interface reliably ensures wireless transmission of information to the Internet using technologies:
- Wi-Fi – using a router.
- GPRS – via SIM card.
- LPWAN – via a tower connected to the server.
Smart electricity meters are already being used in many Russian regions. Such metering devices are still used mainly in the private sector. They are installed on an overhead power line support.
Meters of this type automatically transmit information via encrypted channels to a specialized accounting center. The history of readings and the amount of electricity consumed is stored in the device’s archive and in the center’s database. Consumers no longer need to take readings and transfer them to Energosbyt.
Some such devices are equipped with special remote controls that allow the consumer to remotely control electricity consumption without leaving home and without visually inspecting the energy meter itself.
In the period from July 1, 2022 to January 1, 2022, utility companies are recommended to install smart appliances, but for now this is only a recommendation. They still have the right to install old type appliances. But from 2022, smart meters will become mandatory.
Thief identification check
If you have already realized that electricity is being stolen, you need to catch the thief. For this:
- On the site, unscrew the plugs in your panel (you will not have electricity in the apartment, at the same time, the thief’s devices, which are powered by you, will no longer be powered);
- Go one floor higher, or go into the apartment and look through the peephole;
- It may take a lot of time, but sooner or later the thief will want to turn on your panel.
You will see someone come and screw in the plugs in your panel so that you can use your electricity again. Catch the thief! It is he!
These simple algorithms for checking the accuracy of your meter readings and checking for electricity theft will help you determine if you are paying too much. And if this is the case, then get an official conclusion to change the meter for free (in case of high measurement error). And when identifying a thief, it will be easier for you to prove the fact of theft.