How to disassemble a Legrand switch
Modern models of household switches are distinguished not only by their practicality and ease of use, but also by their miniature components, due to which they do not take up much space and are light in weight.
The electromechanical characteristics of such devices allow them to withstand a large number of operating cycles, and ensure easy dismantling of the device in case of replacement or revision.
Legrand switches have long impressed their consumers with a high level of decorativeness, while it will not be difficult to inspect the connection of contacts in the event of a loss of lighting.
The key or keys are removed without any excessive effort, by pressing on the protruding upper or lower part, after which the decorative cover is removed and the fixing petals resting on the wall are loosened using a screwdriver.
Tips in the article “How to connect a two-key switch?” Here.
After loosening, the switch must be pulled towards you and when the contacts become accessible, visually assess the condition; there should be no carbon deposits; if there is any, it must be removed.
The integrity of the contacts is checked using a multimeter and if the problem is in the switch itself, then a replacement is made, otherwise you should look for a breakdown in other parts of the circuit.
Using verification software
Review and configuration of the D-Link Dir-320 modem
Users often start searching for software online, but do not realize that they already have these programs as standard on their PC. This is not only a diagnosis of network errors, but also a program responsible for the Internet icon. If she detects its absence, then the picture changes to the appropriate one. This symbolizes problems associated with a broken or shorted twisted pair cable.
No program will show you exactly where the cable is damaged, but there are solutions that have more functionality than standard ones.
An example is a good software solution called Network Traffic Monitor. It is completely free and has wide functionality, including:
- Measuring network speed in case of problems and instabilities;
- Analysis of network speed changes;
- Saving all reports on your hard drive;
- Making deep settings;
- Possibility of using useful services;
- Many languages supported.
Installing the software doesn't take even a minute. All you need to do is run the EXE file and agree to the installation. After this, the program will install and be ready to use. Network Traffic Monitor is considered one of the best testing and diagnostic programs. This is evidenced by numerous user reviews.
How to properly dismantle a socket
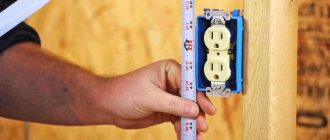
So, having examined the main technical characteristics of sockets and their types, you can proceed to the main thing, how to remove the socket from the wall. To do this you should need:
- small screwdriver with plastic handle,
- insulating tape,
- latex gloves,
- tester.
Here are the step-by-step instructions:
- The first step is to turn off the power to the apartment. In this case, you should check several times that the electrics are actually de-energized. You can use a tester for this.
- Depending on the type of outlet, the decorative cover is removed. It can be secured with screws or latches. Domestic sockets use a screw.
- Then the socket fastenings are unscrewed. If the legs are movable, then when the screw is unscrewed, it will become accessible for removal.
- Carefully pull out the entire structure of the socket and see how the wires are secured.
Note!
If the wiring is old or aluminum, then it is important to be careful not to break the wire. Otherwise, it will be difficult to replace and you will have to build up the wires, which will not have a very positive effect on the overall design.
That's all the instructions for removing the socket. After this, you can hang wallpaper or install a new socket. If you have experience working with sockets, be sure to leave your comments at the end of this article.
RJ-45 connector crimping
The Internet cable that enters the apartment is called twisted pair and is connected to a plastic connector. This plastic connector is called a connector, designated RJ-45. Professionals call such devices “Jacks”.
Basically, the plastic connector is made of a transparent material through which all the different colored wires are visible. Exactly the same parts are used to connect computers, a modem to a computer, and other computer hardware. In this case, the arrangement of colored wires may not be the usual one. This is the connector that is inserted into the information socket. The most important thing here is to understand the order of all the wires and then the problem with crimping the connector will be solved.
Connection diagrams
There are many schemes for connecting a TV connector. A splitter is used to process the signal. This device looks like a small box and performs the function of signal separation. Just like in telephone lines, when transmitting digital electrical signals, you cannot do without their separation.
The principle of operation of a splitter is to divide the signal into equal packets. Next, the divided segments are transmitted to the input part of the television connectors. The splitter is designed in such a way that all TVs receiving the signal, regardless of their number, will receive a signal of equal quality. As a result, within the same apartment there is no point in having a separate antenna for each TV.
The connection can be made in one of two ways:
- The “star” scheme, when the old cable is removed and the new one is laid through the splitter.
- Daisy chain circuit.
Below we will look at the question of how to connect an outlet, while paying attention to the advantages of the circuits under consideration.
Star pattern
This circuit uses a splitter that performs the function of branching the signal, breaking it into packets and amplifying it. The device is placed at the cable entrance to the living space from the entrance. Next, antenna conductors are distributed to consumers. Installing a TV outlet using this simple technology is most often used, since the splitter provides a number of advantages:
- The cable is located in a technically protected place, which is important both during installation work and during further preventive inspections.
- The signal is stable.
- Separated signal packages are uninterruptedly supplied to all television receivers in the apartment.
Daisy chain connection
This method of installing a TV outlet involves the use of a cable. The main cable is routed to any of the TVs in the house, and then it is routed to other receivers directly at the connector. The wiring is a branch into two or more parts (depending on the number of TVs available).
Connecting in this way is called daisy chain. In this case, the connectors connected by a cable must be feed-through, except for the last one, which is the terminal one.
The daisy chain circuit allows you to save on cable consumption, but it also has disadvantages. The disadvantage of a daisy chain system is that the quality on the first receiver will be higher than on subsequent ones. However, if the television signal is strong enough, the difference will be almost unnoticeable. In addition, one should take into account the fact that modern television equipment is equipped with the ability to amplify the signal, and this happens automatically.
Daisy chain connection via pass-through television sockets
So, the uneven distribution of the signal in this case can be considered an insignificant drawback. Other disadvantages of the loop system include the following:
- The circuit, where there are pass-throughs and a terminal TV socket, will cost more than the standard “star” circuit.
- If the circuit breaks, all subsequent consumers are deprived of a television signal.
Installation using the example of a Schneider socket
As an example, let’s look at the installation of a pass-through socket from a French one (model socket tv rj45). The task is to connect two TVs to one cable using a loop-through circuit.
When installing a socket for a TV cable, we provide a small excess of the cable itself - it should come out of the installation box. Next, we strip a small section of the insulating material on the cable. At the same time, we keep the central core and shielding braid intact.
We start by removing the front panel and slightly unscrew the clamping bolt. This is necessary to ensure that the cable exits freely through the hole.
There are arrows on the connector body. Insert the cable all the way in the direction indicated by the arrows. Then we press the cable with a clamping screw (tighten it). The cable must be securely fastened, but the screw must be tightened with care so as not to crush the line. We perform exactly the same manipulations with the second end. We install the connector in such a way as to avoid kinks on the cable.
Note! Before installing a television outlet, you should inspect the area where the wire is fixed for the possibility of a short circuit in the main core with the braid.
When the cable is inserted and secured, put on the front panel. The panel is fixed using special proprietary latches. Using a building level, we check the accuracy of the horizontal installation of the connector. If everything is in order, we finally fix the panel with fastening bolts and cover it with a frame.
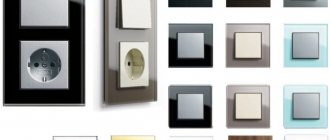
Socket Legrand Valena Life Netatmo 752296 ivory
Other products from this brand
Socket Legrand Valena Life 753526
Socket Legrand Valena Life 753119
Adapter Legrand Elium 050681
Detailed description
The Smart Home Starter Pack is the heart of Legrand's new home comfort system. It consists of a smart plug gateway and a main I'm home/I'm out switch:
The Smart Plug Gateway connects to your Wi-Fi network so you can control lights, appliances or roller shutters locally or remotely using your voice assistant or the Legrand Home Control app on your smartphone. The smart socket is connected in the same way as a standard one.
The main switch I'm at home/I'm away from home allows you to create scenarios for controlling lighting, roller shutters and smart sockets of your Legrand home comfort system.
You create your own scenarios for equipment operation during your absence and return home. The ultra-thin switch can be moved to another location at any time.
Equipment:
| Type: | Socket |
| Switch type: | Key |
| Installation method: | Hidden |
| Case material: | Heat-resistant electrical plastic |
| Depth: | 10.3 cm |
| Weight: | 281 g |
| Dimensions and weight (gross) | |
| Weight: | 281 g |
| Height: | 17.8 cm |
| Width: | 8.2 cm |
| Depth: | 10.3 cm |
| Additional Information | |
| Country of Origin: | France |
| Guarantee period: | 24 months |
Instructions
Instructions
Manual
Articles
- Wiring and electrical equipment in the bathroom: what you need to know
- Electrical wiring in the bathroom: design and installation features
- Smart home Legrand
Rating (1)
- 5 (1)
- 4 (0)
- 3 (0)
- 2 (0)
- 1 (0)
Already bought this product? Tell me what you think about him.
“Your opinion is important to us!”
Interesting and useful thing
My husband and I bought this set of socket, switch and gateway because of the child. My son often forgot to turn off electrical appliances or lights when he left home on his own. Now this problem has been solved thanks to a smart switch. You can control it with a button or from an application through Alice; it’s easier for my son from a phone. In addition, I can control what is happening at home through the application and know when the child came/left. A special convenience is that we had regular Valena Life sockets installed throughout the apartment, but the design of the smart sockets is no different and fits one to one. So the replacement turned out to be visually indistinguishable from the sockets that were there before. And the installation is very simple, just took out (my husband did it) the old outlet and put a new smart one in its place. Very cool!
0 or You found this review helpful. ✓ You do not find this review helpful.
“Your opinion is important to us!”
Thank you for your feedback!
Thanks for your feedback! After passing moderation it will be published on the website. Please note that only product reviews are published here. We always welcome feedback regarding services, any questions and suggestions at
Unfortunately, your review was not saved. Please try again later
Even more products from Legrand
The information on the price and availability of goods presented on this website is valid as of the current date. All prices are indicated in rubles, including VAT. All product specifications and images are provided by the manufacturers. The manufacturer reserves the right to change the characteristics/appearance of the product without prior notice, and therefore, on the date of purchase of the product, they may differ from those presented on this website. Changes and text errors are possible. Please check the availability of the required characteristics and equipment at the time of purchasing the product.
Subscribe to our newsletter!
- information about all promotions and special offers
- tips and ideas for arranging your home or cottage
- current news and trends
Download our mobile application
The OBI mobile application is a construction hypermarket in your smartphone! Now you have access to more than 50,000 home and garden products, and you can choose and compare products without leaving your home. Just install it on your smartphone and enjoy all the benefits thanks to our convenient services.
Here you can easily find ideas and tips for renovation, gardening or decor, share your experience with others and find like-minded people.
Step-by-step dismantling instructions
After checking that there is no voltage in the network, you can begin dismantling.
To disassemble the socket, proceed in the following sequence:
- Remove the cover of the old outlet. To do this, unscrew the bolt or screw located in the middle. If the cover is stuck to the wall, you need to carefully pry it off with a flat-head screwdriver.
- Once again we check that there is no voltage on the line. We place a dielectric mat under our feet, arm ourselves with safety glasses and a headlamp.
- Unscrew the bolts that regulate the position of the legs. If they are stuck to the block, you need to lightly press them with a screwdriver, after trimming the wallpaper.
- We take the block out of the glass and unscrew the wires from the contacts. If the threads on the bolts are rusty and do not give way, you need to drop a little machine oil on it. If this does not help, the wire must be cut off if there is sufficient margin for this.
- Disconnect the ground wire. If it goes to another device, it cannot be cut, as this will negatively affect the grounding parameters.
- We remove the old socket box. The iron sleeve can be crushed with plumbing pliers, and the plastic sleeve can be pulled out by the edges with pliers. To avoid tearing out a piece of plaster, you need to make a groove around the sleeve with a knife or drill several holes.
- Clean the hole from crumbs and debris. We check that the new glass matches the existing hole. If it is small, expand it with a hammer and chisel. You can use a diamond crown. The diameter and depth of the recess should be 4-8 mm larger than the size of the glass. Again, clean the hole from debris and dust. It is advisable to cover the bottom with felt to prevent the penetration of noise, bedbugs, fleas and cockroaches from neighboring apartments.
- We mix the starting putty, coat the socket box with it, thread the wires through the hole and insert it into the niche. The product must be aligned so that its edges are in the same plane with the wall.
Before continuing work, you need to wait 2 hours for the solution to set. After the putty has completely hardened, it is necessary to grout and polish the wall. Then you need to treat it with a deep penetration primer to strengthen the surface.
If you plan to replace the wiring, you should firmly fasten the old and new cables and pull the new wiring through the channels, using the old line as a pull cable.
Versatility and practicality
If you have chosen Schneider sockets and switches of the same series for the entire apartment, then you can safely install the supports right away. They are equally suitable for all electrical installation devices. This approach saves a lot of time, because... It is more convenient and faster to install separate calipers than ready-made sockets, and even with connected wires. You simply tighten two screws and the metal frame is securely fixed in the socket box.
Helpful Hint: When choosing outlets, give preference to outlets with grounding. You can plug in any device into this outlet.
Further work is connecting the outlet. Everything happens very quickly. Depending on the model, you either screw the wires into screw terminals or simply push them into screwless terminals. We recommend that you use screwless terminals because... they guarantee proper operation for the entire service life of the socket without periodic tightening of the thread. The mechanism is inserted into the caliper without additional screws, just on the latches
In the same way, the socket cover is placed on the latches, and on top there is a decorative frame with the colors and shape of your choice. No additional screws, nuts or fasteners. Everything is done by hand without tools. Purely. Reliable. Beautiful.
Checking with a dial multimeter
This is almost the easiest way to ring a cable, since such a device is found in almost every home. To check, take green and orange pairs of veins. The procedure is as follows:
- switch the device to search for resistance;
- touch the orange veins with a chisel;
- the resistance should be set at several ohms;
- touch the green veins and carry out a similar check;
- touch the orange and green veins and get a resistance value of 100 Ohms and above.
If the measurement was successful and showed the same numbers, then this indicates the excellent condition of the wires. If pairs do not ring through, it is necessary to replace them with unused ones, for example, brown or blue.
General recommendations
Before connecting, it is necessary to lay the cable to the installation site of the socket in a groove, a special box or along the baseboard. It is recommended to lay network communications separately from electrical communications. If there is a need to cross electrical wiring, this should be done strictly at a right angle.
For one living space, 1-2 sockets are enough. When installing 2 sockets, they are usually placed on opposite walls. In office premises, a separate point is installed for each workplace. If you have a suspended ceiling or plasterboard walls, installation is greatly simplified.
Removing old sockets and installing new ones
Important!
Before starting dismantling work, it is necessary to turn off the power supply at the panel and check the disconnection using a voltage indicator.
Then you can begin dismantling the damaged socket:
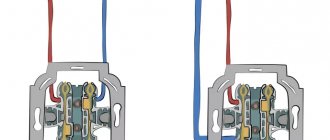
- Unscrew and remove the protective cover plate. It can be secured with one or two screws.
- Release the spacer tabs from the mounting screws and remove the internal mechanism from the box.
- Unscrew the contact screws and disconnect all wires. Remove the damaged socket.
The new outlet must first be prepared for installation:
- To begin with, the socket must be disassembled. Unscrew the protective frame, as it covers the internal mechanism of the device. Inside you can see two spacer legs with screws, two contact screws and a grounding element. If there are only two wires in the socket, then there is no grounding in the device.
- From the end of the wire sticking out of the wall, remove part of the insulation using wire cutters. The wire is inserted into a special contact hole in the socket and clamped with a screw, leaving no exposed sections of the wire. The reliability of the contact can be checked by pulling the wire. If the contact is poor, the connection will burn out and quickly damage the socket. The second wire and grounding conductor are connected in the same way.
- The assembled mechanism is installed in the socket box, aligned and fixed using spacer tabs.
- Then install the frame and protective cover, securing it with a fastening screw.
Schneider-Electric Asfora double socket with grounding, white (EPH9900121)
Short description
The double electrical outlet with grounding is designed for installation in rooms with three-wire electrical wiring. The phase, neutral working and neutral protective conductors are connected to the contact terminals of the socket. Trust. Read more.
Brief characteristics
- Availability: In stock
Pickup | Free Shipping | Same day shipment | Courier services in Ukraine
Payment upon receipt | Cashless payment | Cash
Warranty for all products| Quality Certificates | Return and exchange of goods
- Description
- Characteristics
- Reviews (0)
- Question - answer (0)
The double electrical outlet with grounding is designed for installation in rooms with three-wire electrical wiring. The phase, neutral working and neutral protective conductors are connected to the contact terminals of the socket. The surface of the product is made of glossy plastic, resistant to ultraviolet radiation. The socket complies with TSE, UKR, VDE and IEC 60669-1 environmental standards.
Product type: electrical socket Availability of grounding contacts: yes Availability of protective shutters: no Mains voltage: 250 V AC Rated current: 16 A Switching power: up to 3500 W Type of contact terminals: screw Terminal capacity: 2 x 2.5 mm² Surface material: ABS plastic Surface: glossy Protection level: IP20 Color: white Article: EPH9900121 Series: Asfora Manufacturer: Schneider Electric
| Options | |
| Socket mechanisms | Power |
| Material | ABS plastic |
| Rated voltage | 250 V |
They buy with this
Switch Schneider-Electric Asfora 2-gang white (EPH0300121)
The two-gang white Asfora switch is made in classic white color and has standard dimensions, so it can be installed in any room, regardless of its purpose. Two-grade..
Frame Schneider-Electric Asfora 3-post horizontal white (EPH5800321)
Decorative frame for 3 posts is designed for installation on Asfora series products. Using the frame, you can create multi-standing installations. The surface of the product is made of glossy plastic, resistant..
Frame Schneider-Electric Asfora 2-post horizontal white (EPH5800221)
Decorative frame for 2 posts is designed for installation on Asfora series products. Using the frame, you can create multi-standing installations. The surface of the product is made of glossy plastic, durable...