Electricity is used everywhere. Devices that provide access to this essential resource for all are very important to the consumer. These include surface-mounted sockets and switches - equipment that is extremely simple to install and operate.
Any home craftsman can easily install such a device if desired. We will tell you how to properly secure it and connect it to the power line. Taking into account our recommendations, you will be able to build a trouble-free network that is safe for others.
The article proposed for consideration provides step-by-step installation instructions. We describe in detail the design features of overhead electrical installation products. To optimize the perception of extensive information, useful diagrams, photo collections and guides, and videos are attached to the text.
What types of overhead sockets exist?
These devices have several varieties, depending on their purpose and area of application. Below we will discuss some commonly used types with specific examples. So, overhead sockets are classified as follows:
- Socket specifically designed for computer networks (computer overhead socket RJ-45 Electric);
- Regular power (Viko surface-mounted electrical socket);
- TV socket (TV socket Schneider);
- Telephone socket (RJ 11).
These devices are also divided into types according to the level of protection, which is usually written on the device body. IP20 means the socket is unprotected and is suitable for a normal room. IP66 makes it clear that the device is protected from water and dust.
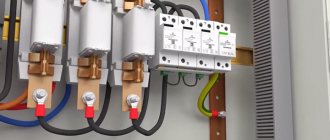
Requirements for device components
Without a set of components, it is impossible to connect a computer socket.
You will have to purchase separately:
- Cable (lan) of the appropriate category.
- Connector (jack) – a device in the form of an eight-pin plug for connecting a cable to a computer port.
- Patch panel – provides the ability to quickly switch between active network equipment and operating points. The number of device ports depends on the number of connected equipment and can vary from 10 to 50.
To connect an RJ45 cat.5e socket, you will need a four-pair shielded twisted pair cable equipped with a common foil screen of the KVPEf-5e type 4x2x0.52. If you connect the RJ45 cat.6 model, you will also need a four-pair twisted pair cable, but of the KVP-6 4x2x0.57 type.
The generally accepted cutting option in Russia is the EIA-5688 standard; its marking designation is displayed with the Latin letter “B”
An eight-core Internet cable includes four twisted pairs. The second wire in each twisted pair has white insulation and is marked with a white stripe.
Information cables are divided into several categories, starting with the third. The higher the category, the higher the standard of transmission.
To transmit data at 1 Gb/s, two-pair cables are used, and within 10 Gb/s, four-pair analogues are used. The price difference between them is not big. Therefore, if you plan to use a larger number of conductors in the future, it is better to immediately purchase a four-pair network.
Cables of categories “3” and “5” are used for data transmission at a speed of 100 Mbit/s, and categories starting from “5e” and above – at 1000 Mbit/s
When installing connection points, preference should be given to shielded types of cables, which are most protected from interference. Shielded cables are suitable for solving a wide range of problems: telephony, smart TV, Ethernet.
If during installation of the equipment the cable length is not sufficient or one of its sections is damaged, you can use a female-to-female adapter. When connecting a connector for cable extension, to avoid mistakes, you only need to rely on the color indicators printed inside the box.
The RJ45 female-to-female adapter allows you to quickly connect twisted pair cables equipped with a connector of the appropriate standard, without compromising signal loss
When choosing a pat-panel, focus on the category of the outlet. There are devices on sale in categories “5”, “5e” and “6”.
The end of the data cable is equipped with an 8P8C connector, referred to in professional jargon as a “jack”. It has a transparent body through which multi-colored wires are visible.
This element is often mistakenly called RJ45. But in fact, RJ45 is an accepted standard, and the exact name of the connector is 8P8C. Today, for connection to equipment, the TIA/EIA-568-B standard for connecting twisted pair cores, generally accepted since 2001, is used.
When connecting an Internet cable, two schemes can be used: T568A and T568B. But in our country, the wires are mainly placed using the “B” scheme.
The standard for connecting “twisted pair” cores TIA/EIA-568-B implies a sequence of cores in the following order: (1-2) – white-orange with orange, (3-4) – white-green with blue, (5-6) white-blue with green, (7-8) – white-brown with brown
When connecting 10BASE-T and 100BASE-T networks, the TIA/EIA-568-A standard is used. There is no need to be afraid that when connecting a twisted pair cable you may accidentally confuse something. Modern router models are designed for both options. Therefore, they are able to automatically transfer the signal.
Under what circumstances and where should they be installed?
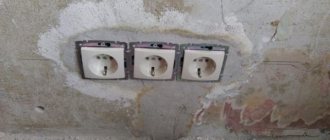
A big advantage is that there is no need for gating (making special channels in the walls for electrical wiring). Meanwhile, an overhead socket can help when the room has already been renovated. Its installation will not require any disruption to the finish.
This device can be easily installed on ceramic tiles. To do this, you will need to make several holes for the mounting screws with a special drill.
This type of socket is also popular in country houses.
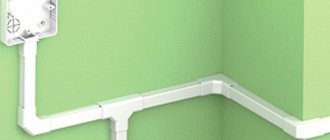
Why do you need to install overhead sockets on the baseboard?
Nowadays, the fashion of hiding wiring in baseboards is becoming increasingly widespread. This installation option has a number of advantages:
- There is no need to disturb the finish in order to expand the electrical wiring network;
- Safety increases due to the fact that the wires do not “hang”;
- Sockets become almost invisible due to their location, which gives the room more aesthetics;
- There is significantly less work on gating, which saves effort and money;
- The socket can be placed in almost any part of the house or apartment.
Placing an outlet on the baseboard will decorate the interior of the room. Installing a surface-mounted socket with your own hands is a fairly simple process, which means you don’t need to seek help from specialists.
It is recommended to buy baseboards and sockets with socket boxes from the same manufacturer. This ensures that the dimensions of the outlet match the rest of the materials.
Attention! To prevent moisture from getting on the contacts, it is necessary that the surface-mounted socket has curtains that can seal the holes.
Classification by availability of additional features
Many varieties perform some additional functions. The sockets are suitable for any type of plug and have special features:
- Child protection. They have a special design - the holes for the plug are moved to the side to prevent attempts to insert something into them.
- Moisture protection. Such a socket can be remote, for example, used outdoors. It can be installed in a room with high humidity levels - a bathroom or kitchen.
- Timer. These modern designs are programmed to turn on and off at specific times of the day. Convenient if you need to create the effect of people being at home during departure. Now there are sockets with daily and weekly timers on sale.
- With a switch. Consumers can turn the power on or off without removing the plug from the socket. This significantly extends the life of both devices.
- With backlight. It is easy to connect the necessary electrical appliance even in a dark room.
- With USB connectors for charging mobile devices. There are usually 1 - 2 connectors, but if desired, you can find more.
- With a counter. Not yet widely used. Allows you to see how much energy a particular connected device consumes.
- Universal household socket. Used with English plug, American plug and many others. The holes are spaced at a width that allows the device to live up to its name. It did not find popularity in the CIS countries.
There are quite a lot of parameters for classifying electrical outlets. These are design features, degree of protection, and the presence of additional functions. Each outlet has its own purpose and area of use.
Overhead sockets for the kitchen
Sockets in this room are located on three levels:
- First level. Serves to connect large appliances (washing machine, electric stove, etc.). The installation height of the socket is 15 cm.
- Second level. Necessary for small electrical appliances that will need to be moved frequently (kettle, mixer, toaster, etc.) Sockets are placed at a height of 110 to 130 cm.
- Third level. Suitable for electrical appliances such as hoods. The height of the rosettes is 200-250 cm.
What you need to know before installation
Remember that the kitchen is a high-risk place because there is water and fire. To avoid negative consequences, make sure that the sockets have the appropriate level of protection.
The installation locations of sockets in the kitchen are selected depending on the location of electrical appliances. For example, near a table or kitchen cabinet.
Important! It is worth remembering that kitchen electrical appliances have high power. Therefore, choose an outlet that is designed for this load level to prevent a fire.
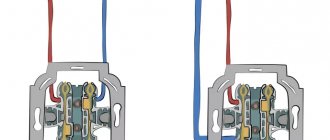
Sealing the connector in the connector
To connect the connector, the insulation is removed from the end of the cable. Each pair is untwisted and aligned, pointing in different directions. If a thin shielding wire is provided, it is also bent to the side for a while.
When laying out pairs in a certain sequence, they are guided by the “B” scheme described above.
The wires, tightly laid in one row, are aligned and cut, leaving a length of 10-12 mm so that the insulation of the twisted pair begins above the latch
Twisted pairs with the ends of the wires cut off are inserted into the connector cavity. The connector should be positioned with the latch facing down. Each conductor is laid on a separate track, trying to push it all the way.
The connector with the wires laid in it is inserted into the pliers. To seal the connector, you need to smoothly bring the handles of the pliers together.
The protrusions present in the mounting sockets of the pliers, when pressed, will push the conductors towards the microknives, and they will already cut through the protective sheath and ensure reliable contact
Ideally, if the connector body “fits” into the socket normally, no effort is needed. If it is necessary to reconnect the cable, you just need to cut off the end again and perform the same steps, but with a different jack.
The technology for installing a double socket is similar. The only thing is that you will have to connect two cables from the router, since parallel connections are not used for network equipment.