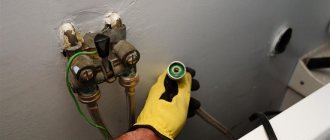
To obtain hot water at home, many private home owners install boilers or instantaneous heaters. However, users often forget or are not aware that the operation of such devices involves the risk of electric shock - through contact with the housing, plumbing equipment, or even water flow. Therefore, we will look at how to ground a water heater in your home, what grounding is and why it is needed, in what ways it is not permissible to do it, and which are better to use.
Safe operation of a boiler in a private home requires proper grounding Source ytimg.com
Grounding - what is it, why is it needed?
The operation of an electric water heater comes down to contact of a certain volume or flow of water with a heating element or coil. The heating element includes a special metal spiral with high resistance. When current passes through it, heat is released, which is transferred through surface contact to the water. As a result, the user receives hot water at the outlet of the tap.
The very specific nature of the operation of such a device does not exclude phase breakdown into the body and water mass. Therefore, on its outer part there is a special separate mount for the grounding conductor. The latter is connected to a grounding loop located outside the building and buried in the ground. In the event of a breakdown, the current will not flow to the housing, through pipes and water, but will safely go into the ground.
From the point of view of the requirements of electrical installation work, the need to ground a flow-type or storage water heater in a private house is determined by the following number of factors:
- Damage to the electrical insulation of the heating element due to corrosion or overheating due to a malfunction of the automation.
- Short circuit and phase breakdown to the housing.
Grounding an instantaneous water heater is a prerequisite for safe operation Source vanna-prosto.ru
See also: Catalog of companies that specialize in electrical work of any complexity
- The occurrence of stray currents on metal parts of an electrical appliance.
- Static electricity builds up as a result of water flow.
- Attracting a lightning strike in a thunderstorm.
All these factors, during contact with the boiler body, faucet, plumbing fixture, or even water flow, lead to the formation of an electrical “heater-man-ground” circuit. As a result, depending on the situation, you can get an electric shock to varying degrees.
Note! Without proper grounding, both instantaneous and storage water heaters cannot operate efficiently and safely. For example, disconnecting the boiler from the network while taking a shower leads to a failure in the settings, as a result of which the device will overuse electricity. In addition, connection to the ground is one of the mandatory conditions of the installation regulations.
Reliable grounding can only be achieved by a properly designed metal circuit Source pinimg.com
Where can I buy
You can purchase a water heater as quickly as possible at your nearest specialty store. A good option in terms of price-quality ratio is purchasing from the AliExpress online store. Mandatory long waits for parcels from China are a thing of the past, because now many goods are in intermediate warehouses in destination countries: for example, when ordering, you can select the “Delivery from the Russian Federation” option:
| HYUNDAI Instant Electric Water Heater | Electric water heater TINTON LIFE with temperature display | Stainless steel liquefied water heater |
| 2500W floating electric water heater, for bath, swimming pool | RX-21.3500W instantaneous electric water heater | Kitchen electric water heater HYUNDAI |
Unacceptable grounding methods
Owners of private houses often violate the requirements for the safe connection of electric heating equipment by using the following unacceptable methods for grounding:
- Connecting the ground conductor to the water supply or heating riser. Even if the pipeline comes into contact with the ground at some point in its trajectory, this method does not guarantee complete grounding. In addition, through pipes and heating appliances, the phase can easily affect any person who touches the water or appliance anywhere in the house.
- Transferring the grounding wire to the elements of fastening the housing to the wall. The bracket attached to the wall is not connected to the ground at all. Therefore, the problem cannot be solved this way.
- Combining “zero” and “ground” in a socket. This is a rather dangerous method of grounding a boiler - since in the event of a break in the zero supply or switching in the electrical panel, a phase transfer will occur to the housings of all devices connected to the network.
Each grounded device must have its own contact on the bus Source biysk-tv.ru
- Serial grounding of several devices. If at least one of the circuit participants fails, all connected equipment will be under dangerous voltage.
- Simultaneous connection of several wires to one terminal. Each grounded device must have an individual contact.
Advice! An alternative way that allows you to connect and safely operate an instantaneous or storage water heater without grounding is to install an RCD in the circuit - a residual current device, also called a differential circuit breaker. In the event of a phase breakdown, it will immediately turn off the voltage supply.
If the water heater is installed by a specialized team
It would seem there is nothing to worry about. Professionals will do everything right. But this is not always fair. First of all, you need to check in the work contract whether there is a section on connecting to protective grounding. By signing such a document, the foreman bears responsibility (including criminal responsibility) for the safety of operation. Before starting work, ask the installers what the boiler ground will be connected to. Perhaps your home does not have a working ground connection at all. Then the “masters” use the working zero as ground.
Important! The use of a working zero instead of a protective grounding, as well as connecting the “ground” to the “zero” in the power supply panel, is unacceptable!
If the installers offer you this option, either do not enter into an agreement with them, or require a different grounding scheme. After carrying out the work, it is necessary to check the correctness of the ground connection. To do this, measure the voltage (using a multimeter) first between the phase and zero, then between the phase and the contacts to which the boiler is grounded. Without going into details, the voltage should be slightly different. If the measured potential is the same (for example, 219 volts in both cases), your boiler will operate without grounding!
Briefly about the main thing
Grounding is a separate electrical conductor leading from the device body to the grounding office. In the event of a breakdown, the current will immediately go into the ground without harming the residents of the house. The need for grounding for water heating equipment is due to the following factors:
- Destruction of heating element insulation.
- Phase breakdown on the body.
- Stray currents.
- Static electricity.
- Lightning strike.
In order to ground a water heater or boiler both in a country house and in a private house, it is necessary to install a special metal circuit in the ground at some distance from the foundation. It is unacceptable to ground in the following ways - by transferring the “ground” conductor to a pipeline or fastening, combining the “zero” with the “ground” in the socket, connecting several devices in series, connecting the conductors from different devices to one terminal.
Safety precautions and expert advice
All rules and specialized requirements for grounding safety precautions must be taken into account by the specialist when carrying out work. Standardization of data from such documentation is provided, which applies to the production of all types of electrical installation and commissioning work, including grounding.
Having summarized the data from the documentation regulating the grounding of various types of electrical equipment, we can highlight the main task of the grounding device - the implementation of the working and protective functions.
The implementation of the protective function will prevent electric shock to residents in the event of a breakdown of the electrical wiring or heating element of the water heater. The working function of the grounding device of the water heater is no less significant.
Experts strongly recommend not to neglect the grounding of the boiler. The working function of the grounding electrodes increases the service life of the boiler. The stainless steel used in the manufacture of the heating tank is exposed to stray currents. Micropores form and the overall tightness of the device is compromised. Grounding allows you to neutralize the harmful effects on a thermally insulated tank by draining currents.
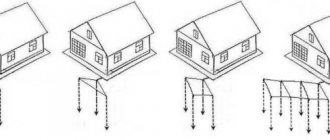
The production of grounding a water heater can be represented as a complex of sequential implementation of interconnected elements. Each element of the grounding system is very important. A reliable level of electrical safety for residents and a long service life of the water heater are the main arguments in favor of the need to ground the device.
Storage heater installation
Electric boiler installation
In the case of storage heaters, temporary installation is not provided. You, of course, can connect an ordinary hose with a watering can to the warm water outlet, but using such a unit will be absolutely inconvenient.
Water heater connection diagram
First step. Select a suitable location to install the water heater and check the wall.
Flow models are quite light in weight. Cumulative ones will put a much more significant load on the wall
Therefore, when choosing a place to install the heater, you need to pay attention not only to the degree of convenience of pipe installation, but also to the strength of the surface
How to install a storage water heater
As a rule, heaters with a volume of up to 200 liters are attached to the wall. Tanks of larger volume require exclusively floor installation. If the heater has a volume of more than 50 liters, it is recommended to attach it exclusively to a load-bearing wall.
Second step. Prepare all the necessary equipment for installing the water heater.
Materials you will need
You will need:
- a hammer drill (if the wall is concrete) or an electric impact drill (if the wall is brick);
- marker;
- tape measure;
- a tile drill (if the surface where the heater will be mounted is tiled);
- safety valve;
- FUM tape;
- dowels and fastening hooks;
- building level.
If the required wiring is available with pre-installed tees and shut-off valves, installation of the storage heater is carried out in an extremely simple sequence.
How to install a boiler
First step. Step back approximately 150-200 mm from the ceiling surface and leave marks on the wall for future holes. Thanks to this gap, you can conveniently lift the water heater for hanging and removing the tank.
Second step. Armed with a drill (hammer) with a suitable drill bit, make holes in the wall with a depth corresponding to the length of the mounting hooks.
Third step. Hammer the dowels into the prepared holes, and then screw the screws into them. Be sure to leave a gap to accommodate the water heater mounting strip.
Fourth step. Install the tank onto the mountings.
Fifth step. Install a safety valve at the cold fluid inlet. With its help, excessive pressure will be removed from the system. Connect the tube for draining excess liquid to the sewer pipe. This tube can also be carefully inserted into the toilet tank.
Sixth step. Connect the cold water pipe to the water heater inlet. The entrance is marked blue. Connection must be made exclusively through the safety valve. At the outlet (marked in red) connect the pipe for the output of the finished hot liquid.
Water heater installation
Typical storage water heater installation diagram
Again, note the importance of the safety valve. Without such a device, the tank may be seriously damaged or even rupture due to excessive pressure build-up during hot water preparation.
DIY boiler connection diagram
If there is a safety valve, the excess pressure will simply be released and the device will continue to operate under normal conditions. Also, with the help of a safety valve, you can quickly and conveniently drain water from the heater when it is necessary to carry out maintenance and repair work on the equipment.
Thus, installing a water heater is not particularly difficult. If you wish, you can install and connect the storage model or flow-through heater yourself. It is enough just to follow the provisions of the presented guide and everything will definitely work out.
Gas water heater diagram
Good luck!
Stages of grounding work
Regardless of the manufacturer and model of the device, the connection instructions contain a recommendation for the need to ground the device.
Production stages:
- Checking the device for the presence of a special ground terminal. In its absence, work is carried out using a special contact (in the plug and socket). You cannot connect the socket and the boiler directly through a phase - there is a high probability of emergency phase failure.
- Search for grounding material. Sections of a corner or part of a metal circle are ideal. The length of the grounding conductors must be at least two meters, taking into account the peculiarities of ground freezing in a certain region.
- Analysis of optimal characteristics of metal bonding. The thickness of the strips is standardized (more than 4 mm), and the length is selected based on the characteristics of the ground electrodes. The length of the metal bonding strips must be sufficient to combine the ground electrodes into a circuit.
Grounding is a complex of interrelated tasks. The preparatory stage is no less important than its production itself.
Preparation
Carrying out any electrical installation work requires the availability of appropriate construction equipment. A general list of necessary materials and construction tools for organizing a boiler protective device:
- metal wire;
- iron rods, metal angle or similar material for the ground electrode;
- bolts, nuts and washers with high-strength mechanical characteristics;
- a hammer drill with a drill of the required diameter;
- welding machine, preferably of the inverter type;
- hammer and wrenches;
- sharpening machine.
At the preparatory stage, a specialist assesses the electrical wiring of the object (the cable must have the appropriate cross-section), determines the suitable material of the grounding conductors and the shape of their arrangement.
The completion of the preparatory stage of work is the assembly of the grounding loop.
Contour collection
We cut the corner into six strips of three meters each. We cut one side of three of them at an acute angle with a grinder; in the future it will be much easier to drive them into the ground. We dig a triangular ditch in the ground, with a side length of a little more than three meters and a depth of 30-50 cm. We install profiles in the corners of the resulting triangle with the points down and, using a sledgehammer, drive them almost to the entire length, leaving 10 centimeters on top.
We weld the driven corners together with the remaining three. In essence, the circuit is ready. It is shaped like a chair with three legs buried in the ground, as in the photo. Now you should connect to the shield.
We make a ditch with our own hands from the nearest corner of the contour to the place in the house where the shield is located. We drill a through hole in the base of the house. The wire is welded on one side to the corner of the contour and is led into the house along a ditch through a hole made in the base.
This cannot be done using wire, as it will rot over time.
A screw is welded to the end of the wire, which is located in the house, with the head down. After this, we bury the contour and wire. It's good if you install it in soft soil or clay, they conduct current well due to their high salt content. If the circuit is installed in sand, the installation site must be watered with saline solution.
Electrical wiring diagram of an apartment building
Until 1998, according to the standards in force at that time, most houses were powered using the so-called TN-C circuit or a circuit with a solidly grounded neutral.
A four-core cable was installed in the house, which had 3 phases and one neutral conductor. In an apartment, such a system is easy to identify - all sockets do not have a protective contact, they are two-pin.
In modern houses, the power supply is supplied by a five-core cable (TN-S wiring), in which the working and protective neutral wires are separated. The sockets have a protective contact, just like when using the TN-CS circuit. There are other grounding schemes.
Grounding organization diagrams
“The figure shows possible options for power supply and grounding schemes. If you don’t have exact information about what kind of circuit is organized in your home, contact the energy specialist of the management company.”
An alternative to zeroing
In the TN-S subsystem, grounding of the protective conductor PE is carried out only in one area - on the grounding circuit of the transformer substation or electric generator. At this point the PEN conductor is separated, and then the protection and working zero do not meet anywhere.
In such a power supply scheme, grounding and grounding organically interact, creating conditions for high electrical safety. However, in systems where the neutral is isolated (IT, TT), grounding is not used. Electrical equipment operating within the TT and IT system is grounded through its own circuits. Since the IT system involves supplying power only to specific consumers, it makes no sense to consider this method of organizing protection in residential buildings. The only alternative to incorrect and therefore dangerous zeroing of the PE bus is the TT system. Such a system is especially relevant, because the transition to technically advanced systems TN-S, TN-CS is technically and financially difficult for houses whose age exceeds 20 - 25 years.
The electrical network, built according to the TT standard, is designed to provide high-quality protection against energized non-current-carrying parts. All work on organizing grounding must be carried out in accordance with the standards specified in paragraph 1.7.39 of the Electrical Installation Rules.
How to ground a 220 V water heater in a country house or in a private house with your own hands
To protect yourself and your loved ones, you need to properly ground the water heater, namely: correctly make a grounding circuit.
Grounding a boiler in a private house
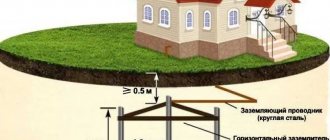
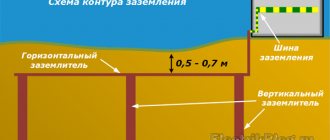
The grounding loop should be located in the ground, not far from the house. Perform the work as follows:
- Select a suitable location for the ground loop. It should be no more than 3–4 m away from the house and located no closer than 1 m from the foundation. Choose a place for the circuit away from roads and paths. Ideally, some kind of art object will subsequently be placed in place of the contour. The fact is that this place will be dangerous for people if electric current passes. No one should be there.
- Prepare the site by removing debris from it and dig a triangle-shaped trench with equal sides, 0.4 m wide and about half a meter deep. The sides of the triangle should be 1.4-2 m. For more information about the grounding device for a private house, read the article “How to properly make grounding in a private house yourself.”
- For the plate connecting the ground loop to the house, dig a trench of the same dimensions.
- Treat all metal grounding elements with anti-corrosion liquid.
- Drive pins into the vertices of the triangle to a depth of at least 1.5 m. Reinforcing rods with a diameter of about 15 mm can be used under the pins.
- Weld horizontal electrodes, which can be made of strip or angle steel, to the pins driven into the ground. The corners are taken with a size of 50*50*5 mm, the strip can have a cross-section of 50*5 mm. Weld the horizontal elements together in the form of a uniform triangle, and then weld them to the vertical electrodes.
- Weld a steel strip to the resulting closed loop for connecting to the house. Its cross-section can also be 50*5 mm.
- Bolt the house liner strip to the wall of the house.
- Before digging a trench, check the ground resistance. How to check the operation of grounding is described in detail in the article “How to check grounding resistance with a multimeter in a private home.”
- If the grounding circuit works well and fully ensures the safe operation of the water heater, then bury the trench.
Layout of the ground loop.
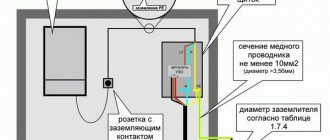
To connect the grounding wire on the device inside the house with external grounding, you can use a single-core copper wire with a cross-section of 4 mm square. or similar aluminum wire with a cross section of 6 mm square.
You can use a ready-made set of grounding elements, which will significantly speed up and simplify the process of installing the grounding loop. In this case, welding is not required.
Grounding carried out according to the above plan can be used not only for the water heater, but also for the entire house.
Maybe