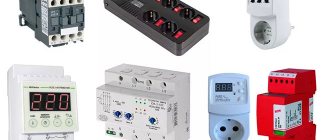
An electronic socket timer, as the name suggests, combines a socket and a time tracking device in one device. The socket timer is installed in a stationary socket or in an extension cord socket. On the back of the case, the device has a power outlet to which consumers - electrical household appliances - are connected.
Electricity is supplied to the output contacts not constantly, but according to a schedule. The voltage supply time is programmed using a timer that controls the relay connecting the input and output contacts.
Timer sockets can be used in a wide variety of environmental conditions. In particular, in addition to standard devices, modifications are produced designed for rooms with high levels of humidity, splash-proof devices.
Functions
A socket with a timer can be used to solve a wide range of problems.
First of all, a programmable household socket allows you to save energy. It will turn off the electric heating while the owners are away and turn it on before they arrive for the period of time necessary to achieve normal temperature. Not every socket with a timer is designed to control powerful heating devices, so when purchasing, you should read the instructions.
An automatic socket with a timer allows you to regulate outdoor lighting and control irrigation in an automated mode. It will also, according to a given schedule, control the electrical equipment of aquariums, terrariums and swimming pools.
Electronic timers allow you to program a time schedule without a strict time reference, with random on-off cycles. This mode of operation simulates the presence of people, even if they are not actually in the house, which will scare away the criminally inclined contingent.
Sockets with countdown timers are also available. Devices of this type are used on washing machines and electric stoves. The required time is indicated by turning the knob of the time relay; after it is counted, the load is turned off.
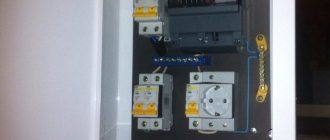
DEVICE CONNECTION DIAGRAMS
The connection diagram for the electronic digital timer TE-15 recommended in the operating instructions is as follows:
At the same time, it is advisable to connect the device through a circuit breaker with a rated current of no higher than 16 A.
To connect a powerful single-phase load, a contactor is usually used. The diagram of such a connection may look like this:
Connection of a three-phase powerful load, for example, an asynchronous motor, electric pump or electric heating boiler, is also carried out using an appropriate contactor.
Types of timers
The devices under consideration are divided according to the principle of operation of timers into mechanical and electronic.
The simplest version of a mechanical timer is a countdown timer made on the basis of a clock mechanism, which is wound by turning the handle.
The greatest demand is for sockets with mechanical daily programs. Because the electric motor of a clock mechanism requires electrical energy to operate, they are sometimes called electromechanical timers. Batteries are used as backup power. The load control program is created mechanically through a series of segments at 15-minute intervals.
An electronic timer for a household outlet makes it possible to set programs for the week and month, as well as display the real time and parameters of the specified programs on a liquid crystal display.
Rating of popular models
Model E.Next e.control.t11
The leading places in the rankings are occupied by German devices from Theben. They have proven themselves to be reliable, durable and high-quality devices.
Theben Timer 26 is available in a regular and waterproof housing with IP44 rating. These are simple electrical sockets that signal the end of the cycle with a characteristic click. They are silent, made of durable and high-quality material. The disadvantages include the lack of light indication. The price of a regular device is 1,800 rubles, with protection against dust and moisture – 3,000 rubles.
The domestic model E.Next e.control.t11 has European quality, despite the low price of 400-500 rubles. Has minimal functionality. The maximum current is 16 A. Additional options are available for E.Next e.control.t14 with electronic control.
Budget devices include another domestic development, Feron TM22/61925. Costs about 700 rubles. The characteristics are not the most reliable; the seller’s warranty is only 14 days. The parameters are standard - 16 A, the presence of an electronic programmer for a week, an LCD display.
Features of the electromechanical timer
A mechanical socket with a disk timer is programmed using a rotating actuator disk and buttons (petals) located around its circumference. The disc is marked with marks at 15 or 30 minute intervals. Using the buttons you can turn the load on and off. Models are produced in which a raised button will turn it off, while for others it will turn it off. On the side of the timer there is a button to switch the operating mode - continuous voltage supply and adjustable.
These devices allow you to switch the load at intervals of 15 minutes without limiting the number of switchings. But installing programs with complex algorithms here, much less arbitrary ones, is almost impossible. Mostly daily and weekly cycles are used.
Varieties
The capabilities and features of controlling an electric timer depend on the type of device. The same parameter also affects the price, so before purchasing a device it is worth understanding what is the difference between them.
Mechanical
The simplest options. They can be used to control electricity for 24 hours, which is why they are called “daily timers.”
The design is a cover plate where a control unit in the form of a round switch is located around the connector or above it. This switch should be set to the current time. Along the perimeter there are petals divided from 15 to 30 minutes. You need to press those petals that correspond to the interval when energy supply is needed. In total, it turns out that from 48 to 96 modes are available.
Such relays have to be reconfigured every day and, unfortunately, they do not provide additional functions. But the cost is very affordable, and even people who have little understanding of technology can handle the controls.
Electronic
These are more advanced digital devices that are controlled using buttons and are equipped with a display to display the entered settings.
A weekly program can be configured here, and in some models a schedule is available even a month in advance. Moreover, it is possible to set a different schedule for each day of the week. Other features are available and may vary by sample. We'll talk about this in more detail in a separate section.
Of course, you will have to tinker with the setup, but you can do it once and forget about the existence of the device for a whole week.
The price of such devices is noticeably higher than the previous type of product, but the advanced capabilities are worth it.
GSM socket
It is part of the “smart home” system, and therefore it is also called a “smart socket”. In appearance it looks like a simple overlay without any buttons or screen.
There are several control methods: via SIM card, with an application or remote control. In the first case, you will have to insert a SIM card into the gadget and create templates for SMS messages that it will send to you. In the second option, everything is controlled from a smartphone through an application; to connect, it is enough to have access to the network.
It turns out that you can regulate the operation of a programmable device from any distance and from anywhere in the world, all you need is Internet access or a mobile network signal. But this also lies the main drawback: if problems with the connection begin, then it becomes impossible to regulate the actions.
The number of options in such multifunctional devices is amazing, but you will have to pay a lot for all these pleasures.
Setup instructions
The instructions for the device clearly show how to correctly set up a mechanical timer for an outlet. It all comes down to the following steps:
- set the mode switch to the constant voltage position;
- by rotating the actuator disk, set the real time - a mark with its value opposite the fixed one;
- to configure the connection and disconnection time periods, you need to press or release the buttons corresponding to the desired period;
- insert the plug of the connected device into the timer plug;
- connect to a power outlet;
- move the mode selection button to the “Adjustable” position.
When operating, the device makes a low buzzing sound. The established mode can be performed every day. When editing it, the socket with the timer must be disconnected from the power supply.
For more information about setting up a mechanical socket, see the following videos:
Disadvantages of use
GlobeTeck smart socket timer
As for the shortcomings, there are really few of them. The main drawback, which is not common to all models, is the difficulty of use. It is also associated with another drawback - the lack of instructions or user manual. The last drawback is more typical for Chinese products, which are present in huge quantities on radio beams and electrical markets.
Garden socket-timer MK IP66 Masterseal Plus
Another disadvantage that many users pay attention to is the cost of sockets with a timer. To be frank, not every pensioner is able to afford such a new product, as well as understand how to use it, but for an adult it is quite easy to evaluate the benefits received with its help, you just have to remember the tariffs for electricity supply
1 4
It is worth noting that some models are equipped with built-in batteries. They can become a limitation on the number of cycles of use of this household appliance.
Accordingly, when choosing, you should give preference to manufacturers with reliable suppliers of components.
Electronic timers
These devices make it possible to set up to 140 programs for controlling electrical appliances. Many of them have an operating mode that creates a “presence” effect, which allows you to control the lighting in the house in a chaotic manner at a specified time (for example, from 19.00 to 24.00). The shortest period of time specified is 1 minute.
The advantages of electronic timers are:
- the ability to specify the days of the week for executing a given program;
- manual and automatic activation;
- autonomy – the capacity of the backup battery allows you to save settings for 4 days;
- availability of a separate program with a validity period of more than 2 years.
TimePC
TimePC is a program for automatically turning on and off your computer at a specified time. Users of the utility can schedule system shutdown on any date. A function is available to automatically terminate active processes before turning off the PC. The utility is compatible with Windows (32/64 bit), translated into Russian and distributed free of charge.
After launching the utility, the main window will open. The first available section is “Settings”. Here users can set the option to automatically launch the application along with Windows, disable or enable sound when software starts, and activate automatic check for updates.
To start working with the utility, you need to go to the “Off/On PC” section. Here, users can specify the date and time to automatically shut down the computer. To do this, check the “Turn off computer” checkbox and click the “Apply” button.
The next available section for managing the startup and shutdown settings of the Windows operating system is “Scheduler”. Here you need to select the day of the week at the top of the section. Next, you should set the action - turn on or off - and specify the time. After this, you need to click the “Run” button. The program will automatically perform the specified action on the selected day of the week.
Advantages:
- simple and convenient interface with Russian language support;
- built-in task scheduler;
- free distribution model.
Flaws:
There are no additional functions for turning off the Internet, the monitor, or rebooting the system.
Setting up an electronic timer
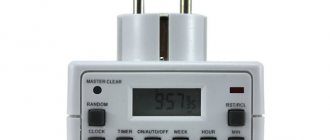
Before you set up an electronic timer, you need to know what the existing keys are for:
- MASTER CLEAR – completely resets all device data.
- CLOCK – multi-purpose, responsible for: Setting real time. Pressed together with HOUR, MIN, WEEK;
- switching time formats - twelve and twenty-four hours. Pressed together with TIMER;
- setting winter or summer time in conjunction with ON/AUTO/OFF.
The setup begins with setting the real time. When the CLOCK key is held down, the hours are set using the HOUR key, and the minutes using the MIN key. The desired format, 12 or 24 hours, is set with the TIMER key.
The days of the week are set using 2 keys. First press CLOCK and use the WEEK key to select the day of the week. The choice of summer or winter time is made by pressing the ON/AUTO/OFF key while pressing and holding CLOCK.
What do you need for work?
Having decided on the material and type of construction, you need to take care of a set of tools for the job. So, to make a wall shelf you will need:
electric drill;
Woodworking tools
- a set of screws and a screwdriver;
- a hand saw (if available, you can replace the saw with a jigsaw);
- construction level (may be needed during installation of the finished shelf);
- a simple pencil;
- tape measure, meter or other measuring instrument;
- crosshead screwdriver;
- hammer;
- work gloves and safety glasses;
- sandpaper or sanding machine.
Application
If you use such a device, share in the comments to the article what purposes you use it for; this information may be useful to someone.
See also on the topic:
Time timer, electronic and electromechanical.
Photo relay for street lighting: types, application, connection diagram.
Pulse relay. Connection diagram and operating principle.
Lifetime
The manufacturer specifies the warranty period for the devices in the technical documentation. However, the actual service life of sockets is usually longer than indicated in the product data sheet. Practice shows that devices from well-known manufacturers last longer than devices produced by little-known companies.
In this material we tried to talk about smart sockets, their purpose, structure and principles of operation. We tried to show that the use of timers and electronic sockets saves electricity and increases the level of safety and comfort. We hope that the information provided in the article will be useful to the reader.
Example
You need to program it to turn on at 17:15 and turn off at 22:30 every day.
a)
Press and release the “ TIMER” button. The display shows “ ON 1”.
b)
Press “ MO, TU, WE, TH, FR, SA, appears on the display .
c)
Press “ HOUR” until 17:00 appears on the display.
d)
Press “ MIN” until 17:15 appears on the display.
e)
Press and release the “ TIMER” button, “ OFF 1” appears on the display.
f)
To set the switch off, repeat points c and d until 22:30 appears on the display