Home » Electrical wiring » Sockets » Socket with a timer - the path to comfort
People always try to create comfortable conditions for themselves. Thanks to this, various technical discoveries are taking place in the world. For example, not so long ago a person invented a computer, and now we can already rejoice at a new discovery - sockets with a timer, which have brought comfort and coziness into life.
Smart socket with timer: what is important to know
A socket with a timer can turn heaters on and off and control heating devices. For example, maintaining a certain temperature in the terrarium. Also, such sockets create an environment where people are present in a house or apartment.
Masterclear timer socket: instructions for use
It should be noted that correct installation, configuration and operation of timers of any type is carried out only in accordance with the technical manual or instructions. First you need to charge the socket from a 220 V network (within 14 hours).
Enable the Masterclear button to reset existing settings. While holding the CLOCK key, set the desired time and the type of its display (the HOUR button sets the hours, and the MINUTE button sets the minutes). To select the current day of the week, hold down CLOCK and then use the WEEK button to select the desired day. The Masterclear timer is a weekly electronic timer with battery.
The sequence of setting it up according to a given program is as follows:
- The ON/AUTO/OFF button is used to select summer/winter time while holding the CLOCK button.
- Timer programming/selection of already installed settings. Press the TIMER button. When you press the TIMER button once, ON1 (first setting) appears on the screen. Afterwards, use the WEEK key to set a specific day of the week (or several days). Next, the hours and minutes are set. In this way, the switching on of electrical appliances is adjusted.
- Then press the TIMER key again, after which OFF1 will appear on the screen. The sequence of steps for setting up to turn off the outlet is the same.
- To program the next on/off block, you must perform the above manipulations. To view the list of saved settings, you must hold down the TIMER button.
- After setting the timer, press CLOCK to exit the program menu. After this, the electronic timer
is ready for use.
What are timers, pause relays, delays
Let’s make a reservation right away: homemade auto-timers adjust the delay from a few seconds to 10–15 minutes. There are schemes only for incl. and for on/off load, as well as for activation at certain times of the day. But their delay range and options are limited; there is no function of periodically operating independently several times and adjusting the intervals between such cycles, like in factory outlet devices. However, the homemade capabilities (there are also ready-made similar simple modules on sale) are enough to activate garage ventilation, lighting in the pantry and similar not too demanding operations.
A temporary relay (timer, pause, delay relay) is an automatic release that is triggered at the moment set by the user, turning on/off (closing/opening contacts) of an electrical appliance. The timer is extremely practical in situations where the user needs the device to be activated or deactivated while he is in another location. Also, such a unit will help out in ordinary everyday situations, for example, it will protect you when you forget to turn off/on the equipment.
Thus, the temporary relay will eliminate situations where you left an electrical appliance on, forgot to turn it off, and, accordingly, it burned out or, even worse, caused a fire. By turning on the timer, you can go about your business without worrying about having to return at a certain time to service the equipment. The system is automated, the unit itself will turn off when the set period on the release has expired.
Where is it used?
Many people are familiar with the clicking sounds in Soviet washing machines, when large graduated selectors set a certain delay before turning on/off. This is a vivid example of this device: for example, they set it to work for 10–15 minutes, the drum spun for this time, then, when the clock inside reached zero, the washing machine turned itself off.
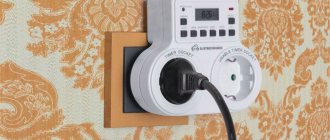
Manufacturers always install temporary relays in microwave ovens, electric ovens, electric water heaters, and automatic watering systems. At the same time, many devices do not have it, for example, lighting, ventilation (hood), then you can buy an additional timer. In its simplest form, it looks like a small rectangular block with time selectors and a plug for a regular socket (“daily” timer sockets) into which it is inserted. Then the power cable plug of the device being serviced is inserted into it, and the delay time is adjusted using the controls on the body. There are also standard sizes for placement by connecting to a line (with wires, wiring, for switchboards), for integration inside devices.
Device, types, features
Mostly timers in factory electrical appliances with trip units are based on a microcontroller, which often also controls all operating modes of the automated device where they are installed. The described combination of functions is cheaper for the manufacturer, since there is no need to manufacture separate microcircuits.
We will describe the simplest time delay relay circuits, only with an on/off option. and selecting a time pause in a small range (up to 15–20 minutes):
- for low-voltage power supply (5–14 V) - on transistors;
- on diodes - for power supply directly from a 220 Volt network;
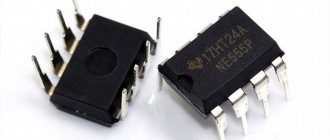
- on microcircuits (NE555, TL431).
There are special factory modules, they can be bought on online sites (Aliexpress, similar and specialized resources), on radio markets, in special stores. Completely handicraft products are created according to similar schemes, mainly for simple tasks: elementary disengagement/coupling of contacts at a certain, specified point in time, while the delay range is small from seconds to 15–20 minutes.
Device setup
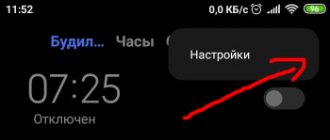
Below we will look at ways to configure the device using the example of a socket with a timer from the Masterclear brand.
The device is equipped with a battery operating at a voltage of 1.2 V. The battery reserve is sufficient for 100 hours of operation. A special feature of this device is that all settings are stored in memory even in the absence of power supply.
Before use, the socket must be charged from the mains for at least 14 hours. Next, you need to press the Master Clear key, which will reset the previous settings. After this, the device is ready for use.
Button functions
To properly control the device, you need to have an idea of the purpose of the buttons located on the panel:
- Master Clear - as mentioned above, this is a task reset button.
- Clock - using this key, several parameters are set at once, including the current time, time format, summer or winter time.
- Timer is a key that allows you to configure various time parameters. Used in conjunction with the Week, Hour, Min, Clock buttons.
- Week—set the days of the week.
- Hour - hours.
- Min - minutes.
- On/Auto/Off - select one of the operating modes.
- Random - This feature allows you to control random connections and disconnections.
- RST/RCL - software activation and deactivation.
Setting the clock and season
Click on the Clock button and set the time you need, as well as the option for displaying it (use the Hour and Min keys). By default, the time is set in a 24-hour range, but if desired, you can set the 12-hour format (am - daytime, pm - evening) using the Timer key. To set the day of the week, first press Clock and then Week. Summer or winter time is set using the On/Auto/Off key while pressing the Clock button.
Mode selection
The device can operate in one of four modes:
- Always in the "off" state. The mode is set using the On/Auto/Off key by selecting the Manual Off item in the menu.
- Always in the "on" state. To do this, use the same button to select Manual On.
- Turn on and off randomly. Adjustable by the Random menu item. If you set this function, the device will turn on and off randomly at night. Auto mode. Using the On/Auto/Off key, you can pre-program the desired operating parameters of the device.
When setting up the device, make sure that the program parameters do not contradict each other. Otherwise, the Off option always takes precedence. In other words, if programs overlap each other, none of them will work fully.
An example is a situation where one of the settings indicates the operating time of the device from 9:00 to 19:00, and another setting indicates from 11:00 to 17:00. As a result of such settings, the outlet will only work until 17:00, since it is at this time that the first command to “turn off” occurs.
How to make a timer yourself: diagrams and recommendations
Electrical devices for controlling current supply have different designs. Relays are considered the most reliable. Triac and thyristor are also found. The connecting element on the general diagram can be located in several places:
- front;
- side;
- behind;
- connect using a separate connector.
To set the time, a potentiometer, switch, or buttons can be used.
How to create a time relay in a 220V socket with your own hands
If the device is intended to be operated under a 220V load, you need to take diode options that are equipped with a magnetic starter. The controller is assembled from the following elements:
- thyristor;
- diodes (4 pcs.), 1A and 400V output;
- resistance (3 pcs.);
- start button;
- capacitor with a capacity of 0.47 mF.
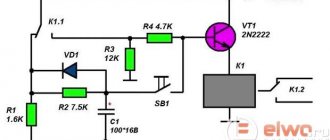
Relay circuit with one transistor
The operating principle of this scheme is quite simple. After pressing the start button, the network closes and the capacitor begins charging. At this moment, the thyristor is in the open state. When the charging of the capacitor is completed, it closes. As a result, the power supply stops and the device turns off.
To adjust the operation, you can select the appropriate capacitor power and resistance resistor (R3).
You can also use this option:
- Connect one of the contacts of the diode bridge together with the switch to 220V.
- The second contact of the diode bridge is connected to the switch.
- Thyristor VT 151 is connected to resistance resistors (1500 and 200 Ohms), as well as to a diode.
- The remaining contacts of the diode and 200 Ohm resistor are connected to the capacitor. In parallel with it, a resistance of 4300 Ohms is switched on.
Relay on a chip
Making your own time relay on the 555NE timer
Many electrical circuits are based on the NE555 integrated timer. Such a system is easy to create at home. The controller is assembled from the following elements:
- screw type terminal blocks;
- diode;
- board size 65x35;
- resistor;
- soldering iron for point connections;
- Sprint Layout program file;
- NPN type bipolar transistor.
A board is used as the basis for mounting the elements. The resistor is attached to the top or removed using wires. There are special places on the board for screw terminal blocks. After all the components are soldered according to the diagram, the excess at the connection points must be removed and the reliability of the contacts checked. To protect the transistor, you need to install a diode. It is installed parallel to the relay. Then the response period is set. If the relay is placed at the output, it will allow the load to be adjusted.
DIY timer
How this system works:
- Pressing the button starts.
- The circuit closes and voltage is supplied to the device.
- The light comes on and the countdown process starts.
- When the set time has passed, the light goes out and the power supply is interrupted.
This scheme allows you to adjust the response period within 4 minutes. If a capacitor is installed, the adjustable time increases to 10 minutes.
These are simple circuits that require minimal circuit board and electrical skills to create. A diverse and rich assortment of modern devices allows you to choose a connector for any need, so there is no need to independently manufacture sockets equipped with a timer. To find a suitable model, it is enough to compare its capabilities with the conditions in which it will be used, and also study reviews about manufacturers and the quality of their products on the Internet.
Advantages of using timers to turn off electrical equipment and electrical appliances
Sockets with a timer help solve a number of household problems and reduce energy consumption. A timed electrical socket of any type, when used, allows you to do a lot of things. Namely, optimization of the operation of equipment that operates periodically, to ensure uninterrupted periodic operation without human intervention for a certain period of time.
It is advisable to use timer sockets in cases where periodically operating electrical appliances are used:
- Water electric pump;
- Heating devices (convector, boiler);
- Lighting equipment (street lighting lamp, aquarium lamp, etc.);
- Household appliances (fans, coffee makers, etc.).
It is possible to reduce electricity consumption, in particular for houses and apartments with multi-tariff electricity metering. Timer sockets can be used for a wide range of home electrical installations.
Modifications
The products are used to control devices on a section of one circuit. They are widely used in houses and apartments. Manufacturers offer a wide range of products, which can be divided into 4 categories: watchdog timer, push-button timer, switch with motion sensor, model with timer for ventilation.
Timer guard
The device is used to protect the home from unauthorized entry. Allows you to organize the visual presence of the home owners. The built-in program turns the lighting on and off in a certain sequence at a specified time interval. If you have to travel frequently, this is the ideal solution to leave your home unattended. From the street it looks like someone is at home. He will not be able to completely protect the house, but he will provide assistance in this matter and confuse intruders.
Light switch with motion sensor
When a person appears in the infrared field, the sensor detects movement and turns on the lighting. In this case, the sensor provides: sensitivity adjustment, lighting parameters. Models are presented that perform one option, but there are also those that perform everything.
Push-button timer
Mechanically pressing the button puts the device into operation, automatically turning off and turning on the light after a certain time. Such models are represented by the ability to set a time interval for a day or a week. It is convenient to install such switches in hallways, on stairs, in the garage, and in the toilet.
Model with shutdown timer for ventilation systems
The hood is found in the kitchen and bathroom, so the layout of any apartment or house is provided for. To use the ventilation system efficiently, it is recommended to install a fan with a shutdown timer, which will simply turn off the device after a specified period of time. This approach will allow solving several problems at once: rational use of electricity and ensuring optimal humidity in the room.
Principles for setting up different types of sockets
Mechanical and digital timers for 220 V have different principles for entering program data. In the first case, a ready-made time scale is used (as in a time relay), which serves as a template for configuration. Each of the blue segment keys is responsible for a period of 15 minutes. If any of the segments is pressed, the timer organizes the supply of electricity to the device. The TM50 scale looks like this:
As you can see, some of the keys are pressed (the period between 16-00 and 18-00, and also below - starting from 2-00). In addition, in the central part there is a rotating disk (the direction is indicated by an arc arrow) with a current time indicator (in the example, the triangle is set to 13-00).
You can learn more about how to set up such a timer in the following video:
The digital timer is set using the display and softkeys:
- TIMER – key for entering data and confirming it;
- WEEK – button to select the required day of the week. The screen displays the selection in English (MO, TU, WE, etc.);
- HOUR, MINUTE – enter time;
- CLOCK – used in combination with TIMER to change the time format from 12 to 24 hour;
- ON/AUTO/OFF – key for selecting manual or automatic operating mode;
- RANDOM – selection of the floating switching function (periodic switching is carried out within a given period of time with an interval of up to 30 minutes).
A visual overview of such a timer is in the following video:
Scheme for 220 Volts
Timers on transistors and microcircuits operate from 5–14 V (standard from 12 V). 220 Volt time relays are diode assemblies with magnetic starters. If the equipment being serviced is low-power (for example, lighting, lamps, soldering irons, boilers, small motors, etc.), then the latter need not be installed - the diode bridge and thyristor transform the voltage themselves.
Let's look at the light bulb timer, the main parts: diode bridge, thyristor. It is not recommended to connect any other load: the thyristor will only pass a positive sinusoid of 220 Volt variables. This is enough for the listed consumers, but other electrical appliances may not be able to withstand it.
What you will need:
- resistors: 4.3 mOhm (R1), 200 Ohm (R2) and adjustable 1.5 kOhm (R3);
- 4 diodes with max. current from 1 A, reverse voltage from 400 V;
- capacitor 0.47 µF;
- thyristor (analogs are possible) BT151;
- regular microswitch.
The principle is standard for such assemblies: gradual charging of the AC. C1 (starts after activation of S1). Thyristor VS1 is open, and load L1 receives 220V from the network. After charging, it closes, cutting off the current - the lamp turns off. The pause is regulated by setting the value to R3 and selecting capacitance C1.
The assembly has a disadvantage: touching any exposed wiring or leg can result in a strong electric shock, since the elements receive a strong current.
What does programming a socket include?
It is worth dwelling in more detail on the method of programming an outlet with a timer:
- First you need to set the exact time. To do this, click on Clock with a sharp object, then set the current day of the week (Week key), hour (Hour) and minutes (Min).
- We designate the turn-on time - you will need a Timer button. After pressing this button, the display will show On 1. Next, you can set the timer to turn off. The time can also be set using the Week, Hour and Min keys.
- To see if the tasks have successfully registered, you need to hold down the Timer button for a couple of seconds.
- Having finished programming, you must press the Clock key again, thereby putting the device into operating mode.
It is worth noting that the programmable socket (instructions for any model are included) can carry out scheduled tasks only in Auto mode. If the Manual on function is activated on the device, the device will act as a simple socket, and the Manual off function completely turns off the device.
Assortment available in stores
| Parameter | Description |
| Brand country | Germany |
| Level of protection from excessive humidity and dust penetration | IP 20 |
| Radio frequency | 433.92 Hz |
| Shortest switching period | 15 minutes |
| Passed current strength | 16 A |
| Power limit of connected electrical appliances | 3500 W |
| Maximum number of starts in 24 hours | 96 |
| Color | White |
| Weight | 150 g |
| Child lock | Present |
| Price | 150 rubles |
Sample model "GLANZEN TG-28 A"
Model "REV RITTER 67074 8":
| Parameter | Description |
| Brand country | Germany |
| Level of protection from excessive humidity and dust penetration | IP 20 |
| Shortest switching period | 30 minutes |
| Passed current strength | 16 A |
| Power limit of connected electrical appliances | 3680 W |
| Maximum number of starts in 24 hours | 48 |
| Colors | White with black or white with blue |
| Weight | 150 g |
| Child lock | Present |
| Price | 250 rubles |
Socket with daily timer “REV RITTER 67074 8”
Model "REV RITTER 66988 9":
| Parameter | Description |
| Brand country | Germany |
| Level of protection from excessive humidity and dust penetration | IP 44 |
| Shortest switching period | 30 minutes |
| Passed current strength | 16 A |
| Power limit of connected electrical appliances | 3500 W |
| Maximum number of starts in 24 hours | 48 |
| Color | Black |
| Weight | 500 g |
| Child lock | Present |
| Price | 380 rubles |
Sample model "REV RITTER 66988 9"
Model "BRENNENSTUHL 1506450":
| Parameter | Description |
| Level of protection from excessive humidity and dust penetration | IP 20 |
| Passed current strength | 16 A |
| Power limit of connected electrical appliances | 3500 |
| Color | Grey |
| Weight | 500 g |
| Price | 410 rubles |
Socket with daily timer “BRENNENSTUHL 1506450”
Model "ELECTRALINE 59502":
| Parameter | Description |
| Level of protection from excessive humidity and dust penetration | IP 44 |
| Shortest switching period | 30 minutes |
| Passed current strength | 16 A |
| Maximum number of starts in 24 hours | 96 |
| Color | White |
| Weight | 50 g |
| Child lock | Present |
| Price | 440 rubles |
Model "REV RITTER 67648 1":
| Parameter | Description |
| Brand country | Germany |
| Level of protection from excessive humidity and dust penetration | IP 44 |
| Radio frequency | 433.92 Hz |
| Shortest switching period | 15 minutes |
| Passed current strength | 16 A |
| Power limit of connected electrical appliances | 3680 W |
| Maximum number of starts in 24 hours | 96 |
| Color | White |
| Weight | 200 g |
| Child lock | Present |
| Price | 450 rubles |
Sample model "REV RITTER 67648 1"
Model "ELECTRALINE 59501":
| Parameter | Description |
| Level of protection from excessive humidity and dust penetration | IP 20 |
| Shortest switching period | 60 seconds |
| Radio frequency | 433.92 Hz |
| Passed current strength | 8 A |
| Power limit of connected electrical appliances | 3680 W |
| Maximum number of starts in 24 hours | 140 |
| Color | White |
| Weight | 50 g |
| Backup time | 100 hours |
| Price | 620 rubles |
Socket with weekly timer “ELECTRALINE 59501”
Model "REV RITTER 67073 1":
| Parameter | Description |
| Brand country | Germany |
| Level of protection from excessive humidity and dust penetration | IP 20 |
| Shortest switching period | 60 seconds |
| Radio frequency | 433.92 Hz |
| Passed current strength | 8 A |
| Power limit of connected electrical appliances | 1800 W |
| Maximum number of starts in 24 hours | 20 |
| Color | White |
| Weight | 150 g |
| Price | 660 rubles |
Socket with electronic timer “REV RITTER 67073 1”
Model "TDM SQ1506-0002":
| Parameter | Description |
| Level of protection from excessive humidity and dust penetration | IP 20 |
| Shortest switching period | 60 seconds |
| Radio frequency | 433.92 Hz |
| Passed current strength | 16 A |
| Color | White |
| Weight | 150 g |
| Price | 670 rubles |
Weekly socket “TDM SQ1506-0002”
Model "REV RITTER 66989 6":
| Parameter | Description |
| Brand country | Germany |
| Level of protection from excessive humidity and dust penetration | IP 20 |
| Shortest switching period | 60 seconds |
| Radio frequency | 433.92 Hz |
| Passed current strength | 8 A |
| Power limit of connected electrical appliances | 1800 W |
| Maximum number of starts in 24 hours | 20 |
| Color | White |
| Weight | 20 g |
| Child lock | Present |
| Price | 800 rubles |
Sample model "REV RITTER 66989 6"
A little history
Previously, a mechanical timer was popular. Built into an outlet, it could turn on household appliances for a certain time (see Fig. 2). In essence, it was a countdown timer; accordingly, its scope of application was limited.
Rice. 2 Kitchen timer - Lemanso LM671 socket
In fact, this is an ordinary socket with a timer; the peak of popularity of such devices occurred in the mid-80s of the last century. Time passed, gradually mechanical devices replaced electromechanical ones, which, in turn, were replaced by electronic ones, such as an electronic stopwatch. The functionality of these devices has expanded significantly. Now it's the turn of digital devices.
Let's return to the topic of the article.
What is important to know
A socket with a timer is a universal device, but you still need to learn how to use it correctly. In this article we talked about how to set it up. However, it should be clearly understood that there are mechanical sockets with a timer, they do not need to be charged and turn off automatically when necessary. But such sockets have a serious drawback - the response time is not accurate and may be confused. The advantages include low cost, but a lot depends on the settings.
Remember! If you need a weekly or daily socket with a high-precision timer, choose expensive models from trusted manufacturers.
How to set up an outlet with a timer
It has a 1.2 W battery. She needs it to save memory of different settings. And it is designed for 100 hours of continuous operation. This is an important feature that is not erased from memory. Before connecting the outlet for the first time, it must be charged from the mains for at least 14–15 hours. Then press the Master Clear button. Thanks to this, all its previous settings will be reset and it will be completely ready for work. Subsequently, the Master Clear button can be used to reset the settings. Sockets in drywall may also have a timer. It is purchased separately and simply inserted into a finished device.
Masterclear Specifications
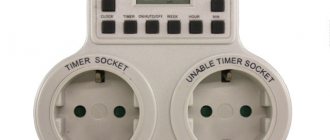
A universal option is a double socket with one timer
To use such an outlet, you need to know the rules for its use. They are designed for a load of 16 A, but if you exceed it, you can cause various damage to the device. If you connect the plug, be sure to ensure that it is well connected. Clean the socket only with a dry cloth.
The Masterclear weekly rosette has these characteristics.
- mains voltage: 230-240 W;
- frequency: 50 Hz;
- control: electronic;
- operating temperature: – 10 … + 40.
To make the outlet safer, it is equipped with special gates that prevent direct contact of various devices with its electrical contacts.
Where can I use it?
The main area of application for sockets with timers is automatic control of equipment in a house or apartment. With their help, you can power household appliances, heating systems, irrigation pumps, heating and lighting systems.
Before connecting, the user makes the settings himself and sets the response intervals.
For a better understanding, here are some application examples:
- Turning on and off the lighting inside the house and in the local area. After selecting the mode, the outlet will itself supply or remove voltage from the lighting devices. The owner does not need to waste time performing these actions. The periodic on/off feature can be used to prevent intruders from entering. Periodically turning on the light will signal to thieves that the owners of the house are present.
- Indoor heating. Another way to use an outlet with a timer is to connect heating equipment to it. Electrical appliances will turn on and off at the specified time.
- Management of agricultural equipment. Devices help optimize agriculture. With their help, you can set up watering, organize the switching on of lighting and heating, resolve issues with feeding and perform other tasks.
- Turning on the water heater. Alternatively, you can turn on the boiler through an outlet with a timer and ensure timely heating of the water. This way you can avoid a situation where you forget to turn on the equipment and are left without the opportunity to buy.
The scope of application of the products is very wide, and an additional advantage is the opportunity to save up to 30-40% on electricity.
Types of motion sensors
To classify devices, we define two main factors: the presence and type of sensor device, as well as installation features.
The main element in the circuit breaker under consideration is a motion sensor. There are several varieties of it, based on different physical laws.
In all cases, the result is the same: when an object appears in the controlled area, the sensor is triggered and the contacts of the circuit supplying the lighting devices are closed.
The most common motion sensor is infrared - it does not emit anything, is relatively cheap and can be installed not only indoors, but also outdoors
Motion sensors for automatically turning on and off lights are:
- Acoustic.
- Infrared.
- Ultrasonic.
- Microwave.
The first two categories of sensors belong to passive devices; they do not emit anything. The detectors of the two remaining varieties are active devices. These options send waves of various lengths into the room, and by the nature of their reflection they determine the presence or absence of new objects in their coverage area.
Equipment of the “active” class with an emitter and receiver is more expensive than “passive” models. The devices are more complex in design, but have a low level of false alarms. Passive devices in this regard are much inferior to their active counterparts, but are cheaper than their competitors.
Acoustic sensors are triggered by the sounds of doors opening, the clicking of heels, and simply sharp claps. This option is best taken for corridors of public buildings.
It is also ideal as an addition to other sensors, so that the light can be turned on by clapping your hands. It is not recommended to install it alone in a private house. There will be too many false reactions to various sharp sounds.
Infrared sensors are designed to be triggered by human heat. But they also react to animals and heated radiators. They must be carefully configured, and the coverage area must be set so that radiators do not fall into it. This is the simplest, most durable and cheapest touch sensor for automatic light control.
Operating principle of ultrasonic sensors. Ultrasonic and microwave sensors are similar in operating principle, they only have a different range of emitted waves
Sensors operating by emitting microwaves and ultrasound are not recommended for installation in residential premises. A person is not able to feel their impact, but it is there, but there is definitely no benefit from it. It has been noticed that domestic animals often react to this radiation in a sharply negative manner.
Such emitters are more suitable for parking lots or open areas. At the same time, active motion sensors also have a limited range.
When organizing control over a large area of ultrasonic devices, you will have to install a lot. Plus, many of them only work during sudden movements. A slowly walking person may completely “fall out” of their field of action.
The ideal option is a combined sensor with several methods of detecting people entering the controlled area. It is more reliable and less likely to trigger erroneously. However, you will have to pay a lot for this accuracy, since such sensors are obviously more expensive than conventional analogs.
Electronic
Using the TM24 model as an example, let's look at how to set up an electronic socket with a timer.
When you turn it on for the first time, you must leave the device in the outlet for 12-14 hours to charge the built-in battery.
Button functions:
This programmer has the ability to configure twenty on and off programs.
As can be seen from the diagram - point 1, it is possible to install the program from Monday to Sunday. That is, it turned on and off at the same time. Setting up individual programs by day of the week from 2nd to 8th point. Combination of the program on weekdays from Monday to Friday, paragraph 9, or only on weekends (Saturday and Sunday), paragraph 10. For six days a week, point 11. Every other day, Monday, Wednesday, Friday, point 12. Tuesday, Thursday, Saturday, point 13. Three days in a row, points 14 and 15.
To start using the outlet, you must first set the current time. You must hold SET for 5 seconds until the day of the week flashes. Use the RIGHT or LEFT buttons to set the desired day. Pressing and holding SET again takes us to setting the clock. Using RIGHT or LEFT we set the desired time. We repeat the same procedure to set the minutes.
Now you can start setting up the program. You can do this as follows:
- Press and hold RIGHT until “1_ON” appears, this is the first timer.
- After this, press and hold SET until the days of the week flash, use the RIGHT or LEFT buttons to select the desired day or combination of days.
- Next, using SET, select the hours and RIGHT or LEFT the desired value, and so on with the minutes.
- Then we repeat the operation while holding RIGHT until the value “OFF_1” appears.
- We repeat the setting similar to the point above, set the day, hour and minutes.
- To exit programming mode, press CLK.
Press the MANUAL button to reset the current program settings to set new parameters. To force the timer to turn on or off, there is a “MANUAL” function, which has three modes: “MANUAL-OFF”, “MANUAL-ON”, “MANUAL-AUTO”. In OFF mode, the timer does not execute programs and is in the off state. In ON mode, the device is in the forced position, and in AUTO mode, programs are executed.
To simulate the presence of a person, there is an interesting RND button on the socket. This function has a floating advance timer that randomly varies from two minutes to half an hour. The time interval is processed taking into account the advance. The switching on of electrical appliances is not strictly tied to a specific minute, which can confuse thieves trying to find out whether people are at home or not.
Instructions for setting the parameters of an electronic socket are provided in the video below:
Setting up the remaining sockets with a timer is no different from the installation algorithm described in the example and should not cause difficulties. Do not forget to change the clock to winter and summer time for more correct operation of the device.
We hope our instructions were clear and useful for you. Now you know how to set up a socket with a mechanical and electronic timer!
It will be interesting to read:
Both in industry and in everyday life, there is often a need to automatically turn on and off electrical appliances at a given time. To do this, use a mechanical or electronic socket timer. Each model has its own advantages and installation methods.
Classification
According to the control method, smart home sockets are divided into:
- mechanical timers (time relays), which are programmed to turn on or off the load at specified intervals;
- sockets with an electronic control unit.
Mechanical and their programming
The operation of the simplest mechanically controlled sockets is similar to the operation of timers built into microwave ovens. The duration of the switched-on state of the socket is determined by the angle of rotation of the control handle. The built-in clock mechanism of the timer works out the set time and turns off the load. Irons, hobs, electric stoves, and other heating appliances are connected to the described type of sockets. Using such a simple device will save energy and prevent fire.
How to use a mechanical device
The industry also offers sockets with built-in mechanical cyclic timers. The current time is set on them and the time for turning on and off the electrical appliance is programmed.
There are smart sockets on sale that are adjusted to a daily or weekly cycle. With the help of such smart sockets, lighting is controlled, simulating the presence of the owners in an empty house. Heating appliances, air conditioners or water heaters are connected to them, which will turn on and off at the selected time and even on the desired day of the week. With the help of such sockets they control street lamps in a country house or in public utilities.
Electronic, automatic, digital: how to use correctly according to instructions
Smart sockets with electronic control units are very diverse, for example, they are designed as timers with a liquid crystal indicator and control buttons. The indicator displays the relay position (on or off), current consumption and wattmeter readings.
The difference between electronically controlled sockets and mechanical devices is the presence of an interface that controls electrical appliances remotely. Smart sockets with electronic filling can be controlled by:
- via infrared port;
- via bluetooth;
- via Wi-Fi;
- via built-in GSM, into which a telephone SIM card is inserted;
- over other radio channels with different types of communication protocols.
Sockets equipped with an IR receiver and a bluetooth module are controlled at a distance of up to several tens of meters. Moreover, in the first case, a remote control from any TV or other household appliance is suitable as a transmitter of control commands. The microchip built into the socket remembers commands received from the IR remote control when “training” the device.
Control via Wi-Fi or GSM allows you to implement the control function from almost anywhere in the world where there is Internet or cellular communication. In this case, you can send control commands and receive information about the state of the connected device, about the electricity consumed, and read the readings of built-in sensors, for example, the air temperature in the room.
A smartphone with an installed application is suitable for the control panel for GSM and Wi-Fi sockets. Manufacturers publish applications in the Google Play and App Stores. The owner of the outlet can download the necessary program there for free. The store you choose depends on the type of phone operating system. The applications have an intuitive interface and a large set of service functions that allow you to implement different load management algorithms.
Any complex system carries certain risks. For example, you cannot be 100% sure that when you leave home, you will turn off the forgotten iron. The phone that serves as a remote control may run out of battery, or “suddenly” run out of money in your account.
Built-in modules
You can control such a device from a smartphone or other gadget. Many programmable sockets now have a built-in GSM module so that they can receive control commands from a distance.
This function will allow you to make changes to the device’s operating schedule if the owner returns home a little earlier or, conversely, is delayed. All you have to do is go into the application and select the appropriate options.
Instructions for programmable socket TGE 2A
The TGE 2A model can often be found in the assortment of stores offering “smart” equipment. A programmable socket (instructions for use are included, but not everyone can set up the device the first time) of this model is popular among buyers. To configure it correctly, you first need to prepare the device:
- completely discharge the outlet and restore charging to 100% (takes about 11 hours);
- using a pencil, carefully press the Master clear button, thereby clearing the memory of program functions;
- re-program the device.
Special Random mode
Random is another interesting feature of the new generation of sockets. Using this option, you can automatically connect the device to absolutely any electrical object in the house. All that is needed is to set the intermediate interval of the two devices and activate the function by clicking on the corresponding Random button.
This function will be especially useful when the owners are temporarily absent from the house. The socket can create the illusion of people in the house and can, to some extent, prevent a robbery attempt.
Recommendations for selection
Firstly, you should immediately decide for what purposes a programmable socket is needed. To do this, you need to weigh the pros and cons again. Secondly, you should buy a new generation socket only in specialized stores, preferably branded ones. It is in such retail outlets that you can get the most professional advice and warranty service.
Thirdly, you need to decide what type of outlet is needed. Remember that if you want to independently adjust the on and off times weeks in advance, you will need an electronic version of the outlet. Fourthly, try to buy original sockets, not fakes. Yes, such things are more expensive, but a high-quality socket will last much longer. Remember that many versions are equipped with additional features that will give greater scope for operation.
A mechanical or electronic socket with a timer is a stylish and economical option for automating power supply modes for personal or industrial facilities.