Why do you need a shield?
The home electrical panel performs several functions at once:
- Ensuring safety (allows you to turn off power to the network, makes it possible to build protective grounding devices into the network);
- Security (protects electrical equipment from external climatic conditions or mechanical human influence);
- Control (all sensors, indicators are easily controlled)
- Convenience (automatic machines, RCDs, conductive busbars are collected in one place, which facilitates installation and operation).
In addition, installing a shield is a mandatory condition for living in both an apartment building and a private house. Its design and contents are consistent with energy sales representatives, so it is important to do everything correctly.
Purpose of the distribution board
Its function is double - supplying and distributing power in a house or apartment, as well as ensuring safety when using electricity. Safety is achieved by installing RCDs and automatic circuit breakers that operate at a certain current strength and open the circuit if it is exceeded. Thus, the machine protects the wiring from burning out during a short circuit.
The automatic machine, as well as the electric meter, are installed by the electricity supply company; everything else can be installed independently.
The only caveat is that after self-assembly before start-up, it is advisable to invite a company representative to check the grounding and correct wiring of sockets and switches.
What does the shield look like?
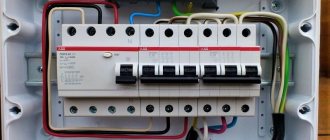
Externally, the shield is a flat box with a lid, inside of which differentiated circuit breakers, resistors, grounding connections, wires and other elements of the electrical power supply of the network are located.
So, the main design elements:
- Housing made of neutral material without or with a back wall;
- The cable that connects the device to your home wiring.
- Electrical installation content.
What is an electrical panel like?
Despite the identical arrangement, there are different types and sizes of electrical panels. For example, the following division is common:
- According to the material. Materials that do not conduct electricity are always used. Metal shields are considered more durable and practical, while plastic products are cheaper, but worse to use.
- By installation. Wall-mounted ones are mounted on the wall, and built-in ones are mounted in a niche.
- In terms of functionality. Household ones are designed for one apartment or house, while industrial ones accommodate several separate lines.
- By production. Both homemade and factory-made options are common.
As for the sizes, they can be different and depend on the individual requirements of the owners. The dimensions of the box are calculated depending on the number of devices placed, and on average it is 100 by 87 cm.
You can make a similar design yourself, but it is easier and more reliable to purchase an already equipped shield. However, you need to be able to choose a quality product from all the variety offered.
Installation and connection of elements
All modern automatic devices and RCDs have a unified mounting for a standard mounting rail (DIN rail). On the back they have a plastic stop that snaps onto the bar. Place the device on the rail, hooking it with the recess on the back wall, and press the lower part with your finger. Once clicked, the item is installed. All that remains is to connect it. They do it according to the scheme. The corresponding wires are inserted into the terminals and the contact is pressed with a screwdriver, tightening the screw. There is no need to tighten it too much - you can squeeze the wire.
They operate with the power off, all switches are turned to the “off” position. Try not to grasp the wires with both hands . Having connected several elements, turn on the power (input switch), then turn on the installed elements one by one, checking them for the absence of a short circuit (short circuit).
Connecting the input machine and RCD
The phase from the input is supplied to the input circuit breaker, from its output it goes to the corresponding input of the RCD (place a jumper with a copper wire of the selected cross-section). In some circuits, the neutral wire from the water is supplied directly to the corresponding input of the RCD, and from its output it goes to the bus. The phase wire from the output of the protective device is connected to the connecting comb of the machines.
In modern circuits, the input circuit breaker is installed two-pole : it must simultaneously disconnect both wires (phase and zero) in order to completely de-energize the network in the event of a malfunction: this is safer and these are the latest electrical safety requirements. Then the circuit diagram for switching on the RCD looks like in the photo below.
When using a two-pole input circuit breaker
To learn how to install an RCD on a DIN rail, watch the video.
In any circuit, the protective grounding wire is connected to its own bus, where similar conductors from electrical appliances are connected. Grounding is a sign of a secure network and doing so is vital. Literally.
To learn how to properly connect an RCD, watch the video tutorial.
When assembling the panel yourself, please note that the input machine and the meter will be sealed by the energy supply organization. If the meter has a special screw onto which a seal is attached, then the input machine does not have such devices. If it is not possible to seal it, you will either be denied entry or the entire panel will be sealed. Therefore, inside the common panel, a box is placed in one or two places (depending on the size and type of machine), and the input machine is mounted in it. This box is sealed upon acceptance.
Individual automatic machines are installed on the rails exactly like an RCD: they are pressed against the rail until it clicks. Depending on the type of machine (one or two poles - wires), the corresponding wires are connected to them. What types of circuit breakers are there, and how devices differ for single- and three-phase networks, see the video; the choice of circuit breaker rating is described here.
After the required number of devices are installed on the mounting rail, their inputs are connected. As they said earlier, this can be done with wire jumpers or a special connecting comb. See the photo for what the wire connections look like.
The machines in one group are connected by jumpers: the common phase arrives
There are two ways to make jumpers:
- Cut the conductors into the required sections, expose their edges and bend them in an arc. Insert two conductors into one terminal, then tighten.
- Take a long enough conductor and strip off 1-1.5 cm of insulation every 4-5 cm. Take pliers and bend the exposed conductors so that you get interconnected arcs. Insert these exposed areas into the appropriate sockets and tighten.
They do this, but electricians say the quality of the connection is poor. It is safer to use special tires. Under them on the case there are special connectors (narrow slots, closer to the front edge), into which bus contacts are inserted. These tires are sold by the meter and cut into pieces of the required length using ordinary wire cutters. Having inserted it and installed the supply conductor in the first of the machines, tighten the contacts on all connected devices. Watch the video on how to connect machines in a panel using a bus.
A phase wire is connected to the output of the machines, which goes to the load: to household appliances, to sockets, switches, etc. Actually, the assembly of the shield is completed.
Choosing the best
The following recommendations will help you choose the best, reliable and inexpensive option:
- Plastic electrical panels will not last more than five years and are easily broken and damaged.
- It is better to purchase an automatic machine for each room network and separate ones for powerful electrical appliances.
- Designs with combination locks are safer and eliminate the possibility of damage or exposure to small children.
- Shields equipped with universal DIN rails are more convenient.
It is important to think about additional equipment. For example, locks, indicator lights, moisture-repellent impregnations or reinforced insulation.
- Buy power cable VVGngls
Electrical wiring diagram in the garage - features of design and installation with your own hands. 120 photos of wiring examples and video instructions for replacing wiring in the garage
Which wire to use for grounding: calculation of parameters, marking and purpose of various types of wires (video instructions + 150 photos)
Installation instructions
After purchase, you can begin installation. The instructions look like this:
- Prepare tools (drill, building level, meter, pencil, anchor, hammer).
- Mark a location for the shield (you need a sun-protected, cool, inaccessible area with plenty of free space and excellent ventilation).
- Drive in the bolt for the top right point.
- Measure the flat side using a level.
- Fix the shield on the wall.
- Route the wires through the empty back wall or drill corresponding holes in another location.
- Secure the DIN rails.
- Place and connect machines, buses and RCDs.
Knowing how to choose an electrical panel and install the structure in your home, you can protect your property and keep the energy supply system under control.
The main thing is to arm yourself with the recommendations given and, if you have the slightest doubt, turn to specialists.
Types and sizes of distribution boards
According to the type of installation, the classification is as follows:
Wall-mounted distribution boards require mounting on the wall surface using dowels and self-tapping screws. As a rule, their dimensions from the wall surface are 12-20 cm.
If the wall consists of flammable material, a layer of insulator is placed between the panel and the wall. When installing, it is better to place it approximately at eye level and in such a way as to exclude the possibility of accidentally hitting your head on the shield.
Built-in distribution boards - the design implies the presence of a niche prepared for them in the wall. The shield inserted inside is placed on the mortar; as a rule, it is mounted flush with the wall.
Installing a built-in distribution board is preferable to a wall-mounted one in terms of space saving.
- How to install electrical wiring in a wooden house
- Urgent entry into a construction SRO
Gasoline power plants
Depending on the material used, there are metal and plastic shield housings. Based on their shape, the cases are divided into square and rectangular, elongated both vertically and horizontally.
In terms of size, if space allows, it is better to take the case with a reserve, so that if you need to add any element, the question of replacing the case with a more voluminous one does not arise.
Photo of electrical panel installation
- Power cable brand ASB - characteristics, classification and rating of the best manufacturers. 115 photos and video instructions for choosing
- Retro wiring in a wooden house: calculation of parameters, design, installation and selection of vintage elements. 165 photos of stylish ideas
Heating cable for gutters and roofs: choosing and installing a self-regulating anti-icing heater with your own hands (135 photos + video instructions)
Types of electrical cables and wires: device, purpose, marking and characteristics of the main types of cables used in houses and apartments (150 photos)Methods for laying cables in trenches: step-by-step instructions for laying and installing power cables in earthen trenches (140 photos)
Types of cable channels and cable boxes: types, sizes and materials of manufacture. 120 photos and videos of cable channel installation
Did you like the article? Share

0
