A built-in hob is an almost mandatory attribute of a modern kitchen. In recent years, most consumers prefer electric ovens, since they are ahead of gas equipment in many characteristics.
A separate outlet for the hob and oven and a dedicated line ensure the functioning of these powerful electricity consumers.
Wiring Requirements
Particular attention should be paid to the quality of electrical wiring, on which the safety and correct functioning of the entire system depend.
The following factors are taken into account:
- The oven and hob are connected via grounding. The plug or socket for the oven must have 3 or 5 contacts (in the first case for a 220 Volt network, in the second - for 380 Volts). In the tasks of the old building, this condition was not always adhered to. However, modern requirements are different, so a new cable will be required.
- Electrical wiring is connected to the distribution box only through an RCD (residual current device).
- Low-power equipment (up to 2.5 kilowatts) is connected to the existing electrical network (if it meets modern requirements). To connect powerful equipment you will need a dedicated line.
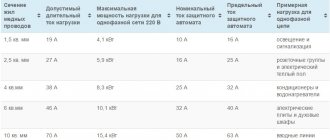
- The optimal cable cross-section is 6 square millimeters. A wire with this cross-section will withstand a long-term load of 10 kilowatts. The recommended protection class for the machine is C32. If the panel power does not exceed 8 kilowatts, a cable with a cross-section of 4 millimeters and a circuit breaker with protection class C25 will be sufficient.
- The correct choice of cable is VVGng or NYM. When purchasing a cable, take into account the diameter of the conductor. For a wire with a cross-section of 4 millimeters, the diameter will be 2.26 millimeters, and for a 6 mm conductor - 2.76 millimeters.
- The data for the residual current device is one point higher than the rating of the circuit breaker. For a 32 Ampere device you will need a 40 Ampere RCD.
Note! Grounding an electrical household device is an essential condition for ensuring safety.
How to choose
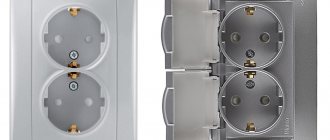
These devices are classified according to technical characteristics, type of installation and size. Everything is clear with the technical parameters; taps can have different current strengths and permissible power. There are three types of sockets for electric stoves : hidden installation, overhead, combined.
- Hidden installation - installation of the socket box is carried out in a hole in the wall, due to this the working surface of the outlet is completely hidden. This significantly increases the safety and tightness of the product;
Photos - types - Overhead - unlike a built-in installation, they are mounted on top of the bends. This is a more convenient option if you don’t want to make a hole in the wall, then they will be visible above the wall. In addition, their tightness is somewhat reduced; moisture, dust and grease, which often end up on kitchen walls, can get under the housing;
- Combined. They represent more complex models of hidden ones. In addition to installing the socket box into the wall hole, they are additionally protected by a cover, thanks to which the built-in contacts are protected from external aggressive factors.
According to the design, the model can be double or single. Professional electricians recommend installing double ones with a higher power than the stove needs. Then, if necessary, it will be possible to install an additional oven, refrigerator, hood or other electrical appliances.
Photo - kitchen wiring plan
Video: how to connect an electric stove
Cabinet location
Before connecting the oven, you need to prepare a place for it. Place the cabinet in a special niche in the furniture.
When preparing the site, the following parameters are observed:
- Avoid distortions of the surface on which the equipment will be installed. If the cabinet is installed unevenly, improper heat distribution inside the cabinet cannot be avoided. As a result, the equipment will break down.
- Provide gaps between the surface of the furniture and the oven. This is necessary to avoid excessive heating of the kitchen unit. The recommended distance from the furniture walls to the oven is 5 centimeters. The distance between the bottom of the niche and the base of the cabinet is from 8 to 10 centimeters, and between the wall and the back cover is at least 4 centimeters.
Tool
- external, overhead. Installation of sockets of this type is carried out directly on the wall plane. They are convenient to use when laying cables in an open way. In addition, such sockets are the safest for installation in wooden houses and in rooms with high humidity. It is this type of sockets that has the best moisture and dust protection;
- internal, installed in special socket boxes, built into the thickness of the wall. They are most widespread in brick and panel houses, when finishing walls with sheet materials such as gypsum fiber board.
Cable and circuit breaker
Since hobs and ovens are large consumers of electricity (their power starts at 3 kilowatts), you will need a dedicated cable to power them.
The optimal choice is a cable with three cores (necessarily with a green-yellow ground wire). The cable cross-section is selected according to the rating of the oven.
If the load is from 3 to 3.5 kilowatts, you will need a cable with a cross-section of 2.5 millimeters. The socket is needed for 16 Amperes, and the circuit breaker is needed for 25 Amps. If the power of the electric stove exceeds 3.5 kilowatts, the cable cross-section is 4 millimeters, and the socket is chosen for 32 Amperes.
Selecting a "point"
Reliable and durable operation of any household appliance is guaranteed if the basic installation rules are followed. Many equipment owners mistakenly believe that choosing a socket and plug for a stove is no different from a similar procedure with any other household appliance.
Some people prefer to do the installation themselves, trying to save on installation costs. Electrical engineering specialists recommend making connections in accordance with technical standards, PUE rules and the requirements of the device manufacturer.
Key attention must be paid to the choice of power connector. It must match the characteristics of the oven and stove (if the device is made in the same housing).
It should be noted that a regular overhead square 16A socket is not suitable. Choosing this may result in plastic melting and damage to the plug body.
Therefore, you should remember about a special type of fittings made for an electric stove and capable of withstanding a load of no more than 7 kW. There are options for single-phase and three-phase networks, as well as those designed for higher power.
It is easy to find special power-type sockets on sale that differ in a number of parameters: including shade, material of manufacture, configuration, installation features, and permissible load. Along with them, you must purchase the appropriate plug. Many manufacturers provide all this in their devices.
Power fittings are made from high-strength material. If it is made of plastic, this means that the consumer is offered to significantly save on quality. It is better to purchase a product made of carbolite - it is more durable.
Currently, there are different options for installing power accessories, installed hidden or open. The first method is relevant if you plan to move the slab close to the wall, when access to the working mechanism will be significantly limited.
Most users of household devices do not really understand how to choose an outlet, what should be taken into account, and what “pitfalls” there may be. First of all, we recommend focusing on fittings with grounding. In addition, based on the type of home electrical network, be it single-phase, three-phase or, less commonly, two-phase, the appropriate power cable with the required number of cores and a suitable cross-section is laid.
Ideally, before purchasing a socket and plug for an electric stove, you should consult with the management company or specialists regarding the design power of the network of the house or apartment, the presence of grounding and a number of other issues. The answers received must be unambiguous, clear and extremely precise - this is the key to your safety when using an electrical appliance.
Having clarified these points, you should proceed to subsequent work, including choosing the location for installing the slab. The device must be connected with a separate cable from the panel and protected with a circuit breaker of the required rating.
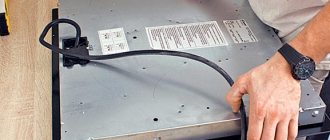
Hob fork
To supply electricity to the hob, a three-core copper cable is used. If you need 380 volts, you will need a cable with five cores. The cable cross-section is selected based on the existing load and according to calculations of the operating current. However, the cross-section should not be less than 4 square millimeters. The machine should be rated at 32 Amperes, and if a 6 mm cable is used, the machine should be rated at 40 Amps.
The peculiarity of the hob is its extremely fast heating. This circumstance is caused by the high power of the device, which can reach 7 kilowatts.
The plug is connected as follows:
- Buy a 220 Volt power plug (alternating voltage).
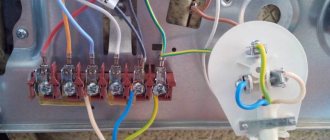
- Remove the protective panel. There are 6 pins on the inside of the plug that are used for connection.
- Terminals numbered 1, 2 and 3 are used to connect the phase conductor (L). These terminals are connected with a jumper.
- Contacts numbered four and five are used to connect zero (N).
- The sixth terminal is intended for grounding.
Note! If the phase conductor is connected incorrectly, the protective device (RCD) or differential circuit breaker will trip.
Oven socket
Many people have a question: is it possible to connect an electric oven from an existing regular outlet that was previously installed in the kitchen for a kettle, microwave, etc.?
It is possible, the main thing is that 3 conditions are met:
- the oven must have a power of no more than 3.5 kW
- The socket is connected with a three-core copper cable from the panel with a cross-section of at least 2.5 mm2
- in the electrical panel, replace a conventional circuit breaker with a thermal release with a differential circuit breaker with a rated current of no more than 16A
According to the third condition, some may experience inconvenience and minor problems. As a rule, many people still have one 16A-25A circuit breaker for the entire socket group, plus another one for lighting.
If you replace the only circuit breaker for sockets with a differential 16A one and connect the oven through it, it will be practically impossible to use other electrical appliances while the oven is working and food is being prepared.
Here you will have to make your own choice, either in favor of saving (not installing new wiring, a separate outlet, etc.), or in favor of comfort and convenience. It is not recommended to leave a regular modular machine in the panel without protection against leakage currents when connecting the oven to an old outlet.
The height of installation of a new socket under the oven should be no more than 90cm from the floor. Although it is also often placed at the level of the kitchen legs.
The most important thing here is ease of use. For safety reasons, when wet cleaning and wiping the oven with a wet cloth, it must be disconnected from the power supply.
And crawling under the very bottom of the kitchen every time to pull out the plug is not always convenient. In addition, here you need to take into account possible situations such as water leaks and kitchen flooding. Therefore, the socket should still be raised 5-10cm above the floor.
The main requirement for placing the outlet is not to place it directly behind the oven. You can install it on the left, on the right, or as mentioned above - under it, directly near the floor.
Another safety point when installing an outlet: if there is a gas supply nearby, for example to a hob (let’s say you have a gas supply and not an electric one), then the outlet should be at least 60cm away from it.
When you have decided on the location of the outlet, you need to connect it.
Connect the phase and neutral cores of the cable to the outermost contacts of the socket. In this case, it does not matter at all where the phase will be located, and where the zero is - on the right or on the left. Connect the grounding conductor (yellow-green) to the grounding terminal (usually the middle one).
Replace the frame or decorative cover.
Hob connectors
Sockets for 220 Volt hobs are characterized by a special location and shape of the holes for the plugs. Switching is carried out in such a way as to avoid incorrect connection of the phase and protective conductor.
380 Volt sockets are stationary switching devices with five sockets. These sockets are suitable for three-phase loads. There is a neutral wire and grounding.
Before buying such a power socket, you need to make sure that the plug fits the contact holes: it can be easily inserted into the connectors. If only a small amount of force is required, this will not deform the conductive pins.
Connection instructions:
- Turn off the current supply to the power cable.
- We test the presence/absence of voltage in conductive elements with an indicator.
- We connect different phase wires to contacts 1 to 3. We connect the conductors independently of each other.
- We connect zero to the contact connector.
- We connect the grounding to the desired terminal, which is indicated by a six or a sign with a tree pattern.
Check the power of all electrical appliances
This information is on a label on the back; if you haven’t purchased the equipment yet, take the average values for such a device or specific ones - on the manufacturer’s website.
Article on the topic: How to cook dumplings on a gas stove
All this will help the electrician calculate the load on the network, the number of distribution boxes and cable thickness. This is especially important if you live in apartments - they are not subject to load standards adopted by SNiPs for residential premises; if there is not enough power, you will have to resolve this issue with the management company and power supply engineers.
The hood connection is made inconspicuously; at medium height - four sockets: enough space for appliances that will stand on the countertop
As a rule, kitchen electrical appliances require 10–15 kW of power, but you need to provide at least another 30–50% of the reserve; that is, the electrical wiring in the kitchen should be designed for approximately 20 kW of power - this will protect you from the risks of short circuits and from power surges, which can cause equipment to burn out.
Connection diagrams
Connect the hob to the outlet in accordance with one of three schemes.
Single-phase circuit for 220 Volts
This option is common in apartment settings. The scheme is implemented as follows:
- We connect the phase wire (L) to terminals L-1, L-2, L-3. We place a pair of copper jumpers between the terminals.
- We connect the neutral wire (N) to terminals N-1 and N-2.
- We direct the protective conductor PE to the appropriate terminal.
The terminals are accessible through the rear panel. To do this, unscrew the screws.
Three-phase circuit 380 V
This is the second most common scheme. Most often used in a private home.
We connect like this:
- We connect phases A, B, C to terminals L-1, L-2, L-3.
- We connect terminals N-1 and N-2, PE in the same way as in a single-phase circuit.
Jumpers are not needed in a three-phase circuit.
Two-phase circuit at 380 Volts
Two-phase circuits are rare, but they do occur. In such cases, for example, A and C may be present, but B absent.
The hob is connected to a 380 Volt network as follows:
- We install a jumper on L-1 and L-2 and connect phase A.
- On L-3 we set phase C.
- All other actions are carried out in the same way as in other variants of the schemes.
Installation instructions
Installation of reinforced components for electric and induction cookers is carried out with the help of specialists or independently. Self-installation includes the following steps:
- Power off . Before starting work, turn off the power to the line and check that there is indeed no current in the wire.
- Preparing a place for an outlet . At this stage, a hole is made with a hammer drill or grinder and a socket box is installed in the wall.
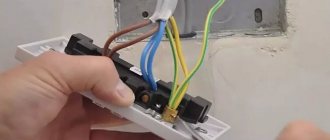
- Cable preparation . A cable is inserted into the socket box and the insulation is removed from it. The veins are stripped to 0.8–1 cm.
- Connection . Remove the decorative cover from the socket and connect the cable cores to the contacts. Connect the yellow-green ground wire to the central contact, phase and neutral to the remaining contacts. Install the socket in the socket box.
- Fixing the socket box. The product is fixed to the wall using a gypsum solution or putty. After drying, secure with screws.
- Installation of the upper housing and testing. The decorative housing of the socket is put in place and the operation of the device is checked.
Connecting a panel without a plug
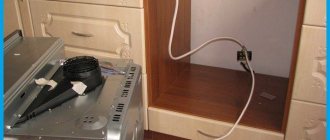
An outlet that extends a few centimeters from the wall does not always suit the owners of the room. The solution is to hide the protruding elements of the outlet.
You can do this in one of two ways:
- Using GML sleeves (tinned copper sleeves).
- Using the KlK-5S mounting box.
We immediately decide on the conductors. On some models, an already connected four-wire wire is removed from the panel. However, in many cases there are only 3 wires in the socket box. Such surfaces are designed for both a single-phase 220-volt connection and a two-phase 380-volt connection. Half of the burners will be powered from one phase, and the other half from the second phase.
There is a misconception that the second phase is only needed to power the control. In fact, the power is equally distributed over both one and the second phase. To connect to 220 Volts, you need to insulate one of the wires.
It remains to connect the neutral (blue conductor), the ground wire (yellow-green) and the phase (black or brown wire). If desired, connect two phases into one through a tip.
Note! Some Bosch hobs with a permanent cable come with a tip by default.
Sometimes there is equipment with a five-core cable. Such surfaces are characterized by high power (more than 7 kilowatts) and are designed for 380 Volts. To connect the panel to a 220-volt network, you need to connect 2 wires in pairs. For example, black and brown wires are sent to phase, and blue and gray conductors are sent to zero. The earth (green-yellow color) will remain single.
Note! The specified connection does not entirely comply with the rules, since the protective conductor PE must have the same cross-section as the phase conductors. In the described case, the protective conductor will be twice as thin.
A little theory
Let's consider the power formula for the case when the voltage in the outlet is 220V, connecting these quantities:
P=I*U*cosφ
The letter P is power (in fact, in the passport or sticker on the panel of the oven or hob, the numbers before the letter W indicate power), I is the amount of current consumed (later it will become clear why this value is important), U is the network voltage (220 V), cosφ – power factor (equal to 0.95).
Thus, the current of the oven (at P=3.5 kW, according to formula 1) is 16.7A, the hob current (at P=7.2 kW, according to formula 1) is 34A.
The electrical network of the apartment (house) is protected from emergencies (such as short circuit, overload) using circuit breakers (automatic circuit breakers) and/or differential circuit breakers (definitely not RCDs).
When we go to the electricity meter to record readings, we see basically the same picture. These are automatic switches.
The size of the switches is characterized by the maximum operating current. Let's say, in new buildings they use automatic equipment 16A (16 amperes), 32A, 40A, an input automatic circuit is on average 50A.
Knowing all this, let's try to understand how to correctly connect to the power grid.
Let's consider two situations:
- the apartment (house) is being renovated, and
- repairs have already been completed.
1. So, repairs are being made. You should think about the fact that the kitchen will not have an electric stove, but rather an oven and a hob, at the stage of designing the residential electrical network. First of all, it is necessary to determine where these electrical appliances will be located in the kitchen furniture. After this step, the locations of the sockets are determined.
It is important to understand that you should not install the socket directly behind the oven or hob - in addition to the fact that you can make a mistake in the size of the depth (when the plug is plugged into the socket, the cabinet may not fit), the principle that applies, for example, during warranty repairs will be violated - First disconnect the power, only then dismantle it.
Therefore, it is better to place sockets in the cabinets adjacent to the left/right:
The installation height of sockets must be at least 30 cm from the floor. There is another location:
In this case, there is inconvenience of use (access is limited by the depth of the kitchen furniture; if there are lower furniture facades, their dismantling is necessary; the likelihood of “not fitting” into the size and not safe - the sockets are too close to the floor; the tap hose has broken and there is chance of being under voltage 220V).
When making repairs, there is often a desire to use old electrical wiring. In the case of a hob, if the cable is old, at least copper 3 * 4 mm2, you can think about using this cable. If the old cable is aluminum of the same cross-section or copper of a lower cross-section, it is definitely better to replace it with VVG-ng-3*6.
In the case of the oven, we have already calculated that its current consumption is 16A. This implies that the cabinet is fully loaded with work. If the cabinet is powered from the same circuit breaker with other consumers (lighting, other electrical appliances) that also consume electricity, a network overload may occur and the machine will trip (let’s say an electric kettle and an oven are connected to the same outlet group, the cabinet consumes 16A, the kettle consumes 6.5A - total current is 22.5A, therefore, a 16A circuit breaker will turn off both the kettle and the cabinet). It would be more reasonable to provide a separate line for the cabinet, laid with a VVG-ng-3*2.5 cable, with its own 16A circuit breaker.
There is a situation when repairs have already been completed and instead of the planned installation of an electric stove, a decision is made to use an oven and hob. As we have already determined above, the best solution is a separate line (group) for the cabinet and for the hob. Even after renovation, it is often possible to draw a line under the kitchen furniture to the switchboard (with the installation of a separate machine).
Attempts to connect the cabinet together with the kitchen sockets do occur. But you need to be prepared for the situation with the electric kettle described above. The only thing that can be noted in favor of this method is that the actual power of electrical appliances may be slightly lower than the rated power, the load on the electrical cabinet is not always maximum (but do not forget about the holidays) - the main principle is that when the cabinet is working, nothing else is working, or look for a combination: percentage of cabinet power - you can turn on something else.
Plugging an oven and a hob into the same outlet is not effective, but it is dangerous.
The fact is that the cross-sections of the power wires of the cabinet and the surface are different. So the wire from the cabinet to the outlet should have a cross-section of 2.5 mm2, and for the surface at least 4 mm2. The circuit breaker for the hob 25A, 32A (depending on the specific model) is designed for sections from 4mm2. So, if the oven malfunctions, the surface automatic will simply not work, and this is fraught with fire (we will not consider the case when all the insulation burns, a short circuit will still occur, and the automatic will work).
Common mistakes
Common problem: the panel is connected, but turns on and off spontaneously. The cause of this behavior is not necessarily due to incorrect installation.
The problem is caused by a variety of factors: child lock is turned on, water gets on the touch parts of the equipment, or accidentally pressing the wrong buttons. Some models are equipped with a cookware recognition function, and until there is a pot or pan on the panel, the stove will not heat up.
Another common problem: only two of the four available burners are functioning. Burners that are not working show residual heat (indicated by the letter H). The situation is caused by blocking that occurs when three-phase models are connected single-phase. The blocking is done programmatically.
Therefore, before tampering with the connection terminal block, it is recommended to study the documentation for the equipment in advance.
Induction cookers
Such equipment can be separated into a separate group not so much due to the peculiarities of its connection, but because of the unusual operating principle, which is based on heating metal utensils under the influence of a powerful electromagnetic field created on the surface of the device. Such a field causes eddy currents to flow in the metal from which the cookware is made, which produces thermal energy.
Advantages of induction models:
- High operating efficiency and heating speed of dishes.
- When the stove is turned on, it only affects metal containers, without having any effect on the kitchen utensils located near it.
- The glossy work surface maintains a low temperature during cooking.
Currently, induction devices are not very common because they have some disadvantages:
- Inability to work with ceramic, glass or aluminum cookware (the electromagnetic field only affects ferromagnetic materials).
- The price of such equipment is quite high.
- The presence of a characteristic sound when the material of the cookware installed on the stove is remagnetized.