A socket with a double connector will provide the ability to simultaneously power two devices connected to separate electrical points. In addition, for each of them there is no need to pull a cable, and it is more convenient to use thanks to the grouped arrangement.
You can handle the installation yourself without any problems if you take into account the recommendations we have given. We are ready to share the intricacies of electrical installation work. We will tell you in detail and show you how to connect a double socket, how to arrange a socket for an electrical outlet and ensure safe operation.
The information offered for review is supplemented with step-by-step photo guides, visual illustrations and videos explaining the nuances of installing and connecting power devices.
Types of double sockets
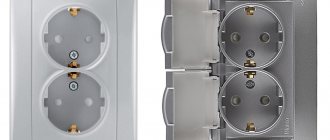
The main elements of an electrical outlet are the outer protective casing and the working part, which includes the base and contacts.
They are connected to each other by screw terminals - clamps necessary for connecting the cable of electrical equipment.
The only drawback of double sockets is that it is problematic to connect two high-power electricity consumers through them simultaneously
There is a misconception that double sockets are identical to assembled or dual models and represent several independent devices located close to each other, interconnected by cables.
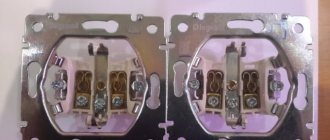
If a double socket is connected to one power circuit, then electrical installation work is carried out according to a scheme similar to connecting a single socket. The only difference is the serial connection of two contact pairs within the electrical installation product
Technological progress does not stand still. Modern models are more advanced designs. In terms of rated voltage and current, they are strikingly different from the sockets that were ubiquitous during the Soviet era.
For example, if in old-style models the permissible current did not exceed 10A, then for modern electrical installation equipment this figure is 16A.
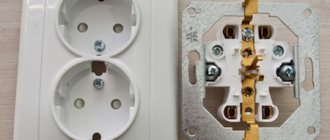
Each part of a double socket can be connected to a separate power circuit if you first remove the brass jumper connecting them at the terminal
In reality, a double socket has one clamp and several distribution strips. Due to this, the electric current is supplied to both sockets equally, but its level will be divided depending on the power of the devices powered from the network.
Therefore, when replacing a failed old device with a new one, it is worth knowing its design features, which require certain nuances during installation.
The distance between the output contacts, as well as the diameter of the plug pins, in modern models is larger than in traditional analogues, and is 4.8 mm instead of 4 mm
According to modification, double sockets are classified into the following main types:
- Open and closed version . In closed models, the holes are hidden behind curtains, which move to the side when the device is turned on. Devices of this type are indispensable for homes where there are small children. The curtains only work when pressed at the same time. Thanks to this, even if a foreign object is deliberately inserted, nothing dangerous happens.
- Without grounding and with grounding contacts . In models of the second type, grounding contacts are installed on the socket body, which protect electrical appliances and the user from breaking currents that accidentally “exit” the plastic body.
- For installation in rooms with high humidity and outdoor installation . Models of the first option are marked IP-44. They are equipped with a housing that protects the device from moisture penetration. Devices for outdoor installation are marked IP-55. Their highly durable housings are protected from dust contamination and moisture penetration.
Each type has a corresponding letter marking. For example: “A” indicates that this is an American double socket, “B” indicates the presence of a grounding contact.
Depending on the type of design and material of manufacture, devices are also divided into standard and polar, overhead and custom-made
Among the latest developments, programmed sockets are especially popular. Devices equipped with a timer turn on and off independently from the power supply after a set time interval has elapsed.
The protective housing of modern sockets is made of heat-resistant, unbreakable plastic. To enhance its decorative qualities, it is decorated with various inserts.
Thanks to the variety of design options, you can choose devices that will be invisible in the interior or, on the contrary, act as a worthy decoration.
When planning to install a double socket yourself, experts recommend choosing simple models without any modifications. Or give preference to double sockets with a spring-loaded plug ejector. Such models are convenient because they are equipped with springs that are activated when the plug is removed from the device.
To protect yourself by minimizing the risk of accidents, you should choose products from proven companies, ABB, and Legrand.
In two sockets
If there are two holes in the wall, in each of which wires are laid, the following solutions are available for this case:
- Insert two devices into them with one socket each. You need to choose them so that the lids do not overlap one another or there is an opportunity to grind them off along the edges.
- Purchase an internal socket with a long cover. Connect two holes into one. After this, you can plug the extra line and insert the mechanism in the middle of the created opening.
The choice depends on the residents' needs for electrical outlets. One option would be to install an outer horizontal block with 4-5 slots on top of the holes.
Connection materials
The wire for connecting the electrical point must be made of the same metal as the main cable. For example, when using an aluminum cable, the jumper must also be made of aluminum.
To ensure an even distribution of incoming electricity, the cable used for connection must have the same cross-section as the main wiring in the room
To install a double socket you also need:
- flat and Phillips screwdrivers;
- braid stripping tool;
- pliers;
- insulating tape.
For safety reasons in case of fire, it is recommended that any electrical wires be laid in corrugation. This solution is also convenient because it does not require breaking through the wall, and also simplifies the replacement of damaged wires during subsequent operation.
Final stage
The photo of the double outlets does not show any protruding wires. They are all neatly placed inside. There should be nothing unnecessary under the fastening tabs. Otherwise, the entire insulation system may be damaged. Bend the wires with a regular accordion. The installation is simply perfect in this case.
Then you slowly bury it inside. Everything is fixed using self-tapping screws or fastener tabs. Using a level you can always choose the optimal place. Its auxiliary part is then attached to the installation box.
Never forget that although this is a double outlet, the load on it does not exceed the standard 16 Amps. The load cannot be increased 2 twice after connecting. When turning on a variety of electrical appliances, it is worth remembering these data.
Two single sockets are placed side by side if there is no extra space when working according to the European standard. Study the question carefully so that you can do everything yourself later.
Double socket installation technology
Installing a double socket in one socket box requires certain preparatory steps. The first step is to determine the identity of the wires by finding out where the phase and zero are.
The easiest way is to study the insulation code marking:
- the phase wire is painted red or brown (less often white or black);
- neutral has white-blue or light blue insulation;
- grounding is always green-yellow.
The following article will introduce you in detail to the features of marking electrical cable cores, which we recommend that you read. But for greater reliability, it is better to play it safe by taking measurements.
An indispensable assistant in this matter will be a regular or electronic screwdriver equipped with an indicator at the end - a light bulb or an LED indicator.
To determine the identity of the wires, remove the cover from the failed device and touch each exposed wire in turn with a screwdriver with a sensitive indicator: on the neutral wire there will be no light signal, and on the phase wire it will light up.
If there is no ground wire in the house, the installation work is a little easier.
Before you begin arranging an electrical outlet, you must de-energize the room. To do this, the levers of the circuit breakers on the panel are lowered down, moving to the “off” position. It is recommended to re-check the voltage at the location where the double socket is installed.
If there is still current in the phase, this indicates that not all supply lines have yet been de-energized. That’s why it’s so important to turn off all circuit breakers before starting work, and not limit yourself to just those that control the wires going to the outlet.
A double socket with a protective contact is installed if a grounding system for a private home is installed. In multi-storey buildings there is no point in using devices with grounding, because... zeroing has been done there
Marking the wall
The socket is placed near the wire running in the wall or from the electrical distribution box. The location of the future device is marked with a pencil.
Before installing a double socket with two “glasses”, it is necessary to determine the distance between the drilled holes. To do this, mark the center of the first socket box. This is the point of intersection of the diagonals. Using the same principle, the center of the second device is determined.
At the marked place in the wall, a recess is made of such dimensions that a glass - the inner body of the device - can easily fit into it.
To drill a hole in the wall itself, use a crown, the diameter of which is a couple of millimeters larger than the size of the purchased socket box. If there should be no problems with a brick or plasterboard wall, then to drill a hole to install a socket in a concrete wall, you will have to set the hammer drill to the shock mode.
The rules and technology for installing socket boxes in walls made of concrete and plasterboard will be familiarized with the material collected and systematized in our article.
The depth of the hole should be such that the “glass” does not protrude beyond the surface of the wall. Having drilled a niche, you need to clean its middle. To do this, use a chisel and a hammer. Plaster can be knocked off with a chisel or screwdriver without much difficulty.
Routing sockets and twisting wires
This stage is very important and must be approached with the utmost care and caution. The master’s task is to connect the power wire to the contacts. To do this, a wire is pulled from the junction box to a double socket.
The socket itself is disassembled into two components by unscrewing the mounting screws using a screwdriver, separating the front panel from the mechanism
The previously installed crown must be replaced with a drill. The diameter of the drill should be slightly larger than the cross-section of the wire supplied to the socket or the diameter of the corrugated pipe in the cavity of which the supplied wire will lie. The ideal option is when the diameters of the drill and wire match.
The main wire is inserted through one of the mounting holes of the socket box. And the auxiliary one is launched through the second hole.
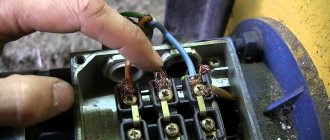
Twisting of wires is performed directly in the “glass”. Before performing work, the outermost one and a half centimeters of the ends are stripped of the braid with a stripper - a tool that does not cut through the wire.
In the absence of one, you can use a sharp knife, first cutting the winding in a circle with it, and then carefully removing it from the wire. For ease of assembly, the edges of the cores are raised up.
To extend the service life of the socket, the exposed ends of the wires must be soldered, or a brass contact must be used. The second option is more successful, since it not only simplifies the subsequent use of the outlet, but also ensures high safety of the device.
When connecting wires, do not firmly clamp their ends into the terminals, since under the influence of great forces they can be damaged.
When connecting a grounded socket, always follow the wiring rule: on the right - phase, on the left - neutral. The grounding cable is connected to the top and central terminal of the device, which is equipped with protruding “antennae”, which often protrude beyond the body of the device. The grounding contact is fixed in the same way as phase and zero.
You cannot attach a phase and a neutral to the same plate, as this will cause a short circuit and damage to the entire wiring.
Having fixed the wires in the contact holes, unclench the “antennae” by unscrewing them clockwise using special bolts
Having completed the installation of electrical connections, proceed to the installation of socket boxes.
Subtleties of fastening socket boxes
The socket boxes with the power cables attached to them are secured using holders located on the sides. They may be included with the device, or they will have to be purchased separately. There are also models that are not equipped with fixing tabs, which are secured by screwing them onto screws.
As you tighten the screws clockwise, the fixing “legs” will diverge to the sides, firmly digging into the socket box
But since the socket box with the lever in the center experiences a double load, during operation the fastenings of the mechanism can become loose and weaken. When the socket boxes fall out, the wires are often exposed, which can lead to emergency situations.
To increase the reliability of fastening, craftsmen often use alabaster or cement mortar. To obtain a homogeneous thick mass, the structure of which resembles sour cream, dry alabaster is mixed with water. But keep in mind that the material should be diluted in small portions and you need to work with it quickly and carefully.
The alabaster mixture is placed in the place where it is planned to install the socket box. To ensure that the mixture adheres well to the surface, the inner edges of the hole should first be moistened with water.
Work on installing the inside of the device should be carried out 20-30 minutes after laying the mixture so that it has time to “set” a little. Having placed the “glass” on the prepared place and buried it in the mixture, level the position using a level and a hammer.
When installing a socket box, it is important to maintain the vertical and horizontal position of its position, applying a level in both planes for this purpose
The resulting gaps between the wall and the socket box are filled with the remains of alabaster. Without waiting for the plaster to acquire the desired strength, the sagging is removed with a knife.
Having placed the double socket horizontally or vertically and given the device the desired position, secure it with screws. If it is necessary to adjust the level, the work is performed using pliers.
When tightening the mounting screws, the main thing is not to overtighten them, otherwise, with strong pressure, the front panel may simply crack or collapse
At the final stage, the front panel is placed on top and clamped with screws. The decorating element will cover the unsightly part of the outlet and protect it from accidental damage.
After completing the connection of the outlet, all that remains is to turn on the circuit breakers and the residual current device in the panel and test the operation of the electrical installation equipment. It is better to check the operation of the outlet when turning on inexpensive household appliances, for example, a table lamp. After all, the slightest mistake during the installation process can cause a short circuit and “burnout” of household appliances.
Open and closed wiring
The difference between the methods is noticeable to the naked eye. The closed wiring is located inside the wall, for which grooves (grooves) are punched or cut into it, in which the connecting wire is hidden under a layer of putty. Open wiring is laid along the surface of the wall, on which it is held in special fasteners or laid in plastic guides - cable channels.
Accordingly, if you can see the wires that fit into the outlet, then the wiring is of an open type. Otherwise, closed wiring is used, for the installation of which the walls were cut.
These two methods of connecting an outlet can be combined with each other - if the old points are connected in a closed way, then nothing prevents you from connecting a new one in an open way. There is only one choice - in wooden houses the socket can be connected exclusively in an open way, just like all other electrical wiring.
Open wiring - advantages and disadvantages
An analogy with the most common extension cord (surge protector), which is essentially an additional branch of the electrical network, but is connected not to a junction box, but to an outlet, will help you understand why open wiring is good.
- You don't have to cut the wall to install a new outlet. This is especially true for those premises that have already been renovated.
- Installation does not require tools such as a wall chaser or a hammer drill.
- In the event of a breakdown, you don’t have to open the wall - all the wiring is in front of your eyes.
- Installation speed. Even after all the work has been completed, adding another point to the existing wiring is a matter of several minutes.
- If desired, you can quickly completely change the wiring - ideal for temporary connection schemes.
- There is a high probability of external influence on the wiring - children, pets, you can simply accidentally hook it. This disadvantage is mitigated by laying wires in cable channels.
- Exposed wires spoil the entire interior of the room. True, it all depends on the design abilities of the owner of the room - cable channels will fit perfectly into modern design solutions, and if the room is made in a retro style, then special wires and other accessories are produced for this.
- The need to purchase special fasteners, even if cable ducts are not used - in wooden houses, open wiring should be laid at a distance of 0.5-1 cm from the wall surface. Wires are often laid inside iron pipes - all these requirements are aimed at increasing the safety of using open electrical wiring.
As a result, this connection method justifies itself if for some reason there is no point in laying the wires to the outlet inside the wall. Besides the fact that the wiring will be visible, there will be no differences in the operation of the outlet.
Hidden wiring - pros and cons
Despite some significant disadvantages, it is used almost everywhere - the advantages of its use still outweigh.
- The wires to the socket fit into the wall, so wallpaper or other finishing can be done freely on the outside.
- Meets all fire safety requirements (in concrete buildings) - even if a short circuit occurs, there is no fear of a fire from the wires in the wall.
- There is a very low probability of damage to the wiring - it can only be damaged when drilling walls.
- For installation you need to cut the walls.
- It is difficult to carry out repair work.
- If the walls are finished, then after installing an additional outlet you will have to redo it.
The disadvantages are leveled out by preliminary calculations - if you plan in advance where and which block of sockets should be installed, then problems usually do not arise in the future.
FAQ
Question No. 1: Which socket box is best to use for quick and high-quality installation?
It should be noted that the choice of socket box is no less important than the selection of the socket itself. Therefore, you should focus on designs from well-known brands, for example, Schneider Electric, which are distinguished by their reliability and high quality.
Question No. 2: Which method of fastening the socket provides greater reliability - clamping tabs or self-tapping screws?
Self-tapping screws become loose over time, as do the legs. However, the second option has proven itself to be a more effective method of fastening, since the clamps press the inner part against the walls of the “glass” with greater force.
Question #3: After creating branches, what is the best way to insulate the sleeve?
Insulation can be done using heat shrink tubing or electrical tape.
Question No. 4: Is grounding connected at once for the entire device or does each socket need its own grounding?
The grounding wire must be connected to each of the sockets available in the device.
Question No. 5: To which contact should the grounding conductor be connected?
The ground wire is connected to the center pin located on the bracket, usually marked with a corresponding symbol.
Types of blocks
Before you study information on how to connect an outlet with a switch, you need to know that when choosing, they pay attention not only to the design of the product - its color, shape. Before purchasing, you need to evaluate the technical parameters and the capabilities of the electrical network
The last point is especially important for apartments in old housing stock, where electrical wiring is often in critical condition. The next question is the functionality of the product. When choosing a particular unit, be sure to take into account which devices will be connected to the outlet and what their power is.
Before purchasing, they decide how many devices will be connected to the network in a particular room. When work is planned in wet rooms, the unit must be equipped with special protective curtains or covers.
Types of combined devices
Nowadays it is easy to find products with various combinations in stores. One device may contain sockets (1-2) and several switches with one/two/three or even four keys. Just like regular blocks, combined structures can be internal or external. The latter look too cumbersome, but they are the only option if there is simply no possibility of making hidden wiring.
Despite the relatively wide range, several types of designs remain the most popular.
- Block with socket and one switch. These simple designs are usually used for garages, basements and other small outbuildings. This minimum will allow you to turn on the lighting and take advantage of the benefits of civilization - heat up the electric kettle, turn on the radio or fan. Connecting a tool is an option for skilled owners.
- Device with two keys. This type of paired blocks is optimal for corridors and combined bathrooms, since it already makes it possible to get a minimum set of amenities - turn on electricity in the hallway, bathroom, connect a mobile phone charger, a vacuum cleaner, a hairdryer or any tool to the network.
- A block with three switches is suitable for small apartments with separate bathrooms/toilet rooms. In this case, a block would also be the most logical solution.
In other rooms (living room, children's room, bedroom), the presence of such structures is unlikely to be advisable, but installation in any room is still not prohibited. Blocks with several keys will help you connect multi-lane lighting devices, and an additional socket will never be superfluous. If electrical appliances are not “going to” work from such an outlet all the time, then the option is well worth considering.
Marking the wall
In the place on the wall where the electrical point is supposed to be installed, you need to make a mark with a pencil. To install a double socket, the design of which has two glasses, you need to measure the distance between the drilled holes. For this purpose, determine the location of the central point of one of the socket boxes, which is located at the intersection of the diagonals. In a similar way, the central point of installation box No. 2 is identified.
Next, at the location where the socket is installed, a recess is made in the wall, the dimensions of which must correspond to the dimensions of the internal part of the product.
Socket layout in the kitchen
In order for the recess to have the correct round shape, you can first make an annular cut using a crown mounted on a drill, after which the material inside the cutout is knocked out with a chisel. The diameter of the crown should be 2 - 3 mm greater than the diameter of the socket. In the absence of a crown, a recess is formed using a drill, drilling several holes and then removing the remaining material with a chisel.
You need to go deep enough so that the mounting box fits completely in the recess without protruding from it.
How everything works
Anyone with basic skills can now connect an outlet from a switch. We will try to talk in detail about all the problems that may arise in such situations.
An electrical outlet should under no circumstances become a source of all sorts of dangerous situations. This is especially true for houses and apartments where there are many energy-intensive appliances. Here you will have to seriously understand the entire structure. You must become familiar with the entire switchgear.
The socket is equipped with decorative elements that are secured with screws. There is also a sub-socket and block on which the frame, grounding, front panel, protection curtains, phase, protective mechanism and housing are located. Don't forget about the fastening tabs, contacts and terminals.
Preparatory work
The amount of preparatory work will depend on whether the outlet is being installed in a new location, or whether they simply want to replace an old regular outlet with it. Let's consider both options.
Preparations before replacing the outlet
If there is already an outlet at the installation site, it must be removed. This can only be done after disconnecting the outlet from the power supply. After turning off the machine, you need to use the phase indicator to check whether the electric point is really turned off.
Removing the socket
Dismantling the socket is carried out in the following sequence:
- First, remove the front panel by unscrewing the screw holding it in place. Sometimes, to access the fastener, you need to pry off the plastic decorative panel, which is held on by a latch, with a flat screwdriver or knife.
- Having gained access to the inside, unscrew the screws holding the wire strands in the terminals.
Next, all that remains is to unscrew the fastening that holds the base of the socket in the socket box.
Preparations before installing a new outlet
As part of the preparatory work, a wire needs to be laid from the distribution box to the installation site of the new electrical point. To do this, a channel is punched in the wall with a punch - a groove.
When the groove is ready, a wire is laid in it. It is best to place it in a corrugated tube. In this case, if the wire burns out, it can be easily removed and replaced with a new one without breaking the plaster.
Socket outlet
After laying the corrugated pipe with the wire, the groove must be covered with cement-sand mortar.
The wire is connected to the terminals of the junction box after installing the socket.
Now you need to make a recess in the wall in which the new double socket will be placed.