Is it possible to place the oven against the wall?
It is not recommended to place the oven, like the hob, close to the refrigerator - this can negatively affect the operation of both appliances. It is also impossible to install equipment close to the wall - it is advisable to leave 5–10 cm.
Interesting materials:
Where is the best place to store contacts? Where is the best place to store onions and garlic? Where is the best place to relax at sea with children? Where is the best place to relax in August? Where is the best place to relax in November? Where is the best place to relax in Egypt in winter? Where is the best place to put a child's bed? Where is the best place to spend Christmas in Europe? Where is the best place to spend Christmas? Where is the best place to study to become an interior designer?
What sockets are needed for powerful equipment?
The oven requires power sockets of 16-32 A, depending on the technical characteristics of the equipment.
The cable and socket for the oven should be selected according to the power of the device. It is usually indicated in the technical documentation for the equipment. Basically, ovens operate at a voltage of 220/380 V. The current strength here is 25/32 A. It all depends on whether the equipment in front of the master is single-phase or three-phase.
More often, the following sockets for stoves and ovens are used for powerful cabinets:
- For 16 A and 220 V. Designed for standard household appliances with a power of up to 3.5 kW.
- At 32A/220 V. Used with single-phase ovens with a power of 3.6-7 kW.
- At 20 A/380 V. Designed for three-phase equipment.
All power points for powerful equipment are grounded. Therefore, they have more terminals than standard elements. For single-phase sockets, there are two supply points and one ground. Three-phase ones have 3 feeders, one for grounding, one for zero (5 in total).
Distance between free-standing devices
The distance between the refrigerator or freezer and any heat sources, which includes the oven, is indicated in the instruction manual and is 50 cm.
If the refrigerator breaks down due to the proximity of the heating device, the service center will refuse warranty repairs.
Reference! Some refrigerators with the Full NoFrost system require a distance of at least 5 cm on each side from any furniture and appliances. This location feature is due to the fact that condensers are located in the side walls, so air circulation is necessary to avoid overheating. Installation requirements are necessarily indicated in the instructions and cannot be ignored.
In practice, it is not always possible to place devices so that there is a distance of half a meter between them. If you use modern technology: an induction hob, a reliable electric oven with a tight-fitting door, the distance can be reduced to 15 cm. A narrow kitchen cabinet can be squeezed into this gap to economically use precious space.
Important! The distance to the gas stove must not be reduced!
Location of built-in appliances in the kitchen: TOP 8 cool tips
a standard car into the set! Over time, the machine will become unbalanced and will shake the entire set, resulting in gaps and cracks in the connections.
Expert opinion
It-Technology, Electrical power and electronics specialist
Ask questions to the “Specialist for modernization of energy generation systems”
Sockets in the kitchen: for the hob and oven, for built-in appliances, on the apron, above the countertop. It is better to think about placement after purchasing and installing the set, because the project depends on its configuration: corner, wall, etc. Ask, I’m in touch!
Operating principle of an induction cooker
A new generation device - an invention that combines the action of magnetic and electric current - makes the cooking process fast and safe. During operation, the cooker generates a high-frequency magnetic field, heating the cookware by induced eddy currents. The glass-ceramic coating of the oven heats up only from hot dishes at the point of contact. Therefore, for the housewife, the risk of food residues burning on the stove is reduced to “0”.
By following all operating rules, new generation equipment will allow you to experience all the comfort and ease of the cooking process. This device provides maximum output of thermal energy - efficiency is up to 90%. The technology allows you to speed up the heating time of a certain oven element with which the dishes come into contact. There are also significant energy savings.
Locations for installing power points
The oven socket cannot be installed in the following areas of the kitchen, according to established standards:
- on the wall in close proximity to hot equipment;
- in the area of wet objects: washing, draining, water pipes;
- at a height much larger than the working surface;
- near gas pipes - sockets are removed from them by at least 40 cm;
- in close proximity to the floor - it is advisable to raise the power point 15-20 cm from its level, ideally 100 cm.
A good area to install a power point is the wall under the countertop - under the built-in furniture. In this case, access to the outlet is always open, and the area where it is located remains dry. Connecting the plug to the socket is very simple here.
Craftsmen recommend refraining from the decision to make an outlet behind the oven. The feeding point should be located in a dry place accessible to the owner’s eye. It should not be exposed to temperature changes. And in any case, this is inevitable when the cabinet is operating.
Another point worth considering is the operation of the combi oven (steam supply to industrial installations). Even in small quantities, condensation can settle on an outlet located behind the equipment. This is already an assumption of an emergency situation.
A power point installed immediately behind the cabinet may prevent it from being organically integrated into the overall “ensemble” of the kitchen. The equipment will unsightly protrude beyond the same common line with the furniture.
Carrying out installation work
The main thing when performing electrical installation work is compliance with safety rules. Always operate with the power switched off.
Connecting the plug and socket
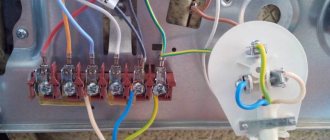
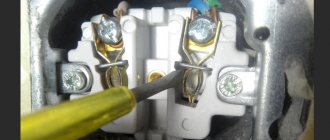
To connect the plug, strip the wire from the oven or stove; if the wire is stranded, then crimp it with NShV lugs and pass it through the plug body. Mount the phase and neutral on the outermost contacts of the plug. Yellow-green grounding conductor - on the middle contact. To prevent the wire from dangling inside the plug, clamp it with a clamp and tighten the plug body.
The socket is connected in the following way: the socket is mounted in the required place, the socket body is removed and the power line is connected to it. Mount the phase and neutral on the outermost contacts of the socket. Yellow-green grounding conductor - on the middle contact. Next, screw the socket housing.
Cable connection diagrams for the oven and hob
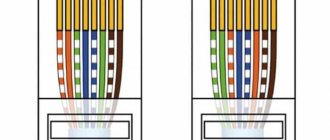
There are two main circuits for connecting an electric stove or hob: single-phase and three-phase. The connection is made to the terminals of the hob, which can be accessed through its back cover - it is unscrewed and removed. Pay close attention to the color markings on the terminals - this will allow you to avoid mistakes, read the connection instructions and safety requirements.
Single-phase 220V circuit (most common in apartments)
Phase L is simultaneously connected to terminals L1-3 of the hob. To do this, two removable copper jumpers are installed between them at the manufacturer. If for some reason you don’t have jumpers, you can make them yourself from an electrical cable whose cross-section is no less than that of the supply cable. Zero N is connected to terminals N1-2. Protective conductor PE – to the PE terminal.
Three-phase 380V circuit (common in private homes and businesses)
Phases A, B, C – are connected to terminals L1-3 of the hob. In this case, it is necessary to remove the jumpers installed at the factory between terminals L1-3. Zero N is connected to terminals N1-2. Protective conductor PE – to the PE terminal.
Connecting the oven is much easier. Most often, such devices are already supplied with an electrical cord with a plug for connection, so the Euro plug is simply inserted into a Euro socket. To connect to machines or terminals, it is best to use a separate cable, since if you cut off the plug on the cable from the kit, this can significantly affect the warranty for this device.
The oven connection diagram is always single-phase:
- Phase L is connected to terminal L of the oven;
- Zero N is connected to terminal N;
- Protective conductor PE – to the PE terminal.
Possible mistakes
Sometimes craftsmen make the following mistakes when installing sockets under the oven:
- Lay a separate wire, grounding the power point to pipes and risers. This is life-threatening.
- Connect other household kitchen appliances to the oven's power circuit. This provokes emergency situations.
- Three-phase models of equipment are connected to a single-phase electrical line. Some of the hob burners will be blocked, and their indicators will show residual heat.
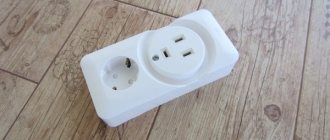
To choose the right socket for your oven, you must first read the technical documentation for it. You cannot use a double combination socket to connect a hob and oven at the same time. A separate powerful cable is pulled for each type of equipment. If both types of equipment are on the same supply line, this will trigger the machine.
In new buildings, the issue of connecting power lines to kitchen electrics is already provided for. Therefore, here it is easier for the master to connect with his own hands.
Connection options
To connect the oven, use the following diagrams:
- Single-phase. It is used if the room is equipped only with a single-phase network with a voltage of 220 V.
- Two-phase or three-phase. It is used to increase power and at the same time increase efficiency.
The manufacturer cannot predict in advance which circuit the consumer will use, which is why hobs do not have a standard electrical plug.
Important! An oven is not such a powerful device, therefore, for its normal operation, a household electrical network is designed, the voltage of which is 220 V. That is why such equipment comes with a standard Euro plug with grounding contacts in the design.
Hood
Also at the top, at a height of 1.9m-2.0m, there is an outlet for the hood. However, a lot can depend on the brand. If this is a cheap option, then you can get by with the cable outlet and then connect it directly inside the equipment.
But if this is an expensive model, then it comes with its own fork. And cutting off the factory plug will void the warranty.
Today, many people install hobs instead of a full-fledged stove, and then install a separate oven. In some situations, this is a very rational approach when arranging a kitchen. When designing a box for an oven, even furniture assemblers sometimes forget about one little thing, which is nevertheless very important. And you have to think about where to install the socket for the oven immediately before using it. A regular extension cord is often used, but it is not always possible to use it. Let's look at everything in more detail.
Optimal places for placement
It is imperative to take into account that the outlet must be located at a level below the countertop. It is best to use a box to place it.
Important! It is imperative to take into account the availability of free space near the outlet, since access to it must be free. This nuance is very important for safety, since even a correctly installed socket can break or catch fire. In case of danger, the device must be quickly disconnected from the power supply.
You can install the socket for the oven in the immediate vicinity of the hood duct or on the working wall of the kitchen unit.
READ Is it possible to carry an iron in hand luggage?
How to connect the fishing line to the electrical panel?
When the oven is connected to the electrical panel, it is recommended to allocate a separate mowing line for it, which is protected by an automatic switch:
- If the rated current of the device is 16A, a 25A circuit breaker is installed.
- If - 32A, the switch must be taken at 40A.
READ Is it possible to install an electric stove instead of a gas one?
Important! A protective ground connection is required. The oven power cable has one grounding conductor connected to the appliance body. It is brought out in order to connect to the corresponding contact on the electrical plug. The insulation color of such a core is yellow-green.
Sometimes the insulation of the lead-out wires may be the same color or the markings may not be the same as usual.
Important! If you make the connection yourself, you must make sure that all pins are connected correctly.
In order to detect the phase conductor, you can use an ordinary indicator screwdriver. But in order not to confuse the ground and neutral wires, you will have to use a tester.
To determine the phase, neutral and ground wires, you can use the following algorithm:
- Using an indicator screwdriver, in the place where the electrical outlet will be installed, you should determine the phase wire. It must be marked with electrical tape or signed.
- To determine the neutral wire on the electrical panel, an indicator screwdriver is also used.
- To detect the grounding conductor, you need to carefully inspect the metal body of the shield or a special block. Usually he connects to them.
- Next, the phase and neutral wires from the input circuit breaker are disconnected. Then they need to be connected to each other.
- On the device side, you need to check the resistance using a tester, which is formed between the phase wire and the remaining two. When the resistance value is minimal, this indicates that the neutral wire has been detected.
- After identifying and labeling all the wires, you can install the socket and connect the cable to the circuit breaker.
Tips and regulations for installing sockets in the kitchen
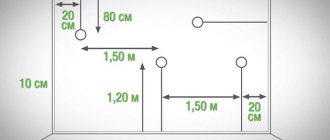
- Sockets should be located at a distance exceeding two centimeters from the baseboard. The most convenient way to place sockets is when they are installed 10 - 20 cm above the kitchen countertop;
- If there are small children in the house, it would be a good idea to equip sockets with special plastic plugs;
- A household appliance that is powered from the mains should be placed no further than one meter from the outlet;
- Make sure that drops of water or hot steam do not fall on the electrical components.
Is the cabinet blocking the outlet? I found a simple solution without moving the socket itself
Let's say you made repairs or rearranged furniture and something began to block the outlet.
Is this a familiar situation?
A wardrobe or sofa or something else is blocking the socket, the plug will not fit A wardrobe or sofa or something else is blocking the socket, the plug will not fit
I was rearranging my apartment and the following problem arose. At first I didn’t know how to solve it, I didn’t want to move everything back and moving the sockets was also not the best option, it was too long and tedious.
After searching for possible solutions to the situation and asking friends, I found the simplest solution. The Chinese are again ahead of the curve and have long ago resolved this issue, which sooner or later affects everyone (this is not advertising, if anything, look for it yourself in household stores)
Socket installation diagrams
Installation diagram of equipment and sockets
Connecting the power point can be done in the following ways:
- Open installation. Provides for the use of an overhead socket on the wall. Power points must be installed openly on wooden walls. This is regulated by the PUE. It is prohibited to embed either wiring or sockets into the tree. For concrete, brick, gas blocks, the open installation method is at the discretion of the master, if it fits into the overall concept of the kitchen interior.
- Hidden way. Involves inserting a socket into the wall. This method is most often used when carrying out major renovations in the kitchen or before finishing, since the work is quite dirty. You will have to significantly damage the tiled kitchen apron. However, for an experienced master this is not a problem.
From a fire safety point of view, the open method of installing sockets is more preferable. In addition, they can be easily built into kitchen cabinets or tables.