Electric hobs are becoming more and more popular. They have firmly taken their place among kitchen equipment due to the variety of functions, simple controls, and design. The panels themselves are not cheap, but installation requires separate costs. To save money, many users connect to the power supply themselves.
Although electrical equipment is considered safer than gas equipment, even the slightest violation of installation rules can result in a fire in the wiring. When connecting the cable for the electric hob, strictly follow the installation instructions. You will learn what these rules are from the article.
Cable for electric stove and hob
The hob is connected strictly according to the instructions.
If the cross-section of the wires and the socket are incorrectly selected, and the panel is incorrectly connected, this can lead to a fire. According to the requirements of the Electrical Installation Regulations (PEU), the cable for the hob can only be copper. Aluminum is allowed to be laid only if its cross-section is 16 square meters. mm or more. This does not apply to apartments. Electric panels are convenient because they heat up quickly. This occurs due to power that reaches 7 kW or more. That is why many models can be connected to both 220 V and 380 V networks.
What to pay attention to
To choose the right reliable, high-quality and safe cable for your oven, you need to consider several important parameters. These include:
- Rated voltage;
- the material from which the wire cores are made;
- cable section;
- Ease of connection to the oven.
As for the rated voltage characteristic of the wire to a Samsung or Bosch oven, it should in no case be less than that provided for in the household electrical network to which the device is planned to be connected.
Requirements that an electrical cable must meet
A cable is not always included with an electric stove - in this case you will have to buy it separately. But how to choose it? What points should you pay attention to?
To choose the right cable yourself, consider the following factors:
- Power. It is indicated in the technical passport. The cross-section of the wire, or rather what it should be, depends on the power. If the power of the device connected to a single-phase network is no more than 3 kW, then the cross-sectional size that is suitable in this case is 1.5 square meters. mm, for power 3-5 kW - 2.5 sq. mm, 7.5-10 kW - 6 sq. mm. If the connection is to a three-phase network, and the power is no more than 5 kW, then the cross-sectional size will be 1.5 square meters. mm, with a power of 10 kW, a conductor with a diameter of 2.5 square meters is required. mm.
- Connection phase. This factor depends on the number of cable cores. It can be three-wire or five-wire. The number of cable cores depends on the power supply network in the house, and the network can be single-phase or three-phase. For a single-phase network, the cable must have three wires (neutral, phase and ground wire). And for a three-phase network, the wire consists of five wires (neutral, grounding and three phase).
Technical characteristics affecting the connection of the hob to the network
When choosing a hob, few people pay attention to power requirements. However, this is the most important characteristic, since when installing modern equipment in old houses, problems with electrical wiring often arise. Therefore, it is better to immediately make a line with a wire of the required cross-section and a protective device. The number of phases and the presence of a grounding circuit play a big role.
Hobs are different and they differ in the type of heating element:
- heating elements;
- gas;
- induction;
- combined (electric and gas burners).
The hob can also be combined with an oven, which looks harmonious and modern.
Important. Regardless of the type of hob, when connecting it, the electrical network must be de-energized.
The hob is connected to a dedicated power line with a socket and grounding. The socket must withstand a current of 32-40 A, and the connected cable must be three-core with a cross-section of at least 4 square meters. mm. In city apartments, combined or gas hobs are used almost everywhere. Induction and heating elements are used in homes where it is impossible to connect to the gas mains.
What wire is needed to connect an electric stove?
Quite often, foreign-made electric stoves, as well as built-in kitchen hobs, are not equipped with wires for connecting to the network. The most annoying thing is that you usually find out about this only during installation.
Therefore, remember, when buying equipment for the kitchen - an electric stove or hob, be sure to check with the store whether they come with wires for connection.
If it is already there, which happens infrequently, just proceed to the connection - How to connect an electric stove yourself.
If it is not included in the kit, read on and I will tell you what wire is needed to connect an electric stove or hob.
The store where you bought the stove may offer to buy the missing wire, but don’t rush to do this, most likely it will cost you much more than the same one purchased at any electrical store or market. I will now tell you what brand and cross-section of wire you need to buy.
We discussed the choice of the cross-section of the electrical wiring cable under the stove in the kitchen in some detail earlier, you can read about it HERE. Now I will briefly tell you the main points that you should know, because the cross-section of the wire for connection is selected in exactly the same way.
The most important parameter that you need to know when choosing a wire cross-section for connecting a stove is its power consumption. Depending on the manufacturer and the specific model, the value may vary, but on average it is 5-8 kW.
Below is a table showing the dependence of cable cross-section on power.
Using it is quite simple, look at the passport data of your electric stove or hob, where you find the amount of power consumed, then use the table to select the cable cross-section that matches your performance.
The table is divided into two parts: for single-phase connection and for three-phase. The choice of connection depends on your wiring to the stove. If a three-wire cable (phase, neutral and ground) is suitable for it, then a single-phase connection, but if a five-wire cable, then choose a three-phase connection. In addition, be sure to consider whether the type of connection you choose supports the electric stove.
Typically, relatively low-power electrical appliances (up to 3-5 kW) are connected to a single-phase network (three stranded conductors), while more energy-intensive ones (from 5 kW) support two- or three-phase connections (four or five stranded conductors).
IMPORTANT! The conductor cross-sections in the table are indicated for copper stranded cable, which is best suited for connection. So, after we have determined the required number of wires and their cross-section to connect your electric stove or hob, all that remains is to decide on the brand of cable required, which you can order in the store
So, after we have determined the required number of wires and their cross-section to connect your electric stove or hob, all that remains is to decide on the brand of cable required, which you can order in the store.
For installation, it is most convenient to use a KG cable (flexible cable) or a PVS wire (vinyl connecting wire).
These cables are ideal for connection, they are copper and multi-core, therefore flexible, they can be easily laid along the kitchen unit or behind it, to the connection point.
If you don’t know what power your electric stove is or want to buy an electrical cord for connecting “with a reserve” for sure, feel free to take a PVS 3x6 wire (3 cores with a cross-section of 6 mm2 each) or a similar KG 3x6. In the vast majority of cases, these wires will suit you.
They can withstand up to 10 kW of power consumption, and their price will pleasantly surprise you, especially in relation to the wires sold in stores. You can find an example of connecting a hob with this wire HERE.
Diagrams for connecting the power wire to a hob or electric stove can be found HERE.
Source: www.el-cab.ru
Electric oven and hob power
The first and most important thing you need to know to carry out this work competently is the power of the connected devices. The power of an electric oven and hob is related to the selected operating mode of the appliance and the number of burners used. But to calculate the electrical connection diagram and subsequent safe operation, we only need to know the maximum power of the oven and stove, which is measured in Watts (W) or kilowatts (kW).
The maximum power of electrical appliances is always indicated on the device itself, on its packaging and in the operating instructions. So for an oven, depending on its type, model and the presence of additional functions, the maximum power varies from 2.5 kW to 4 kW; for a hob, this value can range from 6 kW to 9 kW.
Choosing a location for the outlet
If the choice fell on connecting the oven and hob to an outlet, then an important question arises: where exactly should it be placed? Naturally, placing sockets above the work surface is not aesthetically pleasing, so you need to find a hidden installation location with good access to be able to turn the device on/off.
Device manufacturers recommend not placing sockets behind electrical appliances. The best choice of location would be the lower part of the wall at the level of the plinth of the kitchen unit under the appliance or on the wall with access from an adjacent cabinet.
Calculation of consumables parameters
After we have figured out the power of the oven and hob, it is necessary to assess the condition of the electrical wiring in your apartment (or house) and, based on this data, draw up a connection diagram and calculate the parameters and consumption of materials.
There are two types of connection between the oven and hob: separate and joint. Separate connection means that for each device a separate cable of the required cross-section is laid from the electrical panel, which is carried out at the stage of major repairs or construction. This method is labor-intensive and impossible with a fine finish, but it is optimal and the safest.
A joint connection is used when there is only one cable line for connecting powerful electrical appliances and in conditions of already completed finishing.
Selecting the type and diameter of the cable section based on the power of the devices
When choosing the first type of connection, two options await us: both lines are already available or there is a need to pull the electrical cable from the panel. But in any of these cases, it is necessary to calculate the cross-section of the power cable, compare it with what is available, or select the required cross-section and type for its installation.
To select the correct cable, you need to know an important point: for electrical wiring in residential premises, according to the PUE, a three-core cable made of copper, coated with non-flammable insulation, must be used. Aluminum wires in the electrical wiring of an apartment or house are a relic of the Soviet past and are now not used due to the presence of significant disadvantages in comparison with copper wires.
According to the standards, the following types of cable are used for installation in an apartment:
- for power lines from the distribution panel for powering powerful electrical appliances (hobs), VVG-3 with a cross section of 6 mm2 (VVG 3x6) is used;
- for installation of main wiring lines and connections to sockets (ovens), VVG-3 with a cross-section of 2.5 mm2 (VVG 3x2.5) or a cross-section of 4 mm2 (VVG 3x4) is used;
An NYM electrical cable of appropriate specifications can also be used.
The choice of the final cross-section for the cable is calculated based on the total maximum power of electrical appliances connected to a given line and is based on the fact that the cross-section of the electrical wiring must withstand the rated load limited by the circuit breaker in the distribution panel.
Information about wire and cable brands PVS and KG
The abbreviation PVS stands for vinyl connecting wire. Used to connect electrical devices and instruments to the power supply network. It is a product with conductive copper conductors (from 2 to 5), protected by insulation (each conductor) and enclosed in a common white insulating sheath. The symbol of a wire, in addition to the abbreviation PVS, includes the number of cores and the diameter of each core, for example, the designation PVS 3x4 is deciphered as follows: a vinyl connecting wire with three conductive cores with a diameter of 4 mm. PVA can withstand a voltage of 450 V.
The insulation material does not support combustion, which classifies the wire as a standard product class for fire resistance. Has high strength and bending resistance. The wire can be used in damp and unheated areas. Depending on operating conditions, it lasts from 6 to 10 years. The low price makes it popular when connecting electric stoves of different power.
Electrical installation kit
To connect the equipment to the electrical network, you will need to prepare:
- cable for laying the line;
- circuit breaker;
- socket;
- fork;
- flexible wire.
All installation equipment is selected depending on the power of the VP. Having it at your disposal, you can begin direct electrical installation. Additionally, you may need crimp sleeves, solder, electrical tape, heat-shrink tubing and other small items used when working with electrical wiring. Also, depending on the chosen connection method, you will need a socket box or junction box.
Requirements for electrical wiring and its installation
To turn on a built-in electric stove, you need to use a cable coming directly from the electrical panel. That is, it is important that it be laid directly without the use of junction boxes with branches. It is necessary that the cable only powers the hob. The fact is that such equipment is very powerful, so if other equipment operates from the wire, it may overheat, causing a short circuit.
Wire 5 cores for 3-phase network
If the house or apartment has old wiring, and there is no powerful socket with a direct cable from the panel or meter, then you will need to lay a new separate line. From the desired location of the outlet, a vertical groove is made to the ceiling. Next, horizontal grooves are carried out directly to the cable connection point. If you plan to use suspended ceilings in the future, then the wire can be fixed directly to the floor slab, since in the future it will be hidden.
Note! The hob is a reliable, but not timeless piece of kitchen equipment. Perhaps over time it will break and there will be a need to replace it. For this reason, it is advisable to initially lay the electrical cable with a reserve cross-section that can safely power a more powerful built-in electric stove.
Cable in groove
The line for the electric stove is laid using 2 types of cables: VVGng-Ls or NYM . Their throughput is selected based on the power of the built-in equipment.
Table 1. The ratio of the cross-section of the cores and the power of the hob.
| power, kWt | Core cross-section, mm2 | |
| 1-phase network | 3-phase network | |
| 3-5 | 2,5 | 1,5 |
| 5-7,5 | 4 | 2,5 |
| 7,5-10 | 6 | 2,5 |
These types of cable are used to lay lines directly to the outlet. They consist of a monocore, so they have little flexibility. For this reason, flexible wires are used directly from the plug to the hob: KG or PVS . They are often included as standard with the electric stove, so there is no need to purchase them separately.
Flexible extension cord
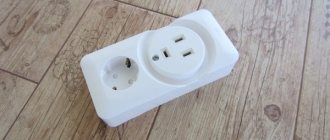
Selecting an outlet and requirements for its installation
The socket for turning on the panel can be located depending on the characteristics of the countertop, as well as personal preferences. It is important to maintain the convenience of turning the hob on and off. As a standard, it is placed at a height of 90 cm from the floor.
If you want to hide communications, you can fix the socket directly below the bottom of the lower kitchen cabinets. With this placement, access to it is provided through the space created by the height of the legs of the bedside tables. It should be raised above the floor to a height of at least a few centimeters so that in the event of a leak, the electrical contacts do not get wet.
Socket under the cabinet
Connecting the hob through an outlet, rather than directly to the panel, has its advantages. Although you will have to do a more complicated installation, it will be easier to turn it off in the future when you wet clean the stove. If you connect without a socket and plug, you will need to go to the electrical panel, which is not so convenient.
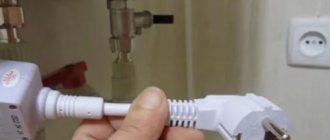
The 2-burner stove can be powered through a regular outlet. More powerful equipment requires special switches. They can be made of ceramic or plastic. Sockets from 10A .
Attention! To connect to a 1-phase 220V , plugs with three contacts are used, and for 380V , with five.
Selecting a circuit breaker
The line for connecting the built-in electric stove must be laid through a circuit breaker. This is a mandatory requirement since the slab can create network overload. At critical loads, the switch will prevent a short circuit. It is very important to choose it correctly, in accordance with the power of the stove. If the cable itself for the panel can be used more powerful, then the circuit breaker must fully comply with it.
You should not save on purchasing it, since cheap devices often do not work or turn off even when the stove is operating in normal mode with a low load.
Prices for automatic machines
Difavtomat
Standard shield machine
Table 2. Correspondence of the current of the machine to the power of the stove.
| Circuit breaker current, A | Circuit power | |
| 220V | 360V | |
| 5 | 1.1 | 2.6 |
| 6 | 1.3 | 3.2 |
| 8 | 1.7 | 5.1 |
| 10 | 2.2 | 5.3 |
| 16 | 3.5 | 8.4 |
| 20 | 4.4 | 10.5 |
| 25 | 5.5 | 13.2 |
| 32 | 7 | 16.8 |
| 40 | 8.8 | 21.1 |
Video - How to choose a hob for your home
Connection options
There are several ways to connect the oven and hob to the electrical network:
- directly to the line that comes from the electrical panel;
- using a power cord: to an outlet of the required power;
- to the machine installed nearby in a special panel;
- to a terminal block fixed in a junction box near the device.
The oven and hob are connected directly if the electrical cable from the wall to the device is long enough. There is nothing complicated about such a connection, because the information is always indicated in the instructions for the device. Each device must be connected to its own line according to the operating instructions.
What socket and plug are needed?
A socket with a plug is the most common way to connect all electrical appliances, including the oven and hob. Household sockets come in 16A and 32A ratings. The choice of sockets, as well as when choosing a cable with breakers, depends on the power of the connected device. When connecting such powerful electrical equipment as stoves, you must use sockets rated only 32A. A 16A socket is suitable for the oven. It is better to choose a well-known manufacturer: ABB, Legrand, Schneider Electric, etc.
It is not recommended to install an outlet on the line to which the hob and oven are simultaneously connected. In this case, it is preferable to use connections via automatic machines. The machines, installed side by side in a special box, are connected to a powerful line designed for the use of several electrical appliances.
In this case, a powerful line (for example, 6 sq. mm) is brought into a special box, protective circuit breakers are installed on each electrical device (+ RCD, if installation with this device is selected) and the corresponding devices are connected to the circuit breaker. The main rule that needs to be remembered when making this connection: the rating of the circuit breaker protecting the powerful line and electrical cable must be higher than or equal to the sum of the ratings of the circuit breakers connected to this cable. For example, if in the main electrical panel this line is 6 sq. mm protects a machine with a nominal value of 32A, then in a special box near the connected devices there should be no more than 2 machines of 16A each.
Can it be connected to a regular outlet?
Many people who are faced with connecting electric ovens are interested in the possibility of connecting such a device to a regular outlet that was previously used for a kettle or microwave. This is permissible, but subject to three conditions:
- The socket must have wiring in the form of a 3-core wire made of copper, which has a cross-section of at least 2.5 square meters. mm;
- the oven itself should have a power of no more than 3.5 kilowatts;
- in the electrical panel, a simple circuit breaker with a thermal splitter should be replaced with a differential solution with a rated voltage of no more than 16 amperes.
How to choose?
If we talk about choosing a cable for connecting an electric stove, then you should focus on the material from which it is made, power and cross-section. Some of this information can only be found out after the characteristics of the slab that will be purchased are analyzed. More precisely, it will be necessary to know its power. And for the choice to be correct, approximately another 20 percent should be added to this figure. It is better to always have a small reserve in case of unforeseen circumstances. But it should be said that the power should not be higher than that of the input cable, otherwise the main load will fall on it.
As a rule, many models of electric stoves that are produced now are designed for 380 V power supply and have an average power rating of 6 kW. But you can find models that are more powerful. For such models, a cable made of copper for a voltage of 380 V and having a cross-section of at least 1.5 square meters is required. mm. This type of wire can handle 16 amps of current. If the device parameters are larger, then it is better to take a cable with a cross-section of 2.5 square meters. mm.
For electric stoves that are powered from a single-phase cable network, the following calculations should be made:
- if the power is up to 3.5 kilowatts, a copper cable with a core diameter of 1.5 square meters is required. mm;
- if up to 5 kilowatts - 2.5 sq. mm;
- if up to 7 kilowatts - 4.0 sq. mm.
Connecting the hob
There are three main connection schemes. Let's look at them in detail.
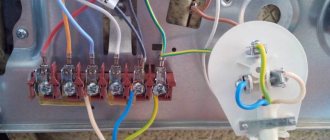
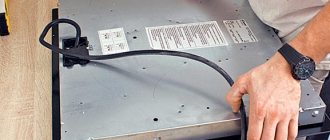
When connecting cables to the socket and terminals of the electric stove, follow the color coding - this will allow you to avoid mistakes.
Three-phase 380V circuit (common in private homes and businesses)
Phases A, B, C – are connected to terminals L1-3 of the hob. In this case, it is necessary to remove the jumpers installed at the factory between terminals L1-3. Zero N is connected to terminals N1-2. Protective conductor PE – to the PE terminal.
Connecting the oven is much easier. Most often, such devices are already supplied with an electrical cord with a plug for connection, so the Euro plug is simply inserted into a Euro socket. To connect to machines or terminals, it is best to use a separate cable, since if you cut off the plug on the cable from the kit, this can significantly affect the warranty for this device.
The oven connection diagram is always single-phase:
- Phase L is connected to terminal L of the oven;
- Zero N is connected to terminal N;
- Protective conductor PE – to the PE terminal.
Single-phase circuit 220V
The most common option in apartments. As follows:
- Phase L is simultaneously connected to terminals L1-3. To do this, we install two copper jumpers between them (they are already included with the stove).
- Zero N is connected to terminals N1-2.
- Protective conductor PE – to the PE terminal.
You can access the terminals of the electrical surface through its back cover - it is unscrewed and removed.
Two-phase circuit 380V
It may also be that in a country house or apartment there are not three phases, but two: A and C are present, but B is missing. In this situation, the hob is connected to a 380V network using a two-phase circuit:
- A jumper is placed on L1-2 and phase A is connected.
- At L3 – phase C.
- The rest is similar to the previous options.
If for some reason you do not have jumpers, you can make them yourself from a wire whose cross-section is no less than that of the supply (i.e. 6 mm²).
For flexible wire, use insulated ring or fork lugs to ensure better contact with the terminal. They are pressed onto the core using special press jaws.
Grounding an electric stove
An electric stove must be grounded. All work in houses is divided into 2 categories:
- the presence of a common grounding circuit;
- lack of a grounding loop.
In the first case, you will need a copper flexible wire with a cross-section of at least 2.5 mm2, which must be laid from the electrical panel and connected to the stove body. In the second case, installing an RCD, performing grounding (using a protective neutral conductor) or both methods together will help.
Where there is no centralized gas supply, an electric stove is a necessary kitchen device, and its operation and service life depend on how it is connected. When choosing a cable or wire, you need to choose the right brand, wire cross-section and quantity, and also pay attention to the manufacturer of this product. And do not forget that electric current is a source of increased danger, leading to undesirable consequences.
Connecting the slab directly
If it is necessary to connect the VP without using a plug and socket, a mounting box is used. This option would be appropriate when you need to move the cabinet close to the wall. In this case, the protruding plug simply will not fit, but the junction box will not hurt.
A flexible extension wire from the panel is simply inserted into the box and pressed using sleeves to the monocore cable laid in the groove. For this purpose, you need to use a sleeve corresponding to the required cross-section. It must be designed for heavy load electric stoves. Each sleeve must be insulated. The best way to do this is to use heat shrink tubing.
This installation method will be even cheaper, since a plug and power socket are more expensive than a pair of sleeves. As for the mounting box, it costs almost as much as a socket box.
Connection via junction box
Installation work on a powerful built-in electric stove can take several days, given the need to chisel the walls for cable laying and further finishing. Without an assembled electrical panel in the house, it is better to immediately entrust this work to an electrician, since twisting to the wire from the meter is unacceptable. If connecting the panel consists only of connecting an extension cord and plug to it, then this will take less than an hour.
Connecting the oven
For an oven, everything is much easier - the Euro plug is simply inserted into the Euro socket (if necessary, the old one must be replaced with a new one).
However, some requirements must be met. Let's look at them:
- It is necessary that the grounding contacts from the electrical panel be connected to the outlet with a separate conductor. The power cable to the oven must be connected to the RCD in the electrical panel.
- The oven power is 3-3.5 kW - that is, ordinary electrical wiring is sufficient for it. If it turns out to be larger (check the passport), you will have to lay a separate 3x2.5 mm² cable from the electrical panel. It connects to a 25A circuit breaker.
The preferred option is to connect the oven to a separate machine. Otherwise, with high power consumption, simultaneous operation of several electrical appliances will be impossible - they will knock out the switch.
If you purchased built-in appliances - an electric surface and an oven, you can connect them yourself. This is not very difficult to do, the main thing is to follow the instructions and be extremely careful. Remember that working with electrical wiring is no joke; mistakes can be costly. The explanations and advice we provide will help you prevent them and do everything correctly.
How to connect an induction hob yourself
If there is already a sufficiently powerful initially or upgraded electrical network in the house, this greatly simplifies the matter. But you still can’t just plug a plug into a regular socket and leave it at that. You need to make sure that the network parameters in the apartment are not lower than required according to the instructions. And ideally, even better protection should be provided.
If the technical data sheet indicates that the protection should be designed for 30 A, then it is advisable to use network protective elements of 25 A. Having dealt with this point, you can also deal with the cable. When a standard connection to the output cable is provided, the following conductors can be used:
- black or brown color (phase);
- yellow-green tone (protection);
- blue and gray colors (neutral).
Sometimes the wire cross-section is not suitable. Power cords with a cross section of 2.5 square meters. mm must be protected by switches with reduced current rating. The most commonly used elements are type B16. But this imposes very strict restrictions on the amount of current consumed. Otherwise, the switch may trip when more than two heating fields are in use.
Some induction devices are connected not using wires, but using terminals. In this case, the design has a special terminal, usually located at the bottom. But there are other situations - for example, when you need to connect an induction hob to a three-phase network designed for 380 V. In this case, instead of three phases, two are usually used. This is the approach most manufacturers take.
It is quite correct and quite simple to connect two heating fields to one phase, and two to the other. In this case, one phase has two average values, and the other has the weakest and strongest currents. In such a scheme there is no need to use gray L3 cables. In some cases, there is a need to interconnect terminals on the board.
This is a very simple task: you just need to use the included board. The wires are twisted with a screwdriver, and this is where the work ends. Here we need to return to connecting hobs using terminals and cover this topic in more detail. The cable ends in the installation box. If the cable is not included in the kit, you need to additionally buy a wire of the OMY model (aka ShVVP).
It is correct to connect the non-working phase to the oven. This will allow the phase to be loaded evenly. In some cases, separate 3x2.5 m cables are used, coming from distribution devices. Then you need to connect such cables to single-phase switches of the highest load. This solution allows, if the operation of one of the devices malfunctions, to use another without the slightest difficulty.
Before buying an induction cooker
First you need to find out what maximum power the wiring supplies to the house/apartment.
If the power of the network is lower than the power of the stove, there is a chance that it will regularly blow out the main fuse (on the stairwell or in the panel) or - in the worst case - it will overheat and the power cord will burn out. For example, in a standard Khrushchev building, the contract power for one apartment, that is, the maximum power that can be consumed by all devices in the house, is 5.5 kW. And this is 2 kW less than the maximum power of an induction hob. Not to mention other devices that you also use while cooking.
If there is a problem with the maximum current, then buy an induction hob with a lower power or with a function to reduce the maximum power. This is a much simpler option, although the lack of full power will result in a decrease in heating rate.
After solving the above problem, a cable with the appropriate cross-section must be laid from the switchgear to the induction hob and this cable must be protected by a separate circuit breaker (read about circuit breakers here) with the appropriate current rating.
Frequent connection errors
If, after connecting, the panel starts to work in an unknown way - it turns itself off, and after a few seconds it can turn on again. Do not rush to commit incorrect installation.
It is quite possible that the child lock is set in the program, water was spilled on the sensors, or the wrong buttons were accidentally pressed. Some models have a dish recognition function. Until you place the pan on the burner, it will not heat up.
Another common problem is that only two of the four burners work, and the rest show residual heat (the letter H is displayed). This is due to blocking during single-phase connection of three-phase models. This way the power is limited by software. Therefore, first thoroughly understand the documentation and only then go back to the connection terminal block.
Five common mistakes that can lead to failure of your panel or fire due to improper installation and connection:
- Using a regular Euro socket and 16A plug for panels with a power of more than 3.5kW.
- Connection via a simple circuit breaker with a thermal release, without an RCD or differential circuit breaker.
- Use of a cable of smaller cross-section for powerful hobs (3*2.5mm for 7kW).
- Connecting the hob and oven to a common distribution box in the kitchen without a dedicated line from the distribution panel.
- Missing phase jumper on one of the terminals. As a result, half of the burners may not work. Or the panel will not turn on at all if this contact was responsible for supplying voltage to the control.
Safety precautions
Now let's say a little about the safety rules when connecting a built-in oven. Caution must be exercised not only when working with electrical wiring, but also when connecting a built-in or separate oven. First of all, we are talking about personal safety.
Considering the fact that an electric oven has a fairly serious energy consumption, additional electrical wiring should be installed under it, using an undamaged and undeformed wire with a conductor cross-section that will conduct a current of 2.5 or 4 square millimeters. But this will be relevant if you have to work with an oven whose power exceeds 3.5 kilowatts.
The connection of the current-conducting wire must be carried out exclusively through a separate machine, where it is easy to connect a hob that runs on electricity. The machine itself, which will work at home, should be selected depending on the value of the entire load that is supplied to it, and add about another 10% to this indicator.
To ensure that the subsequent use of such a device is safe, grounding must be done correctly. And if the house is private, then this will not be a problem. But if we are talking about a room in an apartment building that was built several decades ago, then here you will have to ground the individual core itself to the bus of the common electrical panel. If we are talking about equipment with not very high power, up to 3 kilowatts, and the wiring in the house is quite good and can fully cope with the loads, then ordinary European sockets can be used for installing ovens.
Peculiarities
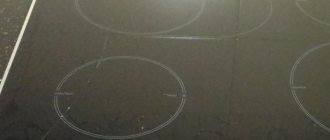
The final power of the hob is affected by the number of burners and their total performance. Most modern samples are produced with several circles of different diameters, each of which has its own power. Any cooking circle has its own purpose, which is described in detail in the accompanying documentation. Electric panels have from 1 to 6 burners of various sizes, which makes it possible not to heat the air in vain and use dishes of “its own” diameter for each of them. Each burner heats up independently of the others and is equipped with a switch that regulates the heat level.
Not only the speed of cooking, but also such an important factor as energy consumption depends on the power of the electric hob . Thus, the electricity consumption of a high-power panel is much higher than the electricity consumption of a low-power device. And if previously all standard electric stoves were produced with the same power rating, then modern electric hobs allow you to choose a model taking into account not only personal preferences, but also the condition of the electrical wiring.