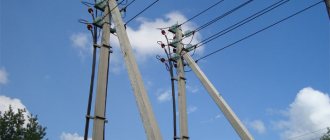
Very often, electricians have to connect an electrical installation to an existing line passing by in relative proximity. In other words, it is necessary create a wire branch. An example would be connecting a private house to a 0.4 kV overhead line or connecting an apartment electrical panel to access electric risers. In both of these cases, the line probably runs very close - here they are, the treasured 220 or 380 volts with the necessary power reserve, just a stone's throw away. But how to connect to them?
Since this problem is widespread and has long been known, quite a lot of options for solving it have already accumulated, and in this article we will try to consider them in detail.
The very first way to create a branch that comes to mind is the good old twist. There’s no need to be tricky here - if the wire is insulated (SIP, for example), then it is stripped at the point of contact, and the branch line is wound around it with a large number of turns to ensure a large contact area.
Of course, anyone who decides to twist will have to take into account the following:
- in the book sacred to every electrician - PUE - they speak extremely disapprovingly of twists and practically anathematize them. Therefore, the electrician who performed the twisting takes on increased responsibility;
— twisting is possible only if the material of the main and branch wires is the same. That is, copper - to copper, aluminum to aluminum. Otherwise, the twist will not last long and can cause the most serious problems;
— twisting is worth doing if you are confident that you will do it well and with high quality. If you doubt your experience and qualifications, use special clamps or pads .
Rice. 1. Universal branch terminal block DKS
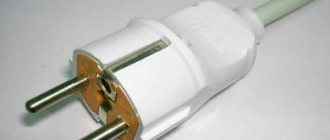
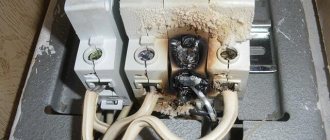
The pads are approved by the PUE. But there are also a few “buts” here. First, to use the terminal block, the main wire must be cut. This is completely undesirable. Secondly, the terminal block is a screw connection that requires systematic maintenance and wiring of contacts.
This is also not very convenient. Well, thirdly, the terminal block is practically not protected by anything either from precipitation or from mechanical influences. In short, the reliability of the branch connection with the terminal block is very low. Therefore, it is better to use branch clamps .
And such compresses are available in a fairly large assortment. The most popular among them are the so-called “nuts” . Their design is as follows: the main and branch wires are pressed from different sides to an anodized steel contact plate using four screws and plates with grooves. This entire “sandwich” is closed with a carbolite body, which is tightened by two spring rings.
Rice. 2. Branch squeezes (“Nuts”)
The marking of “nuts” includes the letter “U” and a three-digit nomenclature number. Nuts are good because they allow you to connect aluminum and copper wires, since the design of these clamps excludes their direct contact - the steel die is an “intermediary”. In addition, to connect with nuts, the main wire does not need to be cut, and the cross-sections of the connected wires can be very different: from 4 to 150 sq. mm. for main wire and from 1.5 to 120 sq. mm. for branch.
“Nuts” is, of course, good, but I would like more. In particular, it is not very convenient that in order to connect the wires they must be stripped of insulation. And installing “nuts” under voltage is not only inconvenient, it’s simply dangerous. In addition, the degree of protection of the “nut” compression from external influences often leaves much to be desired - only IP20.
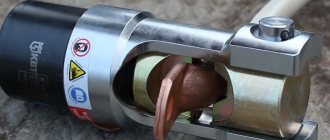
Piercing clamps do not have these disadvantages . These clamps are sealed and do not require stripping the main wire, which means they do not impair its performance. The whole secret is in special clamping plates with teeth that can pierce the insulation and ensure electrical contact with the wire.
The tightening force of the compression bolts is adjusted by the breakaway hex head, which means that the piercing clamps are intended for one-time use. The heads of the clamping bolts are electrically isolated from the contact plates, so that the piercing clamps can be installed even under voltage. Most often, such clamps are used when installing overhead lines with SIP wire.
Rice. 3. Sealed piercing clamp ZPO
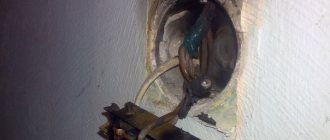
When installing branch lines in a workshop or residential building, it may be more logical to use OB type clamps. They could also be called “piercing”, and their use does not require any tools or special skills at all.
The connected wires, without stripping the insulation, are placed in a clamp, which is simply snapped into place by hand. At the same time, the brass connector pierces the insulation of the wires and provides a reliable electrical connection. However, OBs connect copper and aluminum wires with a maximum cross-section of only 6 square meters. mm., besides, the cross-section of the main and branch wires should be approximately the same, which is why they are not used very often.
Squeeze the nut
When we looked at the basic ways of connecting wires in a junction box, special attention was paid to a special nut-type clamp. The product has a fairly simple design, but despite this it allows you to make the branch reliable and durable. The compression nut consists of a carbolite body, a steel die and a plate, which actually presses the cores with four screws.
All you need is to place the stripped contacts in a special die and carefully tighten the screws with a screwdriver, then snap the housing into place. You can learn more about nut-type compression from our article.
Modern technologies
In many cases, the methods discussed are gradually becoming a thing of the past. They were replaced by factory wire connectors, which made installation and switching work much easier and faster:
- Terminal blocks, inside of which there are tubular brass sleeves. Stripped wire strands are inserted into these tubes and secured by tightening the screws.
- PPE caps, inside of which there are compression springs. The cores are inserted into the cap and then turned clockwise with little effort, thereby reliably compressing the connected wires inside.
- Self-clamping terminals. It is enough to place the wiring in them, and there it is automatically fixed due to the pressure plate.
- Lever-type terminal blocks. This connecting element is reusable. It is enough just to lift the lever, insert the conductor into the contact hole and lower the lever back, reliable fixation is ensured.
We do not talk in detail about all existing terminal blocks, since there is a separate article about this, where each type of wire clamp is discussed in detail.
We hope that we have clearly explained to you how to connect the wires correctly. Choose the method that suits you best. When choosing, take into account the cross-section and material of the conductors, the location of the connection (outdoors or indoors), and the amount of load current that will flow in this electrical circuit.
Piercing clamps
An improved model of nut cable compression are piercing clamps. Disposable products, however, allow you to make a wire branch without cutting and even without peeling off the insulating layer when splicing. The design of the clamp is represented by a hexagonal head, which tightens the conductors, as well as contact plates with teeth, which actually pierce the insulating material.
They are most often used to branch from an overhead line laid with SIP wire without relieving the voltage.
The advantage of these products is as follows:
As for the disadvantages, the main thing is only the “disposability” of the product, however, this point is very controversial, given the durability of this method of branching wires without breaking.
Installation is carried out as follows:
Means of protection
Here is the main list of protective equipment that you need to have with you to connect the input to a live SIP:
- dielectric gloves and canvas mittens (leather)
- cotton gloves
- voltage indicator
- tool with insulating handles
- protective mask with helmet
- claws, gaffs or manholes, depending on the type of support
- electrician's belt
And this is the tool necessary to connect and perform work on the support:
- piercing clamp for SIP with insulated shear head EnstoSicamNiled
Ensto clampsSicam clamps
Clamps Niled
- rope 20m (thickness 10mm)
- block
- separating wedges ST214 – 2 pcs.
- electrician's knife with insulated handle
- insulated wrenches with heads for breaking nuts on clamps
- clamp holder ST34 (for Ensto)
- first aid kit
- shovel for digging the base of the support and checking the reliability of its installation
- device for checking the degree of decay of a wooden support PZD
The minimum set of protective equipment for a team that is constantly engaged in work under voltage looks more than impressive:
Clamp type OB
When repairing or replacing electrical wiring in an apartment, you can use another pretty good option for splicing wires - using OB type clamps. The products have a simple design and an equally simple operating principle - the cable is placed in a special latch, which uses a brass connector to pierce the conductor insulation layer. As a result, in a matter of seconds you can make a good branch from the main power cable (for example, to a socket).
Such connectors are also called “Scotchlocks”. You can learn more about what Scotchlocks are and how to use them in our separate article: https://samelectrik.ru/skotchloki-dlya-soedineniya-provodov.html.
Video instructions for using a latch to branch a wire without cutting:
What is required for soldering
This process does not require special equipment, so soldering can be done by anyone. So, during the work you will need the following tools and materials:
- Electric soldering iron with a power of at least 80 W;
- Cleaning agents (flux, rosin, mixture diluted on their basis);
- Solders suitable for the wire material;
- Wooden or plastic stand;
- File, sandpaper for sharpening;
- Pliers or tweezers for holding wires;
- Alcohol for treating the surface of the cord;
- Insulating tape;
- Heat shrink tubes.
The choice between rosin and flux is determined by the availability of the product and certain points. Thus, it is more convenient to use flux, since the wires are processed quickly, but there is a risk of poor-quality washing and gradual corrosion of the sheath.
Solders are selected taking into account the conductor material. For soldering aluminum wires, zinc products (TsO-12, TsA-15, P250A) are better suited, and for working with copper, POS 40, 50, 60 made of tin and lead are recommended. Solders with the addition of rosin are convenient, which eliminates the need to clean the phases.
Polyethylene terminal blocks
A more outdated method of branching a wire is to use terminal blocks (they are also called polyethylene terminal blocks). It is not recommended to use compact terminal blocks, because... in this case, it is impossible to do without cutting and tearing the main core. In addition, the terminal block also has such disadvantages as poor sealing and the need to periodically tighten the clamping screw, especially if the conductor is aluminum. As a result, you do not get any important advantages when splicing and at the same time you get several serious disadvantages.
Preparatory work
Before starting work, you need to check the stability and integrity of the support on which you will have to climb. When lifting, do not grab the repeated grounds or hooks. It is not recommended to work on a support from ladders, and pulling wires is completely prohibited.
The length of such ladders should be no more than 5 meters, and it can be attached to the pole at an angle of 60-75 degrees.
You simply will not be able to comfortably reach the top of the support under such conditions. And if you lose your balance, what will you grab onto as you fall down?
Rules for working with ladders
If at the very beginning any damage or defects are discovered on the VLI - the hook, support or tension clamp is not securely fastened, all work should be stopped immediately.
Grandfather's twist
Well, the last method of branching wires that can be used is to twist a new line from the passing main line without additional soldering or welding. In this case, you must first strip the insulation of the conductors, after which the branch line must be screwed tightly onto the main line (as shown in the picture).
Please note that when creating twisting, it is prohibited to connect aluminum and copper conductors. Conductors must be made of the same metal. According to clause PUE 2.1.21. (Chapter 2.1 PUE) twisting cannot be done at all - all connections must be soldered, welded, crimped or fixed with clamps or terminal blocks. Therefore, to branch from the wire, use the above methods or solder such twists. We talked more about how to make twists in the article: https://samelectrik.ru/kak-pravilno-sdelat-skrutku-provodov.html.
So, in fact, we looked at the most popular methods of branching wires without breaking or cutting. Now you know how you can make a high-quality splice of two power lines. Our advice is to use piercing clamps, which are the most trustworthy of all the options!
Related materials:
Source
Soldering with a soldering iron
Soldering twists with a soldering iron
The method is very similar to welding, only in this case the wires are connected using solder. For these works you will need a soldering iron. To work you will need:
- soldering iron;
- fine sandpaper;
- rosin (flux);
- brush for applying rosin;
- tin-lead solder.
The operating procedure is the same as for welding:
- Removing insulation and cleaning with sandpaper.
- Twisting.
- Application of flux.
- Direct soldering. The soldering iron melts the solder, which should flow into the twist itself, reliably connecting the wires to each other.
Soldered wiring in a junction box with a soldering iron
Often copper wires are soldered using this method, but if you purchase special solder for soldering aluminum, you can also solder copper from aluminum.
Subscribe to the newsletter
Choosing a method for connecting cable cores and wires when installing electrical wiring is a responsible task. It is necessary to take into account a combination of factors, including the cross-section and material from which the cores are made, working conditions, as well as the availability of the necessary tools for the job. In this article we will talk about the most common methods of connecting conductors.
Terminal blocks
A relatively simple connection method, often used in junction boxes and also for connecting lighting fixtures. The terminal block is a brass bushing placed in a plastic housing. To secure the wire inside it, you must firmly tighten the screws by hand using a screwdriver.
It is important that the size of the terminal block matches the cross-section of the cable or wire. If you need to connect stranded conductors, you must first crimp them using lugs (for example, NShVI).
The main disadvantage of terminal blocks is the ability to connect only two conductors. They also cannot be used to connect cores made of dissimilar metals (for example, copper and aluminum).
Start of work under voltage
First of all, organizational measures are taken and permission is obtained from higher operational personnel to carry out work under voltage.
Then the stability and strength of the support is checked. If it is wooden, then so is the degree of its decay.
Next, you need to check the cable or SIP that you connect to the house and make sure it is in good condition.
If the conductors in it are short-circuited or the insulation is broken, then when connecting to the main line, you risk creating a real short circuit before your eyes! This is especially true if the cable is not new, but used.
The insulation resistance is checked with a 1000-volt megohmmeter, and the absence of a short circuit between the conductors can be determined using a conventional multimeter.
After this, one of the two workers climbs the support, and the second constantly supervises and controls its work. You need to climb the support from the side or opposite side, from the one where the SIP wire is suspended. This is done so that if it falls, it will not drag you down with it.
All work on the support should initially be carried out wearing dielectric gloves with canvas mittens worn over them. The SIP can simply fray over time in the supporting clamp and the phase potential will be transferred to the hook and bandage tape, which you may accidentally touch.
If during work it is possible for any parts of the body or equipment to come into contact with the SIP wire, then these sections of the wire must be covered with protective insulating pads.
Connecting electrical cables
Let's start by connecting the electrical wires. Let's assume that we have three wires going into the electrical box, and they need to be connected to each other. How it's done? First, you need to cut off the excess cable and leave the cable at such a length that it does not interfere with the placement of the cables in the electrical box, but at the same time it is not too short, because a cable that is too short cannot be properly stripped and cannot be connected properly. It should extend about 5 cm out of the box, then we will trim it anyway.
Now we do the following: we strip each cable to a length of approximately 2–2.5 cm. We carefully cut it, trying not to damage the inner conductor. Here the technology is the same for all types of conductors - aluminum, copper, single-core and stranded.
We twist the veins. You can twist them in any direction you like.
To do this, you can use pliers or your own hands, if you don’t mind them. Naturally, only multi-core cables are twisted. If you have a single-core cable, then we simply strip it. We perform the same procedure with the second cable, then with the third: remove the insulation, strip it, twist it. Then we take two cables, lean them against the insulation and tightly twist them like this:
Next, we apply the third cable, also insulation to insulation, and as tightly as possible - this is very important for the further operation of your electrical wiring - we wind it onto the other two cables.
Most electricians recommend that after twisting, you cut the twist where the last cable ended. It ends a little earlier than the other two.
Why is this being done? First, we bite off the excess. We don’t need a strongly protruding twist, it’s inconvenient to insulate, and it won’t fit well in the box. Secondly, we get something like cold welding.
Is working under voltage safer?
There is an opinion, confirmed by many years of practice of foreign companies, that working under voltage in some cases is even safer than with the power turned off. There is a common saying among French electricians: “It is better to work under voltage, knowing about it, than without voltage, believing that there is none.”
For example, if you work in a summer cottage, there are no guarantees that one of the drunken amateur gardeners with minimal knowledge of electricity will not come to the transformer substation and, not caring about all your technical measures, will voluntarily turn on the disconnected switch.
And many people also have generators, which they immediately start as soon as the lights go out. And it is not a fact that in this case the voltage will not go to the supply line.
When working under voltage, you initially use all protective equipment and act with the utmost care and safety.
Splicing electrical cables
The cables have to be spliced in the electrical box or outside it. To do this, you need to strip these cables in the same way as in the previous example. We make cuts, remove insulation, and strip the cables. In order to splice the cables, we lay them crosswise:
We twist them, about 3-4 turns, and we get a fairly strong twist:
You can use pliers for this work. We work with them, trying to ensure that the cable does not diverge.
If desired, if you have a soldering iron, you can also solder this connection to give it additional strength. If you don’t have a soldering iron, you can do it this way. We begin to isolate the resulting twist. We take electrical tape, start about a centimeter before the connection and insulate it.
We also go about a centimeter from the other edge and return to improve the dielectric properties of our connection with a second layer. We bite off the excess electrical tape.
That's it - we spliced the cable.
Soldering wires with solder
An equally wonderful option for connecting wires and ensuring good contact is using ordinary soldering. To use this method, you will need a little soldering skill using an electric soldering iron.
It is best to take a soldering iron with a power of 80 W or 100 W - this is what you need. With this soldering iron you can quickly heat the place (twist) where you will apply the molten solder.
For soldering, POS-30, POS-40 solder is best suited. For such solder you will need rosin or SKF flux (alcohol-rosin flux), which is applied to the soldering area before heating.
In addition to the material listed above, specialists use a so-called solder tube for soldering, which contains rosin inside. This tube is sold in almost every electrical goods store.
And so, to solder wires you will need inexpensive material and an electric soldering iron. This connection by soldering is a more affordable and simpler method.
How to crash into a car's wiring - All about electricity
When laying wiring in the house, you cannot do without connecting the wires. After all, a network with branches is laid around the house to power certain electrical appliances.
The need for wiring connections
Distribution boxes are used to branch the electrical network. But they are intended only to hide the connections of power network branches.
The need for wiring connections is found everywhere. They connect wiring in different ways in the house, electrical appliances, cars, in general, wherever there are wires.
Nowadays, several methods of connecting wiring are used. Each of them has its own positive and negative qualities.
The most common ways are:
- Twisting;
- Soldering;
- Welding;
- Use of terminal blocks, blocks;
- Use of self-clamping terminal blocks;
- Use of connecting insulating clips (PPE caps).
Twist
The simplest and most common way to connect wires is ordinary twisting.
For this type of connection, all the equipment required is a knife for stripping the insulation and pliers to ensure a reliable connection. However, at the end, the place of twisting will need to be insulated.
Twisting is done in several ways.
The simplest is mutual twisting of the stripped ends of the wiring.
For reliability, it is advisable to expose the wires by at least 5 cm. Next, the exposed ends are crossed so that the edges of the insulation touch, and then the crosshairs of the wires are grabbed with the jaws of pliers and twisted with a rotational motion.
After twisting, the connection is bent to one side so that the twist lies parallel to the wire. The connection is then isolated.
The second method is also effective and simple twisting.
The stripped ends of the wires are slightly bent in the middle, and at the bend the wires engage with each other.
After the end of one wire is wrapped around the second, the same is done with the other end of the wiring.
For reliability, the made windings can be slightly tightened with pliers. Then everything is isolated.
The next method is a bandage connection. For such twisting you will need a piece of stripped wire.
The two wires to be connected are placed parallel to each other so that the stripped ends touch along the entire length.
Then they are wrapped with the available piece, creating a kind of bandage.
The last of the used twisting methods that you can find is groove twisting.
To do this, small hooks are made from the ends of the wires, which are interconnected, and then one edge of the wire is wound around the other.
More complex types of wire connections are presented below.
Now about ways to isolate twists.
Often, different types of electrical tape are used for insulation. When using it, you need to wrap not only the place of twisting, it should extend at least 2-3 cm onto the wire insulation.
This will ensure complete insulation, including from moisture.
In addition to electrical tape, it is possible to use thermal tubes.
Such a tube of the required length is placed on one of the wires before twisting.
After twisting, the tube is pushed onto the joint. In order for it to tightly grip the wiring, it needs to be heated a little, for example, with a lighter.
The temperature will cause the tube to shrink, creating a tight fit.
The positive qualities of twists include ease of implementation with minimal equipment, while they are considered quite reliable.
It is considered more preferable in networks that are not fixed and can sag, which is especially important for cars where the wiring is constantly exposed to vibration.
One of the disadvantages is the impossibility of connecting wires of different sections; the resistance in such twisting can be very high, which will lead to heating and melting of the insulating layer.
It is difficult to combine multi-core cables by twisting. They are too soft, so the connection may break when stretched.
If multiple insulated strands are used in the wiring, then after each strand is insulated, the total thickness at the junction can be very large.
It is also not recommended to use twisting to connect cables made of different metals, for example, aluminum and copper.
This will affect both reliability and increased resistance at the junction of the wires.
Soldering
The next method of connecting wires that is often used is soldering.
It is noteworthy that soldering is only an improvement in twisting. That is, the wires must be twisted before soldering and then soldered.
To perform soldering, a soldering iron and solder are used. Thanks to this connection, the twisting strength of a multi-core cable can be significantly increased.
Connecting wires (cables) to car wiring using connectors, twists, clamps
When installing additional electrical equipment, the car enthusiast is always faced with the question of how to connect, connect wires, or rather, cables to each other in the car. Conventional strands have their drawbacks, as they do not guarantee reliable contact with the constant pressing force of the conductors if you do not crimp them properly. Oddly enough, you also need to twist it correctly and be able to do it.
In addition, twists in the electrical wiring of a car may not seem aesthetically pleasing and are not always convenient for installation, especially in winter, when electrical tape is used to insulate the connection. Everyone knows that the adhesive layer in this case does not provide sufficient adhesion between the materials. However, twisting cannot be written off! In addition, connections are made on clamps, when with a slight movement of the hand one wire is connected to another, and on contact blocks, when the wires are connected to each other using fasteners.
Each of these options has its own advantages and disadvantages, each of them can be found on the cars of car enthusiasts. But which one to choose and how to implement the connection of wires in the car yourself, this is exactly what our article is about.
One of the options for connecting wiring in a car is to use a specialized connector. In addition to this, you will also need regular pliers.
Connecting wires in a car using a clamp connector
The technology for connecting wires is very simple. So, the wire to which you want to connect and the wire to be connected are inserted into the connector shown in the figure. It doesn't matter in what order.
The wires can be routed through the side slot in the connector housing. Also, wires can be inserted into a contact.
Make sure that the wires in the connector fit between the teeth of the contact comb; it is present in any of the versions. The insulation from the wires is not removed; later it will be cut by the comb and a contact will be formed through it. You only need to apply pressure with the pliers to cut through the insulation and ensure contact with the conductive part of the cable and comb in the clamp.
Next, the lid closes and snaps onto the body. With this connection, through the formed contacts (wire - comb) from wire to wire through the comb, electric current can now flow. This connection is installed quickly and, as always, has its pros and cons.
Pros and cons of connections using specialized connectors (clips)
Such contacts look aesthetically pleasing, compact and easy to install. Providing a relatively, here it is important to note again the word relatively, a reliable connection of wires. The disadvantages include the fact that the contacts can oxidize, and eventually the contact will disappear.
To prevent this, when crimping such “clips,” use a grease, such as lithol or a lubricant specialized for contacts, which can be purchased at specialized electrical goods stores. This lubricant is also used for connectors used to connect wiring in an apartment (such as Wago).
Also, due to the small contact area, you should not use such connectors for power circuits.
This connection method is more suitable for control signals. For power circuits, it is still better to use a banal twist, but if you solder it well, then this is an ideal option. It is about variations of twists that we will talk further...
Twisting two wires (cables) as a continuation of each other
Despite all the seeming anachronism, twisting wires in a car is a completely decent and high-quality connection, especially if it is soldered and well insulated. One of the options for the jacket could be extending the wire, when one wire continues the other. In this case, twisting can be done as follows.
As you can see, the wires first unravel and then twist together. It is this strategy that provides the largest contact area and connection reliability. Of course, then twisting - the connections must be insulated. For this, a thermal tube is suitable, which must be installed on one of the wires before twisting, or electrical tape.
Twisting two wires (cables) as a branch of one another
By using a twist connection, you can not only extend the wire in the wiring, but also make a branch from it. In this case, the process of branching wires from one another is carried out according to the following algorithm. We strip the cable section down to the conductors...
...and separate them, dividing them in half to the sides.
We thread the second cable into the resulting ring and twist it together.