Apartment renovations are rarely complete without replacing elements such as electrical, television and telephone sockets. From the point of view of connection complexity, a telephone socket is a simpler element than an electrical one.
At the same time, installation work is much safer, since there is no life-threatening voltage in this device. Of course, this does not mean that you should not follow the rules of basic electrical safety, because in standby mode the voltage between the wires of the telephone line is about 60 V. You should also take into account the fact that disconnecting the telephone line is much more difficult than part of the power wiring. Another unpleasant moment is the appearance of 120 V voltage in the circuit at the moment a call arrives on the installed phone from any subscriber.
To understand how to connect a telephone socket, you should carefully consider its internal structure and the procedure for installing this device.
Electrical outlet device
A conventional electrical outlet consists of a plastic front panel and a dielectric base (heat-resistant plastic or ceramic) with contacts and connectors for connecting plug plugs. The plastic base is cheaper and more durable, ceramics are more expensive and more fragile. The number of contacts and their shape depends on the type of electrical outlet (single-phase or three-phase, with or without grounding) and the country in which it is used.
General electrical outlet arrangement
Contact materials
Electrical contacts can be made from several different materials:
- brass (for rooms with normal humidity levels);
- tinned brass (for high humidity);
- bronze (for any operating conditions).
The most capricious ones are brass contacts without sputtering. The color of the metal is light yellow with a pronounced shine. In conditions of high humidity, they quickly oxidize, which leads to poor contact. Also, brass does not spring well, which is why the contact weakens over time. To eliminate this drawback, an electrical socket with brass contacts has additional spring petals that press the contact plates.
The base can be ceramic or plastic, the contacts can be brass and brass with sputtering, bronze
Tinned brass has a matte white color. Due to the protective coating, it oxidizes less, springs better and holds its shape. Such contacts are usually installed in electrical outlets intended for wet rooms and outdoors.
Electrical sockets with bronze contacts are rare, and they can be distinguished at a high price. Bronze contacts are also yellow, but matte and darker. Bronze contacts spring well and provide high-quality contact for a long time.
Ground contact
In addition to phase contacts, the socket may have a grounding contact. It is required when connecting:
- powerful technology;
- equipment that is demanding on the quality of power supply (electronically controlled);
- equipment that uses water in its operating cycle (for example, dishwashers and washing machines).
In addition, electrical outlets with grounding must be installed in rooms with high humidity; outdoors - this is an electrical safety requirement. Having a working grounding means your and your family’s safety.
Ground contact is highly desirable
Sockets without grounding are permissible only in dry rooms, and simple devices such as table lamps, humidifiers, low-power oil heaters, convectors, etc. can be connected to them. They are attractive due to their slightly lower price and smaller “depth,” which means that during installation you need to make smaller holes for them. But, no matter how attractive they may be, computers and complex equipment that consume little electricity but are demanding on the quality of power supply must be plugged into grounded sockets. In addition to protecting against electric shock, grounding also removes static, which can be fatal to electronics.
Connecting wires
Wires are connected to the contact plates using screws or screwless clamps (clamping contacts allow for quick connection without using a screwdriver).
Screw connections of sockets can be divided into two types:
- With the ability to fasten the end of the wire in the form of a loop. Provides an ideal screw connection, so large is the area of contact between the conductor and the contact pad.
- With the possibility of fastening only the straight end.
When installing sockets of the first type, it will take more time, since you need to make a loop (it is convenient to use pliers), completely unscrew the screws to put it on, and then twist the knot. With sockets of the second type, everything is simple - insert the stripped wire into the contact, and then tighten the screw with a screwdriver.
In the first case, a loop can be made at the end of the wire; in the second, the stripped section of the wire must be straight
When using sockets, the contacts undergo a heating/cooling process, which leads to a gradual weakening of the screw contact. For this reason, the screws must be tightened once every six months .
Electrical sockets with clamping fixation of conductors allow you to connect as quickly as possible. The stripped end of the wire is inserted into the socket until it stops. The socket has a spring-loaded clamp (spring-loaded contact) that clamps the conductor securely. Due to the elastic force of the spring, contact always remains good. Such terminals are also called automatic.
Leading world leaders (Legrand, Schneider-Electric, Simon and others) produce sockets and switches with both screw and screwless connections. By purchasing products from well-known brands, you can be confident that the screwless connection will ensure proper contact.
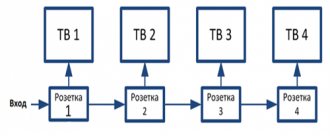
Since in modern homes sockets are often combined into blocks, for parallel connections a separate input of wires is provided - separate holes are provided for jumpers.
Basic elements of the socket
The design of plug devices is simple. The device includes only 3 main elements:
- body (necessary for protection);
- block (the main element of the device);
- contact (acts as a power source).
The body of the device additionally performs a decorative function. Modern models can be decorated to suit any interior style. The building can be single or double.
When it becomes necessary to install paired sockets, you should take separate models with a plastic core and install them in a common frame. The outer cover of the connector is made of plastic, heat-resistant and unbreakable. Some models may have additional equipment in the form of a button (needed to push out the plug), a curtain, a cover for protection and lighting.
The block is an important element of the device that holds contacts with the cover. The material for its manufacture is carbolite or ceramics. In the first case, the devices will be more durable, but are found mainly in older models. Ceramics are fragile. Therefore, when installing sockets that have a block from it, you should be extremely careful. The block can be used for mounting open and closed installation models, and can be used as a blank that serves as the basis for making an extension cord with your own hands.
The contact acts as a working element. With its help, electricity is supplied to household appliances. The permissible current passing through it is from 10 to 16 A. Using screw terminals, one part of the contact is connected to the conductor, the second to the plug of the electrical appliance. Clamps can also be keyboard ones. The material for making contacts is a metal alloy, which is characterized by a certain degree of elasticity. This allows you to establish a reliable connection between the plug and the contacts of the device.
Classification of electrical outlets
Even such a simple device as an electrical outlet has many types and varieties. In addition to different materials, they can have different shapes and installation methods. There are models that are assembled into blocks of several pieces, equipped with a switch or other types of sockets. Let's talk about all these types of electrical outlets now.
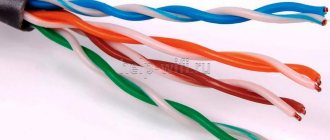
An example of a socket block for a TV. In addition to electrical sockets, sockets are installed for connecting a coaxial (television) cable and twisted pair (Internet cable)
By voltage and current
Electrical sockets are electrical installation products and they have their own technical characteristics: the voltage for which they are intended and the current that they can pass through for a long time. In terms of voltage they can be:
- For single-phase networks with a voltage of 220-240 V. The most common type in our country.
- For three-phase networks 380 V.
- For single-phase networks with a voltage of 100-127 V. These are the standards that are used in Japan and the USA.
Socket and plug for three-phase consumers
In our country, most single-phase sockets are installed for 220 V networks, but they also come in different types: they can pass current of different magnitudes through themselves. Conventional sockets are designed for a current of 10-16 A. To connect high-power household devices (electric stoves, hobs, electric ovens, storage boilers, etc.) you need sockets that can pass a current of 32 A, and sometimes more. For these cases, power electrical sockets are produced. They are large in size, use heat-resistant materials and more powerful contacts.
By installation type
The electrical outlet can be for hidden or open installation. They also say - internal/built-in and external/overhead. A flush-mounted electrical socket (internal) is installed in a hole specially made for it in a wall or other surface. After connection, the front panel is flush with the surface or protrudes just a couple of millimeters.
The internal socket (on the left) is designed for installation in a socket box. Surface-mounted socket (right) does not require a socket box
An electrical outlet for surface mounting (outdoor/surface) is attached to the wall or a special dielectric substrate, which is used if the base is flammable. Installation of such products is simpler, but the appearance is specific. Nowadays they are used mainly in retro wiring. Sometimes overhead sockets can be seen in technical rooms, change houses, and garages. In those rooms where strict requirements for appearance are practically not imposed.
There are also retractable sockets that are successfully used in the kitchen. They can be built into the countertop, the bottom of a wall cabinet, the side of cabinet furniture, and even into the floor. Electrical sockets built into furniture are convenient and functional. You need to turn on a household appliance or device - open/lift the lid, sockets appear. There is no need, the lid is closed.
Sockets slide out when opening the cover
Vertical socket block built into the countertop
IP degree of protection
Electrical sockets also have such a technical characteristic as the degree of protection IP ( International Protection Marking . Translated from English - “international protection codes”). It shows how protected the product is from moisture and dust. Electrical sockets can be designed for different operating conditions; accordingly, they are produced in housings with different degrees of protection. The most common types are:
- with protection class IP 20. For rooms with normal conditions, with heating running in the cold season.
- IP 21, IP22. They can be installed in rooms without heating, or outdoors under canopies.
- IP43, IP44. In rooms with high humidity, near water sources (waterproof sockets).
- IP 54, IP 55. Can be placed outdoors in the open air.
It is unlikely that you will be able to find sockets with a higher degree of protection in ordinary stores, but these also meet all the requirements for an apartment or private house.
The IP degree of protection is indicated in the technical specifications, and the scope of application is indicated in the description
An electrical outlet for outdoor installation may also be equipped with a protective cover that protects the contacts from dust getting inside. Such products can be installed in swimming pools, bathhouses and other rooms with high humidity.
By the number of slots in one housing
A different number of sockets can be placed in one housing. If there are two or more sockets, such products are called socket blocks. They can also have built-in switches or sockets of other types - for connecting the Internet, for example, a USB cable, etc.
The following socket options are often found:
- single;
- double (twin);
- triple.
The most common are single, double and triple sockets
In modern new buildings, they use blocks consisting of several single internal sockets, which are given integrity using a common frame. As a rule, each socket is installed in its own round socket box.
To install socket blocks, universal rectangular socket boxes can be used, which in many cases is more convenient than using round socket boxes.
Connection diagrams and methods
Features of connecting telephone cables vary depending on the type of sockets. For example, installation and connection of the most common of them - RJ-11 and RJ-12 - have several nuances:
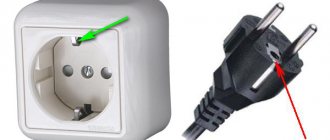
- The socket design has 2 and 4 contacts, differing in small size. There must be a recess in the center for the cores of the supply cable.
- Phones are connected to two central contacts.
- To deepen the veins you will need a cross-cutting knife. If it is not available, you should use the usual one.
- Before straightening the wires, it is necessary to strip the wire by about 4 cm.
- During hidden installation, experts advise using KSPV cable with a copper core. The TRP cable is not suitable in this case - it is better to use it as a distributor.
Preparatory work
Before installing or replacing a telephone socket, you must prepare the following tools and materials:
- a screwdriver with a handle covered with insulating material;
- socket box;
- cable - useful if you need to install a new outlet, and not just replace the old one;
- perforator;
- directly socket;
- knife;
- several screws;
- wire cutters;
- insulating tape;
- multimeter;
- gloves to protect hands;
- Double-sided tape;
- pencil and bright marker.
The set of tools may vary depending on the installation method.
Step-by-step instruction
The action plan for open-type installation looks something like this:
- Protect your hands by wearing rubber gloves. This is important: the voltage in the network sometimes reaches 110 - 120V.
- Using a side cutter, remove about 4 cm from the insulating layer of the wire. You need to act carefully, trying not to damage the wires.
- Using a multimeter, determine the polarity of the contacts. Although it is believed that observing polarity rules is not necessary.
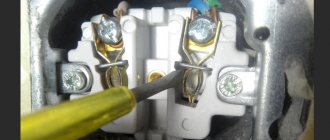
- Connect the contacts to the conductors.
- Connect the cable cores. Secure with special screws.
- In designs with 4 contacts, 2 central ones should be used when connecting.
- Secure the socket to the wall using tape. For greater reliability of fastening, it is better to use self-tapping screws.
- Put on the lid.
Connecting a hidden outlet has no fundamental differences. But it has some features:
- Immediately mark the wiring and location of the outlet on the wall.
- Using a hammer drill, make a hole for the socket box. Self-tapping screws will be needed for fastening.
- The structure is secured in the socket box with spacer screws.
- After installation is complete, connect the electricity. If everything is done correctly, the outlet will work.
Devices come in double and single versions. Dual phones are usually installed in offices, provided that there is a need to use two phones at the same time. They connect the same way.
Electrical outlets with additional options
There are electrical outlets in every home, office, and workplace. They are even found in outbuildings and free-standing toilets. And it is not surprising that manufacturers are trying to diversify their range. There are some very interesting options.
There are sockets with lighting - LEDs light up when the plug is connected, and there are also ones with funny faces
With power monitoring functions
When overhauling wiring or when laying new networks, lines are laid according to modern requirements - through circuit breakers, with the installation of RCDs, stabilizers, etc. on the necessary lines. But there are many homes in which the wiring is several decades old. It is quite functional, but the only means of protection and control are a couple of plugs or automatic machines at the entrance to the house/apartment. Safety problems can be solved, at least for the most sensitive and expensive devices, by installing an electrical outlet with voltage control or an RCD.
There are models that can serve as decorations
Electrical socket with built-in RCD . Powerful household appliances should be connected to dedicated lines, on which there should be circuit breakers and RCDs. If there is nowhere to install them in the panel, you can install an electrical outlet with an RCD. When a leakage current appears in the line or on a connected device (occurs due to an insulation breakdown or if someone touches exposed live wires), the protection will operate and the RCD will turn off the power.
Electrical sockets with built-in RCD are designed for a leakage current of 10 mA
With overvoltage protection. Our networks often experience power surges. If there is no general or local voltage stabilizer, and the equipment connected to the outlet will be sensitive to the quality of the power supply and expensive, you can install an outlet with surge protection. If the threshold voltage is exceeded (different models have different thresholds, but usually it is 275 V), the power is turned off.
Sockets with surge protection relays are a useful feature for sensitive equipment
With increased ease of use
“Advanced” models of electrical outlets provide additional features that can solve many problems.
With timer . Convenient thing. You turn on some device, set the time after which it needs to be turned off and that’s it. At the right moment, a special mechanism will open the contact and the device will turn off.
Electrical sockets with timer - mechanical and electronic
The simplest sockets are with a mechanical timer (pictured above on the left), but there are also electronic ones. And the electronic one can also be programmable, in which you can set a schedule for turning on and off.
With extension cord . We often encounter the need to use an extension cord. You can use a regular one, but there are sockets with a built-in extension cord. Of course, you need a large cavity in the wall for them, but you will never lose such an extension cord, i.e. the storage problem is solved. When folded, the cord is wound onto a drum hidden in the wall, and the socket is used as usual. You need an extension cord - just pull it, if not - pull it a little towards you and the wire will rewind.
Electrical outlet with built-in extension cord
In addition to regular extension cords, there are models with an extension cord and a tee. One socket remains on the wall, two are moved on a cord. It's also a convenient thing.
Childproof
There are two types of childproof electrical outlets. In one, the holes into which the fork is inserted are closed with protective curtains, which are retracted only if pressure is applied to both curtains at the same time. Moreover, you need to press with a certain amount of force, which a small child is simply not able to develop. An electrical outlet with protective curtains is not much more expensive than a regular one, but is reliable protection against children.
Electrical outlet with child protection - you can use more than just plugs
The second type of electrical outlets with child protection is with rotating curtains. To insert a plug into such a socket, you need to pry the curtains with the pins of the plug and turn them to a certain angle. Then the holes in which the contacts are located will open.
Design features
Electronics and electronic devices are increasingly becoming part of our everyday lives. Probably everyone has already heard about the “smart home” system. But probably few people know that there are electrical sockets that can be controlled from a mobile phone. Using a smart socket, you can, for example, remotely turn on and off an electric fireplace in your country house. You can also turn off the iron if you accidentally left it on when leaving home.
There are other, not so exotic models.
There are different electrical outlets, with different functions and additional devices.
With USB port (connector) . We already have so many electronic devices that need recharging that it is necessary to organize separate socket blocks for them or install USB hubs. Another option is to install an outlet with a USB port/connector or several. In one building there can be from one to four or five.
With built-in USB ports
Combined with a switch. Not only several sockets, but also switches can be installed in one housing. Since the installation height of switches has recently been low - at the level of the lowered hand (85-95 cm from the floor), sockets there are quite appropriate. And through such models you can turn on the lamps. For example, wall sconces or lamps on bedside tables. It will be convenient to turn the lighting on/off, and there will also be somewhere to connect the charger.
In one housing with a switch
With lids. There are also sockets with protective covers. They are often placed outdoors or in a dusty room to prevent dust and dirt from settling on the contacts. Most often they are found with lids that rise upward, which are raised when you need to turn on the device - the lid remains raised until you pull out the cord. The lid itself may or may not be transparent.
Electrical socket with cover: there are several types
There are rotary models in which the lid opens to the side, like a door (in the figure above on the right). And it opens only to insert a plug. Then the lid can be closed, since there is a special recess for the cord. Such “draconian” measures are needed for places with very dusty production.
Minuses
Disadvantages are also based on the placement method.
Built-in
- The socket cannot be installed from scratch without interfering with the decorative coating of the surface; it will require grooving using a hammer drill and special attachments.
- Not fireproof enough.
- When dismantling the socket, a deep hole remains, which is not easy to repair; sometimes renovation of the room is required.
- Weak degree of moisture protection; special linings are often provided only for external analogues.
- Built-in models are not suitable for use in wooden houses, but this condition is often neglected.
External
- Unaesthetic, limited model range and modest color range.
- The device protrudes above the surface, is subject to mechanical damage, and creates problems when rearranging furniture.
- Dust accumulates on the top of the device.
- Plastic types are susceptible to fading.
- When changing the design of a room, you need to purchase a new socket assembly if the old one does not suit the style.
Portable
- The cable is often placed on the floor - it is unsightly and makes it difficult to move and move furniture.
- Standardized appearance; there are practically no models compatible with the interior.
- If positions are changed frequently, they quickly break down.
- They often become the object of increased attention from pets and rodents.
- The fire hazard is increased, as they are prone to mechanical damage.
- Temporary wiring is not suitable for powerful equipment.
Types of electrical outlets in different countries
Not only do household networks have different voltages in different countries, but in many of them the sockets have a special shape. Before your trip, you need to find out what type of socket is in the country in order to buy the appropriate adapter. Of course, they are there, but in an unfamiliar place they can be difficult to find.
In our country, European standard sockets are used
In many European countries, the sockets used are the same as ours, but almost everywhere they are with protective grounding. European standard sockets are used in the following countries:
- Germany;
- Spain;
- Czech Republic;
- Poland;
- Bulgaria;
- Belgium;
- Hungary;
- Lithuania;
- Latvia;
- Slovenia;
- Sweden.
There is no news here: the plug and socket are familiar to us, no adapters are needed. In other European countries, electrical installation products have their own standards. But in stores you can find adapters to the European standard, and in modern buildings two types of sockets are often installed, since appliances with plugs of both types are used.
Types of electrical outlets in different countries
In some European Union countries, electrical outlets of a different type are installed. Basically, they have three plugs in the plugs, respectively, three holes in the sockets. The plug to which the protective grounding is connected can be of the same shape as the phase ones, or have a different cross-section. In Italy, plugs have three plugs (phase, neutral and ground) - they have the same size and shape and are located in one line close to each other, the “ground” plug is the middle one. This type of sockets and plugs is called type L.
Different types of electrical outlets around the world
In Switzerland there are also three round plugs, but the middle ground one is located lower and all three contacts form a triangle - this is a type N socket.
The picture is similar in India, but the grounding contact has a larger cross-section and is located slightly lower than in Swiss sockets - the triangle turns out to be an equilateral one (type K).
Types of electrical contacts in countries around the world
In the USA, Canada, Philippines, Thailand and Japan, plugs have rectangular pins for phase wires and semicircular pins for connecting protective grounding. They are located at the vertices of the triangle. In the UK, the pins are also rectangular, but they are thicker and have a different orientation in space (type G). Rectangular but thinner pins in Australia, New Zealand and China. The sockets there are the same, type I.
Useful tips
Following simple advice from experts will help you avoid mistakes in installation:
- It is better to use devices for hidden installation. They fit more harmoniously into the interior than others. But to install them, you will have to break the integrity of the walls and wall coverings.
- In the selection process, it is recommended to pay attention exclusively to proven companies with a good reputation. This is a guarantee of safety and reliability.
- Most outlets have numbered pins. If there are no markings, you should look at the colors. Green, orange or blue contacts in combination with white are positive, contacts of the same colors, but without white, are negative.
- When installing products of the old standard, it will not be superfluous to remember the color design of the contacts: orange, black and green are positive, red, yellow, blue are negative.
The types of sockets for connecting a telephone differ in design, installation method and other parameters. If you follow the instructions, installing these devices will be easy.
Video recommendations for choosing
The first video provides general recommendations for choosing sockets.
If you are primarily interested in quality, then we advise you to pay attention to the products of leading European brands:
- Legrand (France);
- Schneider-Electric (France);
- Simon (Spain);
- Merten (Germany);
- GIRA (Germany);
- ABB (Germany);
- FEDE (Spain);
- Bticino (Italy);
- JUNG (Germany);
- ELSO (Germany);
- Vimar (Italy).
Particularly popular in Russia are sockets and switches from the French company Legrand, and specifically the Valena series - quality at a reasonable price. Schneider-Electric's popular Grossa and Unica series are popular.
What should apartment owners with a two-wire circuit do?
The country has long ago legislated for the transition of residential power supply circuits to a three-wire system. All new buildings are built only according to it, and for old ones a reconstruction plan and a schedule for its implementation during major repairs have been created.
All these deadlines can be clarified with energy supply organizations. After this, you just need to wait time and not make technical changes to the scheme without approval from the competent authorities. When carrying out the next renovation in your apartment, it is recommended to replace the old wiring and assemble it using the TN-CS system with the laying of a PE conductor. But you shouldn’t connect it to sockets and appliances until the building is reconstructed.
If you are interested in more detailed information on the use of a ground loop, then watch the video by Mikhail Chistyakov.
Ask questions about unclear points.
How to use
Precautions and features of use are summarized in a single set of rules:
- It is prohibited to connect the device to networks with an unsuitable load.
- When using, make sure that the plug matches the holes in the outlet and fits tightly into it.
- Installation near heating devices: radiators, heated towel rails is not advisable.
- For rooms with high humidity, it is practiced to install models in a protective housing specifically designed for bathrooms.
- Do not use damaged devices that show signs of sparking or smoke.
- Avoid contact with water, including immersion.
- Store unconnected devices in a temperature range of -25 to 50 degrees.
- Use dry wipes for cleaning.
- For safety reasons, de-energization is used when servicing electrical appliances.
How to move an outlet to another location on the wall
When installing furniture or for other reasons, sometimes it becomes necessary to move the socket to another location, move it to the side or lower it down. In this case, you have to either replace the entire wire from the junction box to the new installation location or extend the existing wires. It is not advisable to change the wire in a renovated apartment; installing an additional junction box is also not always acceptable. It is best to build up the wires using the technology described in the website article “Connecting broken wires in the wall.”
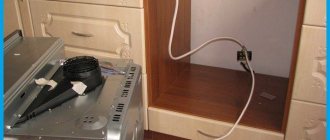
An example of moving a socket to another location on the wall
When renovating an apartment, I took advantage of the situation and moved one of the sockets from one place on the wall to a more convenient one. Until this time, all hands had not reached.
At a new location on the wall, where it was necessary to move the socket, a metal box was installed and a groove was made for laying an additional wire; since the length of the electrical wiring wire was not enough, it became necessary to extend it.
For the extension, we took an available stranded copper wire with a cross-section of 1 mm2, which is quite enough to connect electrical appliances with a power of up to 1200 watts to an outlet.
At the end of the conductors that will be connected to the socket terminals, rings were formed and tinned with solder. The wire itself, consisting of two separate conductors, for ease of installation and reliability, was threaded into a vinyl chloride tube and laid in a groove made at the seam between the bricks.
To ensure that the wire did not fall out of the groove before covering with plaster, it was secured with two self-tapping screws.
After installing the socket and covering the wire with rotband, it is time to perform the splicing. Since the wires are copper, the most reliable method was chosen, connecting the wires - twisting followed by soldering. The current-carrying wire came from the next room through the wall; at the point where it came out, when drilling the wall, a brick chipped and a small void formed. I decided to hide the connection point of the wires in it. If there was no ready-made recess, you could hollow out a recess in the brick yourself in any convenient place.
Next, the wires are shortened to the required length, the insulation is removed and the conductors are tinned with solder using a soldering iron. Please note that the wires are shortened to different lengths to completely eliminate contact with exposed parts of the wires.
The next step is twisting the wires. Before twisting, wires that are longer must be fitted with insulating tubes. The color in the photo is red. Since the stranded wire is softer, I wound its ends onto single-core electrical wiring wires.
Since the wires are already tinned, to connect them reliably, it is enough to simply heat the junction of the wires with a soldering iron and fill it with tin-lead solder.
Then an insulating tube is stretched over the junction of the wires. If you don’t have a tube at hand, you can simply cover the exposed wires with three layers of insulating tape.
After insulating the connection point, the wires must be tucked into the wall cavity and covered with plaster. But it is better, before applying plaster, to close the cavity with a plate of any material. Thick cardboard, a piece of tin from a tin can and any other material will do. I made a cover from fiberglass in the shape of a hole in the wall.
Next, a small amount of solution is diluted; cement, alabaster, gypsum and any other plaster are suitable. I covered the joint with rotband. Using a spatula, the joint is leveled with the level of the wall surface.
Of course, it was possible to cover the junction of the wires with plaster while leveling the walls, but it is better to complete the work started completely, so that later, when leveling the wall, you do not waste extra time. The rotband solution lasts only 20 minutes and when working with it, every second counts.
The socket was moved to a new location and now nothing prevents us from continuing to repair this section of the wall.
Which ones are better
The ideal socket should correspond to:
- environmental conditions;
- fire safety requirements;
- insulation, load and cross-sectional diameter of wires;
- power consumption of electrical appliances.
Additional features of the best device are selected based on room capabilities and functionality:
- In terms of durability and safety, models with reinforcement and a back wall made of metal or ceramic are preferable. They are less common, but outperform their plastic counterparts.
- For apartments and brick buildings, the built-in type is most convenient. Wooden houses and premises with increased fire safety requirements require the use of overhead sockets.
Grounded outlets prevent fatal electric shocks. Previously, this functionality was not provided; in old buildings there is no grounding.
Modern standards require the installation of the grounding wire to be combined with the neutral conductor on the distribution board.