If you are the owner of a private home, then most likely you have encountered the problem of connecting a 380-volt outlet. The easiest way is to find suitable wiring diagrams for a 380-volt outlet. But this is not always possible, especially when there is no time. To make this task easier for you, we suggest you consider the types of 380-volt sockets, also find out how to connect a 380-volt socket, diagrams and detailed descriptions.
Types of 380 volt outlets
Today there are a large number of modifications of 380 volt outlets. First of all, let's look at their types. It is important to note that the connection method directly depends on its modification, so we will identify the existing modifications.
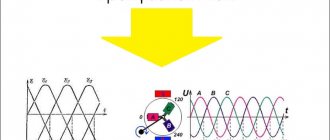
To begin with, it is worth noting that the 380 volt outlet is used in a three-phase system. By this we mean that three wires are used and each of them is a phase. As for the voltage between these wires, it is 220 V. That is, this is phase voltage. As a rule, this is the voltage that is supplied to our apartments and private houses for servicing household appliances. For this purpose, it is enough to start one phase, where there is a neutral wire and a phase.
As for the voltage between the phase wires, it is 380 volts. It is also called linear. That is, you can get 380 volts in the network if you use two phase wires, and not all three at the same time. A large number of electrical installations have a two-phase connection, for example, this method is used in an electric stove. Also, a two-phase connection is required in other equipment.
Important! Any network with 380 volts must have a grounding conductor according to established requirements. In its absence, there is a high risk of electric shock to a person when it comes into contact with the body of electrical equipment.
So, now we offer several types of 380-volt outlets, which are often connected in private homes.
380V 2P+PE
This type of outlet has two phases. It also has power contact. Plus, there is a grounding contact.
380V 3P+PE
This type of socket is equipped with three power contacts. Plus, there is one grounding contact.
380V 3P+PE+N
There are three contacts here, through which three phases can be connected. One contact is provided for the grounding cable. There is also a contact for the neutral wire.
380V 3P+N
This is a combined option that includes both a socket and a plug. As for its features, it is a complete analogue of the 3P+PE configuration. It is no different from this model. And the fact that it is offered for sale as separately is determined only by the presence of a plug.
What load is the fork designed for?
Some countries use 100-127 V at 50 or 60 Hz. Such plugs can operate with current from 2.5 to 20 A.
An example is the North American NEMA 5-20 plug. It is designed for a voltage of 125 V and a current of 20 A, and has a grounding contact.
Plugs designed for a voltage of 220 V can operate with a current of up to 16 A; it will be unsafe to connect more powerful devices to sockets.
Although in some countries in carrying cases they use plugs that can easily withstand a current of 32 A, several consumers are connected to them and the carrying plug is not pulled out until the load is removed.
This is one of the basic rules that must be taken into account in order to know how to replace a plug on a wire. Failure to comply with this requirement may result in the plug melting and causing it to fail.
Typically, powerful forks can be identified by their appearance. They are large in size and have thick insulation, as well as powerful contacts. The connected wire must also be rated for the same current.
Features of 380 volt outlets
So, it is worth paying attention to other features of 380 volt outlets. First of all, they have a blocking of the plug and socket from the possible case of an asymmetrical connection. If you use just such an outlet, this is extremely important. If the connection is made incorrectly, it may result in a short circuit.
In order to prevent an asymmetrical connection, the manufacturer in each case places the connection on the contact at a special angle. It also provides different diameters, a special guide, etc. As a result, you can completely eliminate the possibility of incorrectly connecting a 380-volt outlet according to the diagram.
There is one more original feature that clearly distinguishes this product from ordinary ones. This means the presence of a blocking, which eliminates the possibility of switching on under the existing load. For example, for such sockets the load of 25, 63, 125A is very high. Moreover, this item does not include an arc-extinguishing element that turns off this particular load. As a result, if you forcefully remove the plug without an arc-extinguishing element in the socket, this can lead to the following:
- The device will burn out completely.
- High risk of thermal and electrical burns.
Taking this into account, all manufacturers manufacture these devices with electrical or mechanical interlocking. For example, electrical interlocking is very difficult to connect. Moreover, its cost is relatively high. For this reason, mechanical interlocking is most often chosen. In most cases this is a manual lock.
Equipment selection criteria
Each manufacturer incorporates unique design solutions and operating parameters into its products. All this must be taken into account, since ultimately the connection and installation scheme, as well as the safety and durability of service, depend on them.
In practice, it is recommended to pay attention to the following points:
- The number of contacts and their correspondence to specific tasks,
- Contact form. This is important when purchasing separate plugs and sockets, since it guarantees 100% mating of the nodes,
- Execution (stationary, mobile),
- Rated current value. As a rule, products with a standard current value of 16, 32 or 64A are used. The specific value depends on the power consumption of the equipment,
- Degree of protection (IP) from dust and moisture.
How to connect a 380 volt outlet
The socket and plug must match each other not only in size, but also from a safety point of view. For example, a plug with partially insulated contacts can be used with outlets that have a flat surface.
Expert opinion
Viktor Pavlovich Strebizh, lighting and electrical expert
Any questions ask me, I will help!
Although in some countries in carrying cases they use plugs that can easily withstand a current of 32 A, several consumers are connected to them and the carrying plug is not pulled out until the load is removed. If there is something you don’t understand, write to me!
Methods for connecting 380 volt outlets
So, we suggest you consider three connection options:
- For a four-wire network.
- For a five-wire network.
- For three-phase socket.
Plug-in connection on a four-wire network
It is interesting to consider how it was in old sockets for four wires, where a TN-C connection scheme was used. They had a steel casing that connected to absolutely nothing. This housing was separated from the existing voltage by special insulation. To increase safety, isolation could be increased. But there is one “But” in this scheme. Connecting a 380 socket circuit 4 outputs in this way increased the risk of breakdown of the dielectric layer. Once this happened, a phase could form on the body. And if a person touched it, then everything ended in electric shock. As a rule, this is a characteristic “tingling”, as well as muscle contraction with a cramp. In worst cases, electrical injury could occur.
So, now let's look at the design of the detachable connection. The method of connecting the phase wires could be carried out in the order in which you wanted. This is explained by the fact that the existing load between the phases is symmetrical. As for the connection point of the socket 380 circuit 4 output to the neutral wire, a separate terminal is provided. It was easy to find, since it was indicated by the same symbol as the ground. Mainly on the front side of the socket and plug.
Plug-in connection on a five-drive network
This connection method is much safer. However, as security increases, the complexity of the 380 socket connection also increases. In this case, the socket body must be connected to the neutral cable of the supply transformer. Plus, to increase safety, an RCD is also provided. So, if there is a current leak to the housing, the electricity will be blocked by the RCD. That is, it will turn off the power automatically. As a result, the risk of injury to a person is reduced to zero.
The design of the detachable connection for connecting a 380 volt socket provides an additional contact. The method of their designation is assigned to the European standard. So, the English letter “L” is used for designation, which means line. So, there may be such designations:
- L1.
- L2.
- L3.
Plus, the designation N is provided. This letter indicates neutral. As for the protective one, the grounding icon is used for this. A large number of designs are equipped with a screw connection with a washer. Screwless connection is also known.
This connection method mainly applies to modern models, which have special connectors for a three-phase network. Thanks to the constant improvement of its technologies. So, it is based on creating electrical contact with the wire core. This is achieved by cutting through the insulating layer using a specialized knife with fixation.
The 380 socket is connected according to the following sequence:
- An unstripped and insulated core should be brought to the socket.
- One end of the core should be pushed deep into the hole until you feel a stop.
- Next, install the tip into the socket using a flat-head screwdriver.
- At this stage, the handle is moved up, also until it stops. Due to this, a puncture of the dielectric current is achieved. And with the help of a sharp knife a very tight contact of the cable is formed.
On your part, all that remains is to make sure how well everything is done.
Connection for three-phase socket
Let's consider two options:
- For five contacts.
- Four contacts.
In the first case, to increase safety, two protection options are used: RCD and automatic circuit breaker, as well as a circuit breaker. When using a circuit breaker, it is assumed that the phase will pass through it. Zero will also pass through the circuit breaker. There are only a few cases where the neutral can be connected so that it bypasses the circuit breaker. Installation is carried out using a non-breaking method. That is, a single piece is used, which runs from the grounding contact from the socket to the shield installed in the apartment. As for the use of RCDs, this machine cuts in sequentially. In order to save space in the apartment panel, a differential connection of the switch is carried out. That is, the switch immediately combines these protective devices in its housing.
Now let's look at some features of the 4-pin connection. Again, let's focus on the safe option. Compared to the previous connection method, this one is a little simpler. The simplification is mainly due to the connection of the protective neutral wire. However, there is no additional connector for connecting it on the socket and plug. In this case, it is laid directly. The connection is made to the housing of three-phase equipment. So, if you use a stationary kitchen hob or have small machines in your workshop with asynchronous motors, then this connection method is quite acceptable. However, if the question arises that it is necessary to move this or that electrical equipment, then the issue of reconnecting the protective zero must be resolved. With all this, this issue is resolved before the connection to the electrical network is made.
Marking
Installation of overhead electrical sockets
According to generally accepted technical standards, wires are color and letter marked. This ensures safety during electrical installation to prevent short circuits in the circuit and electric shock, and the causes of the malfunction are rationally identified.
Color markings are usually applied along the entire length of the conductor, indicating the purpose of each of them. Color of phase wires: gray, brown, black, white. In all electrical networks, the neutral conductor is painted blue. It is also called neutral, neutral, zero working contact.
Yellow-green (solid yellow or green) color indicates the protective conductor (grounding), applied along or across the entire length. Another name is zero protection, which should not be confused with working zero.
Each conductor, in addition to the color designation, has a letter marking, which additionally secures work with electricity: phase wires - L1, L2, L3; zero – N; zero protection (grounding) – PE.
For convenience, the corresponding markings are available on 380V plugs.
How to check the connection of a three-phase outlet
Let's look at how you can perform the necessary check in four steps:
- First, an external inspection is carried out. It is necessary to determine the strength and condition of the installation.
- When the voltage is turned off, take a megohmmeter, which should be used to check or measure the strength of the existing insulation.
- Using an ohmmeter, a short circuit is caused in order to determine their compliance with the circuit.
- At the final stage, the voltage is turned on at idle speed. This is important to do so that you can measure phase and linear quantities.
Guide to grounding an electric stove
When working in old-style networks, even qualified specialists often consciously make a grave mistake by grounding various electrical appliances to the working zero buses. Such a connection is fraught with an extremely unfavorable consequence: if the zero wire breaks, the phase will pass through the load directly to the electrical appliance and the user will be shocked.
Electricians often make another serious mistake, confusing the phase and neutral wires. When performing such “grounding”, the result will be similar to the previous case - the owner of the stove can receive an electric shock at any time. But you can’t refuse zeroing either. There are several options to solve the problem. Review the available methods and choose the one that suits your situation.
The first option is to find out whether the apartment’s switchboard is grounded
Let's find out if the apartment's shield is grounded
To do this, we go to the housing office or another service organization. If a company representative says that the shield housing is reliably grounded, all we have to do is connect the yellow-green wire to this housing through a bolt.
If a representative of the service organization gives a negative answer or is confused in his testimony, grounding cannot be performed using the method described above - it will either be ineffective or will lead to an electric shock to the user of the electric stove.
The second option is for residents of apartments on the ground floor and house owners
Ground loop diagram
Owners of such real estate can try to create a separate grounding loop. It is done like this:
- behind the outer wall of the building, three steel rods with a diameter of 16 mm and a length of 250 cm are dug into the ground;
- the buried rods are connected by a strip of steel 4 cm wide and 0.5 cm thick;
- a grounding (yellow-green) wire, previously terminated with a lug, is removed from the electrical panel;
- A wire rod is pulled from the grounding loop upward to the grounding wire. The recommended diameter of such wire is 0.8 cm. At the end of the wire rod, a steel plate with a hole for the bolt is pre-welded. The grounding cable is fastened with a bolt to the wire rod plate at a height of at least 250 cm from the ground level;
- The grounding cable is connected to a separate neutral bus in the switchboard. The grounding wire from the installed stove is connected to the same bus.
Table. The smallest dimensions of grounding conductors and grounding conductors laid in the ground
| Material | Section profile | Diameter, mm | Cross-sectional area, mm | Wall thickness, mm |
| Black steel | Round for vertical grounding conductors | 16 | — | — |
| Black steel | Round for horizontal grounding conductors | 10 | — | — |
| Black steel | Rectangular | — | 100 | 4 |
| Black steel | Angular | — | 100 | 4 |
| Black steel | Pipe | 32 | — | 3,5 |
| Galvanized steel | Round for vertical grounding conductors | 12 | — | — |
| Galvanized steel | Round for horizontal grounding conductors | 10 | — | — |
| Galvanized steel | Rectangular | — | 75 | 3 |
| Galvanized steel | Pipe | 25 | — | 2 |
| Copper | Round | 12 | — | — |
| Copper | Rectangular | — | 50 | 2 |
| Copper | Pipe | 20 | — | 2 |
| Copper | Multi-wire rope | 1,8 | 50 | — |
Third option - if grounding fails
The shield is not grounded, but it is not possible to make an individual grounding circuit? Then we simply plug the yellow-green wire and leave it in the shield until better times.
In such a situation, we pay special attention to the stove. Firstly, we install it so that there is no possibility of simultaneous user contact with the stove and various current-carrying elements such as taps, sinks, pipes, etc.
metal products
Firstly, we install it so that there is no possibility of simultaneous user contact with the stove and various live elements such as taps, sinks, pipes, etc. metal products.
Secondly, we lay, if not a special dielectric coating, then at least a thick dry mat near the electric stove.
Thirdly, we replace the conventional circuit breaker in the panel with a differential model with a 30 mA response rating.
Fourthly, we take special care and vigilance when operating an ungrounded electric stove
Important! It is impossible to ground an electric stove to water supply, sewerage and heating pipes. Although the listed elements according to the rules must be reliably grounded, no one usually controls the resistance of such grounding
The result can be a breakdown of the electrical appliance, electric shock to the user and damage to property, not only your own, but also that of your neighbors. It is also forbidden to ground electrical appliances to other utilities such as elevator shafts, ventilation ducts, etc.
Checking the operation of the electric stove
Good luck!
Calculation of network capabilities in an apartment
Before undertaking such a complex and important task as connecting an electric stove in an apartment or house, it is important to think through every detail. It wouldn’t hurt to familiarize yourself with the technical specifications, power line laying standards, etc.
Before you start directly connecting and working with electrical wiring, you should choose the right place for the stove.
Stove line
When considering a tile line, it is worth considering that it must be installed according to the technical specifications. They indicate that the wire should run perpendicularly up above the entry point, then turn to the side 20 cm from the ceiling. A line is drawn parallel to it to the exit point so as to enter it perpendicularly.
The place where you plan to install the stove must be level, so that when adjusting with the legs, its stable and stable horizontal position is ensured.
What cord is needed
The cord must be three-phase, have a high-quality cable duct and be of sufficient length to properly secure the line. In a cut, its area according to the rules is 4 mm square (up to 12 meters in length), and with a longer duration you will need a 6 mm square cable.
The length of the wire should be generous so that, if necessary, you can easily move the household appliance away from the wall without removing the plug from the socket.
Protective devices
It is recommended to install both an automatic circuit breaker and an RCD, as they will protect the device from voltage drops and the consequences of a violation of the integrity of the cable - a short circuit
But it is important to choose them correctly; the automatic device should correspond as much as possible to the highest capabilities of the electrical device, and the RCD should be a level higher than it
It is better not to place other electrical appliances near the stove - the electromagnetic field can negatively affect their operation.
Installation of individual electrical points
After selecting specific products and laying the wiring, installation of plug sockets is carried out. It all depends on which design scheme is chosen.
For a recessed two-pole socket with or without a grounding contact, a hole is first made in the wall at the location where the socket box is installed. The choice of tool (hammers, grinders, core drills, etc.) depends on the surface material. At the connection stage (after installing the glass), the terminal block with fasteners is separated from the decorative frame, the elements are installed and secured in the socket box. After this, the front panel is screwed on and the installation can be considered complete.
Surface-mounted sockets for an open network are also disassembled before installation, but unlike a recessed one, there is no need to groove the walls. The socket box with the terminal block is screwed with dowels to the surface. After this, the wires are connected and the cover is installed.
A plug socket is one of those elements that surround a person in his everyday and professional activities. However, their choice should be treated quite scrupulously, because the safe operation of all electrical appliances and the network itself depends on it.
What is a 3-slot device?
The socket, regardless of the number of seats in it, has a standard design:
- a ceramic core that contains terminals for the neutral and phase wires, sometimes for grounding,
- decorative plastic box,
- metal plates that crimp the pins of a plug to complete the circuit.
Double and triple ones may have one or more socket boxes - this depends on the brand of the device and its design features. The plates are often brass or copper because they have higher conductivity and strength than other metals. In this case, the method of fastening the wires and the strength of their fixation in the terminals are important. Most often these are holes in metal plates, equipped with a screw for fixation.
It is necessary to tighten the fasteners firmly so that the bad contacts do not heat up and spark.
This condition is important for safety, since such sockets with loose wires in the terminals often cause a fire. There are slight differences in the principle of installing a triple socket with double analogues
It is necessary to connect phase and neutral conductors in a certain order to terminals located in pairs. If the order of location of the phase and neutral wires on the left or right terminals does not play any role, then the order of connection of each subsequent socket has already been determined and must be done so that a short circuit does not occur. Tip: Among several configurations of triple devices, popular are strip ones, in which the sockets are located on the same line, or in the shape of a triangle, where the seats are located more compactly at the vertices of the triangle. There is no fundamental difference in their work; it all depends on the preferences and needs of the owners.
Safety regulations
When installing and operating power outlets, the following safety precautions must be observed:
- The connection must be made with the line at the input package completely de-energized.
- Use only high-quality materials from trusted manufacturers in your work.
- Place nests no closer than 50 cm from kitchen sinks, water, gas and sewer pipes.
- Be careful when connecting wires, check that the connection is correct before applying voltage.
Compliance with these rules will allow for proper installation; using the stove will not cause problems for many years.
Advice from experienced electricians
Three-phase sockets must be carefully selected and installed. It is necessary to be guided by several basic points. The first is current strength. There are three types - 16, 32 and 64 A, respectively. The required one is selected based on the planned load.
The protection class shows the degree of resistance of the outlet to humidity, dust, and dirt. IP mark and numbers - the higher the value, the better, especially if there is moisture in the premises: bathrooms, bathhouses, etc.
An additional point is the installation method. The socket can be mounted on the wall (overhead) or a separate socket can be made (hidden). However, the type of device differs significantly.
Electrical 380V electricity metering panel for a private house with a 220V socket
In this electrical panel diagram, there is additionally a modular 220V socket (number 7) with an individual protection device - difavtomat (number 8), which combines a circuit breaker and a residual current device. The rating of the RCD must be higher than that of the circuit breaker, for example 40A, leakage current 100 or 300 mA.
Electrical metering panel 380V, with modular socket and automatic circuit breaker, TT grounding
Following this example, where the outlet is protected by a residual current circuit breaker, you can install any other modular equipment, contactors, transformers, etc. to the electricity metering panel, if necessary.
Let me note again that under each diagram there are links, by clicking on which you can read the details, find out the equipment used, and ask questions.
Otherwise, here are the main options that are used when connecting private houses and garden houses to the power grid. And most importantly, such electrical panels are successfully accepted by regulatory authorities and put into operation.