The main purpose of a two-key switch: simultaneous control of two circuits of lighting elements in a room. This way you can achieve slight shading or make the flow of light as bright as possible. Using the example of installing one chandelier, the situation looks like this: one key is responsible for turning on 2 of the 5 light bulbs, another is responsible for the next 3, they can be turned on separately or all together.
If you need to control lamps at different ends of the room, two-button switches in retro style will not only solve your problem, but will also become an elegant addition to any interior. We offer a choice of more than a thousand models made of plastic, ceramics, porcelain with a key, toggle or rotary mechanism at affordable prices.
A two-key switch differs from a single-key or pass-through switch in its design, number of contacts and circuit interruption mechanism. It contains:
- two movable keys;
- terminals or screw clamps for connecting wires;
- removable body.
If you turn the control back, you will see the difference. In a switch of this type, 3 contacts are mounted: a common one and 2 taps, through which the phase is directed to the lamps or returns to the connector. To replace a single-key switch with a two-key switch, you need to follow the connection diagram.
When installing new wiring and connecting a model with 2 keys, it is important to correctly distribute the wires and their connections. A pair of contacts are connected to the load from the device. The switch will distribute the current along the conductors, which are separately connected to the lamps. As a result, each key is responsible for turning on one or a group of lamps at the same time.
To connect a two-key model, use a three-core wire and the absence of a PE protective conductor should not confuse you. In this case, it is better to calculate the network load with a margin. Who knows, maybe in a couple of years you will decide to add brightness. Then there will be no need to lay a new cable, because you can connect to the existing one.
Double switches help to save on electricity, and by using small lighting you can create an atmosphere in the house. Connecting a two-button retro switch instead of a single-key retro switch will reduce the number of electrical connection points. Such a broach is safer than a conventional scheme or dividing the lighting into two separate devices.
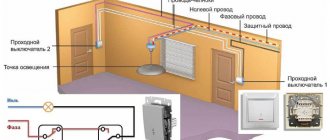
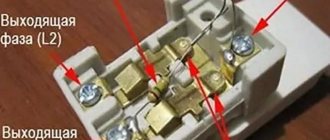
Let's consider the diagram (Fig. 1) for connecting a two-key switch to two light sources using a two-core cable.
Rice. 1
On the right you see the outgoing wires from the panel in the apartment or house, one of them is phase (indicated in red), the other is zero (blue). The neutral cable is not connected through the junction box, but is connected directly to the lamps.
The phase (red wire) passes through the distributor to the switch and supplies power to two separate circuit breakers (further divided into yellow and orange).
The wiring can go to a group of lamps, in which case, instead of one lamp, 2 or more will be connected, as in the image (Fig. 2). It additionally indicates phase L and two distributors L1 and L2.
This solution is great not only for a bedroom or living room, you can install it in any room of the house or industrial premises. For a two-key lamp, a four-wire line is used.
Rice. 2
How to make a two-key circuit from a single-key switch?
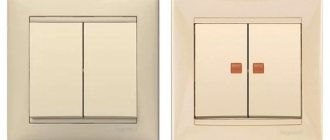
Before purchasing and installing a two-key switch, you first need to decide what it is for? And it is designed to control two lighting circuits from one point. Don't confuse it with pass-through switches, which have different roles. They differ in the number of contacts. Therefore, when choosing, look first of all not at the front panel, but at the back of the switch. two-key pass-through light switch two-key simple switch
Where to start?
To get started you need:
- decide what type of switch needs to be installed;
- Prepare the tools and materials that will be required.
Choosing a new switch
When choosing a device, you should pay attention to the following parameters:
- Maximum power. This device parameter is calculated using a simple mathematical formula. This indicator determines the permissible load, and it is especially critical when using conventional incandescent lamps. The total power consumption of the luminaire should not be higher than that indicated on the switch. If only the permissible current in amperes is marked on the case, you can calculate the maximum power by multiplying this value by 250. For example, 6 A × 250 V = 1500 W or 1.5 kW. To reduce energy consumption, it is recommended to use LED lamps.
- Case material. It determines the temperature stability of the device. Large rooms with powerful fixtures will require breakers that can handle heavy loads. The type of housing in which the contacts are placed is important here. It can be made of ceramic or plastic. Ceramic cases are immune to temperature changes; they work properly even if a large current flows in the circuit. For an ordinary apartment in a multi-story building, a breaker with a plastic case is suitable.
- Number of keys on the switch. The number of buttons is selected based on the type of lamp, existing wiring capabilities and connection diagram. In the kitchens of ordinary apartments, appliances with one key are most often used, and in living rooms - with two. Also, two-button devices are used in separate bathrooms.
- Mounting type. For internal switches, the housing is hidden in the wall, and on the surface there is only a cover with a socket. External switches are almost never used in modern apartments. Their distinctive feature is a thick body and open wiring connected to the device (not hidden in the wall). Illuminated switches are most often installed in the corridors at the entrance to the apartment, so as not to look for them in the dark.
Tools and materials for connecting a chandelier
Let's determine that you have everything ready to install and connect the chandelier and switch:
- you have a chandelier with 2 – 6 lamps;
- a 3- or 4-wire wire hangs from the ceiling;
- to connect the switch, a two or three-wire wire is laid along the wall.
Let's prepare a tool for this job:
Conclusions and useful video on the topic
It is best to imagine how to properly connect wires and install devices by watching a training video.
Two-keyboard for two lamps:
Nuances of connecting a chandelier:
Useful connection tips:
The procedure for installing and connecting a double switch can be performed without the involvement of a qualified technician, but during work you should remember the safety rules. Before electrical installation work, it is necessary to take into account all factors and choose the right circuit.
Do you have anything to add or have questions about connecting a double switch? You can leave comments on the publication and participate in discussions. The contact form is located in the lower block.
How to convert a single switch to a double one
Post by Vadim » Jan 11, 2015, 11:01 am
How to convert a single switch to a double one
Sponsor
Re: How to convert a single switch to a double one
Post by anatmar » Jan 11, 2015, 01:02 pm
Re: How to convert a single switch to a double one
Post by Igor » 12 Jan 2015, 08:34
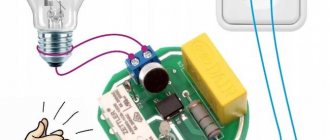
If you forgot about the third wire in the wall, "just a double switch" won't help. You'll have to solder or buy some kind of relay. For example, like this:
Re: How to convert a single switch to a double one
Post by andter435 » Jan 13, 2015, 9:10 pm
Re: How to convert a single switch to a double one
Post by Igor » Jan 14, 2015, 09:14
This solution can be very expensive, especially if the apartment has just been renovated. I have provided a diagram of a simple relay that solves the problem. Here's another circuit, this time without a transformer:
Step-by-step instruction
Let's look at how to change the switch.
Dismantling the old
- First of all, it is necessary to de-energize the wires coming to the switch.
- To dismantle the switch, you need to carefully pry off the switch cover with a flat-head screwdriver (if you can’t pick up the cover from the bottom or top, then try to pick it up from the side; on some models of switches there are special latches there).
- After dismantling the cover, the interior of the switch is revealed to us.
- Now you need to unscrew the mounting screws.
- After this, you can remove the switch from the socket.
- Now that the entire internal space is in front of us, we should use an indicator to check the wires for voltage.
We suggest watching a video on how to dismantle an old switch:
Preparing for installation of a new
- Before further installation of the switch, it is necessary to inspect the wires for frayed insulation.
- If there are any, then it is advisable to cut off this section of the wire, if the length of the wire allows, otherwise wrap it with electrical tape.
- Also, if you have copper stranded wires and the bundle has become significantly thinner, you need to cut it and strip part of the wire for better contact.
Where to start?
Therefore, before replacing the switch, it is necessary to carefully study the process of connecting wires and observe safety precautions when working with electrical devices. Also, to replace the switch, you need to stock up on the necessary tools and, in fact, the switch itself.
- To select a new switch, you must first determine which switch is needed based on the type of mounting. Here it is enough to know whether your wiring is external or internal.
- Then you should decide what you want to get from the switch and select the required functionality.
- It is necessary to choose the principle of closing the circuit in the switch, whether it will be an expensive and fashionable touch switch or a regular key switch, with or without the ability to adjust the light intensity, with or without the function of illuminating the lamp itself.
- The backlight function should be chosen very carefully, since when using diode bulbs with this switch, the bulbs glow dimly in the dark.
- You also need to decide on the method of fastening the wires, screw or quick-clamp. If you have aluminum wiring, then there are no options, only screw terminals, but if you have copper wiring, then you can try modern quick-release terminals.
- Also, in certain cases, it is necessary to pay attention to the maximum load of the switch and the material from which its base is made. According to the maximum load, there are usually 10 A and 16 A switches. A 10 A switch can handle a maximum of 2.5 kW, that is, 25 100 W bulbs. Plastic or ceramic is usually used to make the switch base. Plastic can withstand 16A, and ceramic can withstand 32A.
- If you choose a switch for a small room with standard lighting, then these indicators are not so important, but if you have a room of more than 100 square meters. meters with powerful lighting, it is worth calculating the load and taking a switch with a ceramic base.
- And the last indicator: moisture protection. This indicator is marked with the letters IP and numbers corresponding to the degree of moisture protection. So, for an ordinary room a switch with IP20 is suitable, for a bathroom with IP44, and for the street it is better to take a switch with IP55.
To replace the switch you will need the following tools::
- Voltage indicator . Necessary for safe work. Before starting work, you must use an indicator to check the absence of current in the wires and protect yourself from electric shock or accidental short circuit.
- Screwdriver Set . Screwdrivers are needed to remove the old switch and then install the new switch.
- Pliers . They will come in handy in case the wire breaks while dismantling the old switch and needs to be cleaned.
- Electrical tape . May be useful if the wire insulation is frayed. It is not necessary to have electrical tape when replacing a switch, but it is best to keep some on hand just in case.
- Flashlight . It will be needed if insufficient sunlight falls on the switch.
One button connection
Strip the insulation at the ends of the wires, connect 5 mm sections to the switch terminals, the phase (red wire) to the contact marked L1. Blue or black wire - to the contact marked L2. Insert the switch into the socket, secure the housing with sliding bars and screw in the screws.
Turn on the network at the distribution board and check operation. It happens that turning off is carried out by pressing the key up, turn the switch body over or swap the wires. If everything is fine, screw on the decorative cover and secure the switch key.
Model overview
Legrand
This brand is today the most famous in the field of production of household switches of conventional and pass-through type. At the same time, installation of the equipment does not present any difficulty.
A special feature of the devices is their versatility in use in circuits with 1, 2 or even 3 keys, and this applies not only to pass-through models, but also to cross-over models. The connection of pass-through and cross switches is standard - cross switches are installed inside, and pass-through switches are installed at the edges of the circuit.
The design of Legrand switches is based on an aluminum frame, which makes them quite durable, allowing them to withstand mechanical loads. The outer casing consists of heat-resistant, non-flammable PVC.
The average cost is from 235 rubles for a single-key model without backlight.
Schneider Electric
This brand is not inferior in quality to the previous one.
y, however, can offer cheaper products since they are produced in Russia. The connection is made according to a standard scheme using pass-through or crossover models, and the manufacturer offers the most radical color solutions, including chocolate or charcoal shades.
An aluminum frame is used as the base, which gives high strength to the product. In-wall and wall-mounted options are available. The outer casing consists of heat-resistant, non-flammable PVC.
The cost of a single-key device without backlight will be from 180 rubles per piece.
Connecting a two-key switch in Moscow
Our website will help you quickly find a private craftsman or team to perform any repair work. Just place your request, and within a few minutes you will receive offers with prices from available craftsmen ready to fulfill your order.
Or call us and we will select a specialist for you ourselves
Call daily from 9:00 to 22:00 (7 days a week)
8 (Moscow)
Craftsmen registered on Yuda perform inexpensive electrical installation work; the price for installing a switch is indicated in the contractor’s profile. Cable laying in houses in Moscow and the Moscow region is carried out in a short time. Yuda provides services to specialists with extensive experience.
The profile contains approximate prices for services.
The installation schedule for any switches will be discussed with you in advance. You can urgently call a specialist at a time convenient for you.
How much do the services of an experienced Yudu service specialist cost?
Yudu professionals will inexpensively install wiring and connect switches in apartments, cottages and private houses in Moscow.
Switch installation prices depend on:
- depending on switch type
- depending on the number of light sources
- depending on the connection method
- from the terms given for connection
- on the type of surface in which the recess for the switch is made (plasterboard, concrete wall)
Also, the price of installing a switch depends on the need to provide additional services. These include:
- dismantling old switches
- socket repair and replacement
- connecting electrical wiring to the panel
- dismantling old wiring and connecting new
With the help of Yudu, you can set reasonable prices for switch installation; the cost is indicated when filling out the application.
The professionals represented on Yuda offer competitive prices for the dismantling of the old panel, repairs, replacement of electrical wiring, as well as installation of new switches in apartments and cottages in Moscow.
Specialists will cheaply make a hole in the drywall and connect as many light sources as necessary. The master will calculate the estimate before starting work.
Advantages of ordering services through Yuda
The electrician is called remotely. You can fill out an application from any part of Moscow, indicating the installation time, type of switch, price of work, as well as the need for additional services (repair, dismantling, electrical wiring diagnostics).
To order electrician services, use one of the following methods:
- use the Yuda app for smartphones
- fill out the application on the website
The master will see your phone number after you approve his candidacy. Before installation begins, a contract is concluded.
Advantages of cooperation with Yudu performers:
- the cost of connecting switches is available (prices are based on average prices for connecting switches for light sources)
- specialists carefully make a hole in the drywall, so the interior design is not disturbed
- Our specialists will quickly and accurately draw up all the necessary documentation (calculation of estimates, development of a contract)
On Yuda, the indicated price for installing a switch is approximate; for each order it is calculated individually, but within the framework.
Repair prices
Name of service Unit. change Price
| Replacing the old switch | PC. | 290 |
| Installation of the switch (in a ready place) | PC. | 190 |
| Installation of surface-mounted switch | PC. | 350 |
| Switch installation (drilling a hole, installing a socket box) | PC. | 400 |
| Removing the old switch | PC. | 100 |
| Installation of internal socket box (concrete) | PC. | 170 |
| Installation of internal socket box (brick) | PC. | 150 |
| Installation of internal socket box (plaster) | PC. | 120 |
| Installation of junction box (concrete) | PC. | 350 |
| Installation of junction box (brick, plaster) | PC. | 300 |
| Installation of a socket box for an electric stove (concrete) | PC. | 300 |
| Installing a socket for an electric stove (brick) | PC. | 400 |
| Installing a computer network outlet | PC. | 450 |
| Installing a TV outlet (single) | PC. | 250 |
| Installing a TV outlet (pass-through) | PC. | 300 |
| Installing a telephone socket | PC. | 250 |
Source: https://remont.youdo.com/electrician/switch/
Connection diagrams
The simple and at the same time convenient principle of operation of these devices is based on 2 schemes:
Scheme of three or more points
Can be used in long spaces, such as hotels or industrial corridors.
In such cases, 2 points are not enough if there is a need to control lighting in the middle of the room. Then use cross ones. At the edges of the diagram there are 2 regular pass-throughs, and in the middle there are cross ones, 1 or several.
The disadvantage of this solution is the increasing number of wires, especially if two-key models are used. As a rule, when the number of points is more than 3, electronic control circuits are used.
- The most important place in any switching device is its contacts.
With each connection or break of the circuit under load, an electric arc appears on the contacts, which over time renders them unusable. That is why the manufacturer provides a guarantee for each switch indicating the number of operation cycles for switching on and off. For manufacturers with a good reputation, such as Legrand and Schneider Electric, this number reaches tens of thousands of times. For inexpensive models, often without any documentation, the number of cycles is low and can be only a few thousand times. - The main indicator
when choosing, of course, is cost; saving on electrical equipment is not recommended, especially if the switches are internal. Invoices are always easier to replace, and when dismantling built-in models, damage to the decor may occur. - Branded manufacturers
can also offer a large number of color variations of the case, which will allow you to choose the device that best suits the situation. - The connection is quite simple
, the input and output are indicated on the device body, so you need to insert the wires into the appropriate connectors and tighten them with screws.
Models equipped with a power indicator require special attention It should be remembered that it can only be used if the lighting fixture has conventional incandescent lamps. It is not intended for LEDs, gas-discharge, etc.- lighting
control points be positioned at a height where they can be reached within arm's length by family members of any age. - The first point to be connected to the phase line
is the one that is closest to , and the line should be laid in such a way that in the future, during repair work, it is not damaged by tools. It is recommended to mark the route and the location of the boxes.
What do you need to know about replacement?
Although the process is fairly straightforward, certain precautions must be taken when replacing a light switch yourself. The most important thing you need to know when replacing a switch is the location of the electrical panel. Since the most important thing is to de-energize the wires coming to the switch.
Let's classify switches according to several criteria:
- according to the method of fastening;
- by number of keys;
- by design;
- according to the design of terminals for fastening the ends of the wiring;
- according to the inclusion principle.
- According to the mounting method, switches are divided into two types: internal and external.
- External switches are used with open wiring, when the wiring runs directly along the walls, and the switch is also attached to the wall. This is very rare in ordinary apartments; it is more typical for wooden houses.
- Internal switches are used when the wiring is hidden under the plaster. In this case, drill a technological hole for the switch, attach a socket box to this hole, to which the switch is already attached.
- Depending on the number of keys, switches are single-key, two-key and three-key.
- Single-key switches are light switches that contain only one electrical circuit and a key. They are the easiest to install, but such switches turn on and off all the light bulbs in the chandelier at once.
- Switches with two keys consist of two electrical circuits. They can be used, for example, if you have a three-arm chandelier. In such a switch, you can divide it so that one button is responsible for one light bulb, and the second for two other light bulbs, so in such a chandelier you can turn on any number of light bulbs, starting from one and ending with all three.
- A three-arm switch has three electrical circuits.
- According to the method of fastening the wires, switches are available with screw fastening and screwless.
- Screw-mounted switches are the most common type of switch. The stripped end of the wire in such switches is fixed with a screw. The advantage of this type of fastening is ease of installation. The disadvantages include the need to periodically tighten the screw, since under the influence of vibrations it slightly unscrews.
- Switches with a screwless or quick-release fastening method are less common. The advantages of this type of fastening include the absence of the need to tighten anything. The disadvantages include the fact that this type of fastening cannot be used for any type of wiring; it is suitable for copper stranded wiring and is not applicable for old aluminum wiring.
- By type of activation, switches can be keys, push-buttons, dimmers, rotary, rope, touch, acoustic, with a remote control.
- Key switches do not need any special introduction. Almost everyone at home has such switches. The process of closing the circuit is carried out mechanically by pressing a key.
- In push-button switches, the closing process, just like in keyboard switches, occurs mechanically, only in a push-button switch the on and off process is carried out by pressing the same button. Very often such switches are found on table lamps.
- Dimmer switches are switches that can not only turn the light on and off, but also regulate its intensity. They are equipped with a rheostat. In addition to the fairly common switches, on the same table lamps with a wheel, there are also dimmer switches with push-button adjustment and even touch adjustment.
- Rotary switches are most often found in rooms with exposed wiring or in rooms with antique or loft designer interiors. They are not as multifunctional as dimmer ones. Switching them on and off is carried out by a rotary mechanism.
- Rope switches are also familiar to many; they are often used in bedside sconces. This type of switch is not fundamentally different from other types of switches. This is a purely decorative type of switch, there is nothing else special about it.
- Touch switches are the most modern of the entire list and have great functionality compared to others. Touch switches can have functions such as: timer, backlight, motion sensors, room temperature and others. Despite the fact that this type of switch is the most expensive, it is also the most in demand. Additionally, you can familiarize yourself with the above-mentioned types of devices - infrared, LED and backlit.
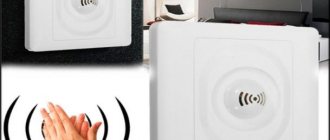
- An acoustic switch is equipped with a sound sensor, which is triggered when exposed to a certain sound signal, most often a clapping sound (we wrote about such a switch here). Unlike touch switches, there are cheaper models that are rarely of good quality.
Disadvantages of pass-through devices
The position of the keys does not allow you to determine whether the system is turned off or on. For example, it may not be possible to immediately understand whether the lights are turned off or a light bulb has burned out. It is impossible to control a lighting device from different places at the same time. A large number of connected devices means a lot of twists in the junction box. Connection errors force you to reassemble the entire circuit.
The pass-through switch has many functionalities. But to connect it, you need to purchase another device. The number of connecting wires also increases, which increases the overall cost of the system. An ordinary switch has a relatively low price, but loses in functionality.
://
A pass-through switch is, strictly speaking, not a switch, but a switch . Although people call it a switch, because it is used to turn off the light. In this article I will also adhere to folk traditions.
Using a pass-through switch is very convenient where you need to turn on or off lighting from different places. As its name suggests, such a switch can be installed in aisles.
Other examples of application are large rooms, corridors, stairs, etc.
In order to turn the light on or off, in this case you need to switch one of the switches (usually there are two, but there may be more) to the opposite position.
Video
Taras Aleksandrovich showed how to change a switch with two buttons on his video channel.
Let's say you want to know how to change a switch with one button to a switch with two buttons, so that the light does not turn on all at once, but several bulbs at a time. In this case, you need to make sure once again that there is an additional output from the chandelier in the junction box. To do this, you will need a voltage tester (for example, I use a multimeter). With the electricity turned on, use an indicator screwdriver to find the phase and zero in the wiring that are connected to the chandelier. Now we set the multimeter to check the voltage (I have the dialing mode). We apply one contact to the already found zero of the lamp, and alternately apply the second to different wires. When the 220 V parameter lights up on the screen, the desired wire has been found.
I almost forgot - the old switch should be in ON mode at this moment. You can read more about installing a single-key switch in the corresponding article.
Remember, replacing a single-key switch with a two-key switch is only possible if there is a second cable with a phase extending from the chandelier.
A little advice. Most often, the phase wires of a chandelier are twisted together to make it more convenient to then wire them to two-key switches, if such a need arises. After you have found the phase wire of the chandelier, you can turn off the electricity, check again for its absence in the phase with an indicator screwdriver and untwist the wires, thus finding the phase we need. You can also read more about how to install a two-gang switch.
Pass-through switch diagram
A pass-through switch differs from a regular switch in that it does not turn off or break the electrical circuit of the pass-through switch circuit, but simply switches from one contact to another. That’s why it’s “passable”.
Due to the fact that a pass-through switch is essentially a switch, its application has a wide range of possibilities.
For example, you can put two such switches on the porch, which is located on the porch above the front door. We wanted to go out at night and turned on the lamp in the hallway. When you come back, turn off this lamp right on the porch, so that later, when you enter the house, you won’t forget that it’s on.
Or we went into the house, turned on the light not only on the first floor, but also on the second. And when we went up to the second floor, you can safely turn off the forgotten light on the first floor with the second floor switch.
Such controlled lighting in a bathhouse or home is not an excess, but for the sake of convenience and comfort.
For example, they left the bathhouse and already in the house they remembered that they forgot to turn off the light. Don’t come back.
The circuit of the pass-through switch is an almost simple task.
How to turn a simple switch into a pass-through switch
To convert, you will need two switches - one-key and two-key. It is better if they are from the same manufacturer and the same size. The essence of the modification is the addition of one more contact to a two-key ordinary switch. First you need to make sure that the design allows you to swap the terminals.
On the ceramic base there is a group of common, private and rocker contacts. The electrical part is removed, one of the moving contacts is turned 180°. One area from the total group is cut off. The resulting mechanism is assembled and its operation is checked.
The device is closed with a single lid. You can leave double keys by gluing them together. Thus, one circuit is activated in one position. By switching the key, another one will be connected.
DIY marching switch
The prevalence of self-manufacturing of pass-through switches is due to the fact that they are much more expensive than conventional ones, and are not available for sale in every household electrical equipment store. The most common method of manufacturing marching switches is to assemble them yourself from ordinary devices - single-key and two-key in various combinations.
Interesting read: what are capacitors?
Pass-through switch - from a conventional single-key switch
To control one lighting device (without dividing the lamps in it into groups), a single-key main switch is used. Unlike the model for hidden wiring, a pass-through device for outdoor installation can be difficult to find on sale, so it is the surface-mounted marching switches that are most often assembled independently.
It will be interesting➡ How to check the serviceability of a triac
A pass-through single-key switch for external wiring can be assembled from two ordinary ones - also single-key. In this case, it is necessary that the switches are of the same model, and the arrangement of internal components in the housing is symmetrical. As a rule, products from one manufacturer are used for assembly. A proven option are switches from Schneider Electric, on one of which we will consider this operation.
Using a screwdriver with a narrow blade, the key is pryed up and removed from the housing, after which the dielectric base is pushed out of the switch by pressing on the front part. The extruded base is separated from the standard plastic socket box. Using the same screwdriver, 4 latches around the perimeter are snapped off, and the base is divided into two parts, each of which is symmetrical about the vertical axis.
Connecting a pass-through switch.
All the operations described are carried out with the second switch, but only in order to remove the rocker arm from it - metal contacts and a graphite rod. The removed rocker arm is turned over around its longitudinal axis and installed in the base of the first switch - in ready-made grooves next to the existing contacts, but in the opposite direction.
A second rod is also inserted into the paired socket, after which the dielectric base is assembled - a jumper (common contact) is installed between the two contacts on one side, the two halves are folded and snapped into place. Upon completion of assembly, it is necessary to “ring” the pass-through switch with a tester at different positions of the key. Accordingly, this device is paired with another one – also from two ordinary single-key devices.
How to use a pass-through switch.
Main switch - from a regular two-key switch
For this method of manufacturing a pass-through switch, you will need one two-key switch. Assembling a main product for hidden wiring is most easily accomplished by reworking products from the Anam, Legrand or Panasonic brands, which have a modular design. To remake the switch, the keys are removed from it, after which access to the modules mounted on guides in the housing appears. One of the modules needs to be removed and, turning it upside down, again installed in its original place.
The fit of the module must be pinpointed with drops of hot-melt adhesive, since in this position its latches may not coincide with the standard grooves. The switch is assembled in the reverse order and a device is obtained, the modules of which, after turning one of them, turn out to be working in antiphase. Therefore, on the back side of the switch it is necessary to install a jumper between the contacts on one side - it will be the common contact of the device. The two keys that are in place must be firmly connected to each other, for example, by filling the gap between them with a sealant of a suitable color.
Material on the topic: what is an electrical circuit.
Pass-through two-key switch
A two-key main switch is designed to control from several places two groups of lamps of a lighting fixture, for example, tiers of a chandelier. Pressing one key on the switch will supply power to one group (tier), and the second to the other. The product consists of two single-key pass-through switches mounted in one housing. Each key has one input and two outputs, for a total of 6 contacts per switch in total.
Thus, single-key and two-key pass-through switches have a common operating principle, but connecting a dual device is more complicated - the phase is supplied to both inputs of the first two-key switch, which is connected to the second by four conductors. To avoid mistakes, it is better to study the methods of connecting two-key marching switches using diagrams, here is one of them:
Pass-through two-key switch
Assembling and installing a two-key main switch with your own hands is only possible when using two converted devices mounted on the wall next to each other and connected accordingly.
It will be interesting➡ The best ways to check the Hall sensor
To control two groups of chandelier arms from two different places, you will need four converted switches. The cost of conventional devices for assembling two-key switches in this case will exceed the price of a finished switch from the manufacturer.
The finished product outperforms the one assembled from two converted ones in terms of compactness and aesthetics, which is why they very rarely resort to self-assembly of pass-through two-key switches.
Safety regulations
It is necessary to change electrical appliances yourself, observing the following safety requirements:
- All work on dismantling and installing new devices is carried out with the electricity turned off at the switchboard. The only exception is the search operation for a phase cable.
- You can make sure there is no voltage on the wires by touching the bare contacts using an indicator screwdriver. The LED will not light if there is no minimum current in the circuit.
- Do not use wires with damaged insulation, kinks or cracks.
- Switches that have visible defects must not be used.
General recommendations and useful tips
There are several important points that should not be forgotten. They relate to both installation work and equipment selection.
Following simple rules will make the system more secure and reliable, which is important for a closed network.
Do not forget that any actions with electrical devices and installations are carried out only after a power outage at the general apartment switchboard. Before each operation with wires, make sure that the circuit is de-energized.
If, instead of a regular two-key switch, you want to install a contactless switch or a device with a dimmer, be sure to study the diagram, since the installation of such devices may differ.
Design Features
Two-key devices for turning on/off the load are structurally almost identical to single-key devices, the main difference lies in the switching mechanism. Below, Figure 2 shows the main design elements.
Figure 2. Main design elements
Designations in the photo:
- A – keys;
- B – external panel-casing;
- C – internal panel;
- D – switching mechanism;
- 1 – input;
- 2 and 3 – contacts for control wires going to the chandelier.
Now let's look at how the contact group diagram of the switching mechanism is arranged; it is shown in Figure 3.
Drawing. 3. Contact diagram of a two-key device
As can be seen from the presented diagram, the switching mechanism has three contacts, “1” is a common input, “2” and “3” are two control outputs.
Now that we have figured out the design of two-key switches, we can move on to their connection diagram.
How to hang one double electrical switch instead of two single ones
Recommended Posts
Recently viewed by 0 users
No registered user is viewing this page.
Beautiful kitchens in green: design rules and 73 photos
Roller blinds in the kitchen interior: what types and colors are best?
Decorating the interior of a kitchen with a balcony or loggia: 30 practical ideas with photos
- Construction and repair
- Foundation
- Roof
- Walls
- Window
- Doors and partitions
- Ceiling
- Balconies and loggias
- Internal structures
- Floor
- Water supply and sewerage
- Heating
- Ventilation and air conditioning
- Gas and energy supply
- Lighting
- Plumbing equipment
- Security and home automation
- Baths, saunas, swimming pools
- Construction Materials
- Decoration Materials
- Tools
- Technique
- Laws and finance
- TechnoNIKOL
- Design and decor
- Apartment
- Bedroom
- Kitchen
- Dining room
- Living room
- Bathroom, toilet
- Hallway
- Children's
- Attic
- Small rooms
- Workplace
- Wardrobe
- Library
- Decoration
- Furniture
- Accessories
- Vacation home
- Landscape
- Redevelopment
- Catalog of houses
- Magazine
- News
- Events
- about the project
- Advertising on the website
- Advertising in a magazine
- Terms of use
- Contacts
- about the project
- Advertising on the website
- Advertising in a magazine
- Terms of use
- Advertising on the website
- Advertising in a magazine
- Terms of use
- Contacts
Are you a professional architect or designer?
IVD. Repair and finishing
Are you a professional architect or designer?
The IVD.ru website is a leading Internet project dedicated to the issues of reconstruction and interior design of residential premises. The main content of the site is the archive of the magazine “Ideas for Your Home” - exclusive author’s articles, high-quality illustrations, practical tips and lessons. A team of professionals is working on the project in close collaboration with famous designers, architects and leading publishing experts.
On our website you can choose comprehensive design solutions; view detailed reviews of the market for construction and finishing materials, furniture, machinery and equipment; compare your own ideas with design projects of leading architects; communicate directly with other readers and editors on the forum.
Are you a professional architect or designer?
Connection process step by step
It is the phase and not the zero that is placed in the gap, that is, on the switch, because this method is the safest. When turning off the power, turning the switch to the “off” position, it would be correct if there is no voltage left on the lamp socket, and when connecting the zero to the gap, this is exactly what will happen, and simply replacing a burnt-out lamp can turn into every second exposure to the danger of electric shock.
Read also:
- Is it possible to install VVGng cable without corrugation behind a false ceiling? Vyacheslav Hello, ElektroAS! Is it possible to install VVGng cable without corrugation behind a false ceiling? Hello, Vyacheslav! You must install the cable using a corrugated pipe or other pipe made of non-combustible materials. Can …
- Electrical installation work is being carried out in my apartment. Igor Good afternoon! Electrical installation work is being carried out in my apartment. All installation is performed using NYM and VVG cable. Do cables need to be laid corrugated? These are the floor and walls. Is it possible in one...
- I am interested in electrical cable installation over the air, do I need a support in this case? Pavel Hello. They responded so quickly, it’s nice. I am interested in electrical cable installation over the air, do I need a support in this case? If the cable is a little sagging, what is the risk? Hello, Pavel! There is no support for you...
- Does the PUE (electrical installation rules) allow electrical installations inside an apartment using a VVG cable rather than a VVGng cable? Alexander, please tell me, does the PUE (electrical installation rules) allow electrical installations inside an apartment using a VVG cable, and not a VVGng cable? Thank you! You have the right to carry out electrical wiring not only with VVG cable, but also with ordinary wire. ...
- Will it be considered a violation of the rules if we lay the cable and install the junction box on the floor, that is, it will then be below floor level? Mikhail Ivanovich Good time! We run cable lines along the floor of the room to the refrigerated display cases. The screed will be laid on top, then the tilers will lay the tiles. Will it be considered a violation of the rules if we install a junction box...
Instructions for replacing the light switch
Before replacing a new light switch in an apartment, you need to dismantle the old keypad and make sure the wiring is in good condition.
How to remove the old switch?
Dismantling the old switch is carried out in accordance with the step-by-step instructions:
- Remove the key and top cover.
- Disconnect the wires using a screwdriver, unscrewing the bolts on the terminals.
- Apply power to the distribution panel and locate the phase wire using the indicator.
- Turn off the mains voltage.
- Mark the phase with insulating tape or another method.
- Loosen the screws holding the spacer tabs.
- Remove the device from the socket.
Scheme for dismantling the old switch
In some cases, the sequence will be reversed - the wires can be disconnected only after the switch is removed. This depends on the design features of the device.
Dismantling the external switch is carried out in a similar manner. The only difference is that instead of loosening the screws of the spacer legs, the screws that secure the device to the wall are unscrewed.
Video instructions for dismantling the old switch can be viewed on the channel “Guys from Stone. Do-it-yourself apartment renovation.”
We are preparing for connection
Before connecting a new device, you must complete the following preparations:
- Loosen the screw terminals so that the wires fit easily into the hole.
- Unscrew the screws of the spacer tabs so that the switch fits freely into the socket box (this operation is not required for outdoor devices).
- Strip the wires when replacing them (if the condition of the old electrical cable is good, there is no need to strip it).
Diagram and connection with one button
After everything is prepared, you can install a breaker with one key, following the detailed algorithm:
- Examine the markings on the terminals of the single-key switch. The phase wire must be connected to contact L, the second end of the cable to connector 1, respectively.
- Insert the bare wires into the contact holes and tighten the terminal screws. Do not apply too much force, otherwise you may break the thread.
- Install the switch in the socket box strictly horizontally without distortion.
- Secure the device with the sliding tabs by tightening the screws.
- Check the correct operation of the lighting fixtures by turning on the circuit breaker on the electrical panel.
- If the switch operates correctly, install the cover and keys.
Diagram and connection with two buttons
Algorithm for installing a switch with two keys:
- Connect the phase wire to contact L, the remaining two ends to connectors 1 and 2 in accordance with the markings.
- Tighten the fastening screws (this operation is not necessary on spring terminals).
- Place the switch in the socket box.
- Tighten the screws of the sliding legs, eliminating even minimal gaps.
- Make sure that the device works correctly by turning on power.
- Install the cover and both keys.
Step-by-step instructions for installing a two-key switch are given in the photo gallery:
Non-standard situation
There are often cases when the wire inside the socket box is too short. It is not long enough to connect a new switch. Such unusual situations arise in old houses, where electrical appliances have already been replaced several times, and the wiring has become unusable. In this case, the cable must be extended.
This will require additional tools and consumables, namely:
- hammer;
- chisel;
- putty knife;
- two-core wire 10–15 cm long;
- a little putty or plaster;
- insulating tape.
Only wires of the same types can be spliced together. A copper cable cannot be connected to an aluminum one - this can lead to oxidation in the contact area, decreased conductivity and burnout of the wiring.
Cable extension is performed in the following sequence:
- Determine in which direction the cable is laid in the wall.
- Carefully release a piece of wire about 10 cm long using a hammer and chisel.
- Cut off the damaged cable section with pliers.
- Strip the ends of the new and old cable, completely removing the insulation in a section of at least 2 cm.
- Tightly twist the protected wires together.
- Wrap the exposed areas tightly with insulating tape.
- Place the connected cable into the channel.
- Cover the damaged area with plaster or putty.
After the solution has completely hardened (after 15–20 minutes), you can continue to install the new switch.
How to choose a circuit for two light bulbs
There are differences in the connection of 1-key and 2-key switches. To better understand the difference, let's first look at the installation nuances of a single-keyboard player.
You can connect one or more light bulbs to a regular switch with a single key - the principle remains the same.
This is the simplest scheme; it is traditionally used if simple control of a lamp or an entire group is needed. When the electrical installation is turned on, all involved light sources light up. If there is a chandelier or sconce with two lamps, then both will turn on at once; it will not be possible to use them one at a time.
Now let’s look at what changes if a single-key device is replaced with a two-key device. The first circuit for connecting a double switch to two separate light bulbs is relevant for the TN-C system, which is still found in old houses. For the lighting circuit, two-core wires are used.
Read also: What is the difference between specific gravity and density
It turns out that you can use either one or both light bulbs at the same time, using either one or two keys.
A positive point is the ability to change the lighting intensity in one room. If the lamps are in different rooms, then you can turn on the lights in each room separately or in both at once.
In new houses, grounding systems that differ in design are used, for example, TN-S. The difference between the second scheme for a home electrical network is that a three-wire wire is required: the third wire is the “ground”.
The grounding wire is connected differently if there is an outlet in the same block as the switch. Then the “ground” from the electrical panel reaches to the distribution box, and from there to the outlet.