We connect the neutral N and protective PE wires outside the circuit breakers using electrical connectors.
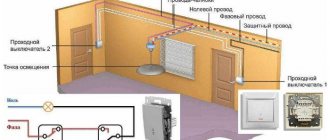
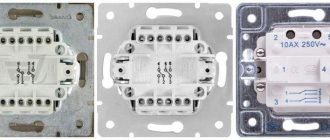
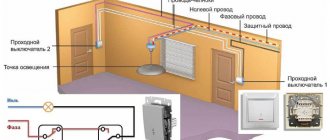
If the cable is not embedded in the plaster, it is placed in a corrugated pipe. This could be any large room where it makes sense to control the lamp from two places. Meanwhile, you place the switch itself in any convenient place - near the bed, in the middle of a long corridor, etc. Let's compare a regular switch with a walk-through switch. As you can see, when you add a third contact to a regular switch, it becomes a pass-through switch. How to connect PROton E-5s
The operating principle of transition-type devices can be studied in the following picture. And the more light points you have, the greater the number of them will be in the distribution boxes.
Thus, you can first turn on the light in one of the rooms, and then turn off the lighting on the stairs.
If it is missing, you will have to use a multimeter to determine the placement of the product terminals.
It is recommended to install switches at a height of 90 cm from the finished floor level and no closer than 10-15 cm to the doorway. We can say that in this connection diagram one conventional switch is replaced by two single-key pass-through switches connected to each other by a two-core cable.
Conclusions and useful video on the topic Purpose and principle of operation of an RCD Unlike a machine that protects the network from overloads and short circuits, an RCD is designed to instantly recognize the presence of leakage current and respond by disconnecting the network or a separate electrical line. Let's compare a regular switch with a pass-through switch. As you can see, when you add a third contact to a regular switch, it becomes a pass-through switch.
Installing a balancing module in a screwdriver for Li-ion battery-18650. connection diagram
General scheme of premises electrification
The general scheme of electrification of a room can be divided into two parts - powering consumers and providing lighting.
In the first case, everything is simple - wiring is thrown from the distribution board (if necessary, it is divided), thanks to which branches are created, and brought to the sockets, through which consumers are connected to the electrical network.
The sockets themselves are constantly energized after connection.
In the case of organizing room lighting, not everything is so simple, since it is necessary to create a branch that provides for the possibility of de-energizing lighting elements - light bulbs.
For this purpose, the circuit contains switches (switches), the task of which is, if necessary, to interrupt and restore the voltage supply circuit to the consumer.
For the normal functioning of indoor lighting and to ensure safety, there are certain schemes for connecting lighting devices through switches to the electrical network.
Moreover, there are several varieties, which allows you to organize the connection of light bulbs according to the provided layout.
For example, with just one switch you can control the lighting of several rooms, independently of each other.
Previously, they used switches that cut into the wiring. That is, the wiring was thrown directly from the distribution board to the light bulb socket, and then the phase core of the wire was cut in the right place, and a breaker was installed in this gap.
Stage 3. Assembling the last ribs.
You have gone through stages 1 and 2 and have come to a situation where all the edges EXCEPT TWO have been assembled, and it is impossible to substitute an unassembled edge to use the formulas of stage 2. To assemble the last two edges, you will need special circuits separately for each case.
2l' U2 2l' U2 F2 2l' F2 2r U2 2r' U2 2l2 | 3l' U2 3l' U2 F2 3l' F2 3r U2 3r' U2 3l2 |
| 3R2 B2 U2 3L U2 3R' U2 3R U2 F2 3R F2 3L' B2 3R2 | 4u' R F' U R' F 4u |
| , | |
| 3-5u' R F' U R' F 3-5u | 2D R F' U R' F 2D' |
At this stage, almost all formulas for the 5x5 cube apply to the 7x7 cube. You can also watch all these formulas in the video.
VIDEO
General provisions
Next, we will consider the most common schemes for powering the lighting elements of a room.
The features of creating such branches largely depend on the number of lamps connected to them, as well as their control using a switch.
But in any case, the created branch includes:
- Switch (one-, two-, three-key);
- Lamps with sockets;
- Junction box;
- Wires (two- and three-core).
A little about the features of the breaker.
Any switch has two outputs - input and output (there may be several of the latter).
Moreover, both of them belong to the same line, that is, if a phase is connected to the input terminal, then it will also be at the output.
By moving the key to a certain position, the contacts of these terminals are connected or disconnected, thereby closing or opening the circuit.
Safety precautions.
Before describing connection methods, let us immediately remind you of safety precautions when carrying out work.
To avoid electric shock, turn off the power supply and take steps to prevent accidental restoration of power before work is completed.
Its supply should be restored only after complete installation and connection of all components of the branch, as well as ensuring reliable insulation of the wire connection points.
Read on: is it worth using aluminum wiring?
How to connect a towbar socket
The seven-pin connector is most often not used on modern foreign cars. We are talking about a socket housing for a tow bar with a cover and a rubber ring for sealing. As soon as more current consumption begins in this area, this will be perceived by the system as an error. It is important that the contacts are not oxidized or rotted. Pinout of the 7-pin towbar socket in passenger car trailers To synchronize the light signals, it is necessary to pin out the 7-pin trailer socket and connect it to the vehicle's electrical wiring. In turn, a matching unit is needed if control signals are transmitted via a multiplex bus. All components are qualitatively connected.
List of the best manufacturers: Bosal. This is much easier than replacing the entire connector on the car.
We are talking about a coordination unit between the electrics, the towbar and the towed part of the car. It provides for connecting the towbar electrics through a special matching device. This option is possible if the tow bar and trailer have the appropriate connectors; universal. Even the cross-sectional area of the conductors is regulated, which ranges from 1.5 to 2.5 mm2 depending on the load consumed.
Pinout of 7-pin towbar socket in passenger car trailers
If the manufacturer is conscientious, then the box will definitely include instructions for proper placement. Universal method of connecting the trailer connector and pinout To connect in a universal way, using the towbar connector, alternately connect the wire of the left turn signal of the car with the left turn signal of the trailer, the rear fog light of the car and the fog light of the trailer, etc.
Connectors are sold in any car dealership, and for their connection they use multi-core copper cables with different wire colors. It is used on cars with a complex electrical circuit that requires the use of a matching unit.
Brake lights are brown. To ensure a reliable connection, you need to purchase special terminals, electrical tape and heat-shrink tubing. However, if you happen to have a foreign car with an original tow bar with a pin socket, and the trailer purchased from our company has a 7-pin connector, then this is not a problem - there are adapters for connecting a 7-pin trailer plug to a pin socket, and vice versa. The first thing to do here is to connect the matching unit to the car’s standard electrical system. Most often, in this place you can find a special technological window provided by manufacturers in order to simplify the procedure for replacing damaged light bulbs. Connecting a trailer socket
One lamp - one switch
The simplest circuit consists of one lighting element and a single-key switch.
Theoretically, the connection does not differ from that described above - the neutral conductor goes directly from the distribution board to the consumer, but a breaker is inserted into the phase conductor. But almost everything looks a little more complicated.
To make this type of connection, you first need to decide on the location of the junction box.
It should be installed as close as possible to the installation location of the switch, while making it easy to access.
The number of wires required to create a branch directly depends on this. Its optimal location is under the ceiling above the switch.
And then everything is simple:
- We determine the location of the lighting element - the lamp (for example, in the center of the ceiling);
- We select the installation location of the breaker (conditionally - below the distribution box);
- We insert the wiring coming from the distribution board into the distribution box;
- We lay the wiring along the ceiling (along the shortest possible path) from the lamp socket and also put it into the box;
- All that remains is to lay the wire from the switch to the junction box.
For simplicity, we will designate the wire going from the switchboard to the box as “input”, and from the box to the consumer as “output”.
For a circuit with a single-key switch and one lamp, two-core wires are used.
After laying all the wiring (in an open or closed way), all that remains is to connect everything correctly and for this it is important to determine which core is phase and which is neutral.
You can find out this using an indicator screwdriver, making an appropriate check at the terminals from the distribution board before turning off the power supply.
General installation approaches
The general procedure for installing the switch will be as follows:
- arrange the installation location of the device (for a surface-mounted one, install a cover plate, for a built-in one, make a recess in the wall and mount a socket box);
- cut the cable (shorten it, remove the top sheath, strip the cores);
- connect the mounted light switch to the conductors according to the selected diagram (the presence of color coding of the conductors will be of great help in this);
- disconnect the conductors in the junction box;
- install the switch in place and secure it (with self-tapping screws, unclamping the petals);
- Reinstall the decorative plastic parts.
Connecting a two-gang switch
The next one will be a circuit that uses a two-key switch.
A feature of its design is the presence of two output pins, each of which can be connected to the input (phase) pin independently of each other.
This allows you to create two separate branches from one input wire, for which power control is provided with its own switch key.
Typically, a two-key switch is used to power two lamps, but there are situations when only one lighting element needs to be powered, that is, to create one branch.
In this case, the connection does not differ from that described above. The only thing is to decide which key will be working and connect a phase conductor to its output terminal.
With this connection, the second key will be disabled.
Post navigation
The following diagram has more in common with reality. Let's start with a video intercom in an apartment with a module for connecting an entrance intercom.
The outer cable has a UV-resistant sheath.
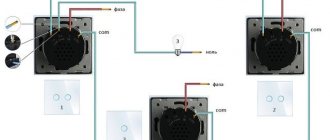
The first and last devices in the chain are pass-through switches. We need a power cord and a cable that is routed to switch S2.
Often, the accompanying documentation for a washing machine, electric stove, dishwasher or boiler indicates which devices need to be additionally installed into the network. Let us consider in more detail what the requirements for the installation of electrical accessories are, the basic installation rules and what is the wiring diagram for the pass-through switch.
How to connect a pass-through video switch What problems can be solved using switching devices If there is a flight of stairs at home, then its lighting can be conveniently controlled from two places. The switches are connected by two brown and gray wires in the diagram.
The first of them is easier to understand and is sufficient when installing devices in the case of existing electrical wiring.
To set the apartment number on the MSC adapters, you need to open them by unscrewing a couple of screws and switch the necessary microswitches to the ON position. Draft. There will be more detailed tokzamer.ru-3s 4s 5s 100A
Well-known manufacturers of pass-through switches
The Legrand company occupies a leading position in the electrical goods market. The demand for Legrand pass-through switches is due to the high quality of the products, ease of installation, ease of further operation, stylish design and flexible pricing policy. The only drawback is the need to adjust the installation location. If it does not coincide with the product, difficulties may arise during its installation, which is carried out according to the connection diagram for the Legrand pass-through switch.
Legrand pass-through switches
A subsidiary of Legrand is the Chinese company Lezard. However, the products have only a stylish design left from their native brand. The build quality is much lower, which is due to the low cost of the products.
One of the leading domestic manufacturers of electrical goods is the Wessen company, which is part of the Schneider Electric company. All products are manufactured using the latest technologies on modern foreign equipment and comply with European quality standards. The models have a universal, stylish design that allows each element to fit into any interior of the room. A distinctive feature of Wessen switches is the ability to replace the decorative frame without dismantling the device.
Another equally well-known manufacturer is the Turkish company Viko. The products are characterized by high quality workmanship, reliability and durability, and comply with electrical safety requirements and European quality standards. In the manufacture of the device body, fireproof durable plastic is used, which is designed for a large number of operating cycles.
A pass-through switch, unlike a regular switch, has three conductive wires
The Turkish brand Makel offers high-quality, reliable, safe and stylish products. Thanks to the ability to connect a cable without the need to use a distribution box, installation of switches becomes simpler, and further operation becomes comfortable and safe.