Applications, Benefits and Methods of Use
Switch with socket
A socket with three switches has a more complex connection scheme than a simple light switch, since three contacts are routed simultaneously to the chandelier or lamp. However, using such a block has a number of advantages:
- compactness and functionality – the case contains several devices;
- lighting control in adjacent rooms;
- energy saving;
- the ability to use combined lighting;
- ease of adjustment of light intensity.
When connecting, the neutral working cable is directed from the switchgear to the socket, and the phase wire comes from the switch jumper.
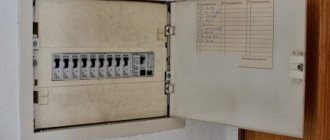
Installation and connection of sockets with switches in one housing
The advantage of interlocked fittings is not only aesthetics and ergonomics, but also ease of installation and connection. In this case, there is no need to drill several recesses in the wall panel and pull various wires to them.
Of course, the grooves will have to be sealed, however, the labor intensity of this operation is disproportionately lower than when replacing wiring and several sockets or switches.
The question of the convenience of placing the keys and the plug panel on the same level is quite complicated. From the point of view of classical ergonomics and electrical safety rules, the optimal height of the socket is 50.0, and the switch buttons are 130-150 centimeters from the floor.
The rules of European electrical installation standards and regulations, on the contrary, recommend placing all elements of electrical fittings, with the exception of connection points for light sources, on the same level.
Types of devices
The 3-key switch with socket is available in a wide range of design solutions; it is possible to choose an option that suits the design of the room where you plan to connect the device. According to the criterion of the location for which the device is intended, the products are divided into walk-through types, placed in the corridor or on the landing, and intended to control the chandelier and local lighting devices located in the same room. Some switches have indicator lights that can remind you when the light is on or show you where the light is in the dark.
When choosing a suitable model, you need to inspect it for physical defects, scratches, and abrasions. The keys should make a clicking sound when switching. If the process occurs silently, this indicates a failure of the self-clamping lemmas designed to secure the connected cables.
Connection features
The connection diagram of the switch depends on its type.
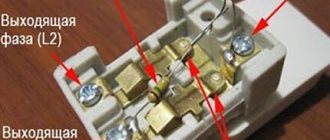
The unit itself is connected in the same way as the option with two or one button. The power cable is connected to the input of the switch, and the wires are pulled to three light bulbs. The socket has its own zero, it is not connected to the switch, but they have a common phase. The neutral working wires (both from the socket and from the light bulbs) are directed to the distribution box, and the phase wire is led to the unifying contact at the input of the device. Lighting cables are placed on insulated blocks, from which the voltage is supplied to the lamps. The ends of the conductors are stripped of 1 cm of insulating material.
Switches are placed vertically on the wall, most often next to the door frame. You can construct a niche for the block with spacer elements and a frame frame. The switchgear is equipped with 5 connections, with the grounding going to the socket. For devices with metal elements, it is necessary to place a protective connection under the screw to protect against electric shock.
Connection diagram for a three-key switch with socket
Connection diagram for a three-key switch with a socket.
The diagram is often located in the instructions supplied with the device. For a triple switch, regardless of the presence or absence of an outlet, it has a standard appearance. Zero cables (3 pieces) from the lamps are connected to the zero, and one conductor is directed to the socket. In apartments of multi-storey buildings, only phase cables go from the wall, and neutral cables lead directly to the lighting device. If this rule is ignored, chandeliers and sconces will be energized all the time - then the resident is in danger of receiving an electric shock even when performing a simple procedure for replacing light bulbs. Models with a socket have an additional zero.
If there is no socket, 4 cables lead to the switch, and 5 if there is one.
In apartments with a Soviet-era layout, you can place a box with three keys only at the junction of the bathroom, hallway and kitchen. To install it in the bedroom or living room, you will need to partially change the placement of the wiring. It is better to invite a professional electrician to perform this work.
If you intend to connect all the switches yourself, in the living room of such a house you can install only a device with one or two buttons.
Design
There are no special differences in the design of these switches. The principle of operation is the same as for two- or one-key ones.
Let's consider the main elements of the switching device.
Keys and frame, so-called protective elements. For their manufacture, special heat-resistant plastic is used. The keys directly turn the switch on and off.
The operating mechanism, or actuator, that operates the keys. The frame is connected to the working mechanism with special latches or screws. This entire assembled structure is mounted in an installation box and fixed in it with special spacers.
The connected three-key device must have four contacts - one to connect the power supply wire, three more will connect the switch to the lighting elements. The material for contacts is usually copper; the size varies depending on the cross-section of the wire and the connected load.
The use of this type of switches is more intensive than others, so their average service life is from 8 to 10 years. There can be two main reasons why a device may fail:
- Mechanical - fastening elements are damaged, the housing is destroyed.
- Electrical - damage to contacts.
If there is a breakdown, do not try to replace any components in a three-key switch; the device should be replaced completely. It would be better if this is done by a professional electrician in compliance with all safety rules. Although, if you are well acquainted with electrical engineering, have skills in working with power tools, and understand what “phase” and “zero” are, it will not be difficult for you to do this yourself.
Connection methods
The three-button switch can be connected using a junction box or without it.
With junction box
Distribution box
First of all, you will need to disassemble and remove the old switch from the wall, clean the niche and check the condition of the wiring. There should be five wires coming out of the wall. Now you need to turn off the power to the apartment, straighten the wires, and then direct power to them. Using an indicator screwdriver or other device, paying attention to the color of the insulating material, find the single-core and neutral phase conductors and connect them to the socket. The phase is placed on the contact going to the jumper of the device. The remaining three wires are placed on their corresponding contacts. When you press the switch buttons, the lights should light up.
Without junction box
With a direct connection, after eliminating the old unit, 8 wires will stick out from the wall. You need to pay attention to the color of their insulation. If the wires are colored the same, you need to turn off the current in the apartment, then straighten the wires, laying them in space so that the ends on which the insulating material is stripped do not touch each other. Apply voltage and look for phase (two-core cable) with an indicator. It must be marked with insulating tape, having previously de-energized the line. Then they look for zero. Of the remaining six wires going to connect 3 lighting fixtures, you need to select phase and neutral. The phase for each lamp is combined with N coming from the distribution box, and zero is applied to the socket contact. N lead to the socket, it goes to 3 devices. L from the shield is connected to the socket. The remaining wiring that goes to the sconces and chandeliers leads to the switches. When using this circuit, the neutral wires are twisted - they must be hidden in the device block with the socket.
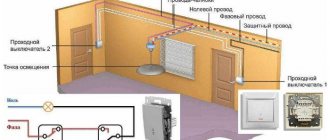
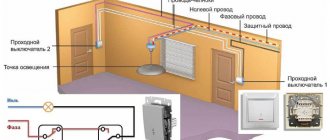
Wiring through junction box
It is better to use the same one fine to bring all three phase wires to the distribution box again, and then use the common upper fine to bring them to the lamps.
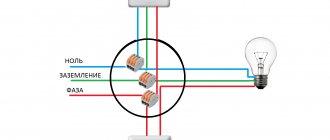
If we are doing wiring to a chandelier, then the last option is the best. Triple switch: connection diagram to the chandelier
L – phase to the switch (red); then the phase (yellow, brown, pink) goes to three groups of chandelier lamps; N – working zero (blue), goes directly to the chandelier and is separated by the chandelier terminal block into groups; PE – grounding (yellow-green), connected to the chandelier body
Thus, before connecting the triple switch, it is necessary to prepare all the wiring.
All work should be carried out with the lighting circuit switched off. To search for zero and phase, the power is turned on, but after the indicator finds them and marks them, it turns off again.
Next, the following work is performed:
- Search for existing wiring: you need to find the junction box, the fines that will be involved in the wiring. It is necessary to mark the walls for treatment. A place is marked for the hole where the three-key switch will be installed, and for routing the wiring to and from it.
- Opening existing channels and punching new ones.
- Laying and securing cables from the box to the installation site. The wires for phase, neutral and ground (if any) must be marked. If possible, you should adhere to the standard colors of the wires: blue for neutral, yellow-green for grounding and other colors for the phase.
- Installation and fastening of socket boxes. The wires are routed inside them.
Connecting a triple switch
Identifying the wires in the junction box to which the wiring should be connected. Phase and zero are indicated by the indicator. They are marked (with electrical tape).
This work is carried out after inspection has confirmed that the previous actions did not cause damage to the wiring. After this, the lighting circuit breaker is turned on and the phase phase of the distribution box wires to which the connection must be made is determined. The wires are marked, after which the power is turned off again.
The wires of the new wiring are connected to the junction box, their ends are securely insulated with special caps.
To check the correct connection, turn on the machine again and, making sure that everything is normal, check the phase on all wires. It should be located on only one phase wire going through the socket to the switch. The rest should have zero: on the neutral wires going to the lamps, on the ground wires and phase wires going from the switch to the lamps, since they are open.
- Having turned off the machine again, you can connect the switch by connecting the wires to the terminals according to the connection diagram. After this, the switch can be put in its place, secured in the socket box according to the design.
- The wires are connected to the lamp sockets or terminal blocks of the chandelier. Each cartridge must have two wires - zero and open phase.
Before connecting each wire to a chandelier or lamp, you need to know exactly which of them are zero (coming from the junction box, blue according to the norm) and which are phase. Color identification of each wire helps. But in order for them to connect correctly, you need to turn on the machine to determine it and check each of them in turn with an indicator, including the corresponding button of the three-button switch.
After installation and checking that all lamp units are connected, the work can be considered complete.
Installation errors
Connecting a triple switch with a socket
When connecting a three-key switch with a socket in the same housing, erroneous actions are possible, as a result of which the lighting devices may not turn on. Common cases include:
- A non-working switch with a working socket indicates that the technician has mixed up the phase and neutral wires. You need to check the design with an indicator and make the required changes.
- Two buttons do not function until the third is pressed - a sign that the phase was launched to the output of the third button, and not to the main input.
You should not connect a tee to the socket - its contacts are not designed for high voltage, and the device may stop functioning.
Installing a two-key block
When installing an electrical unit of this design, all work is carried out in the same way as installing a single-key device. Almost all two-key models do not require more space for installation and an additional socket box.
All preparatory work described for the example of installing a single-key device is used for installing two-key modules. The phase wire is taken away from the common phase wire, and at the output of each switch one core is attached, which are then led to the lighting fixtures.
Installing a three-key block
A three-key device is installed in a similar way, with the only difference being that the number of wires that will be directed from the switch to the lighting fixtures is 3.
Switch Manufacturers
Three-key switches with a Kuntsevo-Electro socket
You should choose a brand based on your own priorities. If artistic quality is important, you can focus on the range of companies Fede and Gira. The first of them specializes in antique styles. Functional models in a modern design solution can be found from the manufacturer ABB. Some of these switches are backlit with LEDs. Among Russian companies, devices with a socket (with a different number of buttons) are produced by Kuntsevo-Electro.
When installing a device with a socket, the correct identification of the neutral and phase wires and their correct connection to each other are crucial. Only in this case will reliability and safety of operation be ensured.
Choice
The modern market of electrical equipment offers many different modifications of combined electrical fittings.
However, all of them can be classified according to the following criteria:
- The relationship between the number of interlocked sockets and switches.
- Installation method: external or built-in.
- Design.
Today, you can find on sale a unit consisting of one socket and a one- or three-key switch, or you can choose a product with two or three electrical sockets and a different number of switches.
Of course, the choice of one or another modification depends on the number of connected electricity consumers and the number of lighting sources. Multi-key switches are indispensable when connecting multi-arm chandeliers, when using different combinations of pressed keys you can step by step change the lighting intensity.
External electrical fittings are visually perceived as somewhat cumbersome and their installation is due to the impossibility of installing hidden wiring.