In rooms heated using underfloor heating technology, the feeling is much more comfortable than with a traditional radiator system. When the floor is heated, the temperature is distributed optimally: the feet are warmest, and at head level it is cooler. There are two heating methods: water and electric. Water is more expensive to install, but cheaper to operate, so this is what is used more often. You can slightly reduce installation costs if you make a water heated floor with your own hands. The technology is not the simplest, but it does not require encyclopedic knowledge.
Distribution of heat flows for different heating systems
Advantages and disadvantages
Warm floors are quite popular today and are used by many owners of private houses. Heat transfer in these systems is carried out due to pipes located under the floor covering, through which heated coolant circulates, or through electric heating elements.
As a result, the floor heats up and becomes warm to the touch, which in itself significantly increases the level of comfort in the home.
Among the positive qualities of a heated floor, the following stand out most clearly:
- High level of comfort . A floor heated to a certain temperature allows you to walk on it barefoot without fear of any discomfort.
- Economical . Savings when using heated floors are achieved due to the efficient distribution of energy - it moves from bottom to top and heats only the volume of the room in which heat is needed, i.e. There are no extra expenses.
- Possibility of adjusting temperature conditions . It is strongly recommended to equip a heated floor with an electronic control unit, which will allow the system to monitor the current temperature in the room and keep it within user-specified limits.
- Easy to install . Installing heated floors is a fairly simple task, especially when it comes to the electrical version of the system. The water circuit is more difficult to lay out, but even if desired, it is quite possible to install it yourself.
There are also disadvantages:
- High cost . To install a heated floor, you will need a lot of materials, and you will have to fork out for some tools. There is only one way to reduce costs - to do all the heating installation yourself.
- Reducing the volume of the room . The thickness of a heated floor can vary from 7 to 12 cm - and it is to this height that the entire floor rises. If the ceilings are high, then this will not cause any special problems (unless you have to redo the thresholds).
- Demanding requirements for flooring . You can cover a heated floor only with coverings that transmit heat well. It is best to purchase specialized materials designed for use in combination with heated floors. An unsuitable coating will not allow the system to operate effectively, and in the case of electric heaters, there is also the possibility of their failure as a result of overheating.
The advantages of heated floors are significant, and the disadvantages are not critical, so such heating systems can be used for heating, both as the main and as an additional source of heat.
What type of flooring is best to choose for a city apartment?
When choosing a heated floor model for an apartment, you need to take into account the advantages of each system and the design features of the room. You need to decide whether it will be the main heating or additional heating.
The water design is environmentally friendly and economical to operate. Heat transfer is carried out by radiation, so excess positive ions are not formed - there is no electromagnetic field.
But installing it in an apartment has its own difficulties:
- Obtaining permission to install a system in a multi-storey building. After all, installing water heating in an apartment building is dangerous due to the possibility of leakage and flooding of neighbors below, and can also lead to a decrease in pressure in the general system of the house. In addition, this will significantly increase the load on the floors.
- A mixing unit is required, and this is not always possible to do in an apartment.
- During the repair of the general house system, slag will fall into the hydrofloor.
- When carrying out annual pressure tests, the pressure in the system will exceed 6 Bar, and the TP equipment (manifold with flow meters) has a maximum pressure of 6 Bar.
- The temperature of the liquid in the heating system can reach up to 100 degrees, which will negatively affect the equipment.
When choosing an electrical system (see the device, types and installation diagrams), all the previously listed problems are absent: no permit required, no risk of leaks. In addition, such structures are less labor-intensive, and the cost of their construction is lower than water ones. But during operation, electricity bills increase.
Cable-type electric floors filled with screed have less weight, thereby not placing a large load on the floors of the house. Infrared film is ideal for an apartment. It is easy and quick to lay, and it does not take up much usable space.
To summarize, we can say that for an apartment, purchasing and installing an electric floor is a cheaper option, but during operation, a water floor is less expensive.
But with its installation in an apartment building, as mentioned above, there are a number of problems.
Preparation of the base for all types and options of heated floors
One of the most important elements is the basis for a heated floor in a private house, which must be prepared even before installing the heating system itself. There are a number of requirements for the base - it must be strong enough, even and not allow heat to pass through. Each requirement is important, but it is thermal insulation that requires special attention - without it, the generated heat will simply go under the floor. Various pipe insulations are used, which must be selected for specific conditions.
The technology for preparing a base with expanded clay insulation includes the following steps:
- Dismantling . The first step is to remove the old covering, under which there may be concrete, soil or wooden supports. All dirt and unnecessary elements must be removed.
- Marking . Using a building level along the entire perimeter of the walls, it is necessary to mark a line along which the base will be leveled. In the case of expanded clay, you need to leave more free space so that the thickness of the thermal insulation layer is sufficient to effectively retain heat.
- Bedding . The base is covered with a layer of sand, the thickness of which should be about 10 cm. The sand cushion must be compacted after backfilling.
- Waterproofing . A waterproofing material is laid on the compacted sand layer (polyethylene is the cheapest, but a waterproofing membrane is a more reliable option).
- Arrangement of beacons . Now you need to install the supports on which the beacon profiles will be located. The beacons need to be very accurately leveled.
- Laying thermal insulation . All free space between the beacons is covered with expanded clay. For greater reliability and efficiency, it is worth mixing expanded clay with liquid cement mortar.
- Filling the screed . Actually, after laying the heat-insulating layer, you can begin pouring the screed, which should reach the previously measured level. The screed is leveled along the profiles.
- Alignment . When the screed has set a little, the beacons need to be removed and the resulting holes must be sealed. The seams are rubbed down, after which the floor must be left until the solution has completely hardened.
In addition to expanded clay, a number of other materials can be used as thermal insulation:
- Polystyrene boards, which are usually reinforced with reinforcing mesh and attached to the base with anchors to increase strength;
- Rolled foil materials, excellent for use in combination with electric heating elements;
- Polymer mats designed specifically for laying water-heated floors, for which purpose the material has special protrusions between which pipes are laid.
How to properly install heated floors in the kitchen
Separately, it must be said that before laying the heat-insulating material, the surface must be cleaned and leveled as best as possible. Only after this are the thermal insulation strips laid, the seams of which are fastened with tape. An installation tape is attached over the thermal insulation. For these purposes you will need dowels. The mounting tape should be attached at intervals of 0.5 m. It is necessary so that in the future it is possible to fix the hinges of the heating section.
Heated floor pipe layout diagrams.
The cable must not cross. The loops, in turn, should be smooth and have no kinks. Do not forget that the distance from the wall must be at least 50 mm. There are special tabs on the mounting tape to which you need to attach the ends of the cable. After you have laid the heating section, it must be filled with a screed containing cement and sand. Its thickness should be no more than 5 cm.
Essentially, your floor is ready for decorative covering. The first time you need to turn on the heating no earlier than a month after pouring the screed.
Do-it-yourself water heated floor installation
There are different options for heated floors in a private home, but the most popular type is water-based. Structurally, such heating is a pipeline system laid under the floor covering through which hot coolant passes. The pipes are connected either to an existing heating system or directly to a heat source.
Water heated floor includes the following elements:
- Pipes . Metal-plastic or polyethylene pipes are most often used to install heated floors. Both materials have good thermal conductivity and a low coefficient of thermal expansion.
- Collector . This element is necessary for the formation of proper wiring - each heating circuit must have separate terminals. Inexpensive manifolds have only shut-off ball valves, while good devices are equipped with a valve that allows you to regulate the temperature in each individual circuit.
- Circulation pump . The pump ensures normal circulation of coolant in heated floors. If the heating equipment has a built-in circulation pump, then there is no need for a separate device.
- Damper tape . This tape is laid along the entire perimeter of the room and allows you to compensate for the expansion of the screed when heated. Standard damper tapes are made from foamed polymers.
- Fastening elements . If installation is carried out on mats, then they will perform the function of pipe fastenings. In all other cases, special brackets equipped with locks and anchors will be required.
Pipe selection
For water heated floors, it is allowed to use materials that meet specific requirements. These include: durability, no welds. There are a number of standards regarding the outer diameter of the pipe and the permissible length:
- 16 mm – from 50 to 80 m;
- 20 mm – up to 100 m;
- 25 mm – up to 120 m.
The heated floor is configured to work with coolant at low temperatures. But the reserve must take into account unforeseen circumstances. Therefore, the characteristics should include temperatures up to 95 0C.
Stainless steel corrugation
These pipes can be spliced. The fittings that are used in this case are considered the most reliable among others. The material meets all requirements and is easily bent while maintaining position. The outside is covered with high-density polyethylene.
Copper
When metal oxidizes, it becomes covered with a layer of patina, so copper protects itself from corrosion. Thanks to this fact, pipes last from 50 to 200 years. Positive aspects are also high heat transfer and ductility with mechanical strength. For heated floors, products in a polymer shell are used.
Copper pipe for underfloor heating Source wieland-plumbing.com
Polypropylene
Such pipes are not used for water heated floors. The material is resistant to bending, so it is impossible to organize a step of 20 cm without soldering. And this is unacceptable. In addition, polypropylene has low heat transfer, which is not relevant for the operation of a low-temperature system.
Polyethylene
Such pipes are made of cross-linked polyethylene. The material has a classification, which is designated by letters from PEX-a to PEX-d. For water heated floors, only the first group is recommended for use. The second option shrinks over time, the third is cheaper, but inferior in quality characteristics. The latter product is being withdrawn from production, since production is accompanied by the participation of nitrogenous compounds.
An alternative material for making pipes is PE-RT. This polyethylene lasts for more than 50 years and can withstand several freezing cycles with water inside without loss of characteristics or shape. Connections can be made by fittings or welding.
Metal-plastic
Polyethylene pipes with aluminum reinforcement last no more than 30 years. The flexible material is sold in coils up to 50 m long. If you need more, you can place an order with the manufacturer and increase the size to 80 m. The best option would be material made from PEX-a, PEX-b or PE-RT.
Metal-plastic pipes for heated floors Source zkheizung.de
It is important to purchase quality materials. Different thermal expansion of polyethylene and metal leads to delamination. Thin layers of 0.8 mm and 0.2-0.4 mm, respectively, cannot always cope with interruptions without consequences. Therefore, before choosing, you need to require accompanying documentation: certificates of quality and compliance.
Laying pipes in a private house
In order for a water heated floor to work efficiently and be sufficiently reliable, the pipes must be laid at a certain distance from each other. Typically, the step value varies from 15 to 35 cm and is determined depending on the required heat transfer - for more efficient heating, the step must be reduced. There is no point in saving on pipes - too large a step will lead to uneven heating of the floor areas, which will lead to a noticeable decrease in comfort.
The total length of pipes for one room is calculated using the following formula:
- D = S / M * k, where
- D – total length of pipes,
- S – room area,
- M – laying step,
- k – safety factor, varies from 1.1 to 1.4.
Usually for 1 sq.m. The room area requires about 1.5-3.5 m of pipes.
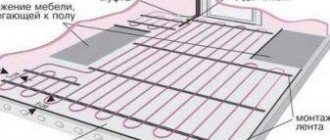
An important point is the layout of the pipeline, which can be performed according to one of the following schemes:
- "Snake" . A good option for small spaces. Since the area is small, the temperature in the pipes remains virtually unchanged throughout the entire circuit.
- "Snail" and "double snake" . These layout options are suitable for medium-sized rooms. Thanks to the close location of the supply and return circuits, the floor will warm up evenly.
- A circuit that includes several circuits . For complete and efficient heating of large rooms, it is most advisable to equip several separate circuits that will provide good heat transfer and be quite reliable.
Selecting a collector-mixing unit
The choice of collector (see types, principles of operation and installation of the collector, connection diagram and configuration) is directly related to the number of circuits that are planned to be installed. The device must have as many outputs as the water floor structure will have.
The device allows you to adjust and supply heated coolant into the system, and discharge it back to the device after working out.
The simplest model of the corrector has only a shut-off valve, and it cannot be used to adjust the operation of the structure. More expensive devices are equipped with valves for adjustment; they make it possible to independently set the level of intensity of water flows, separately for each circuit.
In addition, a mandatory attribute of any manifold is an air vent valve and a drain valve for emergency situations. In order for the device to work normally, you only need to adjust all the valves once, according to the required parameters.
It is worth noting that inexpensive collector models are often installed. But if you do not need to save money, then it is better to buy a model with servo drives and mixing units. This device allows you to automatically regulate the degree of heating of the water supplied to the water floor.
The collector is installed directly in the heated room or in a room nearby. To install the device, a special cabinet is made, its standard size is 50 by 50, and its depth is 12 - 15 cm. It is placed above the surface of a warm water floor. It is not uncommon that the manifold cabinet does not spoil the interior of the room, it is recessed into the wall.
Manifold for heated floors. Three ways to configure flow meters.
Installation of water heated floor
Water heated floors in a private house are installed using the following technology:
- Collector installation . The collector is installed in a collector cabinet or a niche in the wall intended for it, after which it is connected to the heating equipment.
- Installation of damper tape . The tape is laid along the entire perimeter of the building or around the area where the heating circuit will be located. The presence of the tape not only compensates for thermal expansion, but also reduces heat loss.
- Reinforcement . A reinforcing mesh must be laid on the thermal insulation layer, which is fixed with anchors and connected to each other with ordinary wire.
- Pipe installation . The water circuit pipes unwind, and care must be taken that they do not twist along their axis. The pipeline is laid in accordance with the selected scheme and fixed using brackets or clamps.
- Connection to the collector . All circuits are connected to the corresponding terminals, after which the system can be filled with coolant. The water circuit must be left in working condition for two days to check for leaks.
- Filling the screed . A regular cement screed is poured over the water-filled system, which must be left until it hardens completely (usually this takes about a month). When the solution has completely dried, it will be possible to start the heating in operating mode. Starting the system prematurely is likely to damage the concrete layer.
Laying the heat insulator
Extruded polystyrene foam and cross-linked polyethylene foam, only these two materials can be used for thermal insulation in a water heated floor system.
Before laying the heat insulation sheets, a damper tape 10-12 mm thick is glued around the perimeter of the room. It serves not only to compensate for the thermal expansion of the screed, but also to prevent heat from escaping into the walls. In height, it should protrude beyond the boundaries of the top layer of the screed.
The heat insulation sheets are laid out staggered and always on top of the waterproofing layer. For waterproofing, it is best to use polyethylene film with a thickness of 0.2 mm.
If you decide to make the thermal insulation thickness 10 cm, then it will be better if you lay two layers of slabs 5 cm thick. Be sure to have a spacing between the layers.
There is an option to use special slabs designed for organizing water-heated floors as a heat insulator. Their difference is in the bosses on one of the surfaces. A pipe is laid between these bosses. But their cost is unreasonably high. In addition, not all pipes will be supported in such slabs. For example, polypropylene and polyethylene pipes are too elastic and will require additional fixation.
The pipes are not attached to the heat insulator. The fastener must pass through the foam layer and be fixed in the screed. This is a very labor-intensive process considering the amount of work involved.
Mounting tapes are a more acceptable solution, but it is very difficult to lay a pipe on them in a spiral (snail).
The best option would be to fix the pipes on the mesh. In this case, the mesh will serve specifically for fastening pipes, and not for reinforcing the screed.
There are special meshes made of biaxially oriented polypropylene, or you can use a simple masonry mesh.
See also: Warm floors - which type to choose? Options
Design and types of electric heated floors
If it is necessary to install heated floors in a separate room, then an electric heating system will be more relevant. Most often, electric underfloor heating is used as auxiliary or local heating. Such a system must be connected to a thermostat, which turns the system on and off as needed.
The design of an electric heated floor includes heating elements connected to the electrical network. When voltage is applied, they heat up and transfer heat to the floor covering, which provides heating.
Where is the best place to install them?
How to make a heated floor? Connecting a heated floor to a heating system without a collector
Since warm floors cost a lot, and not everyone can install them in the entire apartment, you need to decide where to install water heating in the front.
In the bathroom and toilet
The bathroom and toilet are the main rooms where additional heating will come in handy, since there is a large amount of cold water there, which leads to the formation of condensation.
Warm floors from central heating will protect against high humidity and mold formation. It will create a more comfortable atmosphere during water procedures, because stepping on warm tiles is much more pleasant.
In addition, if the bathroom is warm, the water becomes less hot when used, and this saves resources.
Corridor
Another place where heated floors are often installed is the corridor. Wet footprints, wet rugs and shoes on such a floor will not be a problem; they will dry quickly.
The presence of a thermostat will allow you to set the heating temperature, which will not adversely affect leather shoes. Plus, in cold weather it’s much more comfortable to take off your shoes and stand on a warm surface.
Children's room and bedroom
It is quite logical to want to make a heated floor in a room where children play on the floor, as well as in the bedroom, because getting out of bed and stepping on a heated floor is more pleasant.
But at the same time, there are a number of points:
- any heating device “burns” oxygen, and this in turn negatively affects human health;
- Not all topcoats respond well to heating from below.
In addition, dry air will ruin natural wood furniture.
When deciding to install a heating system in an apartment using central heating, you should think through all the nuances, take into account the pros and cons, and the economic feasibility of this system. And also, in order to avoid problems, the advice of experts is to act in compliance with all legal requirements.
Installation of film heated floors
Film heated floors are the most common system, which is largely due to the ease of installation.
An electric heated floor in a private house is installed from scratch using the following technology:
- Laying reflective material . It is strongly recommended to lay heat-reflecting foil material under the heated film floor, which will prevent heat from passing into the underground space.
- Open the films . It is advisable to cut the film as small as possible in order to reduce the number of wires used. The film can be cut only along the cut lines drawn on it - this avoids damage to the internal elements of the material.
- Laying the film . The prepared heating elements are laid out on the base and leveled. You can secure the strips of film with tape, but it is better not to secure the edges to make it easier to connect them to the network.
- Connecting strips . In areas where the conductive path is located, you need to open the film and attach a clip to it.
- Contact insulation . Each contact and area where the strips were cut must be carefully insulated. A good insulation option is butyl plates, which usually come with the rest of the heated floor elements. With such plates the contacts are simply crimped.
- Connecting the thermostat . The film leads must be connected to the thermostat, following the instructions on its body or in the instructions. The system must be turned on and make sure that all bands are working.
- Installation of flooring . If the heating elements are functioning normally, then you can safely cover them with the selected floor covering.
Conclusion
It is very easy to install a heated floor - all types of heated floors in a private house can be easily assembled with your own hands. The finished system will ensure complete heating of the room and the proper degree of comfort.
The simplest installation method
An electrically heated floor is only part of the ceiling, which consists of several layers of different materials with specific functionality.
Typically, connected electric floor heating under tiles or any other floor covering consists of the following components:
- thermal insulation layer laid on top of the waterproofing layer installed earlier;
- end coupling;
- special insulating tape for installation, used without any strict instructions, but in such a way that the fastening is reliable and durable;
- connecting tube for connecting sensors that control the operation of the system;
- coupling.