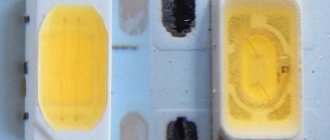
An LED is a semiconductor device that allows you to convert electric current into light radiation. Structurally, it is a semiconductor crystal (chip), which actually emits light, a substrate, a housing with contact leads and an optical system.
As you already know, they come in different colors, it depends on the material of manufacture and various additives. As a rule, one crystal (chip) is installed in the case, but if necessary, the manufacturer can install several crystals.
How to choose LED lamps for a lamp
When creating LED lamps, two types of LED bulbs are used in terms of power:
- Up to half a watt. Their main features are minimal heating and the ability to set the lighting fixture to any shape, thanks to a large number of points. The disadvantage is that their installation is very labor-intensive, considering that you need to solder and connect with your own hands.
- From 1 to 5 W. The high power of diodes allows you to significantly reduce their number in the device, which reduces labor costs. However, effective operation of a lighting device based on them is impossible without the correct selection of a radiator and light diffuser.
The production of LED lamps is also possible based on LED strips. The lighting power, color selection and density of light bulbs in a strip are determined by operating conditions and personal preferences of the person who will assemble them with their own hands. They typically reach 8-10 mm in width, and up to 5 meters in length (this is exactly the length of the coils sold). Power is supplied from a DC source with a voltage of about 12 volts or higher. To connect them from a household network, you will need an appropriate power supply. They can also be assembled using batteries.
Reading between the lines
Manufacturers of LED lamps almost always publish information about the LEDs they use, but rarely disclose data about the power supply. However, you can form your own idea of whether the power supply is of high quality or not, based on the parameters of the lamps that the manufacturer openly publishes.
First of all, this is the power factor λ (sometimes it is denoted as cos φ, which is not entirely correct for LED lamps). The larger this parameter, the better. For a high-quality power supply it should be at least 0.85. Simplified power supplies with low reliability usually show themselves by having a low λ value.
PSUs from leading manufacturers are characterized by a high power factor, an example of this is this device from Osram
Lamp manufacturers, of course, know that it is the power supply, and not the LEDs, that limits the service life of the lighting fixture. Therefore, although they indicate “LED service life 50,000 hours,” nevertheless, the warranty period is set based on the numbers for the entire lamp. Usually they base it on how many years the lamp will work if it is turned on around the clock. For example, the warranty period for LED lamps in the mid-price category is usually 3 years. We multiply this period by 8760 hours per year, and we get 26280 hours - this is how long the lamp is guaranteed to work
Please note that this figure is very close to the service life of a typical mid-price PSU - 30,000 hours
But the most important thing is where the power supply is located and what it looks like. If it is external and connected to the lamp via a connector, then it is definitely isolated (manufacturers usually do not directly violate electrical safety rules). In the event that the power supply is internal, but is made in the form of a separate unified module from one of the leading power supply manufacturers, then most likely it is also isolated. Non-insulated power supplies are usually designed as an integral part of the luminaire design.
Calculation and principle of operation of a driver with a quenching capacitor
To equip existing chandeliers and other lamps in the apartment with a cheap source of LED light, you can use a driver circuit with a quenching capacitor.
Its main feature is low energy consumption. When assembling the block with your own hands, everyone will be convinced that it is quite simple and there is nothing superfluous in it, including a stabilizer. The diodes used do not emit much heat, so the device also does not have a heatsink.
The only disadvantage of this scheme is the direct connection to the 220V network. This means that if there are constant power outages, the lamp will blink constantly. To assemble such a driver, you will need to prepare the source materials:
- Bread board.
- One-two watt resistors.
- Circuit breakers.
- Capacitors 47 mF at 500 V.
- Diode bridges type KTs405A.
- Film capacitors for 600 volts (you can take more).
If an LED lamp is made for a ceiling chandelier using a standard socket, you can use the base from a burnt-out energy-saving fluorescent lamp as a base. To do this, you need to carefully disconnect the lamp with your own hands, preferably outdoors.
Scheme
The operation of a self-made capacitor circuit is subject to the following algorithm:
- The resistor (designated R1 in the diagram) reduces surges in the network until the circuit stabilizes. This takes about one second. Its parameters are resistance 50-150 Ohms, power - 2 W.
- The resistor (R2 in the illustration) supports the operation of the ballast capacitor - it discharges it when the power is turned off. In practice, this is useful so that if it is necessary to carry out repairs with your own hands, the technician will not be exposed to electricity. In addition, it prevents the formation of a current surge when the first half-wave of the alternating mains current is not aligned with the polarity of the capacitor.
- C1 is a direct quenching capacitor. This is the main element of the LED lamp circuit based on strip or lamps. Its function is to filter current. With its help (by varying the power parameter) you can set any current value in the circuit. So, for the diodes given as a basis (see above), its value does not exceed 20 mA for a long time at peak voltage.
- Next, according to the circuit, the diode bridge is turned on.
- C2 (electrolytic capacitor) prevents lamp flicker. In addition, due to the slow discharge of the electrolyte, the lamp does not go out immediately, but gradually.
Important! The LED elements of the LED strip do not have an inertia effect. Therefore, when turning the light on and off, the human eye can only notice a change in lighting stability at a frequency of 50 Hz. However, if you look at the lamp through a smartphone camera, you can immediately detect its quality. As a rule, cheap Chinese diodes immediately reveal themselves by flickering, invisible to the naked eye.
Basics of calculation
To correctly calculate the capacitor, you must use the following formula: I = 200*C*(1.41*U network – U led): I – circuit current (A); the number “200” is a constant obtained by multiplying the current frequency of 50 Hz by “4”; the value “1.41” is another constant; C is the capacity of the quenching capacitor, expressed in farads; U network – voltage in the network used, usually 220V; U led is the total voltage drop across the LED strip or individual diodes, for example, if each element has 3.3V, then this value must be multiplied by the total number of them and the value U led will be obtained.
Problems during operation of dimmable LED lamps and methods for eliminating them
There are two reasons for problems when using dimmable lamps: poor quality of the device and incorrect selection of additional elements. Let's look at several common problems and ways to solve them.
The lamp is not dimmable in the power range from 10% to 15%
The minimum value to which the brightness of an LED lamp can be reduced is 10%. If you notice no change in the glow level within 10-15% of the power, then the reason is the poor quality of the lamp, or the dimmer does not match the lighting device
To prevent the problem, look for models with a minimum on/off level
The lamp flickers
The reason for flickering when the light is off is the presence of a switch with an indicator light. To solve the problem, you need to turn off (remove) the indicator or install a new switch. The second reason may be a faulty driver in the lamp.
The lamp hums when turned on
The cause of the extraneous sound is the incompatibility of the LED lamps with the dimmer or the failure of the driver. In addition to hum, a sign of inconsistency is the periodic on/off of one or more lighting elements. Replacing the dimmer or lamps will help solve the problem. When choosing, listen to the recommendations of experts.
The dimmer did not fit the 220V network
If the quality of the dimmable lamp is good, you can use any dimmer for a 220V network. However, often cheap dimmers do not cope with the task. Therefore, you should buy a dimmer on the recommendation of specialists or after testing the device in practice.
What materials can be used
When making homemade lamps, any materials that can be combined with LED strips and light bulbs are suitable. The case can be made either with your own hands, or you can use a previously used device as a basis. In this case, it is necessary to take into account the heat transfer of LED elements. Without a properly selected radiator, they will quickly deteriorate.
High power diodes will require thermally conductive material. For example, it could be an aluminum profile, pipe, cone and other metal objects. For elements such as 5 mm “straw hat” LEDs with a luminous flux distribution angle of one hundred and twenty degrees, you can use any material - plastic, paper, wood, cardboard - since they do not heat up.
Upgrading a halogen light bulb
Necessary materials:
- LED elements. The quantity is at your discretion, but preferably no more than 22 pieces, since it is difficult to work with a large quantity.
- Burnt out halogen light bulb.
- Super glue.
- Copper wire.
- Resistors.
- A piece of aluminum sheet, a regular beer can will do.
- Tools: hammer, soldering iron, hole punch.
Step-by-step instruction
- Remove the top halogen bulb. Use a screwdriver to remove the putty around the pin base.
- Using precise blows of a hammer, knock out the pins from their sockets so that the old light bulb falls out.
- Based on the number of diodes, make a plan of their location and print it out.
- Attach the paper stencil to an aluminum sheet and use a hole punch to knock out holes on it.
- Download on the Internet a diagram for connecting diodes depending on their number.
- Place the aluminum circle on the stand and insert light emitters into the holes. To facilitate the soldering process, you can immediately bend the cathode legs of the diodes to the anode legs of the others according to the diagram.
- Secure the light emitters in their seats with superglue, avoiding getting it on the legs of the LEDs.
- After the glue has dried, solder the legs according to the diagram. In this case, leave one negative and one positive leg for connection to the power supply. In order not to make a mistake in their polarity in the future, you can cut off the negative one a little.
- Solder resistors to the negative contacts. The result should be six positive and negative terminals (with resistors).
- Solder the resistors according to the diagram.
- Solder a piece of copper wire to the two contacts left for connecting to the power supply, which will become a pin base. One of them, the negative one, can also be made a little shorter so as not to confuse the polarity. The space between them must be glued so that a short circuit does not occur in the future.
- Install the structure on the reflector and glue it.
- Mark the positive and negative contacts with a marker. It is also advisable to note the voltage level: 12 V.
- Check the functionality of the product by connecting it to a car battery or 220/12 V power supply.
How to make a lamp with your own hands: detailed instructions
Now let's look at the most popular options for making lamps based on LED elements. We will analyze in detail how to make their body with your own hands, and what materials are best used for table and wall lamps, as well as decorative lighting fixtures and some other models.
Desktop
To make a table lamp with your own hands, you will first need to upgrade an existing lighting device. To do this you need:
- Remove the original cartridge.
- As a base, take the base from the economical light bulb described above and place it in it, connecting according to the circuit, a driver with a quenching capacitor.
- As a housing for LED elements, you can use, for example, a deodorant cap of a suitable size.
- Holes of suitable diameter for 5 mm diodes (about 50-60 in total) are drilled/punched across its entire area.
- The body is attached to the remainder of the base from an energy-saving light bulb with small self-tapping screws to a round plastic base with a diameter similar to that of the cap. In this case, the base itself is attached to small corner podiums and also to fasteners.
- After fixing and assembling, the lamp is simply screwed into the table lamp instead of a regular incandescent lamp.
Advice! Using the above technology, you can make your own lamps for ordinary pendant chandeliers, as well as lampshades hung to illuminate utility rooms, garages, bathhouses, and basements. Instead of conventional incandescent lamps or “housekeepers,” they will use homemade LEDs.
Wall
The LED wall lamp can be used in various rooms - bathroom and toilet, kitchen and children's room, living room and hallway, corridor. The procedure for making it in the shape of a round lampshade with your own hands is as follows:
- First of all, you need to select a base for mounting the diodes. It should be proportional to the diffuser. For example, you can cut the bottom from a plastic construction bucket.
- Having calculated the required number of diodes (on average 100-120), it is necessary to make holes evenly according to the markings.
- A driver is attached to the back of the base, several pieces if necessary.
- The base with diodes and drivers must be fixed to the base of the lampshade with self-tapping screws. To do this, you need to install a plastic or metal podium in the middle.
- The assembled device is mounted on the wall and covered with a diffuser.
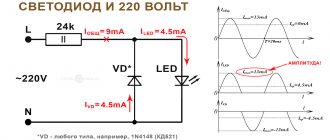
Mains powered LED lighting
But to build an LED lighting circuit, it is necessary to build special power supplies with or without regulators, transformers. As a solution, the diagram below shows the design of a mains-powered LED circuit without the use of transformers.
220 V LED lamp circuit
To power this circuit, 220 V alternating current is used, which is supplied as an input signal. Capacitive reactance lowers the AC voltage. Alternating current is supplied to the capacitor, the plates of which are continuously charged and discharged, and the associated currents are always flowing into and out of the plates, causing reactance against the flow.
The response produced by a capacitor depends on the frequency of the input signal. R2 dumps the accumulated current from the capacitor when the entire circuit is turned off. It is capable of storing up to 400V, and resistor R1 limits this flow. The next stage of the DIY LED lamp circuit is a bridge rectifier, which is designed to convert the AC signal to DC. Capacitor C2 serves to eliminate ripple in the rectified DC signal.
Resistor R3 serves as a current limiter for all LEDs. The circuit uses white LEDs, which have a voltage drop of about 3.5 V and consume 30 mA of current. Since the LEDs are connected in series, the current consumption is very low. Therefore, this circuit becomes energy efficient and has a low-cost manufacturing option.
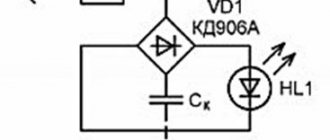
LED lamp from waste
LED 220 V can easily be made from non-working lamps, the repair or restoration of which is impractical. A strip of five LEDs is driven using a transformer. In a 0.7 uF / 400V circuit, polyester capacitor C1 reduces the network voltage. R1 is a discharge resistor that absorbs the stored charge from C1 when the AC input is turned off.
Resistors R2 and R3 limit the flow of current when the circuit is turned on. Diodes D1 - D4 form a bridge rectifier that rectifies the reduced AC voltage, and C2 acts as a filter capacitor. Finally, Zener diode D1 provides LED control.
The procedure for making a table lamp with your own hands:
Disassemble and carefully remove broken glass. Carefully open the assembly. Remove the electronics and remove them. Assemble the circuit on a 1 mm laminate sheet. Cut a round sheet of laminate (with scissors). Mark the positions of the six round holes on the sheet. Drill holes to match the LEDs flush in the six holes. Use a glue tip to hold the LED assembly in position. Close the assembly. Make sure the internal wiring does not touch each other. Now test carefully at 220V.
LED for car
Using LED strip, you can easily make homemade beautiful exterior lighting for your car. You need to use 4 LED strips of one meter each for a clear and bright glow. To ensure waterproofness and strength, the joints are carefully treated with hot-melt adhesive. Correct electrical connections are checked with a multimeter. The IGN relay is energized when the engine is running and turns off when the engine is turned off. To lower the car voltage, which can reach 14.8 V, a diode is included in the circuit to ensure the longevity of the LEDs.
DIY LED lamp 220V
The cylindrical LED lamp ensures a correct and uniform distribution of the generated illumination over all 360 degrees, so that the entire room is evenly illuminated.
The lamp is equipped with an interactive surge protection function, ensuring the device is perfectly protected from all AC surges.
40 LEDs are combined into one long chain of LEDs connected in series one after the other. For an input voltage of 220 V, you can connect about 90 LEDs in a row, for a voltage of 120 V - 45 LEDs.
The calculation is obtained by dividing the rectified voltage of 310 VDC (from 220 VAC) by the forward voltage of the LED. 310/3.3 = 93 units, and for 120V inputs - 150/3.3 = 45 units. If you reduce the number of LEDs below these numbers, there is a risk of overvoltage and failure of the assembled circuit.
Basic rules for assembling homemade LED lamps
To make a working lamp based on LEDs, you need to make sure that its circuit diagram is correct and that its elements are selected correctly:
- The diodes should be assembled strictly according to the given diagram. If connected incorrectly, an explosion may occur!
- The quality of soldering of components must be at a high level. Otherwise, the contacts may become disconnected and the lamp may break.
- To accurately calculate all parameters, including voltage drop, it is necessary to carry out preliminary measurements with precision instruments, a multimeter.
- To eliminate the effect of the bluish backlight (irritating to the eyes) of white diodes, it is necessary to install 3-4 red ones for every 10 LED elements.
Interesting! The above diagram for making a lamp with your own hands is quite simple, effective and economical. However, it is connected directly to a network with a voltage of 220V, which does not exclude electric shock, and therefore requires compliance with safety rules as with any other household electrical appliance.
What do you need to know about safety when fixing to the ceiling?
Here experts give several important recommendations:
LEDs get very hot
Therefore, special radiators are used for cooling. Contact and heat dissipation are improved thanks to special thermal paste at the junction between two important elements. When installing, it is important to ensure that there is free space around the radiators, not enclosed. Otherwise, the LEDs will fail prematurely.
It is also prohibited to install lamps near heating appliances.
Special regulators and light bulbs with a dimming function will be needed for those who are interested in adjusting the level of brightness and lighting. Availability of replacement lamps is an important factor when choosing suitable models.
Where can you hang an LED light?
Stretch and suspended ceiling structures – these are the products with which LED spotlights are most often used. Devices can be located in the center or on the sides. Here, each buyer chooses the option that best meets current operating conditions.
Main conclusions
You can make a lamp yourself using improvised means and inexpensive radio products. Also, this will require direct LED elements - lamps or strips. They can be both low-power and strong. When choosing a material for the body, you need to proceed from the parameters of their heat transfer. To connect such a device to a network without a power supply, you will need to make a driver with a quenching capacitor, having previously calculated it using the formula.
Using the proposed technology, it is possible to produce lamps of any shape and parameters for installation as the main or decorative source of lighting. You can mount them with your own hands on the ceiling and walls in lampshades, chandeliers and table lamps, as well as in any other specially made artistic design.
Previous
LEDs Formula and example of calculating a limiting resistor for an LED
Next
LEDsDetails about the characteristics of LED lamps
Life first
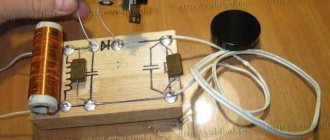
The history of this Gauss LED lamp began at a factory in a distant country, whose inhabitants call it the Middle State (or more simply, the navel of the earth). In general, there was an ordinary 12 W 220 volt lamp, which, after long journeys on ships and trucks, came to my house. For several years it illuminated the desktop, or one might even say “blessed the creative space,” until the next time it was turned on it finally went out.
You can, of course, throw it away and buy a new one, but considering the price is 10 times higher than incandescent lamps, it makes sense to try to revive it. Besides, it’s interesting to see what’s inside...
LED selection
Before you begin, you should decide what LEDs you will need. All lamps can be divided into two types:
- powerful;
- low-power.
The choice in this case will depend on the characteristics of the lamp being assembled, since one high-power LED is equal to fifteen low-power ones. That is, when choosing the latter there will be more work. Therefore, a novice master should choose a 1 W LED lamp. Parts of this type are also divided into two types:
- for surface installation;
- output.
It is better for a beginner to choose the second option.
Preparation for repair
Troubleshooting begins with dismantling the lighting fixture and studying its design.
This is followed by diagnosing the device for malfunctions: checking the electronic circuit for wiring defects, checking the functionality of the light bulbs, checking the base for burnt spots.