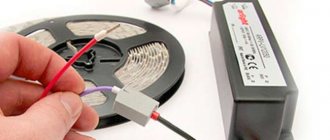
LED strips cannot simply be plugged into an outlet - they need power at a lower and constant voltage. This is precisely the difficulty for most people who dream of LED lighting, but cannot afford to purchase it. Ready-made power supplies for 12 Volt LED strips cost about 500 rubles or more. Moreover, the higher the power consumption, the more expensive these devices are. It turns out that it is much easier to make a power supply yourself - for this you do not need to have a wealth of knowledge in electronics, the circuitry is simple.
Tape supply voltage
The main parameter of LED strips is the supply voltage. Of course, it is different from what we have in our outlets. Based on voltage, tapes are divided into three groups:
- Power supply 12 V.
- Power supply 24 V.
- Power supply 36 V.
Moreover, the current must be constant! If you plug the tape into the network without a power supply, it will fail. The unit voltage must be appropriate - 12, 24, 36 Volts. With its help, the mains voltage is reduced to the operating value. The most popular models of LED strips operate at a voltage of 12 V. Therefore, you need to choose only those LED strip power supply circuits that can generate such voltage.
Purpose and principle of operation
The power supply or adapter is designed to connect equipment to power sources for its normal operation. The power supply for the LED strip serves as a converter of the input voltage to the required output voltage. In this case, we are talking about twelve volts.
The use of such a power supply requires certain competence. If the device is used for its intended purpose, it will not pose a threat to the health of the owner or the equipment.
Pulse adapters level out voltage surges using a special filter. Therefore, an electrical network with unstable voltage critically needs such a device. Voltage surges can not only negatively affect the operation of electrical equipment, but also damage it.
Device Features
The design of such devices is quite simple; they do not contain scarce elements. A standard power supply for 12 Volt LED strips consists of the following elements:
- Step-down transformer - its power should be approximately 25% greater than that of the LED strip. This is done so that there is a small reserve.
- Bridge made of semiconductor diodes. This is a simple design that includes two pairs of semiconductor diodes, which make it possible to obtain a constant voltage from an alternating voltage. But more often, ready-made diode assemblies are used, which have 4 terminals - an alternating current source is connected to two, and the rectified one is removed from the rest.
- A capacitor installed between the positive and negative terminals provides reliable current filtering. More precisely, with its help the entire variable component is cut off. Diodes convert the current, but after this a small proportion of the alternating component remains. An electrolytic capacitor allows you to get rid of it.
All these components are contained in a robust housing. Moreover, if necessary, a cooler (fan) is installed. You can even make sure that it is turned on constantly - this will ensure the normal operation of the homemade LED strip power supply. When making it yourself, it is recommended to pay attention to the safety of the device - it should not overheat.
Adviсe
- Any unit designed to power LED lamps must comply with lighting standards.
- It is not recommended to disassemble the case and try to make any changes. Re-soldering the adapter circuit is difficult and time-consuming. Even for an electronics engineer.
- Depending on the power of the power supply, several tapes can be connected to it. There is an RGB amplifier for this. It receives a signal from one tape and distributes it to others. At the same time, the synchronicity of color changes and brightness is not lost.
Attention! If you try to connect the tape directly to an outlet, it will start to smoke and, naturally, will not work after that
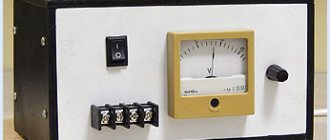
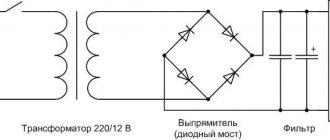
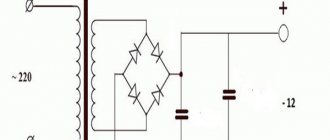
Transformer power supplies
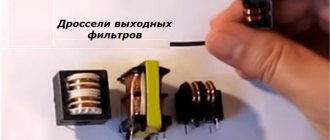
The simplest in design are transformer power supplies. The main element in it is a coil transformer. With its help, the voltage is reduced from 220 V to 12..15 V (or 24, 36 V). The voltage generated on the secondary winding is supplied to the input of a bridge rectifier using semiconductor diodes. Then filtering occurs using a chain, usually consisting of an electrolytic capacitor, resistor, and inductor. Sometimes zener diodes or microassemblies are installed in order to fix the output voltage at the same level.
The advantage of transformer power supplies is that they operate even without connecting a load (the so-called idle mode). In addition, there is galvanic isolation from a 220 V network. But, despite the simplicity of the design, there are a number of disadvantages: very low efficiency, large dimensions, high sensitivity to voltage changes. And the most important inconvenience is the large mass. It is because of these shortcomings that many people use transformerless power supplies for LED strips.
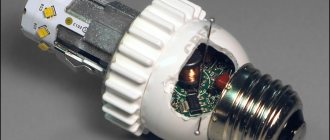
Fluorescent lamp ballast
Each energy-saving light bulb contains a small circuit that prevents flickering when turned on, and also helps to gradually warm up the device's coils. Its name is electronic ballast. It is with the help of it that gas can emit a glow (frequency 30−100 kHz, and sometimes 105 kHz).
A significant advantage of such devices is the absence of any noise during operation, as well as the absence of an electromagnetic field, which negatively affects the human body.
An electronic choke plays an important role in the ballast circuit of an energy-saving lamp. It is he who determines whether the device will light up immediately with full force or warm up gradually over several minutes. It is worth noting that the manufacturer never indicates the heating time on the packaging. This can only be checked during operation of the device.
Those ballast circuits that perform the function of voltage conversion (and most of them) are assembled on semiconductor transistors. In expensive devices, the circuit is more complex than in cheap light bulbs.
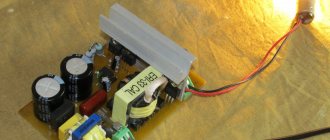
From a burnt-out energy-saving lamp you can make blanks for a future switching power supply. You can also take a working device for this.
The compact fluorescent light bulb (CFL) contains the following elements:
- Bipolar transistors with protective diodes. As a rule, they can withstand voltages of 700 V and currents of up to 4 A.
- Pulse current transformer.
- Electronic throttle.
- Capacitor (10/50 V, as well as 18 V).
- Bidirectional trigger uncontrolled diode (dinistor).
- Very rarely the device contains a unipolar transistor.
When making a power supply from an energy-saving lamp with your own hands using expensive housekeepers, it is enough to supplement the source with some details. You can also use a driver for LEDs, which are often installed in flashlights, as the basis for the future block.
Switching power supplies
There is no need to think that pulse-type designs do not have a transformer. It exists, but its dimensions and weight are much smaller than those of the structures discussed above. The device operates at high frequencies (several tens of thousands of Hertz versus 50 in a household network). But the disadvantages remain the same - high sensitivity to voltage changes. Moreover, when operating in idle mode, the device may fail. Such power supplies for 12 Volt LED strips can be used, but it is not recommended to turn them on without load.
Purpose and principle of operation
The power supply or adapter is designed to connect equipment to power sources for its normal operation. The power supply for the LED strip serves as a converter of the input voltage to the required output voltage. In this case, we are talking about twelve volts.
The use of such a power supply requires certain competence. If the device is used for its intended purpose, it will not pose a threat to the health of the owner or the equipment.
Pulse adapters level out voltage surges using a special filter. Therefore, an electrical network with unstable voltage critically needs such a device. Voltage surges can not only negatively affect the operation of electrical equipment, but also damage it.
How to calculate power
When making your own power supply, it is necessary to take into account the power consumption of the LED strip. Exact data can be found in the specification for a specific model. Here are the most common types of data:
- SMD-3528 accommodating 60 LEDs per 1 meter, total power 4.8 W.
- SMD-3528 with 120 LEDs per meter has a power of 7.2 W, respectively.
- SMD-3528 with 240 LEDs per meter has a power of 16 W.
- SMD-5050 with 30 elements – 7.2 W.
- SMD-5050 with 60 elements – 14 W.
- SMD-5050 with 120 elements – 25 W.
If you are selecting a power supply (ready-made) for an LED strip or assembling elements for self-production, you need to take into account all the parameters. The main ones are:
- Power.
- Operating voltage.
In order to calculate the total power of the tape, you need to know how much one linear meter consumes. This value is then multiplied by the length (in meters). Next, you need to add another 25% of the obtained value and select a power supply (or transformer) whose power is closest to the calculated one.
Types and types
Before connecting the LED strip, you should understand their types and markings. This way you won’t make a mistake when choosing a power supply and will accurately calculate the required glow intensity, tape length and other parameters.
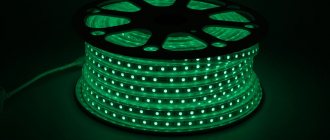
The most popular in interior lighting are strips made of single-color—monochrome—crystals. The constant change of colors is too stressful and does not allow you to relax. This is illumination, not lighting
Therefore, universal tapes are used to create advertising, illuminate cars - where it is necessary to attract attention. When decorating interiors, SMD tapes are mainly used
Degree of protection
Since the scope of application is wide, the degree of protection varies. For dry rooms, regular open ones are available - without a protective coating. There are waterproof ones - they can be used in damp areas - in bathrooms, for example. They are filled with a layer of varnish. There is another option - moisture resistant. They are sealed in a sealed housing and can be mounted directly in the water - in an aquarium, pond or pool. They can also be used for outdoor lighting.
Sealed tapes for illuminating aquariums, swimming pools or decorative ponds
For exterior car styling, LED strips placed in a transparent polymer tube are most often used. It protects not only from moisture, but also from mechanical damage, but their cost is also higher.
LED sizes, brightness and density
Let's figure out the sizes. If you take several strips, you can see that they are made of LEDs of different sizes. In addition, they are sometimes located tightly next to each other, in some - at a fairly decent distance, and there are also strips with LEDs in two lines.
Most popular LED sizes
It is not difficult to distinguish the sizes of elements externally, but how can you tell by the markings? Dimensions are displayed in numbers that appear after the letters indicating the type of LED. For example, LED-R-SMD3528 (red) and LED-RGB3528 (universal) are assembled from elements measuring 3.5 * 2.8 mm, LED-G-SMD5050 (green) and LED-RGB5050 (universal) - 5.0 * 5.0 mm.
These are the two most common types, although there are larger ones - 56 * 30 mm, and smaller ones - 20 * 20 mm.
The larger the crystal size, the greater the light intensity they produce. For monochrome crystals the indicators are as follows:
- size 3.2 * 2.8 mm produces a luminous flux from 0.6 to 2.2 lm;
- size 5.0*5.0 mm - from 2 to 8 lm.
Universal LEDs of the same size have lower intensity: three small crystals of different colors are sealed in one housing, and therefore the RGB glow intensity is lower:
- 3.2*2.8 mm produces 0.3 to 1.6 lm;
- size 5.0*5.0 mm - from 0.6 to 2.5 lm.
All values are given for crystals without protective coating. Any of them reduces the intensity of the glow and this must be taken into account when calculating the brightness of the glow.
Example of power calculation
For example, you have a tape available:
- There are 40 LEDs per meter.
- Total length – 5 meters.
- The supply voltage is standard – 12 Volts.
With a nominal power value of one meter of 4.8 W, the total value can be calculated. It will be equal to 24 W. It is recommended to add another 6 W to this value (this is 25%). This means that the power supply must have a power of 30 W.
So which is better?
In most cases, voltage stabilizers are used. After all, LED lighting is mainly used where the temperature range is not very high. These are living and working premises, apartments, private houses and so on. Another argument in favor of stabilizers is that lighting fixtures are always connected in parallel. Even LED strips, although they contain groups of series-connected LEDs. These groups are also connected in parallel when increasing the length of the tape. And, as you know, the voltage drop with a parallel connection remains unchanged. Current consumption increases.
It is advisable to use a driver (current stabilizer) in the case of single LED lamps, series-connected devices, and with significant temperature fluctuations (street lighting).
DIY making
So, you have decided to assemble your own power supply for the LED strip. The size of the power supply depends on the power of the transformer (if a circuit using it is selected). For a simple device, you will need a transformer with a primary winding designed for 220 V. The output current should be about 1 Ampere, the voltage should be 12 Volts.
You will also need several elements:
- Diode assembly. You can use 4 semiconductor diodes connected in a bridge circuit.
- An electrolytic capacitor with an operating voltage of at least 25 V. You can use elements with an operating voltage of 50 V. The capacitance must be at least 470 μF.
- Zener diode or microassembly KR142EN. This is a voltage stabilizer, but it must be installed on the radiator.
The need to use switches
Even if the LED strip is supposed to be constantly lit, a power switch after the voltage source is necessary. In case of repair or maintenance work (cleaning from dirt, etc.), it is convenient to relieve the voltage with one movement of the switching element.
Circuit breaker and power switch.
There must be a circuit breaker on the 220 V side (regardless of the connection diagram). If the power supply or rectifier is plugged into a household outlet, then it is most likely protected by a circuit breaker. If a permanent connection is used, then it is necessary to provide for the installation of a circuit breaker. It serves as both a switching element and a means of protection in an emergency situation. And it will never be superfluous to install an RCD, especially in the absence of galvanic isolation in the form of a transformer.
Power supply assembly process
You have an LED strip in stock, the power supply has been calculated and the elements have been selected, now you can begin assembly. Both printed and wall-mounted installations are allowed.
Of course, the whole structure will look much more attractive on a printed circuit board. The manufacturing process looks like this:
- The diodes are connected to each other using a bridge circuit. Be sure to observe polarity; all diodes have an anode (positive terminal) on the strip side of the body.
- Connect the secondary winding of the transformer to the diode bridge.
- An electrolytic capacitor must be connected to the bridge output. When connecting, you must observe polarity! Otherwise the capacitor may explode!
- A choke is connected to the positive terminal gap.
- Next, a zener diode is switched between plus and minus. After it, it is also advisable to install another capacitor.
Finally, the entire device is assembled into one housing, the elements are securely fastened and two outlets are made. The red wire should indicate the positive terminal, black or blue the negative terminal. At this point, the production of the power supply for 12 Volt LED strips is completed, you can use the device.
Adding a capacitor
If you increase the supply voltage to the LEDs in order to make the light brighter, the LEDs will begin to heat up, which significantly reduces their durability. In order to avoid this, you need to connect a 10 W recessed or table lamp with an additional capacitor. Simply connect one side of the base to the negative output of the bridge rectifier and the positive side, through an additional capacitor, to the positive output of the rectifier. You can use 40 LEDs instead of the suggested 60, thereby increasing the overall brightness of the lamp.
Video: how to make an LED lamp with your own hands
If desired, a similar lamp can be made using a powerful LED, but then you will need capacitors of a different value.
As you can see, assembling or repairing a conventional DIY LED lamp is not particularly difficult. And it won't take much time and effort. This lamp is also suitable as a summer option, for example for a greenhouse; its light is absolutely harmless to plants.
| JLCPCB is the largest PCB prototype factory in China. For more than 600,000 customers worldwide, we place over 15,000 online orders for prototypes and small batches of printed circuit boards every day! |
Anything in here will be replaced on browsers that support the canvas element