A very convenient and useful thing in the household is a spotlight with LED lamps. It can be very compact and at the same time emit a good bright light that can easily illuminate the entire area of your yard and will help you easily move around the yard in the dark. In this case, the LED spotlight can be either stationary and installed at one point, or portable. But due to the nature of its design, the system may malfunction and work a little incorrectly.
One of the most common problems that appear with LED floodlights is the blinking of the bulb when turned on or even off. In this article we will help you solve this problem.
Operating principle of LED spotlight
Floodlight with LEDs – an LED device for illuminating an area, a powerful light source. Inside its plastic or iron body there is a lamp that sends light forward. There are reflectors around that direct the lighting to the desired area. They are able to concentrate light in a special way, as intended by the design, and as a result it turns out bright and saturated.
A diode spotlight also consists of a semiconductor and two electrodes - an anode and a cathode. After applying voltage, the semiconductor heats up, which emits light. For high-quality operation of the system, the incoming current passes through a rectifier and driver, which stabilize the electrical wave and regulate its magnitude. The circuit contains a power supply that requires 12 volts for operation.
Restoring the operation of the W illuminator with your own hands
Very often, the cause of failure of the spotlight can be excessive heating of the matrix.
Repair consists of the following sequence of actions:
- the matrix must be removed by unscrewing the screws and unsoldering the conductive elements;
- remove a layer of old dried thermal paste;
- wash the contact pads on the body and matrix with alcohol;
- apply a layer of thermal paste;
- tighten the screws and solder the conductive parts in place.
Reference! You should treat the matrix with care. You cannot change its “geometry”. Only “original” screws are used.
If there are already 2-3 burnt-out diodes, it is advisable to replace them without waiting for complete burnout. In the event of a partial burnout, the entire device will not be able to operate normally. In the future, both the driver and the voltage converter will fail.
Signs of blinking
When buying the cheapest spotlight, you cannot be sure of its uninterrupted operation. Such products usually have poor soldering of parts, all elements are of poor quality, and current parameters are not sufficiently adjusted.
Imported LED devices are sometimes made without taking into account the specifics of power fluctuations, which can also cause breakdowns. The most common complaint from users is the blinking of the lamp; this often happens not only when it is on, but also when it is off. There can be a lot of reasons.
Spotlight flashes due to motion sensor
Why does lighting equipment that has a motion sensor blink? First of all, it is worth checking the operation of the sensor itself; often the reason is hidden in it. If the luminous flux flickers when supplied, the main reasons are as follows:
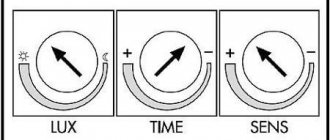
- Violation of sensor settings. Flashing is often observed due to an incorrectly set timer, which helps maintain the system in working order during the specified period. You should reconfigure the timer and then test the device.
- Faulty contacts, “floating” contact. This is observed when the sensor operates normally, but the signal does not pass through to the spotlight itself. You should check the correctness of all connections in the system, tighten wires and contacts, and evaluate the reliability of terminals and screws.
- Low voltage. When the sensor is constantly under insufficient voltage, it passes to the spotlight, but cannot turn on the device fully. This does not cause full inclusion, but flickering.
- Sensor failure or initial malfunction. If the product is still under warranty, you will have to return it to the store. Otherwise, you should take the motion sensor to a workshop; you cannot repair it yourself.
The reason for blinking is weather conditions
If it is frosty outside, the LED spotlight may light up in an abnormal mode - blink. This often happens even with high-quality products from popular manufacturers. The reason is “frostbite” of any component of the lamp start-up, that is, icing of the elements. Some models begin to blink already at -10 degrees, although the technical parameters indicate the possibility of working at -50...+50 degrees.
Typically, this temperature regime is noted for other elements, but not for the LED itself. The trigger mechanism in the LED spotlight cannot cope with low temperatures, the controller or capacitor freezes. The issue can be resolved this way: periodically bring the spotlight into the house during the day, and then put it in its proper place at night.
The spotlight flashes when turned on
When the device starts to blink when turned on, the reason is most often due to damage to the starting LED capacitor. After replacing it, the system starts working properly. Flickering can also be associated with poor contact or broken wires. In such a situation, check the cables and eliminate the fault.
The spotlight flashes when turned off
This happens when a backlit mechanism is used to turn it on and off. Due to the backlight, a small amount of current flows to the LED spotlight. This causes a flickering effect. If you want to eliminate this phenomenon, you will have to connect the backlight directly or place an incandescent lamp in the path of the current. The latter will draw electricity onto itself.
Spotlight mode
Expensive floodlight models have various additional functions. One of the popular ones is the glow mode, and blinking can be the result of its accidental activation. You should completely turn off the device, then turn it on, assessing whether this phenomenon has disappeared or not.
Another reason is the design feature of the spotlight, where one button activates several functions. This usually happens when the manufacturer decides to save on materials. When pressed twice, the strobe mode is activated - repeating fast light pulses.
Lighting in the switch
To design lighting in a cottage or private house, backlit switches are often purchased, which are designed to ensure the operation of the spotlight. It is the switch that provokes the blinking effect of the spotlight. The main reason is this: the LED does not completely break the circuit, and the insulated wires act as both a conductor, a capacitor, and an AC rectifier. Thus, a low-power LED is not able to ensure efficient operation of the circuit. It is enough to start the lamp, but it is not enough for long-term operation.
It's easy to rectify the situation. You need to disconnect the switch LED from the power supply. You can also replace the backlit switch with a regular one, which in the off position will completely break the electrical circuit. Another option is to introduce a 0.1-0.5 µF capacitor or a 50 kOhm resistor with a power of 2 W into the circuit. They are located in the switch socket.
Pitfalls of LED systems
High lighting performance with minimal power consumption make LED spotlights one of the best among analogues. However, you need to remember an important point, and it should be the most important criterion when choosing - high-quality systems cannot be cheap!
Many, in an attempt to save money, purchase inexpensive options on Chinese sites. However, soon such a spotlight begins to work incorrectly. It flashes spontaneously, even when turned off; models equipped with a sensor stop responding to movements (or vice versa, do not turn off). What is the reason? As already mentioned, in low-cost systems the manufacturer saves on everything in order to achieve low costs. Too flimsy thin conductors are used, soldering of circuit elements is done poorly (often even manually), the cheapest starting devices and batteries are used. Therefore, you should not be surprised that problems begin after just six months of operation.
The most common complaint from users of modern energy-saving systems is that the lamp blinks even when turned off. In most cases, the cause of spontaneous flickering is the excess of limit currents.
Moreover, the manufacturers themselves deliberately install weak current limiters, and when there are fluctuations in our power grids, they very quickly become unusable. As a result, such an LED spotlight shines very brightly at first, but soon it begins to get very hot due to constant overloads.
Reasons for flashing spotlights
To repair the device, you need to accurately determine the cause of the flickering light. It may be related to wiring, malfunction of semiconductors and other components of the device.
Wiring irregularities
Often the cause of flickering is a simple device connection error. When connecting wires, the master may confuse phase and zero. In some situations, the equipment does not work at all, in other cases it begins to blink. Solving the problem is not difficult - you just need to swap the wires.
Infrequent flickering with unequal frequency means a violation of contacts with the cable connection. A high-power LED floodlight is very different from a regular lamp. If there is no tight contact at the junction of the wires, the resistance begins to increase. The wire heats up, and the resulting scale impairs the contact.
From the area of connection to the network to the point where electricity passes to the matrix power driver, intermediate currents appear. This can happen in the junction box, motion sensor, connectors on the power supply, or switch. You will have to check all the elements until the problem is fixed. Next, the wire is stripped and the contact density is restored by soldering.
Presence of semiconductor devices in the circuit
When a switch with a diode backlight or an infrared motion sensor is installed in front of the lamp, light pulsates at a high frequency (up to 25 times/second). This is caused by a change in current strength in the circuit by the passage of a half-wave of alternating voltage. You can fix the problem by turning off the switch backlight LED. Another repair option would be to replace the motion sensor from infrared to ultrasonic, inductive.
Irregularities in the floodlight power circuit
Failures in the device’s power supply system occur frequently, mainly in cheap models. To correct such problems, you need to know the basics of radio engineering or take the device to a repair shop.
Rectifier (diode) bridge
The cheapest LED floodlights often use a single-bridge AC rectifier. It is very different from a conventional two-bridge circuit in quality - it gives a high voltage ripple amplitude. Even installing a smoothing capacitor does not eliminate the ripple, which causes the light to flicker. The solution is to buy high-quality devices with a “classic” two-bridge circuit.
Smoothing capacitor
Installing a transformer will reduce the voltage amplitude to 12 volts, and the polarity of the negative half-wave will change. Installing a smoothing capacitor will allow you to increase the ripple amplitude to 10-15%, which will not be perceived by the human eye. If the capacity of the smoothing capacitor is insufficient, the amplitude will remain above 15% and will appear as a blinking light.
LED installation errors
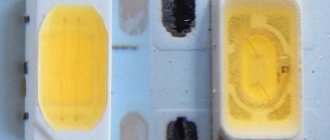
With a low-quality assembly of the matrix, which is made up of many LED elements, the contact pad often turns out to be poorly soldered. If one of the contacts is broken, the connection of the group of diodes becomes unstable. This provokes blinking. The solution is to re-solder the diodes or submit the device for repair.
Current limiting capacitor
When the spotlight turns on normally, but operates unevenly and blinks, there is a possibility of a breakdown of the current-limiting capacitor. Unscrupulous manufacturers often want to achieve high brightness not through the power of the device, but by connecting a current-limiting capacitor that is not suitable for the driver. You should replace the part with one that has an operating voltage of 400 volts, and the flickering will disappear.
power unit
Sometimes lighting equipment works well after purchase, but after a few months it begins to flicker. This usually happens when there is a problem with the power supply. The service life of the blocks is up to a year. Towards its end, various light defects begin to appear, after which the element breaks completely. You can buy a suitable power supply (take your old one with you, the store will select one suitable according to the parameters). Also, in many cases, a block from a scanner or printer is suitable. You need to check the technical specifications yourself and replace the part.
Driver
Low-power spotlights are often equipped not with a full-fledged power supply, but with an LED driver. The equipment cannot be powered directly from a 220-volt network; it needs alternating current, so you cannot do without a driver. The latter adjusts the output current, after which a voltage of 12 volts is supplied to the LED. When the driver fails, a flickering effect is noticeable. If it is unevenly heated or cooled, the light bulb takes a long time to start when turned on; at first, only individual diodes light up. The blinking is present even after turning off.
To replace the driver, you need to disassemble the spotlight, find out the markings and characteristics of the element. You can buy it at an electronics store. Experienced specialists solder such drivers themselves.
Matrix burnout
Such a breakdown is considered serious, since the LED itself fails. The burnt matrix must be uninstalled by first unscrewing the 4 fastening screws and unsoldering the capacitors. Then you should buy new diodes, apply a layer of thermal paste on them, solder the conductive parts, and screw the matrix. Its shape remains original, as do the fastening screws. If the latter are made in the form of cones, they are likely to damage the matrix.
conclusions
To summarize, if you have problems with spontaneous lighting of LED lamps, we advise you to check the following parameters: eliminate the possibility of incorrect phase connections, replace the switches with a model without built-in LED backlight (or turn off the power to the light bulb built into them), check the lamp for possible incompatibility with the motion sensor used. We also strongly recommend not to save money - the lower the cost of the spotlight, the less it will work - this has been tested several times. Due to high power and installation in unfavorable environmental conditions, such lighting systems experience constant overload. And if initially the safety factor of the lamp is low (due to low-quality components), then it is reasonable not to expect long-term uninterrupted operation from it. And here the rule comes into play - the stingy pays twice!
When can a device be repaired - expediency
The price of a quality spotlight is usually high. An experienced technician can disassemble almost any device, even a sealed one, which means it can be repaired. But we must take into account the cost of spare parts and the complexity of repairs.
The power supply most often fails, because only the LED crystals themselves are durable in the device. Finding the perfect block is not easy. Here it is important to take into account all parameters for power and voltage, otherwise there will be consequences for the remaining elements of the device. If the power supply costs more than the spotlight itself, repairs are not advisable. In other cases, you can try to repair the spotlight, having previously calculated the costs.
In order for lighting equipment to work properly for many years, it is better not to use it for too long. It’s not worth leaving it on all night, which wastes a lot of potential. During installation, you must carefully check all connections for bad contacts - this will cause voltage surges. These rules will help make the work of the spotlight long and uninterrupted.
If it stops shining completely
If, after turning on, the LED spotlight does not light up at all, the reason may lie either in a broken contact or in the failure of the driver components. If you have a measuring device (voltmeter), it is enough to check the presence of voltage at the driver power terminals. If voltage is supplied, we look for a breakdown in the power circuit; if it does not arrive, we have a break in the connection circuit.
How to check the power supply circuit of a spotlight
Visual inspection
When examining the board, you can find a swollen capacitor, a blackened burnt-out resistor, and a burnt-out contact track on the back of the board.
Checking with a voltmeter
- Measure the voltage at the connection terminals (at the input in AC mode, at the output - DC);
- Check the voltage at the output of each diode. The failure of one of them reduces the output voltage by 2 times, which is not enough for the spotlight to operate.
If you are unable to find the cause of the malfunction on your own, do not rush to throw away the product. The current stabilizer chip may need to be replaced. Even a visit to a radio workshop and the purchase of a new part will cost much less than a new product.
Please rate the article. We tried our best:)
Did you like the article? Tell us about her! You will help us a lot :)
Contact oxidation on connectors
Not everyone likes and knows how to solder tape, so they connect it in another, more accessible way - with connectors.
However, they have one significant drawback - oxidation of contacts. Most often this happens in rooms where the walls have recently been painted, whitewashed or screeded.
That is, where there was an excess of moisture. The current flowing through the connector often exceeds 10A:
for an area of 5m and a power of 75W - 6.5A
for tapes power 30W per meter – 12.5A
If the contact is oxidized, then at high current it will heat up and burn out until it disappears completely.
The same can happen due to insufficient contact patches between the contact pads, which is often observed in such connectors.
Therefore, it is recommended to carefully select connectors. Which types of them are the most common and how to choose the best one can be found in the article “3 types of connectors for connecting an LED strip.”
The above defects apply primarily to low-voltage tapes 12-24V. And there are also 220 volt tapes.
In them, the LEDs are connected sequentially over longer areas. For example, in 1 meter you will have 60 diodes.
And as soon as one of them fails or blinks, it will immediately affect all the others, along the entire length.
With a 12V backlight you are more or less freed from this. They consist of short modules of 3-6 diodes. Flickering or fading of one of them will lead to the same effect only on this short module.
This can be easily detected and eliminated either by resoldering the faulty diode or by replacing one module or cluster.
Sometimes the tape begins to blink only an hour or two after it is started and power is applied. This may also be due to a faulty diode.
It heats up over time and breaks contact. The tape goes out, cools down, the LED starts up again, and the glow resumes. And so on in a new circle.
If the backlight does not start at all after a long period of time or turns on “every once”, do not rush to scold your Chinese comrades. Perhaps this is due to a trivial reason - the batteries in the remote control are dead.
Therefore, this thing needs to be checked first. Most often, remote controls are used to control RGB controllers.
And if the multi-colored ribbon suddenly starts switching and changing colors by itself, check not the remote control, but the controller itself.
A working remote control should not make any independent switches. To make sure it has nothing to do with it, simply remove the batteries.
Another way to identify a faulty RGB backlight controller is to exclude it from the circuit and supply power to the strip separately for each color.
If individually all colors work properly, but together nothing lights up, or blinks once and immediately goes out, then the reason is damage to the RGB controller. Change it exactly.
Once you have figured out the main reasons, it is worth understanding how best to identify and diagnose them. What will you need for this and where to start?
All LED lighting can be divided into separate functional parts:
first comes the power supply
next, RGB color control unit (controller)
RGB amplifiers, if any
the LED strip itself
connectors or connectors
The main device required for diagnostics is a multimeter for measuring direct and alternating voltage.
First of all, measure the alternating voltage supplied to the power supply. Suddenly there is no necessary 220V (“+” “-” 10%).
Next, check the output. There should already be 12V or 24V (“+”/”-” 10%), depending on what source you are using. If the output voltage is lower or higher, do not forget that it can be slightly adjusted using a resistor.
Find the ADJ connector and tighten the screw with a screwdriver. When everything is fine with this, you move further along the chain.
Check whether power is supplied to the input of the RGB controller or dimmer. It should be the same as at the output of the power supply.
Gradually reach the tape itself. Apply the measuring probes to the contact pads and take measurements. They can have voltage from 7 to 12 volts. If one area glows dimly, and not the entire tape, then measurements should be taken on it.
If there is an abnormal decrease in voltage or its complete absence, it is precisely the faulty area or backlight element that is responsible for the performance of the tape that is detected.
If all measurements show that the voltage at the contacts is normal or within its limits, you need to move on to searching for faulty LEDs.
Does low voltage in the network affect the flickering of LEDs?
Do you know what happens to a battery that runs out? She won't be able to work for a long time, and the same principle applies here. The power driver, regardless of its type, is created to operate at a certain operating voltage, and it has a certain reserve. Obviously, budget models have a limited supply or it is underestimated, while expensive ones will have more. This point cannot be ignored. Low-quality power supply, when amplitude drops occur, often occurs in rural areas where overhead power lines are used. But it is absolutely possible to solve this problem. In a separate article, I described in detail how you can increase the low voltage of the network to 220 volts in a private house. For an LED lamp to work properly, it needs high-quality and uninterrupted power supply. Therefore, simultaneously with checking its value, you can begin to search for the place where the malfunction occurred and begin repairs. The level should be in the range of 207-253 volts. It should be noted that unstable operation of drivers may begin already at lower values if their quality is low.
Design
To understand the reasons for blinking and ways to correct this shortcoming, let's consider the main design features of an LED lamp.
The functions of the emitting element of this source are performed by a set of semiconductor crystals, the pn junction of which, when direct current flows, begins to generate light in the visible wavelength range.
The LED is a point source, therefore, to obtain uniform radiation, individual crystals are connected into series-parallel chains, placed on a supporting base according to a special scheme.
The spectral composition of the emitted light can be adjusted by various additives to the crystal material, and the brightness of the glow can be changed over a wide range by changing the value of the forward current.
A developed metal radiator is used to remove heat. All structural elements are mounted on a plastic supporting base equipped with a standard base and covered with a protective glass bulb.
An alternating voltage is supplied to the lamp from the network, which, according to GOST, can vary within a fairly wide range.
To obtain the direct current necessary for the operation of semiconductor emitters, a so-called driver must be introduced into the lamp.
It is understood as a device that provides rectification of alternating current and its stabilization when the mains voltage changes within the limits of those standard tolerances allowed by network standards.
For the working elements of the lamp, the driver performs the functions of a multifunctional current source, the older models of which provide:
- galvanic isolation of emitting crystals from a 220-volt network, which is a necessary condition for their long service life;
- obtaining direct current from alternating current;
- stabilization of the current through the crystals when the mains voltage changes;
- suppression of various ripples and impulse noise induced in the network.