Modern chandeliers are not just lighting fixtures, but important decorative elements of the interior, so each of us treats their choice with special trepidation. But what to do if your favorite chandelier for some reason fails: did the kids try hard or did the old wiring fail? Of course, seek help from a specialist who will carry out high-quality and professional chandelier repairs right at your home. We specialize in this area, so we have an excellent understanding of even the most complex structures, and we also have all the necessary equipment to do our job conscientiously.
Chandelier repair cost
Depending on the complexity of the work and the range of tasks, the cost of repairing chandeliers can be very diverse. To find out the approximate cost of your specific order, call the phone number listed on the website.
| price | ||
| PC. | Disassembly and assembly of the lighting fixture | 400 |
| PC | Replacing lamps | 150 |
| PC. | Replacing lampshades | 150 |
| PC. | Cleaning the horn from burnt wiring | 350 |
| PC. | Replacing a button, switch (sconce, floor lamp) | 350 |
| PC. | Replacing the light controller (Dimmer) | 450 |
| PC. | Replacing wiring in a fluorescent lamp | 550 |
| PC. | Replacing the starter socket | 250 |
| PC. | Replacing a round chandelier transformer | 1420 |
| PC. | Replacing a chandelier transformer, lamp | 500 |
| PC. | Diagnostics of the lighting device | 800 |
| PC. | Replacing wiring in a floor lamp | 450 |
| PC. | Replacing wiring in a chandelier, sconce | 300 |
| PC. | Replacing a non-standard cartridge | 300 |
| PC. | Replacing a conventional cartridge | 200 |
| PC. | Replacing the throttle | 500 |
| PC. | Replacing the wiring in the horn | 300 |
Types of breakdowns and their causes
There are several possible malfunctions of LED devices, which is due to their similar, but rather complex design. The most common breakdowns among others are accompanied by the following points:
- complete absence of glow;
- periodic lack of lighting;
- short-term flickering;
- turning off the lights at random times;
- damage to the light bulb or LED.
There are even more reasons for breakdowns. The most common of them are the following:
- Violation of the rules and recommendations for the operation of LED devices. When buying a new lamp, be sure to study the operating conditions specified in the technical manual. If you ignore any rule, the likelihood of breakdowns increases several times.
- Equipment overheating. The LEDs themselves practically do not heat up during operation, but if the temperature exceeds the stated 50–60 degrees, then the filament, holder, or detachment of contacts on the electronic board may occur. Overheating sometimes occurs due to the fact that a lamp not intended for this purpose is installed inside the stretch ceiling. This prevents its natural cooling.
- LED diode burnout - complete or partial. This can be caused by high mains voltage surges or capacitor burnout.
Important! The last failure is relevant for cheap devices that use low-quality boards.
If you go deeper, you can identify several other, rarer, but no less interesting reasons why an LED lamp may not work:
- technical violations when connecting to the power supply;
- short circuit;
- incorrect installation of equipment;
- errors when constructing elements in the connection diagram;
- low quality product - when trying to save money, do not forget that you are buying a “pig in a poke.”
In such devices, the contacts may initially be poorly soldered, or a cheap capacitor may be used instead of a driver. This is a so-called manufacturing defect.
LED ceiling lights with a remote control often fail precisely because of manufacturing defects. Thus, to carry out repairs, it is important to correctly determine not only the breakdown, but also the cause of its occurrence.
Checking the tape for functionality
When you buy a strip or repair a lighting system with such a solution, there is a need to check it. To do this, you must have at least a crown battery; you can use it to check small areas. But this simplest option has a big drawback - you will not see the full brightness of the LEDs.
To turn them on fully, you need a 12-volt power source. For small pieces, a compact A23 battery is perfect; they are used in some remote controls and radio doorbells.
For long areas it is necessary to use large batteries. For example, from a computer's uninterruptible power supply, they have 12 volts at their terminals; a car battery will cope with this task perfectly.
And, of course, no one canceled the option of using a known-good power supply.
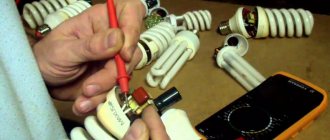
To test each LED individually, you need to use a multimeter or a 3-volt battery. How to check an LED using a multimeter is described in this video.
An LED lamp can be repaired: how to do it?
An LED lamp is a repairable device, and few people know about it. To repair such a lamp, you just need to have a regular soldering iron. The reason for the shutdown is most often that one of the LEDs burns out. It opens the circuit, and all the others do not light up. So for repair it is enough to exclude it from the circuit.
PHOTO: YouTube.com It is not difficult to disassemble the lamp: you just need to carefully use a mounting knife or a regular knife at the junction of the transparent and opaque parts of the bulb, after which these parts can be separated
PHOTO: YouTube.com Inside you will see several small LEDs connected in a circuit. One of them is burned out, we need to find it
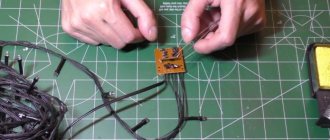
PHOTO: YouTube.com You can identify a burnt-out LED visually - there will be a speck or dot on it. Or you can use a simple homemade tester
PHOTO: YouTube.com It’s not difficult to assemble it, using a power supply for a phone or laptop as a basis.
PHOTO: YouTube.com A burnt-out LED just needs to be removed and the contact closed by soldering
PHOTO: YouTube.comAfter this procedure, the circuit will be closed, and the remaining LEDs will return to work again. But practice shows that they, too, will soon fail - alternately, one after another
Replacing the LED strip in a lamp with your own hands
LED strips
It is not difficult to replace an LED strip at home with your own hands. It is important to know how it works, study the instructions and how it works. You are also required to have minimal electrical knowledge and skills. The best way to help with this is educational videos.
Typically, you can replace the tape by following these steps:
- Remove and disassemble the lamp.
- Inspect the structure from the inside for defects.
- Replace damaged elements or solder broken contacts.
Additionally, to repair and repair the device, you may need to tighten all the screws and repack the terminal blocks.
After repair, you need to check the operation of the device and its contacts. It is important to avoid overloading the capacitor and not to repair equipment if there are more than 10 LEDs.
How to unsolder an LED from the pad
To unsolder the LED from the pad, you need to take thermal tweezers, a razor blade and a soldering station. First you need to attach the LED strip to the table. Double-sided tape is suitable for this. Next follow these steps:
- Heat up the soldering iron and prepare half of the blade.
- Start melting the tin on any LED lead by sliding the blade between the lead and the print pad.
- Carefully clear the soldering area for the heat-sinking substrate, without touching the body with the soldering iron tip.
- Cut the tin and check the result by ringing all the tracks using a tester.
It is important to prevent damage to the track due to the loss of the topology of the pattern and possible damage to the entire product. You can also cut without heating the soldering iron.
Driver circuits for LEDs from a 220V network
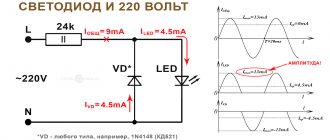
The simplest diagram for connecting an LED strip to a 220 Volt network includes the values of Itot, I led and I vd. The resistance with the power of the resistor depends on the LED current. It is calculated according to Ohm's law. The dissipation power is calculated from the same formula.
In the second circuit, the current through the resistor includes the values L, VD, LED, N. The current flows two times less, which means four times less power is released. However, for this circuit you will need a diode with reverse voltage, for example, 1N4007 (KD258).
LED lamp driver repair
If the driver contains small SMD components, for repair you need to take a soldering iron and copper wire, and then identify the burnt-out diode and unsolder it according to the electrical circuit. If there is no damage, you should unsolder all the elements and test them with a tester. Having eliminated the unusable element, install a new one.
Typical malfunctions of LED lamps include problems with device components, overvoltage, overheating, improper operation and installation. It's easy to repair. The procedure is to perform a visual inspection, find the cause and correct it using appropriate instructions.
We search for the problem
Troubleshooting a ceiling light begins with determining the cause of its occurrence. To calculate the section of the chain where the damage occurred, as a rule, three elements are evaluated before moving on to the chandelier itself:
- switch;
- light bulbs;
- electrical wiring.
You can start testing all parts in turn or be guided by the manifestation of any characteristic signs for each of them.
Switch
The first accessible element involved in powering the chandelier is the switch. Most often, key switch models fail in everyday life, this is due to the moving contacts in them, which constantly collide with each other, and creates additional vibration.
To check the switch:
- remove the keys and false panel;
- check the input voltage with an indicator screwdriver or tester;
- Close the switch key and check for voltage at the output to the chandelier.
Rice.
1. Checking the key switch If voltage is present in both cases, then the switch is working. If not, check the condition of the contacts; they may have oxidized or fallen away from the attachment point. In some situations, the core could break from the lamella or come loose, which is why there is no electrical contact through which power was transferred to the ceiling lamp.
Obvious prerequisites for failure are the blinking of the lamps when the switch is turned on or the need to apply force, to press the switching. Also in chandeliers with several groups of lamps turned on from different switches, when one group turns on and the second does not.
Light bulbs
Another reason for the lack of lighting may be a faulty lamp. Such a breakdown is typical for a chandelier with one shade and one lamp. In all other models of ceiling lighting devices, one bulb rarely affects the operation of adjacent ones, so a single burnout occurs.
The easiest way to check is an incandescent lamp in a chandelier; as a rule, the integrity of the tungsten filament is compromised.
Rice. 2. Burnt out light bulb
If LED lamps are installed or no abnormalities are visible in the bulb, then install the lamp in a known-good lamp and check its operation. You can also check any lamp using a multimeter, but the process will be different for halogen, incandescent and LED bulbs. If a malfunction is detected, replace the light bulb.
Wiring
If the two previous elements in the circuit turned out to be serviceable, you should check the condition of the connection of wires and cores in the area from the switch to the chandelier.
To do this, follow these steps:
- Turn off the switch that supplies power to the lighting fixtures.
- Check the lack of potential on the chandelier using an indicator screwdriver. If the switch does not break the phase, you should turn off the machine.
- Remove the chandelier cap to get to the wiring connection. If the chandelier design does not have a cap, remove the entire chandelier.
Rice. 3. Place of connection of wiring to the chandelier
- While maintaining personal safety, apply power to the chandelier and measure the presence of potential differences at the phase and neutral terminals of the wiring. According to clause 2.1.31 of the PUE, the color marking must correspond to blue - zero, yellow-green - ground, other colors - phase.
If voltage is present at the terminals or contacts of the chandelier, then there are no wiring faults. Otherwise, to repair the electrical wiring, you can either find the location of the damage and restore contact, or replace the line completely.
The easiest way to check a lamp's LED circuit
Let's look at the easiest method for checking an LED circuit. First, fix the lamp using a cut plastic bottle with a smaller diameter. The lamp is inserted into it. To supply power, use an auxiliary power supply (if we are talking about a 12 or 24 V device).
Instead of ringing every LED in the circuit, you can resort to a simpler method. In turn, install a jumper between the contacts of each diode using tweezers. If there is no jumper, then take any wire, first stripping both ends and tinning the contacts.
It is important that the lamp is connected to the network at this moment. As soon as you close the contacts on the burnt out LED, the device will light up. If this does not happen, then more than one diode may have burned out.
Continue visual inspection of the circuit and look for burnouts, swollen capacitors, and examine each trace on the board. If broken contacts are found, perform soldering. If the circuit consists of 10 or fewer elements, then under no circumstances replace a burnt-out LED with a wire or jumper. This can overload the coils and burn out the diodes.
Troubleshooting remote-controlled lamps
This type of chandelier is much more complex than conventional models, so it needs to be repaired differently. If the equipment does not turn on, the first thing to do is replace the batteries in the remote control; this is often the problem. If replacing the batteries does not produce results, then carry out repairs as follows:
- Carefully remove the chandelier from the ceiling and prepare it for inspection. First, select a power supply with a suitable voltage and connect it to the contacts, then turn on the equipment using the remote control. If it works, then you should look for a problem in the wiring. When the chandelier did not turn on, but a soft click was heard, the controller is most likely working.
- It is easy to check the driver; to do this, you need to disconnect it from the controller and apply voltage directly. If the lamp works, then the problem is in the controller. When the light does not appear, you need to buy a driver. They have approximately the same characteristics, the main thing is to take into account the number of control channels.
- When there is no driver, but you need to use the chandelier, you can disconnect the wires of the lamps and drivers and directly connect them to the terminal block. Then you will use the equipment from a standard switch on the wall.
- Searching for other faults should be carried out in the same way as described above; there is no difference in replacing the LEDs.
Mark of overheating on the driver housing.
Repairing LED lamps with your own hands is possible for anyone who understands the simplest circuits and knows how to use a soldering iron. The main thing is to be careful and not use parts that do not match the characteristics of those that have failed.
Frequent malfunctions
Most often, the product completely stops turning on using the radio remote control. This phenomenon is possible due to dead batteries. The cause may also be a malfunction of the controller on the ceiling. Sometimes not all groups of light bulbs light up. If you hear a clicking sound when you try to turn it on remotely, the controller is most likely working normally. In such situations, repairs come down to replacing the remote control and transformer. Incorrect operation can be observed only in some modes.
The transformer and sockets can be damaged if halogen lamps are selected incorrectly. Parts will have to be replaced. To avoid such damage, it is recommended to select light bulbs that are not too powerful.
Table of main malfunctions of a chandelier with a remote control.
Sometimes blinking and spontaneous mode changes are observed. The device turns off spontaneously. Breakdowns can occur due to low quality elements if cheap Chinese products were purchased.