There are situations when the extension cord is short, and the connection point is further away than the length of the extension cord. Of course, you can take another one to connect them and connect electronic equipment. And if there is no other extension cord or outlet nearby, but there is lighting (electric socket of an incandescent lamp), then you can be smart. Do-it-yourself extension cord ideas arise.
Homemade extension cord on a reel
I had a lot of free time, material (round pipe), 28 meters of two-core wire with a cross-section of 4 squares, at one end there was an electric plug, at the other end there were two sockets connected in series and it was all called an extension cord. And such an extension cord caused a lot of inconvenience, it constantly unwound during transportation, took a long time to wind up and unwind, got tangled, and in general took a lot of energy.
The idea came to mind to make a homemade extension cord on a reel, but before that I went to a hardware store to look at the prices for this product and realized that it was easier to buy an empty extension cord on a reel and wind a wire around the extension cord, it seemed like I could stop there. But the mechanism in the head is already running and a reasonable decision cannot stop stubbornness.
How to make a reel for an extension cord with your own hands at home?
- The cable for carrying must be chosen from PVS, as well as PBPPG. Their difference is that the first is round, and the second is flat.
- This cable must contain three cores. The earth in such a carrier is necessary, it is better not to use it than to regret its absence later.
- The extension cord is recommended to be used with a straight plug. The connection to the plug is more practical without bending, this will be convenient in hard-to-reach places, and the eyelet will make it easier to turn off, and will also not interfere with hanging.
Materials
The plumbing store sells the necessary material to assemble the device. The price of pipes is low, therefore affordable to everyone. Inventory list:
- plastic bay;
- plywood;
- polypropylene pipe;
- the wire;
- socket;
- fork;
- fitting.
Surely, any dacha owner has a basic tool.
How to choose an anchor rope for a boat?
Novice fishermen and lovers of water recreation often have a question: how to choose a rope for anchoring an inflatable boat? The topic of choosing an anchor cable for large vessels is fairly well covered in the literature, but only advisory requirements are set out for the anchor devices of small watercraft. Since we are talking about the safety of people on board, let's talk more about this topic.
An anchor cable is an important component of the equipment of any vessel, serving to hold and secure it in open water, both during wind and current. Obviously, there is no point in installing an anchor chain on a light fishing boat. The “veterans” of the fleet – natural ropes – have already served their time. Today they have been replaced by synthetic ropes, which have undoubted advantages in strength and wear resistance.
The best materials for an anchor halyard are: nylon (aka polyamide, nylon), polyester or polypropylene. All of them are not subject to rotting, do not lose their performance properties in water and in the sun.
Materials for homemade carrying
To make an extension cord with your own hands, you will need:
But this set seems banal only to the untrained eye. The fact is that depending on the cable parameters:
- Wire material;
- Type of insulation;
- Conductor cross-sectional area;
- Lengths.
It will depend on how much total power of electrical appliances can be powered through a homemade extension cord.
Ratio of maximum power and wire length
It is best to gradate extension cords according to the connected power and cable length. For example, when used inside an apartment, the maximum load can rarely exceed 3 kW:
- TV - 100 W;
- Iron - 1000 W;
- Microwave - 1.8 kW;
- Laptop + router + 3 LED lamps - 100 W.
IMPORTANT: devices must not only be connected, but simultaneously operate at maximum load.
For a cottage or garage, it is better to make a carrier designed for higher power, well, at least 6 kW. But here the cable length factor intervenes. The dependence can be seen in the table.
For an apartment, a 10 meter long carrier will cover the needs in 99.9% of cases. For a summer house, garage and other household needs, it is better to make an extension cord on a reel with your own hands, with a cable 40-50 meters long. This will a priori solve almost all possible needs.
Cable or wire
Unlike a wire, a cable has additional, general insulation of conductors, which allows it to be laid in the ground, or temporarily placed on the ground, in the open air. Therefore, for indoor use, you can use a wire, and for universal carrying, a cable.
IMPORTANT: for extension cords, always use only cable products with stranded copper cores.
The main requirement for an extension cable is flexibility. Therefore, when choosing materials, all types of cables with aluminum conductors, as well as single-core copper wires, are eliminated from the list of candidates.
FOR REFERENCE: according to GOST 15845-80, a stranded cable should be distinguished from a cable with a stranded copper core. In the first case, each core inside the cable has its own insulation. In the second case, several thin wires are twisted into one core and have a common insulation.
The electrical cable for the extension cord must be marked PVS or PBPPG. Their difference is that PBPPG is flat, and PVS is round.
There must be three wires in the cable! Grounding is a function of an extension cord that is better to have and not use than to complain about its absence after a tragic incident.
As practice shows, it is best to make an extension cord with a straight plug.
The wire fits to it along the axis, without bending. In some cases, this feature can be decisive when connecting in places with poor access. An eyelet on the plug makes it easier to disconnect and can be used for hanging.
Almost all plugs have a ground connection. Protection class not lower than IP44.
What does IP44 protection class provide?
If the connection at the plug and socket is correctly assembled, then the IP44 protection class allows you to leave them in wet rooms, they are not afraid of splashes. If the contact group is suspended above the ground, then the carrier can be left in the rain.
Socket block
There are two categories of products that are very similar in appearance
- Overhead sockets;
- Block (block) of sockets.
Such devices are easily distinguished when viewed from the back.
Please note that the socket block does not have special holes or slots for fastening on the back side. For the extension cord, you need to select exactly the socket block.
It may come with a switch
It doesn't make any fundamental difference. But do not forget that grounding must be required.
How to choose the protection class of a portable socket block is important if the extension cord will be used outside the apartment, such as in the country house, in the garage or even in nature. For universal carrying, the marking must indicate IP44.
Making a tube holder
At the second stage, a stand for the reel is made from polypropylene. You must have a device for soldering pipes, without which you cannot make a reel for an extension cord with your own hands from polypropylene. Progress:
- They make a rectangular bottom frame that is installed on the ground. It is assembled from plastic parts, corners and tees. On the elongated part, a tee is soldered in the center so that the free outlet is directed upward. A vertical stand is attached so that it is above the drum, to which a tee is also attached in the middle, only the outlet should be directed horizontally into the frame. A horizontal tube is soldered into this hole - this is the axis for rotating the coil.
- At the top of the vertical stand, a handle made of a tube is fixed horizontally. Furniture plugs are placed at the ends. Place the drum on a polypropylene sleeve and fix the clip on the edge.
- A hole is drilled in the disk, the plug is removed from the extension cord and the cable is pushed through a wooden circle so that the socket is outside. It is attached to the drum with self-tapping screws. The plug is reinstalled. A short wooden rod (handle) is screwed to the product with a screw. This part will make it easier to wind the wire.
Attention! It is better to make a coil for an extension cord with your own hands using photos and drawings.
Installing a carrier from scratch
The protective sheath is cut off a few centimeters from one edge of the cable. Carefully remove the strands from the copper wires so that they are exposed. The carrier is disassembled, the wire is placed in a special groove, and the wires are passed through the clamps, having previously unscrewed the small bolts. The fasteners are clamped back with the wiring, the top cover is applied and the box is tightened from below with bolts or screws.
It's the same with a fork. Also, the protective coating of 2-3 cm is removed from the cable. The cores are removed from the wires. Disassemble the fork and unscrew the bolts on the fastenings. Wires are passed into these places, and the clamps are screwed back in. The cable is installed in the groove. Place the lid on top and tighten it with a bolt.
Wooden drum installation
From improvised means they make an effective device for winding wire. Step by step assembly:
- A piece 15 cm long is cut from a log with a diameter of 10-15 cm. 2 wooden disks are made from plywood 1 cm thick. The blanks are treated with sandpaper so as not to drive splinters into your fingers during operation.
- The circles are screwed with self-tapping screws on the sides of the log. Using a long drill with a cross-section of 22 mm, make a hole through the middle of the wooden disk so that it passes through another circle.
- Take a flat stick 2 cm thick, from which 22 cm is cut off, but if the length of the axis is 15 cm, and the thickness of the disks is 1 cm. Push the part through the log part.
- Long and even sticks from under the handle of a rake or shovel are screwed along the edges of the axis so that their size is larger than the drum. If the diameter of the coil disks is 30 cm, then the axis is screwed in the middle on wooden rods 50 cm long.
- A crossbar made of sticks is attached to the upper part. Black screws are used. A hole is made in the disk, a cable is inserted into it, and the socket is screwed to the circle.
The device is installed with the pins in the ground, with the handle up. Turn the drum by hand until the cable is completely wound. This is the simplest version of the extension cord reel. Do it yourself in 1 hour.
Assembling a plastic device
All parts are pre-cut and prepared, laying them out at the workplace. It's easier to achieve results this way. How to make a coil for an extension cord with your own hands step by step:
- A circle of suitable diameter is drawn on plywood or MDF sheet. If the material is thin, then you need to make 4 parts in order to later glue them in pairs with quick-drying glue. Cut out the blanks with a jigsaw or a hacksaw.
- The resulting elements are symmetrically glued to each other with double-sided tape. According to the diameter of the sleeve on which the cable will be wound, a circle is drawn on cut pieces of plywood. Mark cross-shaped lines with the same spacing and place dots at the location where the bushing is installed. Also, one point is located in the center of the wooden disk. The wood is sanded along the edges, since it is difficult to make an even cut with a hacksaw.
- Cut 4 metal or aluminum tubes with a diameter of 10 mm along the length of the sleeve, for example - 25 cm. You will need 8 8-point dowels. Plastic rods are driven into the tubes with a hammer, in which they must be firmly installed.
- At the designated points, holes are made with a drill with a diameter slightly smaller than the black self-tapping screw. A hole with a cross-section of 22 mm is made in the central mark on the wooden disk.
- A tube is applied to each hole in the circle in the inner part and screwed with self-tapping screws. You should get 4 pins; a plastic pipe sleeve is placed on them. If the diameter of the axis is 15 cm, then the pins must be positioned in accordance with this size. Another wooden disk is installed on the reverse side and screwed with screws.
Attention! The plastic bushing made from the pipe must fit tightly onto the metal rods so that it does not rotate while twisting the wire.
Extension cord on reel
Let's look at another way to make an extension cord on a reel yourself.
We will need a cable, the length is at your discretion, a socket block, a plug, two washers, an 8 mm bolt 16 cm long and a nut, an electric jigsaw, a screwdriver with an 8 mm drill and a spool.
First, let's make a coil. Using a jigsaw, cut two perfectly even pancakes, the diameter of which is 25 - 30 centimeters. Suitable material: plywood, chipboard. Next, drill a hole in the pancakes exactly in the middle, cut off a polyethylene pipe 13 cm long with a diameter of 5 cm.
Then, we put a washer on the bolt, the bolt itself with a washer, push it into the hole in the pancake, then we put on the pipe, then the second pancake, the washer, the nut and tighten them together.
The polyethylene pipe serves as a sleeve between the pancakes. As you tighten, the sleeve must be centered. Drill another hole on the pancake from the edge 3 cm to the center. On one side of the cable we connect the socket block. We push the other end of the cable inward from the outside until the socket block rests against the coil, and secure the socket with self-tapping screws. We connect the plug to the cord. And we wind the cord around the sleeve. The extension cord with the coil is ready.
DIY cable reel
Electric carrying is an integral part in the household. There are no problems when the carrier is only a couple of meters long, but when the length of the carrier reaches 15-50 meters, it becomes very inconvenient to constantly unwind and rewind it.
The solution to this problem has existed for quite some time; electrical extension cords on a reel are commercially available. But the whole problem is that the price of such reels is exorbitant, and the quality sometimes leaves much to be desired.
On the other hand, you can easily make a wire reel with your own hands, which will be much cheaper. Moreover, you can use a wire of the length and cross-section that is necessary for your purposes.
To make an extension cord on a reel, we will need: an electrical plug, a wire, a socket, and, of course, the reel itself. But where can I get the reel? Coils from television cables, chains, cables, etc. are suitable for these purposes. You can go to construction markets or small stores that sell these materials and purchase an empty spool.
- But if you don’t have the time or desire to go shopping and beg for a reel, you can easily make one yourself. All we need is: - a piece of plywood or OSB 60x30cm with a thickness of 8-10mm, - 9cm of plastic sewer pipe with a diameter of 110mm
- — 3 bolts M6 or M8 120mm long with nuts.
The most important thing is to make the sides (cheeks for the reel). I'm used to doing everything smoothly, so I'll offer my version.
- We make a hole in an unnecessary piece of plywood for a jigsaw file, and fasten the jigsaw sole with screws to the plywood.
Then we turn the jigsaw over and screw the plywood to any protruding surface (table, chair, stump, etc.)
- On a piece of workpiece (plywood or OSB) we mark the center (in my case the radius was 15 cm) and drill a hole for the screw, after which we place the workpiece close to the file, and fasten the plywood with a screw, just do not tighten it too much, we need the workpiece to rotate around its axes.
Turn on the jigsaw (press the lock button) and begin to rotate the workpiece (plywood) around its axis. This way we will get perfectly round sidewalls for our future reel.
We drill holes in the sidewalls for the tightening bolts, and in the center we drill a hole for the axle. Since the center hole can break over time, I decided to use a sleeve made from 1/2″ plastic pipe. The sleeve on the reverse side should protrude 15-20mm so that the bolts do not cling to the frame.
The frame was bent from 10mm rod, and consists of two parts, a handle and a support. In principle, if support is not needed, then you can only make a handle (bend the rod in the shape of the letter P), this will be enough to unwind and rewind the reel.
After fitting, we weld the handle to the support. We cut an M10 thread on the handle for the nut that will secure the coil. Source
:https://www.sense-life.com/hands/katushka_dlya_provoda.php
- It is advisable to paint the frame and coil so that the plywood does not delaminate and lasts longer, after which we assemble it.
All that remains is to wind the wire and install the plug and socket. As for the wire, I use PVS 2x1.5mm; on the market I choose the one that is softer. A similar type of coil with PVA wire served me for 7 years without any complaints.
Let's block ads! (Why?)
Source: https://soveti-po-remontu.ru/blog/43429009177/Katushka-dlya-kabelya-svoimi-rukami
Tools
Every dacha owner should have the tools for making an extension cord reel with his own hands. If you don’t have electric tools, you can rent them from a construction company. Scroll:
- sharp knife;
- screwdriver;
- pliers;
- dowels;
- self-tapping screws;
- ruler;
- pencil;
- soldering iron for plastic;
- screwdriver;
- drill;
- sandpaper;
Instead of a soldering iron for polypropylene, you can use bolts and nuts to secure pipes.
Key stages in the manufacture and assembly of an extension cord coil
1. Making a bushing for the drum. A universal homemade extension cord reel will rotate. Therefore, it is important to make a reliable bushing with locking washers. To do this, you need to take a pipe with a cross section of 20 and 25 mm. The material is cut to the width of the drum, taking into account the installation of the fixing bolt. In this case, a tubular element with a cross-section of 20 mm must be cut with a margin of at least 5 mm in width. The smaller pipe diameter should fit freely inside. On the sides of the axle, bushings machined from steel 2-4 mm thick are installed. The moving element is fixed with an M8 or M10 bolt.
2. Stand for the reel made of profiled pipe. In the instructions in the photo, which shows how to make a reel for an extension cord, there is a structurally important element - a U-shaped stand. This part can be made from sections of profiled pipe 20x20 mm and 20x40 mm. Initially, it is important to determine the dimensions of the structure taking into account the dimensions of the rotating drum. A 20x20 mm pipe is cut to the required parameters and welded together in the shape of the letter P. The central part is marked in the center. After which a 20x40 mm pipe is welded vertically.
Important: The 20x40 mm pipe must be welded as evenly as possible so that in the future there will be no difficulties with rotating the drum. To do this, it is recommended to use a square or a building level.
3. Attaching the drum axle to the stand. The axle must be welded to a 20x40 mm pipe. It is first necessary to note the height position of the drum. A 20 mm round pipe is welded to the profiled electrode welding. You will also need a thrust washer, which will act as a retainer for the drum. If necessary, the washer can be welded to the profile.
4. Handles for the reel and supporting frame. Handles are necessary for ease of use of the reel. Handles from a grinder or drill are suitable as the main elements. The large handle must be secured to the upper part of the 20x40 mm profile using a nut. The small one should be located on the coil itself. The handle for rotating the drum can be made from a bolt or pin. A handle with a roller will also work. In this case, you can get a smoother operation of the rotating mechanism.
5. Installing sockets on the coil. Before reading how to make a reel for an extension cord with your own hands, you need to purchase all the components to assemble the product. For normal operation of the device, you must purchase panel sockets. This type of socket is quite convenient and most suitable for installation. Installation options are shown in the photo below. For reliability, the socket can be secured with self-tapping screws with a cap. The socket fasteners are selected individually, taking into account the width of the plastic drum.
6. Installing the drum on the axle. After installing the sockets and handle, the coil must be secured to the axis. To do this, a drum with a sleeve is placed on a 20 mm pipe. The outer part of the axle is fixed with a bolt or nut, depending on the type of design chosen. The locking mechanism should be tightened taking into account the free rotation of the drum. After tightening, the coil should not jam.
7. Winding the electrical cable onto a reel. For the intended use of the product, you will need to wind the cable. Almost any wire with a core cross-section of 1.5-2.5 mm2 will do. Winding must be carried out taking into account the cable fixing mechanism. There must be a plug at the end of the wire for inclusion, and the installed sockets must be connected in series. The number of sockets depends on the overall dimensions of the drum.
Important: For safety reasons, all contacts should be insulated.
There are situations when the extension cord is short, and the connection point is further away than the length of the extension cord. Of course, you can take another one to connect them and connect electronic equipment. And if there is no other extension cord or outlet nearby, but there is lighting (electric socket of an incandescent lamp), then you can be smart. Do-it-yourself extension cord ideas arise.
Using a cable unwinding crane
When carrying out work on construction and installation sites where there are cranes or access by motor vehicles, in particular a truck crane, is possible, unwinding of cable and wire products is allowed using them. To do this, it is necessary to correctly sling the coil through the pipe, which will play the role of a giving axis.
The advantages of this method are:
The method is also suitable for use in workshops, rooms and areas equipped with crane beams or hoists. Pulling can be done manually, using a winch or other mechanisms.
How to connect an extension cord to the network using a lamp
So, we will need pliers, insulating tape, a lamp, wire cutters and the extension cord itself. Take the lamp, carefully break the glass, and use pliers to remove the glass burrs from the threaded part of the lamp. We leave the central glass rod, then we bite off the central antennae with pliers, leaving the side electrodes.
We take an extension cord plug, one electrode and tightly wrap several turns onto the pin of the plug and insulate it with insulating tape. Moreover, the glass rod should be between the pins of the plug in the middle.
We do the same with the second electrode and part of the plug, then we wrap the entire connection with tape for elasticity and insulation. We screw our assembly into the socket, turn on the switch and the extension cord under voltage.
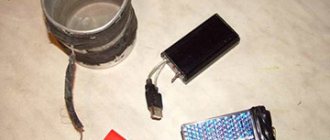
What can you use to make an extension cord at home?
If you don’t have a purchased cable, then what can you use to make an extension cord at home? Some far-sighted people, when any electrical appliance breaks down and is only scrapped, for example: a vacuum cleaner, drill, refrigerator, electric oven, etc., cut off the cords and leave them, who knows how to use them.
And indeed, from several scraps of cords of different lengths you can assemble a good extension cord. The old wiring will also work after replacement.
When connecting, step-by-step assembly of extension cords and instructions for assembling extension cords will help. Of course, this option is a way out for urgent needs, but not for constant use, in order to avoid fire safety.
Homemade yard extension cord from a spool of welding wire
dal_wost 21-02-2015, 14:27 22 658 Tools / Electrics
OK
When you get tired of winding a cable around your elbow every day and then unraveling it, you have to urgently make a device like this. My version of a homemade garden and yard extension cord from what was at hand at the time.
And this is what happened:
A piece of laminated chipboard, a piece of PVC pipe D-40 mm, a piece of laminate, a PVC panel, a threaded rod or a large screw, a small cylindrical handle from an old bedside table and the most important part - an empty spool of welding wire.
Tools:
Electric drill, drills, drill bit, saw, clamp, screwdriver, knife, wrench, el. cable ~30 m, plug, socket.
Manufacturing:
We saw off the laminated chipboard measuring 300*300 mm, drill a hole in the center for screwing in a pin (screw), depending on what you have. Take a PVC pipe and cut off a piece from it equal to the width of the coil + 10 mm, reserve for the washer, this will be a sleeve on which the reel of wire rotates. Now let's select core drills, we need three different sizes, one No. 1 equal to or slightly smaller than the inner diameter of the pipe, the second No. 2 equal to the outer diameter and the third No. 3 larger than the second by 10 mm or more. Using the first drill, we make several centering washers for the pipe from a piece of laminated chipboard or laminate, put them on the pin and then put on the pipe sleeve. Using drill No. 3, we drill a PVC panel (laminate), drill the resulting circle with drill No. 2, we get a ring, it should fit on the pipe, then we put on the coil. It is convenient to drill on a wooden lining with a clamp, then the probability of PVC breakage is reduced. Using drill number 3 we make the last finishing washer, put it on the stud and tighten the nut with a lock nut or glue, there is no need to tighten it, the coil should rotate easily but not dangle. We install a handle for winding the wire. For the wire, we make a hole in the coil, slightly larger than the diameter of our wire. We insert a wire from the inside and attach a plug, on the other side one or several sockets. You can check everything by winding the cable onto a reel; I have about 30 m of wire for a lawn mower. Everything unwinds itself quickly when stretched and is easily wound by hand by the handle. Don’t forget that using the extension cord in the wound state is prohibited and a little harmful! Become the author of the site, publish your own articles, descriptions of homemade products and pay for the text. Read more here.
OK
To write a comment you must log in to the site via social media. networks (or register): Regular registration
Information
Visitors in the Guests group cannot leave comments on this post.
usamodelkina.ru
Metal structure
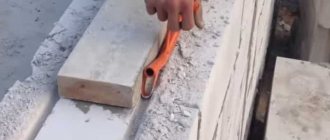
To make a reel for a cable extension cable with your own hands from iron, you will need a welding machine. Material for assembly can be found at hand in the country. How to do it:
- Circles are cut out of 2 sheets with a cutter. The edges are cleaned with a grinder.
- A hole with a diameter of 1.2 cm is made in the middle of the workpieces.
- Cut an iron tube of the required length with a cross-section of half an inch. Take round reinforcement and use a grinder to cut off a certain part.
- The disk is placed on the table, a tube is placed vertically in the exact center, which is leveled with a square, and the part is secured by welding. On the reverse side they do similar work. Smooth fittings are inserted inside the pipe.
- Construct 2 triangular frames from the corners. In the middle, where the axis will be located, weld a corner horizontally on one and the other workpiece and make holes in the center. The lower part of the triangles is connected with corners, and a handle is mounted at the top.
- The coil is held at the level of the holes for the rod. Reinforcement is inserted into the hole. On one side they are attached by welding, and on the other they make a handle for rotating the drum. An input for the cable is also burned into the disk. The rosette is fixed on the circle.
You will get a durable homemade extension cord reel. Anyone can make, paint and test for functionality with their own hands.
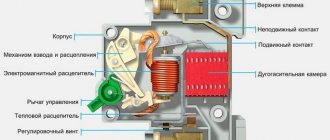
Repair - what to do if the surge protector button is broken
If, when you turn on the surge protector button, extraneous sounds begin to be heard, which are accompanied by the smell of melting plastic, the device should be immediately de-energized. Next, you need to disassemble the surge protector and check the condition of the contacts on the switch.
If the contacts are burnt out, the tester readings will confirm this (in this case, there will be no voltage at the output from the button in the “On” position). To clean the contacts, the switch needs:
- Disassemble the surge protector housing by unscrewing the mounting screws;
- Unsolder the button and remove it from the filter housing. The button is held in the housing by plastic clips, which should be carefully squeezed out.
- Disassemble. To do this, you need to disconnect the key by picking it up with a flat-head screwdriver.
- Take out the contacts and clean off any black deposits.
- Assemble the button. After this, we assemble the button in the reverse order, install it in place and solder it.
If the contacts have burned very badly and melted the plastic of the switch housing, it should be completely replaced.
- Disassemble the filter;
- Unsolder the button;
- Remove the switch from the housing;
- Install a new one in its place (sold in radio parts stores, costs about 30 rubles);
- Solder the button and assemble the filter housing.
Often the button on the surge protector does not work due to mechanical damage. The most common case is the breakdown of the latches that hold the switch key in the housing. In this case, it is not necessary to buy a new button - the latches can be restored.
Which is better: heated floors or radiators?
Warm floorBatteries
To do this you will need the following materials and tools:
- A through hole is drilled in the key into which a cotton swab is inserted (it will act as a latch).
- A toothpick is inserted inside the cotton swab for greater rigidity. On both sides, the improvised retainer is trimmed with side cutters so that on each side it protrudes approximately 3-4 mm.
- Now all that remains is to insert the key into the body - to do this, just slightly bend the sides of the seat with a screwdriver.
How to make an electrical extension cord with your own hands - step-by-step assembly, recommendations and diagram
We will need a cable, the length is at your discretion, a socket block, a plug, two washers, an 8 mm bolt 16 cm long and a nut, an electric jigsaw, a screwdriver with an 8 mm drill and a spool.
Expert opinion
Strebizh Viktor Fedorovich, leading construction foreman
Then, we put a washer on the bolt, the bolt itself with a washer, push it into the hole in the pancake, then we put on the pipe, then the second pancake, the washer, the nut and tighten them together. If you want to clarify something, please contact me!
Equipment for cable (wire) rewinding
Cable rewinding equipment is a set of devices designed to mechanize or automate cable rewinding processes in cable production, warehouses or retail stores. These include not only devices for direct cable handling, but also all kinds of mechanisms for transporting cable reels and structures for storing cables on drums and in coils.
Lightweight cable rewinding machines are designed for rewinding, measuring length and cutting long materials such as cable, wire, rope, slings. Lightweight cable and wire rewinding machines are an excellent solution for cable, wire, cable or rope retail stores.
Machines or devices for winding cables into coils are designed for winding cable, wire, rope and other long materials into coils.
Machines for winding cables (wires, cables) onto a cable drum are designed for rewinding cables, wires, ropes and other long materials from a cable drum to a drum or from a coil to a drum.
Making a carrying reel
There's an electric cable
The main thing when working with electricity is safety. Therefore, to make the cable carrier we will use only dielectric materials.
You will also need:
The carrier will consist of a body made of a canister and a spool for winding the wire.
Stage No. 1 - making a spool
We will use a PVC pipe as a spool.
We measure the width of the canister and mark this size on the pipe, departing from the outer edge.
We drill a hole in the middle of the pipe on one wall - a place for the wire to come out.
At this stage, we complete manipulations with the pipe , since it will be needed to apply markings to other elements of the homemade product.
Stage No. 2 – spool handle
The rotation of the spool will be carried out using a plexiglass handle.
To do this, on a sheet of dielectric with a previously prepared pipe (spool), we mark the place where the handle is attached. We also draw the shape of the future pen in any form. You need 2 pieces of such blanks.
We cut according to the markings; for this we use a jigsaw and a drill with a crown. We sand the blanks.
We glue the resulting parts together, sand them and paint them as shown in the photo above.
Stage No. 3 - preparing the canister
Mark and cut out
The spool will be exactly in the center, so we make markings on both sides of the canister.
The diameters of the holes for the pipe are different, so we mark them using a prepared PVC pipe.
We drill holes with a crown or cut out with a knife.
Stage No. 4 - gluing the spool and handle
The spool is completely ready
The paint on the plexiglass has dried, so you can glue the handle to the pipe.
But before that, you need to drill a hole on the handle for the bolt, which will be used for rotation. It should look like the one shown in the photo above.
Stage No. 5 – final assembly
We assemble the entire structure: we insert the wire through the spool, then through the canister and its lid. Everything should turn out as shown in the diagram below.
How to properly use a homemade extension cord
When using a homemade extension cord, several mandatory requirements must be met.
- There should not be any damage on the cable, and if it does appear, it must be insulated. Isolation is performed when the extension cord is unplugged from the outlet.
- If a plug or socket fails, it must be replaced. They should be protected from moisture and avoid excessive overloads.
- When operating at maximum loads, the cable must be completely unwound to avoid overheating.
Selecting materials
To make the right choice, all materials of a homemade extension cord must correspond to the total power that the devices included in it will produce. For example, if one point is needed, the maximum power of the largest load is taken to determine.
- When you need to connect several devices to outlets at once, it is advisable to add up their total power or the total number of amps. Based on this indicator, the parameter of the plug and the socket itself is selected, and the cross-section of the conductor is determined.
- If a unit is installed, to which one device is suitable for 3A, and the second - 4A, then the total current will correspond to 7A. In this case, a 10A rating will be enough for the extension cord, and there will be a reserve in case there is a need to connect a device with more power.
- The wire cross-section is determined using the same method, but 30% must be added to the amount for reliability. The individual core parameter is selected from the corresponding tables. According to them, the load factor cannot be higher for the conductor brand.
It should be noted that if you need to use your creation as a phase, zero and, accordingly, ground, it is recommended to use a three-wire conductor, respectively, other elements (sockets and switches) contain three outputs.
When only phase and neutral are available, carrying three will not be practical to use.