In this article, we decided to show in detail the twisted pair crimping circuit and talk about all the possible crimping options. Today, almost every third inhabitant of the planet has wired Internet in their home. And of course, problems with the RG 45 plug or cable often arise. For example: your cat or dog really likes to play with wires, the consequence of these games is obviously that you have to call a technician to re-crimp the plug or replace the cable. To save money on calling a technician, we will show all popular crimping schemes, with their help you can crimp twisted pair cables yourself.
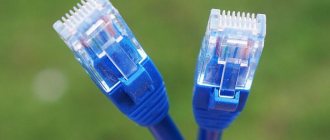
Network cable crimping diagrams for RG-45 connectors
In our previous articles, we already wrote how you can crimp a network cable yourself, so now we will pay more attention to pinout options. There are several most popular schemes; most Internet providers use them. Let's discuss them now.
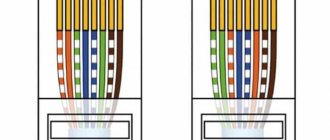
Direct pinout, marked as 568V
Direct layout is used to connect a switch, router, hub with your computer. This method is the most common in our country. In the picture below you see how the wires of a twisted pair consisting of 8 cores should be positioned in the connector.
If you look closely at this diagram, then you will understand why it is called straight. This is due to the fact that the crimping can be done identically on two RG 45 connectors.
Crossover pinout, marked as 568A
A crossover circuit is used when they want to connect a computer to a computer directly or a switch to a switch. Therefore, if you need to connect two devices over a network, this method is just right for you. An example of what the cable pinout should be for an 8-core twisted pair is shown in the photo below.
You can see that on the second plug, the wires are reversed, hence the name - crossover circuit.
Direct crimp from 4-core twisted pair (two-pair wire)
Two-pair cable is also often used by Internet providers for indoor installation. Two pairs are enough to pump 100 Mbit/s, but the cost of such an Internet cable is much lower. The procedure for crimping this twisted pair is shown below in the picture.
The disadvantages of such a cable are that it is impossible to supply power to the device, since there are only 4 wires. Therefore, if you need to transmit power in addition to the information signal, then buy an 8-core cable. See also the article on how to remove the password on Windows 10, 8, 7.
RG-45 twisted pair cable crimping circuit with PoE, standard - IEEE 802.3af
This circuit will allow, in addition to the information signal, to transmit the supply voltage to a switch, router or any other device. Thanks to this, you will not need to buy a separate wire for power supply. In the rj-45 connector pinout, blue and brown wires are used to supply electricity. You may ask, where can we use this? I answer: when installing video surveillance, supplying electricity to the switch. Many of which are designed to receive power from the rj-45 connector. And so on.
Remember! It is strictly forbidden to supply 220 V via a network cable; it is not designed for such a high voltage. The consequences may be unpredictable. The standard diameter of the network cable is 0.51mm, this makes it possible to pass voltage up to 1.5 A. If you need to pass more, then connect the two wires in parallel, then you will get a 2-fold increase (3 A).
Cross-circuit for pumping speed of 1 Gbit/s
To achieve a 1 Gbps connection between devices, you need to use 4 pairs (8 wires). See an example of compression below.
You might be interested in this article about how to enable bluetooth on a Windows 7, 10 laptop.
Console cable crimping diagram (rollover cable)
In this option, you need to crimp one end of the twisted pair in the opposite way, in relation to the other end. It looks like you turned it over and looked at the plug on the other side. This compression scheme is used when you need to configure a router or switch using a PC. Most often used for Cisco devices.
Installation of the terminal block and mounting of the cover plate
After checking the signals, we move on to the final part of installing the Internet outlet.
To do this, carefully hide the rest of the wires and return the terminal block with the connected conductors back to the socket of the socket, tighten it with the fixing bolts to the built-in “glass”.
The terminal block should fit tightly in the socket, there should be no protruding or kinked wires.
If the terminal block does not fit into the recess of the wall, then you can cut out the back part of the mounting “glass”. Usually, when installing the terminal block, a couple of mm are missing
Once again, we check that the connection is correct; to do this, we connect a device, for example, a laptop, and see if it detects a connected local network or the Internet.
If there is no connection on the device, we return to the pinout point and re-check the correctness of the actions performed, as well as the quality of the compression. It often happens that one of the cables is simply not sufficiently pressed into the terminal block. To do this, you just need to recess the core clamp more tightly.
After an additional check of the network’s functionality, we trim off all remaining protruding wires and proceed to installing the cover plate. The cover is usually equipped with several plastic latches.
It is enough to accurately place it on the socket of the socket and press until you hear a clicking sound. That's it, the Internet socket is installed and ready for use.
If the signal does not pass through when checking the connection, you need to check the quality of the contact. It is possible that it is simply weakly clamped
How to choose a network cable
We will tell you what you need to pay attention to when choosing a twisted pair cable.
- A very important point, you need to understand whether you will be laying the network cable indoors or outdoors. Because the simplest and cheapest twisted pair cable is suitable for internal installation. But for external use (outdoors), you need to take it with additional protection (double braiding that protects from natural phenomena, such as sun, rain, snow, frost).
- If the cable length is long, then take a twisted pair cable with additional wire. It will reliably keep the wire from breaking.
- Pay attention to the composition of the wire; it can be made of bimetal or copper. Of course, copper is better, but its price is several times higher. So, here you need to look at the budget allocated for the purchase and decide.
- The thickness of each core should be about 0.50 mm, ideally. But, alas, many manufacturers underestimate these figures to 0.40 mm.
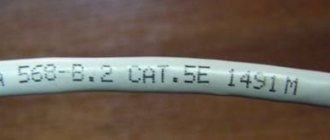
- Look at the markings on the cable; a self-respecting manufacturer makes it clear and understandable. And an unscrupulous manufacturer applies such markings that when touched, they are erased, or they are not even on the cable at all.
- You can buy a network cable that has additional protection against various interference (thunderstorm, static). This cable has a foil-shaped shield.
- Availability of a quality certificate.
Twisted Pair Categories
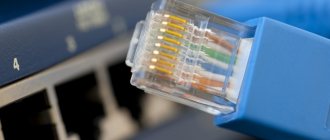
Crimping a twisted pair cable into a connector
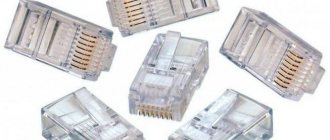
To crimp the ends on the connector, special pliers are used, which can cost from 6 to 10 dollars, depending on the manufacturer. When using such a tool, high-quality contacts are obtained, although this can be done using wire cutters and a screwdriver.
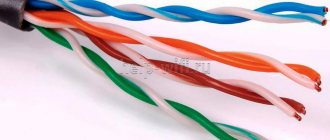
First, you need to remove the protective insulation from the cable, at a distance of 7-8 cm from the end of the cable. The cable contains four pairs of wires of different colors, twisted in pairs. There are cables with a thin shielding braid. It won't be needed, so you can simply bend it to the side. All pairs are untwisted, and the wires are aligned, spread apart and laid out according to pattern “B”.
The separated wires are clamped between the thumb and forefinger. At the same time, you need to make sure that the wires are straight and tightly pressed to one another. If the wires are of different lengths, they can be aligned with wire cutters, leaving a total of 10-12 mm in length. If you take the connector and try it on, the insulation of the wires should start slightly above the latch.
This can also be seen in the photo. After this, the prepared wires are inserted into the connector.
It is very important that each wire falls into a special path, and each wire must rest against the edge of the connector. Holding the cable in this position, it is inserted into the pliers. Crimp the cable with a smooth, careful movement until the handles of the pliers come together. If all prepared operations are performed correctly, then there should be no problems. If you feel that additional force is needed, then it is advisable to pause the crimping process and check everything again. The main thing is that the connector is in the correct position. After checking and adjusting, crimping continues.
During the crimping process, the pliers push the conductors towards the microknives, which push the insulation and establish contact with the conductor.
The result is a reliable connection with excellent contact. If it doesn’t work the first time, the crimping process must be repeated. To do this, the wires with the “jack” are cut off, stripped, a new “jack” is taken and the process is repeated. The main thing is to stock up on “jacks”, because it’s unlikely to succeed the first time.
Steps to connect a simple socket
To properly connect a computer or any other outlet (under a stove, refrigerator, power supply), you will need step-by-step instructions and a wiring project. The first step is to complete all the preparatory work. This is wiring the cable to the desired location, organizing a hole in the wall (if the connection will be made using a built-in socket) and selecting the desired type of device.
Photo - installation of a wall model
Step-by-step instruction:
It is necessary to turn off the power to the apartment or house. This is the first and very important step on which your safety depends. In most cases, a machine is installed at the entrance to the room, which allows you to completely stop the flow of electric current. After this, you need to check the voltage using a special screwdriver; there should be no voltage when you turn off the power. To avoid possible injuries, you need to work in dielectric rubber gloves; Then you need to remove the old outlet box. It is attached using screw connections. Carefully unscrew them and move the screws to the side. For fixation, most boxes are attached with metal tabs to protrusions in the wall
They need to be carefully bent; be careful, they may break if handled carelessly. Now you need to disconnect the power wires; To ensure the maximum level of safety, we recommend connecting a grounded socket to the panel
They differ slightly from standard socket outlets in their design; they have the grounding terminals connected first, and only after them the phase cables. Here the ground wire from the switchboard is laid to the desired socket and is adjacent to the protruding metal terminals; If you have a model without grounding, then the work is simpler and faster. In most cases, connection wires are color coded. Each of them needs to be stripped a little - this will help make the cables more flexible. To do this, up to 15 centimeters of insulation is removed; Then we connect the power wire to the terminals. For a tighter and more durable installation, it must be connected to the contacts using a screw clamp. Use a screwdriver to tighten the screw, but do not pinch it, otherwise the thread will come off;
When connecting the socket, you need to twist the wires into a ring, so they are guaranteed not to fly off the clamp screw. After all the terminals are checked again for fastening strength, the device is inserted into the box; Depending on the type of device, it can be installed on or into the wall. The built-in one is considered more convenient and safer in everyday use, but at the same time, the invoice significantly saves time at the preparatory stage.
When you insert the device into the socket, make sure that there are no distortions; all ends should be at right angles to the wall. When everything is ready, simply install it in place using the tabs and screws that hold the socket in the wall opening.
Preparatory work
The example uses a product from the Legrand Valena model. Since its mechanism is suitable for many series of Legrand electrical installation equipment, it has become popular among consumers.
Before you begin installing a computer socket with your own hands, you need to install a twisted pair cable. To do this, the end of the twisted pair is brought out into the socket box.
First of all, you need to remove the back cover from the mechanism. To do this, the Internet socket must be turned back to face. This is done as follows: you need to turn the white lock clockwise (approximately ninety degrees). How this is done correctly is shown in the photo below:
After the latch has been rotated, it stands perpendicular to the connector body and the rear part of the structure is easily detached from the device. Then you need to insert the network cable (twisted pair) into the center of the back cover, which was previously removed. This is done from the latch side (outer side). After this you need to expose the veins. To do this, you need to carefully remove the protective sheath from the twisted pair.
Tags: beat, sconce, upper, view, harm, house, , clamp, star, insulation, cable, cable, like, computer, crown, , , installation, multimeter, crimping, connection, principle, wire, start, , work, socket, row, garden, network, connection, connection wire, means, diagram, ten, type, current, installation, photo, shield
What types of computer sockets are there?
Looking at the wide variety of products for the cable system, you understand that your eyes simply run wild. You can preview photos of computer sockets to understand what they are like and decide in advance which one you need.
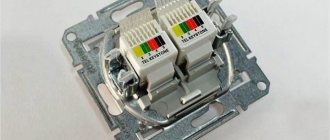
In order to connect standard equipment (for example, computers), you will need an RJ-45 socket. This type of device meets all communication norms and standards, thanks to which it is possible to automate many processes.
The device consists of a plastic case, inside of which there may be 1-4 connectors.
In order to install a home network, you will need a double computer socket: the first connector is needed to connect to the communication cable, the other is needed to communicate with the Patch panel.
The twisted pair (transmits information) must be brought into contact with the module. Another twisted pair is needed to transmit information to the network.
Installation diagrams and connection methods
Connecting a telephone socket is much easier than its electrical counterpart
But a process that involves working with low, but still voltage, requires accuracy and caution
The connection diagram for a telephone socket is quite simple and involves connecting the two ends of the telephone wire to the corresponding contacts in the socket
When installing a telephone socket, you can use one of two installation methods:
- open - involves installation in an overhead manner;
- closed - in which the telephone line is hidden inside the wall.
When choosing a laying method, they are guided by the design of the walls, the service conditions of the communication line and the pretentiousness of the design of the room itself. Surface-mounted sockets do not look very aesthetically pleasing, but they are ideal for speed of maintenance: in a matter of minutes they can be removed from the support and the integrity of the contacts can be assessed.
The open method can be carried out without mounting it on the wall at all, by placing the device on the floor, and hiding the cable leading to it under the baseboard
To protect exposed wires from mechanical damage, decorative plastic cable channels are used. They are found on sale in the form of wall structures and floor skirting boards. It is convenient to monitor the condition of the wire in them through one- or two-sided snap panels.
For closed installation, KSPV cable is most often used. The single core of this cable is made of copper wire, and the outer sheath is made of polyethylene, painted white.
The telephone line is also laid using the TRP distribution cable. It has a dividing base. The core of this single-pair wire is also made of copper and insulated with polyethylene.
For ease of use and harmonious combination with the design, telephone sockets are not installed separately in the wall, but are included in the socket block
To decorate the connection points and make them less noticeable to prying eyes, the devices are placed behind TV screens and monitors, and are also built behind the façade of wall-mounted furniture.
A separate line should be highlighted for sockets built into the baseboard. The main thing is to choose models whose front panel fits tightly to the surface of the baseboard. Otherwise, over time, it will begin to move away from the base, exposing unsightly seams.